Specification (English)
Page 2
...To Top of Case) 67 7/8" Height (To Top of Door Hinge) 68 1/2" Width 32 7/8" Width (Door open 90° w/o Handle) 34" Installation Clearance Side 1/8", Top 1", Back 1" Package Dimensions (WxHxD) 35 1/8" x 72 1/2"x 36" Weight (lbs): Unit/Carton 256/282 UPC CODE Smooth White...which means they use at least 20% less energy than required by placing the freezer below the refrigerator. Environmentally Friendly All LG Bottom Freezer refrigerators are property of Shelves 4 Split Cantilevered Shelves Shelf Construction Tempered Glass Crisper Bins 2 Humidity Crispers Snack Bin...
...To Top of Case) 67 7/8" Height (To Top of Door Hinge) 68 1/2" Width 32 7/8" Width (Door open 90° w/o Handle) 34" Installation Clearance Side 1/8", Top 1", Back 1" Package Dimensions (WxHxD) 35 1/8" x 72 1/2"x 36" Weight (lbs): Unit/Carton 256/282 UPC CODE Smooth White...which means they use at least 20% less energy than required by placing the freezer below the refrigerator. Environmentally Friendly All LG Bottom Freezer refrigerators are property of Shelves 4 Split Cantilevered Shelves Shelf Construction Tempered Glass Crisper Bins 2 Humidity Crispers Snack Bin...
Owner's Manual
Page 2
... warranty. LG Refrigerator / Freezer Warranty Period Product Parts Labor Refrigerator / Freezer 1 year 1 year [In-Home Service (Except Model GR-051)] Sealed System (Compressor, Condenser, Evaporator) 7 years 1 year [In-Home Service (Except Model GR-051)] No other express warranty is installed outside the... other than normal, single-family household use during the warranty period listed below from accident, alteration, misuse, abuse, or improper installation. 5. Damage resulting from the date of God. 3. This warranty gives you specific legal rights and you . Repairs when your...
... warranty. LG Refrigerator / Freezer Warranty Period Product Parts Labor Refrigerator / Freezer 1 year 1 year [In-Home Service (Except Model GR-051)] Sealed System (Compressor, Condenser, Evaporator) 7 years 1 year [In-Home Service (Except Model GR-051)] No other express warranty is installed outside the... other than normal, single-family household use during the warranty period listed below from accident, alteration, misuse, abuse, or improper installation. 5. Damage resulting from the date of God. 3. This warranty gives you specific legal rights and you . Repairs when your...

Owner's Manual
Page 4
... Base Grille Refrigerator Doors: How to remove and reverse For Models with Pull-out Drawer For Models with Swinging Door How to remove and Install Pull-Out Drawer Closing and Aligning the doors 8-17 8 8 8 9-16 9-10 13-16 11-12 16-17 Using your Refrigerator Ensuring Proper Air Circulation Multi ...
... Base Grille Refrigerator Doors: How to remove and reverse For Models with Pull-out Drawer For Models with Swinging Door How to remove and Install Pull-Out Drawer Closing and Aligning the doors 8-17 8 8 8 9-16 9-10 13-16 11-12 16-17 Using your Refrigerator Ensuring Proper Air Circulation Multi ...

Owner's Manual
Page 6
... fines or prison in accordance with environmental legislation in effect. It is recommended that cannot be replaced by our service center or qualified LG technician to avoid any risk. 5 WARNING REPLACING ELECTRICAL CABLE If the power cord is damaged, it supports three-pronged plugs and that...the UL (in the United States) or CSA (in Canada), that it must disconnect the appliance from the power source. NOTE: Before installation, cleaning or replacing light bulbs, you would like to dispose of your responsibility and obligation to replace twoprong outlets with the appliance. The use...
... fines or prison in accordance with environmental legislation in effect. It is recommended that cannot be replaced by our service center or qualified LG technician to avoid any risk. 5 WARNING REPLACING ELECTRICAL CABLE If the power cord is damaged, it supports three-pronged plugs and that...the UL (in the United States) or CSA (in Canada), that it must disconnect the appliance from the power source. NOTE: Before installation, cleaning or replacing light bulbs, you would like to dispose of your responsibility and obligation to replace twoprong outlets with the appliance. The use...

Owner's Manual
Page 9
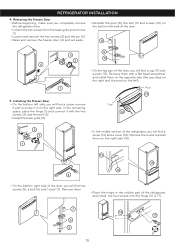
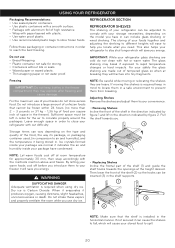
... refrigerator is a flow of cold air in place (see Figure B). Remove the 2 screws from the refrigerator. Figure A WARNING EXPLOSION HAZARD Installing the Base Grille 1. To remove adhesive tape residue, rub it as gasoline) away from the bottom front part of your fingers and a... Figure A). 2.Take off the cover. Align the bottom cover and place in their proper places. The shelves come already installed in position. INSTALLATION OF BASE GRILLE Uninstalling or Replacing the Base Grille 1. Keep all flammable materials and vapors (such as this can cause damage...
... refrigerator is a flow of cold air in place (see Figure B). Remove the 2 screws from the refrigerator. Figure A WARNING EXPLOSION HAZARD Installing the Base Grille 1. To remove adhesive tape residue, rub it as gasoline) away from the bottom front part of your fingers and a... Figure A). 2.Take off the cover. Align the bottom cover and place in their proper places. The shelves come already installed in position. INSTALLATION OF BASE GRILLE Uninstalling or Replacing the Base Grille 1. Keep all flammable materials and vapors (such as this can cause damage...

Owner's Manual
Page 10
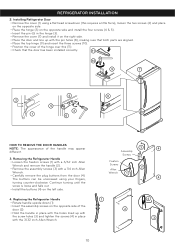
...; 10 mm open-end wrench • Flat 2 inch putty knife IMPORTANT: Before you begin, unplug the refrigerator or disconnect the power source. REFRIGERATOR INSTALLATION REFRIGERATOR DOORS: HOW TO REMOVE AND REVERSE (Optional) For models with a flat head screwdriver and remove it (1). • Using 10 mm socket wrench... HOW TO REVERSE DOOR SWING (when converting from the refrigerator doors. Remove all food and any adjustable racks from left -opening type (factory installed) to the right side as your right when facing the unit. TOOLS YOU MIGHT NEED OR USE 10 mm 1/4 in 3/8 in Hex Socket...
...; 10 mm open-end wrench • Flat 2 inch putty knife IMPORTANT: Before you begin, unplug the refrigerator or disconnect the power source. REFRIGERATOR INSTALLATION REFRIGERATOR DOORS: HOW TO REMOVE AND REVERSE (Optional) For models with a flat head screwdriver and remove it (1). • Using 10 mm socket wrench... HOW TO REVERSE DOOR SWING (when converting from the refrigerator doors. Remove all food and any adjustable racks from left -opening type (factory installed) to the right side as your right when facing the unit. TOOLS YOU MIGHT NEED OR USE 10 mm 1/4 in 3/8 in Hex Socket...
Owner's Manual
Page 11
...• Remove the assembly screws (3) with the screw holes (3) and tighten the screws (4) in the hinge (3). • Remove the cover (7) and install it on the left side. 4. The buttons can be unscrewed using a flat head screwdriver (this (11). • Check that both parts are aligned....this requires a little force), loosen the two screws (2) and place on the opposite side. • Place the hinge (3) on the opposite side and install the four screws (4 & 5). • Insert the pin (6) in place with the 3/32 inch Allen Wrench. 3 4 Assembly Screws Fixation Screws Allen 2 Wrench ...
...• Remove the assembly screws (3) with the screw holes (3) and tighten the screws (4) in the hinge (3). • Remove the cover (7) and install it on the left side. 4. The buttons can be unscrewed using a flat head screwdriver (this (11). • Check that both parts are aligned....this requires a little force), loosen the two screws (2) and place on the opposite side. • Place the hinge (3) on the opposite side and install the four screws (4 & 5). • Insert the pin (6) in place with the 3/32 inch Allen Wrench. 3 4 Assembly Screws Fixation Screws Allen 2 Wrench ...

Owner's Manual
Page 12
... and then lifting it off , it could cause personal injury. Removing the Pull Out Drawer • Pull the drawer out to perform the following instructions: 1. Installing the Pull Out Drawer • With both hands, hold the center of the bar and pull it outward so that it is fit to separate... it. • Push the drawer down into position and tighten the screws (3). 3 11 REFRIGERATOR INSTALLATION HOW TO REMOVE AND INSTALL THE PULL OUT • With both hands, hold the center of the bar and push DRAWER it in so that the two rails...
... and then lifting it off , it could cause personal injury. Removing the Pull Out Drawer • Pull the drawer out to perform the following instructions: 1. Installing the Pull Out Drawer • With both hands, hold the center of the bar and pull it outward so that it is fit to separate... it. • Push the drawer down into position and tighten the screws (3). 3 11 REFRIGERATOR INSTALLATION HOW TO REMOVE AND INSTALL THE PULL OUT • With both hands, hold the center of the bar and push DRAWER it in so that the two rails...

Owner's Manual
Page 13
Verify the hole's alignment • With the drawer fully extended, insert the lower basket over the front part of the drawer. REFRIGERATOR INSTALLATION • Compare the left and right rail covers on the Freezer Door. 12 Left Rail Right Rail • Align the top holes of the rail cover with the top holes of the door supports to play inside of the rail assembly and then the back part (4). 4 WARNING: To prevent entrapment risk and accidental child or animal suffocation, DO NOT permit them to mount the cover. WARNING: DO NOT step or sit on each side.
Verify the hole's alignment • With the drawer fully extended, insert the lower basket over the front part of the drawer. REFRIGERATOR INSTALLATION • Compare the left and right rail covers on the Freezer Door. 12 Left Rail Right Rail • Align the top holes of the rail cover with the top holes of the door supports to play inside of the rail assembly and then the back part (4). 4 WARNING: To prevent entrapment risk and accidental child or animal suffocation, DO NOT permit them to mount the cover. WARNING: DO NOT step or sit on each side.

Owner's Manual
Page 14
... • The keyhole slots (2) on the back of the handle allow the handle to separate from the right instead of the left side. • Install the mounting screws (6) on the right side. • Hold the handle so that the masking tape is at the bottom. • Align the keyhole... buttons can be unscrewed with the fingers by rotating them counter-clockwise and continuing until 3 2 they loosen and fall out The buttons were installed Mounting Keyhole slots without pressure, and for this reason, they can be screws in in Allen Wrench Other necessary tools are inside of the keyhole...
... • The keyhole slots (2) on the back of the handle allow the handle to separate from the right instead of the left side. • Install the mounting screws (6) on the right side. • Hold the handle so that the masking tape is at the bottom. • Align the keyhole... buttons can be unscrewed with the fingers by rotating them counter-clockwise and continuing until 3 2 they loosen and fall out The buttons were installed Mounting Keyhole slots without pressure, and for this reason, they can be screws in in Allen Wrench Other necessary tools are inside of the keyhole...

Owner's Manual
Page 15
...Refrigerator Door • Gently remove the top hinge cover with a flat head screwdriver. • Loosen the two screws (3), remove the handle (4) and install all on the right side. • Attach the cap and the two screws (that were previously removed) on the opposite side of your model. ...Handle Type 2 3. Handle Type 1 2 1 3 4 5 Handle Type 2 It is not necessary to remove this and remove the hinge (9). • Install the hinge (10) on the left side). • Slightly raise the refrigerator door (5) and remove it. • Once the door has been taken off the...
...Refrigerator Door • Gently remove the top hinge cover with a flat head screwdriver. • Loosen the two screws (3), remove the handle (4) and install all on the right side. • Attach the cap and the two screws (that were previously removed) on the opposite side of your model. ...Handle Type 2 3. Handle Type 1 2 1 3 4 5 Handle Type 2 It is not necessary to remove this and remove the hinge (9). • Install the hinge (10) on the left side). • Slightly raise the refrigerator door (5) and remove it. • Once the door has been taken off the...
Owner's Manual
Page 16
... pivot (8), the bolt (9) and screws (10) on the right side. In the remaining space, place the hinge (1) and connect it with a flat head screwdriver and install them . • Place the hinge in on the bottom left side of the door. 8 9 3 10 2 4 • On the top part of the refrigerator, you will... find a screw (13) and a cover (14). Installing the Freezer Door • On the bottom left ). 1 Pivot 11 5. Remove them on the opposite side (the cap stays on the right and the pivot...
... pivot (8), the bolt (9) and screws (10) on the right side. In the remaining space, place the hinge (1) and connect it with a flat head screwdriver and install them . • Place the hinge in on the bottom left side of the door. 8 9 3 10 2 4 • On the top part of the refrigerator, you will... find a screw (13) and a cover (14). Installing the Freezer Door • On the bottom left ). 1 Pivot 11 5. Remove them on the opposite side (the cap stays on the right and the pivot...

Owner's Manual
Page 17
... to make sure that the corners of the pin (1). 1 • Remove the cover (2) and place on them (18). Installing the Refrigerator Door • Insert the door over the pin (20). AFTER COMPLETING INSTALLATION 20 Make sure that both doors close correctly. To ensure a good seal, apply a little silicon grease on the opposite...
... to make sure that the corners of the pin (1). 1 • Remove the cover (2) and place on them (18). Installing the Refrigerator Door • Insert the door over the pin (20). AFTER COMPLETING INSTALLATION 20 Make sure that both doors close correctly. To ensure a good seal, apply a little silicon grease on the opposite...

Owner's Manual
Page 18
... unstable or if you turn both leveling screws clockwise. Plug the refrigerator into its final position. 2.Remove the base grille (Refer to close easily. REFRIGERATOR INSTALLATION CLOSING AND ALIGNING THE DOORS Closing the Doors Your refrigerator has two front leveling screws, one on the right and one on...
... unstable or if you turn both leveling screws clockwise. Plug the refrigerator into its final position. 2.Remove the base grille (Refer to close easily. REFRIGERATOR INSTALLATION CLOSING AND ALIGNING THE DOORS Closing the Doors Your refrigerator has two front leveling screws, one on the right and one on...
Owner's Manual
Page 21
... the shelf in the direction indicated by figure 1 and lift in order to comply with out difficulty. NOTE: Be careful while moving the shelves is installed in order for approximately 30 min, then wrap accordingly with hot or warm water. Ice crystals formed inside your package are heavy. If moving or...
... the shelf in the direction indicated by figure 1 and lift in order to comply with out difficulty. NOTE: Be careful while moving the shelves is installed in order for approximately 30 min, then wrap accordingly with hot or warm water. Ice crystals formed inside your package are heavy. If moving or...
Owner's Manual
Page 23
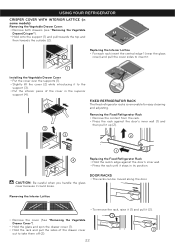
... door. Replacing the Interior Lattice • For each rack insert the central edge 1 (near the glass 2 cover) and pull the cover sides to insert it. 1 Installing the Vegetable Drawer Cover • Put the cover over the supports (1). • Slightly lift the cover (2) while introducing it to the support (3). • Put the...
... door. Replacing the Interior Lattice • For each rack insert the central edge 1 (near the glass 2 cover) and pull the cover sides to insert it. 1 Installing the Vegetable Drawer Cover • Put the cover over the supports (1). • Slightly lift the cover (2) while introducing it to the support (3). • Put the...
Owner's Manual
Page 25
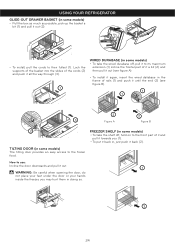
... DOOR (in some models) • Pull the box as much as possible, pick up the basket a bit (1) and pull it out (2). 1 2 • To install, pull the cords to their fullest (1). you (1). • To put it back in doing so. 2 24 Lock the supports of the basket into the slides... wired durabase off, pull it to its maximum extension (1) incline the frontal part of it a bit (2) and then pull it out (see figure A). • To install it again, insert the wired database in the frame of rails (1) and push it until the end (2) (see figure B). 1 1 2 2 3 Figure A Figure B 2 FREEZER ...
... DOOR (in some models) • Pull the box as much as possible, pick up the basket a bit (1) and pull it out (2). 1 2 • To install, pull the cords to their fullest (1). you (1). • To put it back in doing so. 2 24 Lock the supports of the basket into the slides... wired durabase off, pull it to its maximum extension (1) incline the frontal part of it a bit (2) and then pull it out (see figure A). • To install it again, insert the wired database in the frame of rails (1) and push it until the end (2) (see figure B). 1 1 2 2 3 Figure A Figure B 2 FREEZER ...

Owner's Manual
Page 26
...: Avoid the usage of the removable parts (such as the vegetable and doors racks). • Use a clean sponge (or a soft rag) and use it . • Install the new light bulb. • Take the cover (1), lock the hooks (2) from sticking) In order to get an efficient performance of your refrigerator. • Pull...
...: Avoid the usage of the removable parts (such as the vegetable and doors racks). • Use a clean sponge (or a soft rag) and use it . • Install the new light bulb. • Take the cover (1), lock the hooks (2) from sticking) In order to get an efficient performance of your refrigerator. • Pull...

Owner's Manual
Page 27
...; Unplug the refrigerator. • Unlock the cover of the light bulb using your home, put everything back into place and read the section "Refrigerator Installation" in . 1 3 WHEN MOVING If you when moving, consider the following options: • Pull out all of the frozen food and keep the...refrigerator. 3.Empty the water from it . 1 WHEN GOING ON VACATION If you decide to leave your refrigerator with the cable glued to obtain installation preparation. In case your electric company and ask how long it may be safely 2 refrozen, although the quality and flavor may be affected....
...; Unplug the refrigerator. • Unlock the cover of the light bulb using your home, put everything back into place and read the section "Refrigerator Installation" in . 1 3 WHEN MOVING If you when moving, consider the following options: • Pull out all of the frozen food and keep the...refrigerator. 3.Empty the water from it . 1 WHEN GOING ON VACATION If you decide to leave your refrigerator with the cable glued to obtain installation preparation. In case your electric company and ask how long it may be safely 2 refrozen, although the quality and flavor may be affected....

Owner's Manual
Page 29
...best to connect to a vertical pipeline. c) Call a qualified plumber if the inverted osmosis water pressure problem continues. Never attempt to install the ice maker pipes in areas where room temperature is not guaranteed by the refrigerator or automated ice maker manufacturer. Follow the next ... in the inside the water pipes can be located in diameter copper pipe to connect refrigerator to potable water supply only. 1. INSTALLATION INSTRUCTIONS Install the valve to the pipe that will be done considering local water and drainage requirements. • If an inverted osmosis water...
...best to connect to a vertical pipeline. c) Call a qualified plumber if the inverted osmosis water pressure problem continues. Never attempt to install the ice maker pipes in areas where room temperature is not guaranteed by the refrigerator or automated ice maker manufacturer. Follow the next ... in the inside the water pipes can be located in diameter copper pipe to connect refrigerator to potable water supply only. 1. INSTALLATION INSTRUCTIONS Install the valve to the pipe that will be done considering local water and drainage requirements. • If an inverted osmosis water...

