Owner's Manual (Español)
Page 2
... year) Press the appropriate option, and have your Bill of Sale to LG in the U.S. LG Refrigerator / Freezer Warranty Period Product Parts Labor Refrigerator / Freezer 1 year 1 year [In-Home Service (Except Model GR-051)] Sealed System 7 years 1 year [In-Home Service (Except Model GR-051)] (Compressor, Condenser, Evaporator) No other rights which proves to...
... year) Press the appropriate option, and have your Bill of Sale to LG in the U.S. LG Refrigerator / Freezer Warranty Period Product Parts Labor Refrigerator / Freezer 1 year 1 year [In-Home Service (Except Model GR-051)] Sealed System 7 years 1 year [In-Home Service (Except Model GR-051)] (Compressor, Condenser, Evaporator) No other rights which proves to...

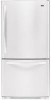
Owner's Manual (English)
Page 2
... / Freezer 1 year 1 year [In-Home Service (Except Model GR-051)] Sealed System 7 years 1 year [In-Home Service (Except Model GR-051)] (Compressor, Condenser, Evaporator) No other express warranty is applicable to you may not apply to this product. LG ELECTRONICS SHALL NOT BE LIABLE FOR THE LOSS OF USE OF...Call 1-800-243-0000 (24 hrs a day, 7 days per week, 365 days per year) Press the appropriate option, and have your product type (Refrigerator), model number, serial number, and ZIP/Postal Code ready. 2 Call 1-800-243-0000 (24 hrs a day, 7 days per week, 365 days per year) Press ...
... / Freezer 1 year 1 year [In-Home Service (Except Model GR-051)] Sealed System 7 years 1 year [In-Home Service (Except Model GR-051)] (Compressor, Condenser, Evaporator) No other express warranty is applicable to you may not apply to this product. LG ELECTRONICS SHALL NOT BE LIABLE FOR THE LOSS OF USE OF...Call 1-800-243-0000 (24 hrs a day, 7 days per week, 365 days per year) Press the appropriate option, and have your product type (Refrigerator), model number, serial number, and ZIP/Postal Code ready. 2 Call 1-800-243-0000 (24 hrs a day, 7 days per week, 365 days per year) Press ...
Owner's Manual (English)
Page 5
... or Product failure caused by the consumer. Damage or missing items to any water leakage due to the Product caused by LG Canada. 9. Model and Serial numbers, along with the Product. Costs associated with removal of accessories, components, or cleaning products that negates or... varies any consumable parts. Ÿ Repairs when your warranty information below: Product Registration Information: Model: Serial Number: Date of the Product if it conflicts with the above excluded circumstances shall be readily determined. Also excluded are ...
... or Product failure caused by the consumer. Damage or missing items to any water leakage due to the Product caused by LG Canada. 9. Model and Serial numbers, along with the Product. Costs associated with removal of accessories, components, or cleaning products that negates or... varies any consumable parts. Ÿ Repairs when your warranty information below: Product Registration Information: Model: Serial Number: Date of the Product if it conflicts with the above excluded circumstances shall be readily determined. Also excluded are ...
Owner's Manual (English)
Page 6
...Installation Unpacking Your Refrigerator Installation Base Grille Removing, Reversing and Replacing Your Refrigerator Doors For Drawer Models For Swing Models Door Closing and Alignment Using Your Refrigerator Ensuring Proper Air Circulation Multi Flow Door Alarm Setting ...the Controls Adjusting Control Settings Food Storage Guide Storing Frozen Food Refrigerator Shelves Chef Fresh / Snack Pan TABLE OF CONTENTS 2-3 4-5 6 38 70 7 -8 8 9 - 11 12 - 19 12 12 12 13- 19 13 17 19 22...
...Installation Unpacking Your Refrigerator Installation Base Grille Removing, Reversing and Replacing Your Refrigerator Doors For Drawer Models For Swing Models Door Closing and Alignment Using Your Refrigerator Ensuring Proper Air Circulation Multi Flow Door Alarm Setting ...the Controls Adjusting Control Settings Food Storage Guide Storing Frozen Food Refrigerator Shelves Chef Fresh / Snack Pan TABLE OF CONTENTS 2-3 4-5 6 38 70 7 -8 8 9 - 11 12 - 19 12 12 12 13- 19 13 17 19 22...

Owner's Manual (English)
Page 8
...not, under certain Conditions, we strongly recommend against the use of an extension cord. Have the wall outlet and the circuit checked by LG Electronics, to use an extension cord, it is absolutely necessary that the electrical rating of the cord be 15 amperes (minimum) and ... under any type of installation, cleaning, or removing a light bulb, turn the control (Thermostat, Refrigerator Control or Freezer Control, depending on the model) to ensure that a separate circuit serving only this appliance must be a UL-listed (in place so that used CFC's (chlorofluorocarbons). WARNING POWER...
...not, under certain Conditions, we strongly recommend against the use of an extension cord. Have the wall outlet and the circuit checked by LG Electronics, to use an extension cord, it is absolutely necessary that the electrical rating of the cord be 15 amperes (minimum) and ... under any type of installation, cleaning, or removing a light bulb, turn the control (Thermostat, Refrigerator Control or Freezer Control, depending on the model) to ensure that a separate circuit serving only this appliance must be a UL-listed (in place so that used CFC's (chlorofluorocarbons). WARNING POWER...
Owner's Manual (English)
Page 9
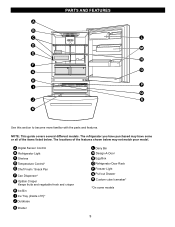
The locations of the items listed below may not match your model. PARTS AND FEATURES A B C L D M E N F O G H P I Ice Tray (Inside of H)* J Durabase K Divider L Dairy Bin M Design-A-Door N Egg Box O Refrigerator Door Rack P Freezer Light Q Pull... out Drawer R Custom cube Icemaker* *On some or all of the features shown below . NOTE: This guide covers several different models. A Digital Sensor Control B Refrigerator Light C Shelves D Temperature Control* E Chef Fresh / Snack Pan F Can Dispenser* G Optibin Crisper Keeps fruits and vegetable fresh...
The locations of the items listed below may not match your model. PARTS AND FEATURES A B C L D M E N F O G H P I Ice Tray (Inside of H)* J Durabase K Divider L Dairy Bin M Design-A-Door N Egg Box O Refrigerator Door Rack P Freezer Light Q Pull... out Drawer R Custom cube Icemaker* *On some or all of the features shown below . NOTE: This guide covers several different models. A Digital Sensor Control B Refrigerator Light C Shelves D Temperature Control* E Chef Fresh / Snack Pan F Can Dispenser* G Optibin Crisper Keeps fruits and vegetable fresh...
Owner's Manual (English)
Page 10
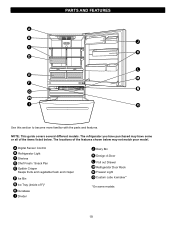
The locations of the features shown below may have some models 10 A Digital Sensor Control B Refrigerator Light C Shelves D Chef Fresh / Snack Pan E Optibin Crisper Keeps fruits and vegetable fresh and crisper F Ice Bin... (Inside of F)* H Durabase I O Use this section to become more familiar with the parts and features. NOTE: This guide covers several different models. The refrigerator you have purchased may not match your model. PARTS AND FEATURES A B J C K D L E M F N G H I Divider J Dairy Bin K Design-A-Door L Pull out Drawer M Refrigerator Door Rack N Freezer Light O ...
The locations of the features shown below may have some models 10 A Digital Sensor Control B Refrigerator Light C Shelves D Chef Fresh / Snack Pan E Optibin Crisper Keeps fruits and vegetable fresh and crisper F Ice Bin... (Inside of F)* H Durabase I O Use this section to become more familiar with the parts and features. NOTE: This guide covers several different models. The refrigerator you have purchased may not match your model. PARTS AND FEATURES A B J C K D L E M F N G H I Divider J Dairy Bin K Design-A-Door L Pull out Drawer M Refrigerator Door Rack N Freezer Light O ...
Owner's Manual (English)
Page 11
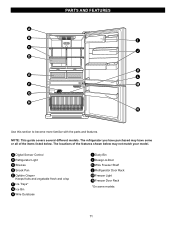
... H Wire Durabase I C J D K E L F M G H N Use this section to become more familiar with the parts and features. NOTE: This guide covers several different models. The locations of the items listed below may have some models 11 PARTS AND FEATURES A B I Dairy Bin J Design-A-Door K Wire Freezer Shelf L Refrigerator Door Rack M Freezer Light N Freezer Door Rack *On...
... H Wire Durabase I C J D K E L F M G H N Use this section to become more familiar with the parts and features. NOTE: This guide covers several different models. The locations of the items listed below may have some models 11 PARTS AND FEATURES A B I Dairy Bin J Design-A-Door K Wire Freezer Shelf L Refrigerator Door Rack M Freezer Light N Freezer Door Rack *On...
Owner's Manual (English)
Page 12
... bottom of cold air in the shipping position. Avoid placing the unit near heat sources, direct sunlight or moisture. To remove any warningtype labels, the model and serial number label, or the Tech Sheet that is too low or high, cooling ability may result in death, explosion or fire. Please reinstall...
... bottom of cold air in the shipping position. Avoid placing the unit near heat sources, direct sunlight or moisture. To remove any warningtype labels, the model and serial number label, or the Tech Sheet that is too low or high, cooling ability may result in death, explosion or fire. Please reinstall...
Owner's Manual (English)
Page 13
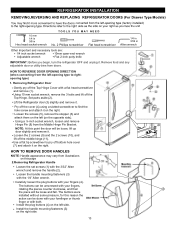
... and lift off the Top Hinge. The buttons can be done with your fingers (4). REFRIGERATOR INSTALLATION REMOVING,REVERSING AND REPLACING REFRIGERATOR DOORS (For Drawer Type Models) 10 mm 1/4 in 3/8 in Hex head socket wrench TOOLS YOU MAY NEED No. 2 Phillips screwdriver Flat head screwdriver 1/4 in 3/32 in Allen wrench Other Important...
... and lift off the Top Hinge. The buttons can be done with your fingers (4). REFRIGERATOR INSTALLATION REMOVING,REVERSING AND REPLACING REFRIGERATOR DOORS (For Drawer Type Models) 10 mm 1/4 in 3/8 in Hex head socket wrench TOOLS YOU MAY NEED No. 2 Phillips screwdriver Flat head screwdriver 1/4 in 3/32 in Allen wrench Other Important...
Owner's Manual (English)
Page 17
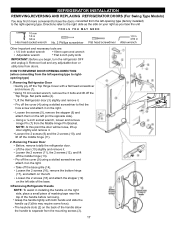
... or utility bins from the Middle Hinge Pin Bracket. Take off the Top Hinge. REFRIGERATOR INSTALLATION REMOVING,REVERSING AND REPLACING REFRIGERATOR DOORS (For Swing Type Models) 10 mm 1/4 in 3/8 in Hex head socket wrench TOOLS YOU MAY NEED No. 2 Phillips screwdriver Flat head screwdriver 1/4 in 3/32 in installing the handle on...
... or utility bins from the Middle Hinge Pin Bracket. Take off the Top Hinge. REFRIGERATOR INSTALLATION REMOVING,REVERSING AND REPLACING REFRIGERATOR DOORS (For Swing Type Models) 10 mm 1/4 in 3/8 in Hex head socket wrench TOOLS YOU MAY NEED No. 2 Phillips screwdriver Flat head screwdriver 1/4 in 3/32 in installing the handle on...
Owner's Manual (English)
Page 18
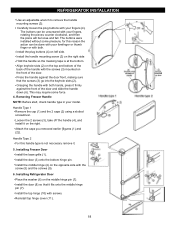
... Freezer Handle NOTE: Before start, check handle type in your fingers, rotating the pieces counter clockwise, and then the piece will be unscrewed with your model. Install the door (8) so that the screws (3) go into the keyhole slots (2). Align keyhole slots (2) on the right. Handle Type 1 Remove the cap (1) and the...
... Freezer Handle NOTE: Before start, check handle type in your fingers, rotating the pieces counter clockwise, and then the piece will be unscrewed with your model. Install the door (8) so that the screws (3) go into the keyhole slots (2). Align keyhole slots (2) on the right. Handle Type 1 Remove the cap (1) and the...
Owner's Manual (English)
Page 23
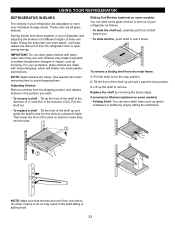
... Shelves Remove shelves from its metal frame: 1. To remove a shelf : Tilt up and pull it in the direction of (2). Sliding Out Shelves (optional on some models) Folding Shelf: You can slide some models) You can store taller items such as follows.
... Shelves Remove shelves from its metal frame: 1. To remove a shelf : Tilt up and pull it in the direction of (2). Sliding Out Shelves (optional on some models) Folding Shelf: You can slide some models) You can store taller items such as follows.
Owner's Manual (English)
Page 24
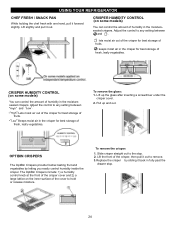
... crisper, then pull it out to remove. 3.Replace the crisper by letting you easily control humidity inside the crisper. CRISPER HUMIDITY CONTROL (on some models) You can control the amount of the cover to any setting between " " and " ". Adjust the control to hold or release moisture. ...moisturesealed crispers. The OptiBin Crispers include: 1) a humidity control knob at the front of the crisper cover and 2) a large lattice on some models) You can control the amount of fresh, leafy vegetables. USING YOUR REFRIGERATOR CHEF FRESH / SNACK PAN While holding the chef fresh with one...
... crisper, then pull it out to remove. 3.Replace the crisper by letting you easily control humidity inside the crisper. CRISPER HUMIDITY CONTROL (on some models) You can control the amount of the cover to any setting between " " and " ". Adjust the control to hold or release moisture. ...moisturesealed crispers. The OptiBin Crispers include: 1) a humidity control knob at the front of the crisper cover and 2) a large lattice on some models) You can control the amount of fresh, leafy vegetables. USING YOUR REFRIGERATOR CHEF FRESH / SNACK PAN While holding the chef fresh with one...

Owner's Manual (English)
Page 25
... support and push down the rack until it locks completely so that "click" sounds can be moved to cover. To remove the lattice on some models) To remove the crisper cover: 1. Remove all bins are not Firmly assembled.
... support and push down the rack until it locks completely so that "click" sounds can be moved to cover. To remove the lattice on some models) To remove the crisper cover: 1. Remove all bins are not Firmly assembled.
Owner's Manual (English)
Page 26
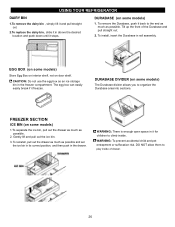
... Egg Box on interior shelf, not on some models) 1. To reinstall, pull out the drawer as much as possible. 2. To install, insert ...prevent accidental child and pet entrapment or suffocation risk. To remove the Durabase, push it freezes. EGG BOX (on some models) 1.To separate the ice bin, pull out the drawer as much as an ice storage bin in the freezer compartment... the Durabase and pull straight out. 2. Gently lift and pull out the ice bin. 3. DURABASE (on some models) The Durabase divider allows you to the end as much as possible and set the ice bin in its correct ...
... Egg Box on interior shelf, not on some models) 1. To reinstall, pull out the drawer as much as possible. 2. To install, insert ...prevent accidental child and pet entrapment or suffocation risk. To remove the Durabase, push it freezes. EGG BOX (on some models) 1.To separate the ice bin, pull out the drawer as much as an ice storage bin in the freezer compartment... the Durabase and pull straight out. 2. Gently lift and pull out the ice bin. 3. DURABASE (on some models) The Durabase divider allows you to the end as much as possible and set the ice bin in its correct ...
Owner's Manual (English)
Page 27
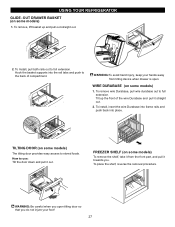
To remove, lift basket up the front of compartment. To remove wire Durabase, pull wire durabase out to full extension. TILTING DOOR (on some models) 1. To 27 Hook the basket supports into place. To place the shelf, reverse the removal procedure. To Install, pull both rails out to full ... of the wire Durabase and pull it straight out. 2. adWjuAstRNING: Be careful when you open . USING YOUR REFRIGERATOR GLIDE -OUT DRAWER BASKET (on some models) To remove the shelf, take it from the front part, and pull it towards you do not injure your hands away from tilting device when...
To remove, lift basket up the front of compartment. To remove wire Durabase, pull wire durabase out to full extension. TILTING DOOR (on some models) 1. To 27 Hook the basket supports into place. To place the shelf, reverse the removal procedure. To Install, pull both rails out to full ... of the wire Durabase and pull it straight out. 2. adWjuAstRNING: Be careful when you open . USING YOUR REFRIGERATOR GLIDE -OUT DRAWER BASKET (on some models) To remove the shelf, take it from the front part, and pull it towards you do not injure your hands away from tilting device when...
Owner's Manual (English)
Page 29
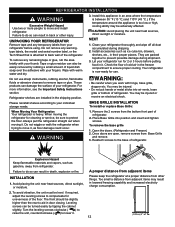
...ON VACATION If you choose to turn the thermostat control (refrigerator control) to OFF. If you choose to leave the refrigerator on your model, set the thermostat control (refrigerator control) to OFF. Depending on while you leave, follow these steps. 1. Tape rubber or wood blocks... power. 2. See the Door Closing section. 8. See the Setting the Controls section. 3. When you leave. 1. Unplug the refrigerator. 4. Depending on the model, raise the front of dry ice in a frozen food locker. Take out all frozen food and store it and dry well. 4. Use up any perishables...
...ON VACATION If you choose to turn the thermostat control (refrigerator control) to OFF. If you choose to leave the refrigerator on your model, set the thermostat control (refrigerator control) to OFF. Depending on while you leave, follow these steps. 1. Tape rubber or wood blocks... power. 2. See the Door Closing section. 8. See the Setting the Controls section. 3. When you leave. 1. Unplug the refrigerator. 4. Depending on the model, raise the front of dry ice in a frozen food locker. Take out all frozen food and store it and dry well. 4. Use up any perishables...
Owner's Manual (English)
Page 30
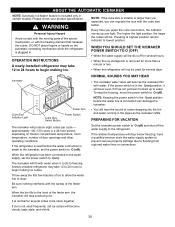
Pressing at highest position returns indicator to clear. If the refrigerator is used before the water line is plugged in certain models. Anewly-installed refrigerator may take 12 to 24 hours to begin making ice cubes. Every time you can damage the icemaker. • You will hear ...
Pressing at highest position returns indicator to clear. If the refrigerator is used before the water line is plugged in certain models. Anewly-installed refrigerator may take 12 to 24 hours to begin making ice cubes. Every time you can damage the icemaker. • You will hear ...

Owner's Manual (English)
Page 31
...an adapter (available at least 8 feet (2.4 m) as a power drill) during installation, be between 20 and 120 PSI or 0.137 and 0.82 MPa on models without a water filter and between 40 and 120 PSI or 0.275 and 0.82 MPa on to the shut off valve and the refrigerator water valve.... SHUT OFF THE MAIN WATER SUPPLY diameter to connect the refrigerator Turn on the nearest faucet to relieve the pressure on models with your existing copper water code requirements. CONNECTING THE WATERLINE NOTE: Water line installation is needed when the Automatic Ice Maker and/or Water...
...an adapter (available at least 8 feet (2.4 m) as a power drill) during installation, be between 20 and 120 PSI or 0.137 and 0.82 MPa on models without a water filter and between 40 and 120 PSI or 0.275 and 0.82 MPa on to the shut off valve and the refrigerator water valve.... SHUT OFF THE MAIN WATER SUPPLY diameter to connect the refrigerator Turn on the nearest faucet to relieve the pressure on models with your existing copper water code requirements. CONNECTING THE WATERLINE NOTE: Water line installation is needed when the Automatic Ice Maker and/or Water...

