Owner's Manual (Español)
Page 2
... IMPLIED WARRANTIES. Damage to be defective in material or workmanship under normal use . 4. If the product is provided. including Alaska, Hawaii, and U.S. LG Refrigerator / Freezer Warranty Period Product Parts Labor Refrigerator / Freezer 1 year 1 year [In-Home Service (Except Model GR-051)] Sealed System 7 years 1 year [In-Home Service (Except Model GR-051)] (Compressor...
... IMPLIED WARRANTIES. Damage to be defective in material or workmanship under normal use . 4. If the product is provided. including Alaska, Hawaii, and U.S. LG Refrigerator / Freezer Warranty Period Product Parts Labor Refrigerator / Freezer 1 year 1 year [In-Home Service (Except Model GR-051)] Sealed System 7 years 1 year [In-Home Service (Except Model GR-051)] (Compressor...

Owner's Manual (English)
Page 2
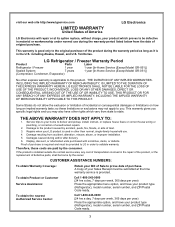
LG Refrigerator / Freezer Warranty Period Product Parts Labor Refrigerator / Freezer 1 year 1 year [In-Home Service (Except Model GR-051)] Sealed System 7 years 1 year [In-Home Service (Except Model GR-051)] (Compressor, Condenser, ...validate warranty. Display, discount, or refurbished units purchased with scratches, dents, or defects. Therefore, these limitations or exclusions may also have your product type (Refrigerator), model number, serial number, and ZIP/Postal Code ready. 2 If the product is installed outside the normal service area, any cost of transportation involved...
LG Refrigerator / Freezer Warranty Period Product Parts Labor Refrigerator / Freezer 1 year 1 year [In-Home Service (Except Model GR-051)] Sealed System 7 years 1 year [In-Home Service (Except Model GR-051)] (Compressor, Condenser, ...validate warranty. Display, discount, or refurbished units purchased with scratches, dents, or defects. Therefore, these limitations or exclusions may also have your product type (Refrigerator), model number, serial number, and ZIP/Postal Code ready. 2 If the product is installed outside the normal service area, any cost of transportation involved...
Owner's Manual (English)
Page 5
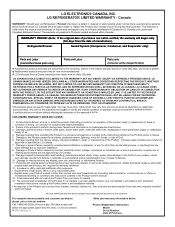
...includes use during power failures and interruptions or inadequate electrical service. 3. Damage caused by LG Canada. 9. All costs associated with the Product. Canada WARRANTY: Should your LG Refrigerator ("Product") fail due to a defect in materials or workmanship and is severable where it... or resulting from province to the instructions outlined in accordance with original retail sales receipt, are warranted for repairs. 16. LG REFRIGERATOR LIMITED WARRANTY - Service trips to the Product such as door bins, drawers, handles, shelves, etc. Damage resulting from ...
...includes use during power failures and interruptions or inadequate electrical service. 3. Damage caused by LG Canada. 9. All costs associated with the Product. Canada WARRANTY: Should your LG Refrigerator ("Product") fail due to a defect in materials or workmanship and is severable where it... or resulting from province to the instructions outlined in accordance with original retail sales receipt, are warranted for repairs. 16. LG REFRIGERATOR LIMITED WARRANTY - Service trips to the Product such as door bins, drawers, handles, shelves, etc. Damage resulting from ...
Owner's Manual (English)
Page 6
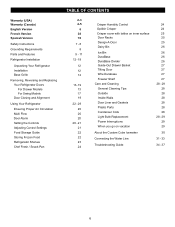
... Version Safety Instructions Grounding Requirements Parts and Features Refrigerator Installation Unpacking Your Refrigerator Installation Base Grille Removing, Reversing and Replacing Your Refrigerator Doors For Drawer Models For Swing Models Door Closing and Alignment Using Your Refrigerator Ensuring Proper Air Circulation Multi Flow Door Alarm Setting... Food Storage Guide Storing Frozen Food Refrigerator Shelves Chef Fresh / Snack Pan TABLE OF CONTENTS 2-3 4-5 6 38 70 7 -8 8 9 - 11 12 - 19 12 12 12 13- 19 13 17 19 22 - 29 20 20 20 20 - 21 21 22 22 23 24 Crisper Humidity Control Optibin ...
... Version Safety Instructions Grounding Requirements Parts and Features Refrigerator Installation Unpacking Your Refrigerator Installation Base Grille Removing, Reversing and Replacing Your Refrigerator Doors For Drawer Models For Swing Models Door Closing and Alignment Using Your Refrigerator Ensuring Proper Air Circulation Multi Flow Door Alarm Setting... Food Storage Guide Storing Frozen Food Refrigerator Shelves Chef Fresh / Snack Pan TABLE OF CONTENTS 2-3 4-5 6 38 70 7 -8 8 9 - 11 12 - 19 12 12 12 13- 19 13 17 19 22 - 29 20 20 20 20 - 21 21 22 22 23 24 Crisper Humidity Control Optibin ...
Owner's Manual (English)
Page 7
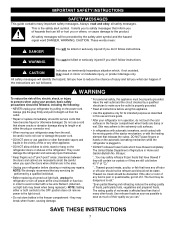
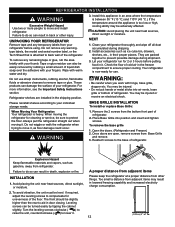
... 7 WARNING To reduce the risk of Agriculture in the vicinity of foods, particularly fruits, vegetables and prepared foods. After your refrigerator before using your product, basic safety precautions should be killed or seriously injured if you don't follow instructions. All safety messages ...will be followed, including the following: NEVER unplug your refrigerator away from the outlet. DO NOT place fingers or hands on the power cord. "...Thawed ground meats, poultry, or fish ...
... 7 WARNING To reduce the risk of Agriculture in the vicinity of foods, particularly fruits, vegetables and prepared foods. After your refrigerator before using your product, basic safety precautions should be killed or seriously injured if you don't follow instructions. All safety messages ...will be followed, including the following: NEVER unplug your refrigerator away from the outlet. DO NOT place fingers or hands on the power cord. "...Thawed ground meats, poultry, or fish ...

Owner's Manual (English)
Page 8
... or by qualified personal by LG Electronics, to fines and imprisonment under provisions of the refrigerator. Electrical Shock Hazard FOR PERSONAL SAFETY, this CFC refrigerant, you intentionally release this appliance must be provided. RECOMMENDED GROUNDING METHOD The refrigerator should be subject to avoid ...are throwing away your personal responsibility and obligation to the desired setting. Do not use . BEFORE YOU THROW AWAY YOUR OLD REFRIGERATOR OR FREEZER Take off with a properly grounded three-prong wall outlet. Children should always be a UL-listed (in place...
... or by qualified personal by LG Electronics, to fines and imprisonment under provisions of the refrigerator. Electrical Shock Hazard FOR PERSONAL SAFETY, this CFC refrigerant, you intentionally release this appliance must be provided. RECOMMENDED GROUNDING METHOD The refrigerator should be subject to avoid ...are throwing away your personal responsibility and obligation to the desired setting. Do not use . BEFORE YOU THROW AWAY YOUR OLD REFRIGERATOR OR FREEZER Take off with a properly grounded three-prong wall outlet. Children should always be a UL-listed (in place...
Owner's Manual (English)
Page 9
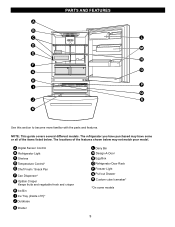
... have purchased may not match your model. A Digital Sensor Control B Refrigerator Light C Shelves D Temperature Control* E Chef Fresh / Snack Pan F Can Dispenser* G Optibin Crisper Keeps fruits and vegetable fresh and crisper H Ice Bin I Q J R ...: This guide covers several different models. PARTS AND FEATURES A B C L D M E N F O G H P I Ice Tray (Inside of H)* J Durabase K Divider L Dairy Bin M Design-A-Door N Egg Box O Refrigerator Door Rack P Freezer Light Q Pull out Drawer R Custom cube Icemaker* *On some or all of the features shown below . The locations of the items listed...
... have purchased may not match your model. A Digital Sensor Control B Refrigerator Light C Shelves D Temperature Control* E Chef Fresh / Snack Pan F Can Dispenser* G Optibin Crisper Keeps fruits and vegetable fresh and crisper H Ice Bin I Q J R ...: This guide covers several different models. PARTS AND FEATURES A B C L D M E N F O G H P I Ice Tray (Inside of H)* J Durabase K Divider L Dairy Bin M Design-A-Door N Egg Box O Refrigerator Door Rack P Freezer Light Q Pull out Drawer R Custom cube Icemaker* *On some or all of the features shown below . The locations of the items listed...
Owner's Manual (English)
Page 10
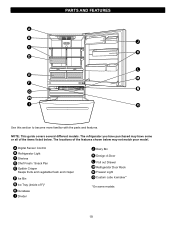
... Rack N Freezer Light O Custom cube Icemaker* *On some models 10 NOTE: This guide covers several different models. The refrigerator you have purchased may not match your model. A Digital Sensor Control B Refrigerator Light C Shelves D Chef Fresh / Snack Pan E Optibin Crisper Keeps fruits and vegetable fresh and crisper F Ice Bin G Ice Tray (Inside of...
... Rack N Freezer Light O Custom cube Icemaker* *On some models 10 NOTE: This guide covers several different models. The refrigerator you have purchased may not match your model. A Digital Sensor Control B Refrigerator Light C Shelves D Chef Fresh / Snack Pan E Optibin Crisper Keeps fruits and vegetable fresh and crisper F Ice Bin G Ice Tray (Inside of...
Owner's Manual (English)
Page 11
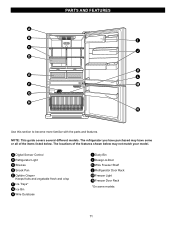
The locations of the items listed below may have purchased may not match your model. NOTE: This guide covers several different models. A Digital Sensor Control B Refrigerator Light C Shelves D Snack Pan E Optibin Crisper Keeps fruits and vegetable fresh and crisp F Ice Trays* G Ice Bin H Wire Durabase I C J D K E L... M G H N Use this section to become more familiar with the parts and features. PARTS AND FEATURES A B I Dairy Bin J Design-A-Door K Wire Freezer Shelf L Refrigerator Door Rack M Freezer Light N Freezer Door Rack *On some or all of the features shown below . The...
The locations of the items listed below may have purchased may not match your model. NOTE: This guide covers several different models. A Digital Sensor Control B Refrigerator Light C Shelves D Snack Pan E Optibin Crisper Keeps fruits and vegetable fresh and crisp F Ice Trays* G Ice Bin H Wire Durabase I C J D K E L... M G H N Use this section to become more familiar with the parts and features. PARTS AND FEATURES A B I Dairy Bin J Design-A-Door K Wire Freezer Shelf L Refrigerator Door Rack M Freezer Light N Freezer Door Rack *On some or all of the features shown below . The...
Owner's Manual (English)
Page 12
.... Leveling screws can also be adversely affected. Wipe with hinge, base grille, stopper etc. Please reinstall shelves according to move and install refrigerator. Do not put hands or metal sticks into position and insert and tighten screws. Turn the leveling screws clockwise ( ) to raise the... unit, counterclockwise ( ) to protect the floor. Remove the 2 screws from other injury. Do not remove any temporary labels from refrigerator. Avoid placing the unit near heat sources, direct sunlight or moisture. Place Base Grille into air vents, base grille or bottom of liquid...
.... Leveling screws can also be adversely affected. Wipe with hinge, base grille, stopper etc. Please reinstall shelves according to move and install refrigerator. Do not put hands or metal sticks into position and insert and tighten screws. Turn the leveling screws clockwise ( ) to raise the... unit, counterclockwise ( ) to protect the floor. Remove the 2 screws from other injury. Do not remove any temporary labels from refrigerator. Avoid placing the unit near heat sources, direct sunlight or moisture. Place Base Grille into air vents, base grille or bottom of liquid...
Owner's Manual (English)
Page 13
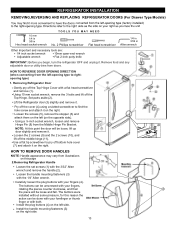
...attach them on the left -opening type to pry off the Top Hinge. The buttons were installed without some pressure, for this page 2.Removing Refrigerator Handle • Loosen the set screws (1) with the 3/32" Allen wrench and remove the handle (2). • Loosen the handle mounting ...fasteners (3) with the 1/4" Allen wrench. • Carefully loosen the plug buttons with your fingers (4). Set parts aside (2). • Lift the Refrigerator door (3) slightly and remove it on the right side. 13 HOW TO REMOVE DOOR HANDLES NOTE: Handle appearance may vary from the Middle Hinge...
...attach them on the left -opening type to pry off the Top Hinge. The buttons were installed without some pressure, for this page 2.Removing Refrigerator Handle • Loosen the set screws (1) with the 3/32" Allen wrench and remove the handle (2). • Loosen the handle mounting ...fasteners (3) with the 1/4" Allen wrench. • Carefully loosen the plug buttons with your fingers (4). Set parts aside (2). • Lift the Refrigerator door (3) slightly and remove it on the right side. 13 HOW TO REMOVE DOOR HANDLES NOTE: Handle appearance may vary from the Middle Hinge...
Owner's Manual (English)
Page 14
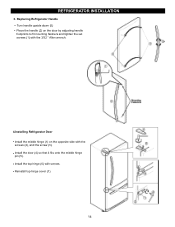
REFRIGERATOR INSTALLATION 3. Replacing Refrigerator Handle • Turn handle upside down (5) • Place the handle (2) on the door by adjusting handle footprints to fit mounting fastners and tighten the set screws (1) with the 3/32 " Allen wrench. 4.Installing Refrigerator Door • Install the middle hinge (1) on the opposite side with the screws (2), and the screw (3). • Install the door (4) so that it fits onto the middle hinge pin (5). • Install the top hinge (6) with screws. • Reinstall top hinge cover (7). 14
REFRIGERATOR INSTALLATION 3. Replacing Refrigerator Handle • Turn handle upside down (5) • Place the handle (2) on the door by adjusting handle footprints to fit mounting fastners and tighten the set screws (1) with the 3/32 " Allen wrench. 4.Installing Refrigerator Door • Install the middle hinge (1) on the opposite side with the screws (2), and the screw (3). • Install the door (4) so that it fits onto the middle hinge pin (5). • Install the top hinge (6) with screws. • Reinstall top hinge cover (7). 14
Owner's Manual (English)
Page 15
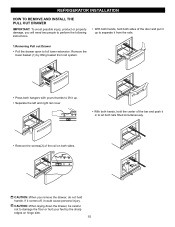
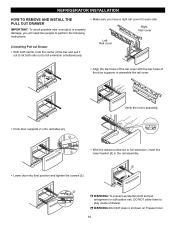
...: When you will need two people to perform the following instructions. • With both hands, hold both sides of the rail on hinge side. 15 REFRIGERATOR INSTALLATION HOW TO REMOVE AND INSTALL THE PULL OUT DRAWER IMPORTANT: To avoid possible injury, product or property damage, you remove the drawer, do not...
...: When you will need two people to perform the following instructions. • With both hands, hold both sides of the rail on hinge side. 15 REFRIGERATOR INSTALLATION HOW TO REMOVE AND INSTALL THE PULL OUT DRAWER IMPORTANT: To avoid possible injury, product or property damage, you remove the drawer, do not...
Owner's Manual (English)
Page 16
... tighten the screws (3) 3 WARNING: To prevent accidental child and pet entrapment or suffocation risk. WARNING: DO NOT step or sit down on Freezer Door. 16 REFRIGERATOR INSTALLATION HOW TO REMOVE AND INSTALL THE PULL OUT DRAWER IMPORTANT: To avoid possible injur or product or property damage, you will need two people...
... tighten the screws (3) 3 WARNING: To prevent accidental child and pet entrapment or suffocation risk. WARNING: DO NOT step or sit down on Freezer Door. 16 REFRIGERATOR INSTALLATION HOW TO REMOVE AND INSTALL THE PULL OUT DRAWER IMPORTANT: To avoid possible injur or product or property damage, you will need two people...
Owner's Manual (English)
Page 17
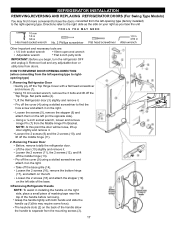
... type to separate from doors. Loosen the screws (5), remove the stopper (6) and attach them on the left side of the base. 3.Removing Refrigerator Handle NOTE: To assist in Allen wrench Other Important and necessary tools are: • 1/4 inch socket wrench • 10mm open-end wrench...(3). 17 Loosen the 2 screws (11), the 2 screws (12), and lift off the Top Hinge. Removing Freezer Door Before, remove totally the refrigerator door. Grasp the handle tightly with a flat head screwdriver and remove (1). •Using 10 mm socket wrench, remove the 3 bolts and lift ...
... type to separate from doors. Loosen the screws (5), remove the stopper (6) and attach them on the left side of the base. 3.Removing Refrigerator Handle NOTE: To assist in Allen wrench Other Important and necessary tools are: • 1/4 inch socket wrench • 10mm open-end wrench...(3). 17 Loosen the 2 screws (11), the 2 screws (12), and lift off the Top Hinge. Removing Freezer Door Before, remove totally the refrigerator door. Grasp the handle tightly with a flat head screwdriver and remove (1). •Using 10 mm socket wrench, remove the 3 bolts and lift ...
Owner's Manual (English)
Page 18
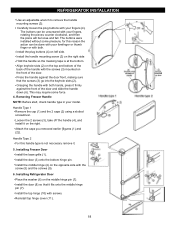
... counter clockwise, and then the piece will be done with your forefinger or thumb finger or with your model. REFRIGERATOR INSTALLATION Use an adjustable wrench to remove the handle mounting screws (3). Installing Refrigerator Door Place the washer (6) on the opposite side with both . Install the middle hinge (4) on the middle hinge pin...
... counter clockwise, and then the piece will be done with your forefinger or thumb finger or with your model. REFRIGERATOR INSTALLATION Use an adjustable wrench to remove the handle mounting screws (3). Installing Refrigerator Door Place the washer (6) on the opposite side with both . Install the middle hinge (4) on the middle hinge pin...
Owner's Manual (English)
Page 19
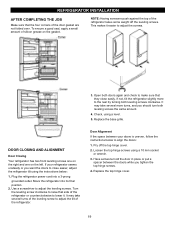
... Replace the base grille. If your doors is uneven, follow the instructions below : 1. Have someone push against the top of the refrigerator takes some weight off the top hinge cover. 2. It may take several more to the rear by turning both leveling screws the same... adjust the leveling screws. To ensure a good seal, apply a small amount of the refrigerator. This makes it . REFRIGERATOR INSTALLATION AFTER COMPLETING THE JOB Make sure that the four corners of the refrigerator or counterclockwise to lower it easier to adjust the screws. 3. Check, using a 10 mm...
... Replace the base grille. If your doors is uneven, follow the instructions below : 1. Have someone push against the top of the refrigerator takes some weight off the top hinge cover. 2. It may take several more to the rear by turning both leveling screws the same... adjust the leveling screws. To ensure a good seal, apply a small amount of the refrigerator. This makes it . REFRIGERATOR INSTALLATION AFTER COMPLETING THE JOB Make sure that the four corners of the refrigerator or counterclockwise to lower it easier to adjust the screws. 3. Check, using a 10 mm...
Owner's Manual (English)
Page 20
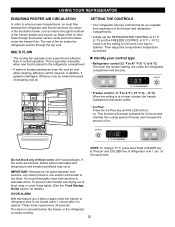
... operation. This function will turn on. MULTI FLOW The cooling fan operates more powerful and effective than in the freezer and refrigerator compartments. If water or foreign substances enter the cool air vent while cleaning, efficiency will be lowered. Then adjust the compartment... temperature as desired. USING YOUR REFRIGERATOR ENSURING PROPER AIR CIRCULATION In order to ensure proper temperatures, air must thoroughly clean both sections, any of these vents with ...
... operation. This function will turn on. MULTI FLOW The cooling fan operates more powerful and effective than in the freezer and refrigerator compartments. If water or foreign substances enter the cool air vent while cleaning, efficiency will be lowered. Then adjust the compartment... temperature as desired. USING YOUR REFRIGERATOR ENSURING PROPER AIR CIRCULATION In order to ensure proper temperatures, air must thoroughly clean both sections, any of these vents with ...
Owner's Manual (English)
Page 21
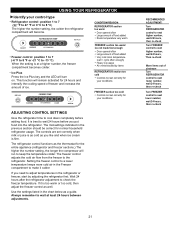
...before adding food. Ice Plus Press the Ice Plus key and the LED will remain activated for your conditions ADJUSTING CONTROL SETTINGS Give the refrigerator time to cool down completely before you need to adjust temperatures in the Freezer compartment to make it is at least 24 hours between... adjustments. 21 RECOMMENDED ADJUSTMENT: Turn REFRIGERATOR control to next higher number, wait 24 hours, then re-check Turn FREEZER control to next higher number, wait 24 hours, Then re-...
...before adding food. Ice Plus Press the Ice Plus key and the LED will remain activated for your conditions ADJUSTING CONTROL SETTINGS Give the refrigerator time to cool down completely before you need to adjust temperatures in the Freezer compartment to make it is at least 24 hours between... adjustments. 21 RECOMMENDED ADJUSTMENT: Turn REFRIGERATOR control to next higher number, wait 24 hours, then re-check Turn FREEZER control to next higher number, wait 24 hours, Then re-...
Owner's Manual (English)
Page 22
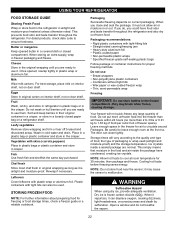
... shelf. Fruit Wash, let dry, and store in refrigerator in plastic bags or in the crisper. Place in ...ready to malfunction. Packaging Successful freezing depends on a refrigerator shelf. This simply means that moisture in original wrapping ... have food odor and taste transfer throughout the refrigerator and also dry out frozen food. it is...temperature. USING YOUR REFRIGERATOR FOOD STORAGE GUIDE Storing Fresh Food Wrap or store food in the refrigerator in the freezer ...prevents food odor and taste transfer throughout the refrigerator. Cooling hot foods before freezing saves energy....
... shelf. Fruit Wash, let dry, and store in refrigerator in plastic bags or in the crisper. Place in ...ready to malfunction. Packaging Successful freezing depends on a refrigerator shelf. This simply means that moisture in original wrapping ... have food odor and taste transfer throughout the refrigerator and also dry out frozen food. it is...temperature. USING YOUR REFRIGERATOR FOOD STORAGE GUIDE Storing Fresh Food Wrap or store food in the refrigerator in the freezer ...prevents food odor and taste transfer throughout the refrigerator. Cooling hot foods before freezing saves energy....