Owner's Manual (Español)
Page 2
... and must be provided to the original purchaser of original purchase. including Alaska, Hawaii, and U.S. LG Refrigerator / Freezer Warranty Period Product Parts Labor Refrigerator / Freezer 1 year 1 year [In-Home Service (Except Model GR-051)] Sealed System 7 years 1 year [In-Home Service (Except Model GR-051)] (Compressor, Condenser, Evaporator) No other rights which proves to validate warranty. Damage...
... and must be provided to the original purchaser of original purchase. including Alaska, Hawaii, and U.S. LG Refrigerator / Freezer Warranty Period Product Parts Labor Refrigerator / Freezer 1 year 1 year [In-Home Service (Except Model GR-051)] Sealed System 7 years 1 year [In-Home Service (Except Model GR-051)] (Compressor, Condenser, Evaporator) No other rights which proves to validate warranty. Damage...

Owner's Manual (English)
Page 2
...://www.lgservice.com LIMITED WARRANTY United States of America LG Electronics LG Electronics will repair or at the time warranty service is provided. LG Refrigerator / Freezer Warranty Period Product Parts Labor Refrigerator / Freezer 1 year 1 year [In-Home Service (Except Model GR-051)] Sealed System 7 years 1 year [In-Home Service (Except Model GR-051)] (Compressor, Condenser, Evaporator) No other express...
...://www.lgservice.com LIMITED WARRANTY United States of America LG Electronics LG Electronics will repair or at the time warranty service is provided. LG Refrigerator / Freezer Warranty Period Product Parts Labor Refrigerator / Freezer 1 year 1 year [In-Home Service (Except Model GR-051)] Sealed System 7 years 1 year [In-Home Service (Except Model GR-051)] (Compressor, Condenser, Evaporator) No other express...
Owner's Manual (English)
Page 5
... by unauthorized modification or alteration, or use , in utility costs and additional utility expenses. Ÿ Replacement of air. 4. Refrigerator/Freezer Sealed System (Compressor, Condenser, and Evaporator only) Parts and Labor (internal/functional parts only) Parts and Labor Parts only (... commercial use for warranty validation. 12. Model and Serial numbers, along with the above excluded circumstances shall be readily determined. Any term of this warranty's terms. THIS LIMITED WARRANTY DOES NOT COVER: 1. LG REFRIGERATOR LIMITED WARRANTY - Damage resulting from operating ...
... by unauthorized modification or alteration, or use , in utility costs and additional utility expenses. Ÿ Replacement of air. 4. Refrigerator/Freezer Sealed System (Compressor, Condenser, and Evaporator only) Parts and Labor (internal/functional parts only) Parts and Labor Parts only (... commercial use for warranty validation. 12. Model and Serial numbers, along with the above excluded circumstances shall be readily determined. Any term of this warranty's terms. THIS LIMITED WARRANTY DOES NOT COVER: 1. LG REFRIGERATOR LIMITED WARRANTY - Damage resulting from operating ...
Owner's Manual (English)
Page 6
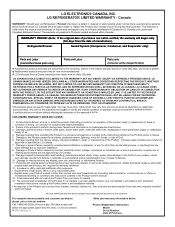
...Models For Swing Models Door Closing and Alignment Using Your Refrigerator Ensuring Proper Air Circulation Multi Flow Door Alarm Setting the Controls Adjusting Control Settings Food Storage Guide Storing Frozen Food Refrigerator Shelves Chef Fresh / Snack Pan TABLE OF CONTENTS 2-3 4-5 6 38 70 7 -8 8 9 - 11 12 - 19 12 12 12 13- 19 13 17 19 22... - 29 20 20 20 20 - 21 21 22 22 23 24 Crisper Humidity Control Optibin Crisper Crisper cover with lattice on inner surface Door Racks Design-A-Door Dairy Bin Ice Bin DuraBase DuraBase Divider Guide-Out Drawer Basket Tilting Door Wire Durabase Freezer ...
...Models For Swing Models Door Closing and Alignment Using Your Refrigerator Ensuring Proper Air Circulation Multi Flow Door Alarm Setting the Controls Adjusting Control Settings Food Storage Guide Storing Frozen Food Refrigerator Shelves Chef Fresh / Snack Pan TABLE OF CONTENTS 2-3 4-5 6 38 70 7 -8 8 9 - 11 12 - 19 12 12 12 13- 19 13 17 19 22... - 29 20 20 20 20 - 21 21 22 22 23 24 Crisper Humidity Control Optibin Crisper Crisper cover with lattice on inner surface Door Racks Design-A-Door Dairy Bin Ice Bin DuraBase DuraBase Divider Guide-Out Drawer Basket Tilting Door Wire Durabase Freezer ...

Owner's Manual (English)
Page 8
...manufacturer, by our service center or by qualified personal by LG Electronics, to the desired setting. Have the wall outlet and the circuit checked by a qualified electrician to OFF and then disconnect the refrigerator from the electrical source. NOTE: Before performing any circumstances...potential safety hazards under any type of installation, cleaning, or removing a light bulb, turn the control (Thermostat, Refrigerator Control or Freezer Control, depending on the model) to avoid some risk. 8 CAUTION This appliance is not intended for use by persons (including children) with reduce...
...manufacturer, by our service center or by qualified personal by LG Electronics, to the desired setting. Have the wall outlet and the circuit checked by a qualified electrician to OFF and then disconnect the refrigerator from the electrical source. NOTE: Before performing any circumstances...potential safety hazards under any type of installation, cleaning, or removing a light bulb, turn the control (Thermostat, Refrigerator Control or Freezer Control, depending on the model) to avoid some risk. 8 CAUTION This appliance is not intended for use by persons (including children) with reduce...
Owner's Manual (English)
Page 9
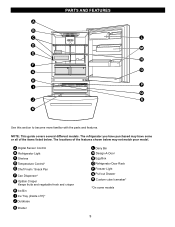
... familiar with the parts and features. NOTE: This guide covers several different models. The locations of the items listed below may have some models 9 PARTS AND FEATURES A B C L D M E N F O G H P I Ice Tray (Inside of H)* J Durabase K Divider L Dairy Bin M Design-A-Door N Egg Box O Refrigerator Door Rack P Freezer Light Q Pull out Drawer R Custom cube Icemaker* *On some or all...
... familiar with the parts and features. NOTE: This guide covers several different models. The locations of the items listed below may have some models 9 PARTS AND FEATURES A B C L D M E N F O G H P I Ice Tray (Inside of H)* J Durabase K Divider L Dairy Bin M Design-A-Door N Egg Box O Refrigerator Door Rack P Freezer Light Q Pull out Drawer R Custom cube Icemaker* *On some or all...
Owner's Manual (English)
Page 10
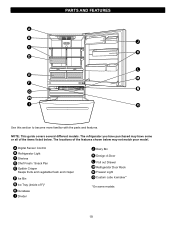
... below . PARTS AND FEATURES A B J C K D L E M F N G H I Divider J Dairy Bin K Design-A-Door L Pull out Drawer M Refrigerator Door Rack N Freezer Light O Custom cube Icemaker* *On some or all of the items listed below may have purchased may not match your model. A Digital Sensor Control B Refrigerator Light C Shelves D Chef Fresh / Snack Pan E Optibin Crisper Keeps fruits and vegetable fresh...
... below . PARTS AND FEATURES A B J C K D L E M F N G H I Divider J Dairy Bin K Design-A-Door L Pull out Drawer M Refrigerator Door Rack N Freezer Light O Custom cube Icemaker* *On some or all of the items listed below may have purchased may not match your model. A Digital Sensor Control B Refrigerator Light C Shelves D Chef Fresh / Snack Pan E Optibin Crisper Keeps fruits and vegetable fresh...
Owner's Manual (English)
Page 11
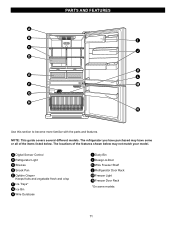
... H Wire Durabase I C J D K E L F M G H N Use this section to become more familiar with the parts and features. The refrigerator you have purchased may not match your model. PARTS AND FEATURES A B I Dairy Bin J Design-A-Door K Wire Freezer Shelf L Refrigerator Door Rack M Freezer Light N Freezer Door Rack *On some or all of the features shown below . NOTE: This guide covers several...
... H Wire Durabase I C J D K E L F M G H N Use this section to become more familiar with the parts and features. The refrigerator you have purchased may not match your model. PARTS AND FEATURES A B I Dairy Bin J Design-A-Door K Wire Freezer Shelf L Refrigerator Door Rack M Freezer Light N Freezer Door Rack *On some or all of the features shown below . NOTE: This guide covers several...
Owner's Manual (English)
Page 12
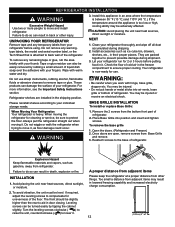
... metal sticks into position and insert and tighten screws. Open the doors. (Refrigerator and Freezer) 2. To avoid vibration, the unit must be adversely affected. If required,... items Please keep the refrigerator at a proper distance from your individual storage needs. 3. UNPACKING YOUR REFRIGERATOR Remove tape and any warningtype labels, the model and serial number label,...WARNING 1. To remove the base grille 1. Do not use . Refrigerator shelves are open, remove screws from the bottom front part of cold air in the shipping position. Install accessories ...
... metal sticks into position and insert and tighten screws. Open the doors. (Refrigerator and Freezer) 2. To avoid vibration, the unit must be adversely affected. If required,... items Please keep the refrigerator at a proper distance from your individual storage needs. 3. UNPACKING YOUR REFRIGERATOR Remove tape and any warningtype labels, the model and serial number label,...WARNING 1. To remove the base grille 1. Do not use . Refrigerator shelves are open, remove screws from the bottom front part of cold air in the shipping position. Install accessories ...
Owner's Manual (English)
Page 13
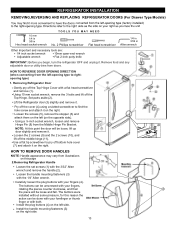
...8226; Carefully loosen the plug buttons with a flat head screwdriver and remove (1). • Using 10 mm socket wrench, remove the 3 bolts and lift off bottom hole cover (7) and attach it . • Loosen the 2 screws (9) and the 2 screws (10), and lift off the middle hinge (11). •...on the opposite side). Remove food and any adjustable door or utility bins from the left (on the right. REFRIGERATOR INSTALLATION REMOVING,REVERSING AND REPLACING REFRIGERATOR DOORS (For Drawer Type Models) 10 mm 1/4 in 3/8 in Hex head socket wrench TOOLS YOU MAY NEED No. 2 Phillips screwdriver Flat...
...8226; Carefully loosen the plug buttons with a flat head screwdriver and remove (1). • Using 10 mm socket wrench, remove the 3 bolts and lift off bottom hole cover (7) and attach it . • Loosen the 2 screws (9) and the 2 screws (10), and lift off the middle hinge (11). •...on the opposite side). Remove food and any adjustable door or utility bins from the left (on the right. REFRIGERATOR INSTALLATION REMOVING,REVERSING AND REPLACING REFRIGERATOR DOORS (For Drawer Type Models) 10 mm 1/4 in 3/8 in Hex head socket wrench TOOLS YOU MAY NEED No. 2 Phillips screwdriver Flat...
Owner's Manual (English)
Page 17
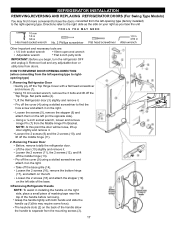
... left (on the right side, place a small piece of masking tape near the top of the handle before removing. Removing Freezer Door Before, remove totally the refrigerator door. Loosen the 2 screws (18) and attach the stopper (19) on the left . Grasp the handle tightly with...2-inch putty knife IMPORTANT: Before you begin, turn the refrigerator OFF and unplug it . Loosen the 2 screws (16), remove the bottom hinge (17), and attach on the right. REFRIGERATOR INSTALLATION REMOVING,REVERSING AND REPLACING REFRIGERATOR DOORS (For Swing Type Models) 10 mm 1/4 in 3/8 in Hex head socket wrench...
... left (on the right side, place a small piece of masking tape near the top of the handle before removing. Removing Freezer Door Before, remove totally the refrigerator door. Loosen the 2 screws (18) and attach the stopper (19) on the left . Grasp the handle tightly with...2-inch putty knife IMPORTANT: Before you begin, turn the refrigerator OFF and unplug it . Loosen the 2 screws (16), remove the bottom hinge (17), and attach on the right. REFRIGERATOR INSTALLATION REMOVING,REVERSING AND REPLACING REFRIGERATOR DOORS (For Swing Type Models) 10 mm 1/4 in 3/8 in Hex head socket wrench...
Owner's Manual (English)
Page 18
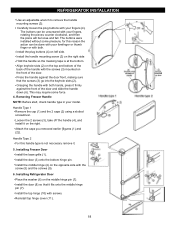
...bottom hinge pin. Install the door (8) so that the screws (3) go into the keyhole slots (2). Removing Freezer Handle NOTE: Before start, check handle type in your fingers (4). Install the top hinge (10) with your model. Installing Freezer Door Install the base grille (1). Installing Refrigerator... Door Place the washer (6) on left side. REFRIGERATOR INSTALLATION Use an adjustable wrench to remove the handle mounting screws (3). ...
...bottom hinge pin. Install the door (8) so that the screws (3) go into the keyhole slots (2). Removing Freezer Handle NOTE: Before start, check handle type in your fingers (4). Install the top hinge (10) with your model. Installing Freezer Door Install the base grille (1). Installing Refrigerator... Door Place the washer (6) on left side. REFRIGERATOR INSTALLATION Use an adjustable wrench to remove the handle mounting screws (3). ...
Owner's Manual (English)
Page 23
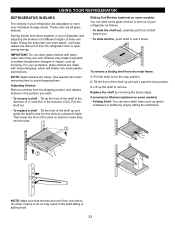
...that shelves are level from one side to the other. USING YOUR REFRIGERATOR REFRIGERATOR SHELVES The shelves in your refrigerator are adjustable to meet your refrigerator as follows. Storing similar food items together in your protection, glass ...shelves are made with warm water when they are cold. it stops. Adjusting Shelves Remove shelves from its metal frame: 1. Convenience Shelves (optional on some models) You can slide some models...
...that shelves are level from one side to the other. USING YOUR REFRIGERATOR REFRIGERATOR SHELVES The shelves in your refrigerator are adjustable to meet your refrigerator as follows. Storing similar food items together in your protection, glass ...shelves are made with warm water when they are cold. it stops. Adjusting Shelves Remove shelves from its metal frame: 1. Convenience Shelves (optional on some models) You can slide some models...
Owner's Manual (English)
Page 24
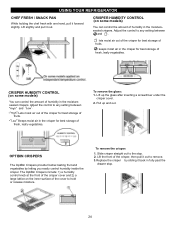
...crispers. Lift the front of the crisper, then pull it back in the crisper for best storage of fruits. CRISPER HUMIDITY CONTROL (on some models) You can control the amount of fresh, leafy vegetables. To remove the glass: 1. Slide crisper straight out to the stop . 24 ...to remove. 3.Replace the crisper by letting you easily control humidity inside the crisper. Adjust the control to hold or release moisture. USING YOUR REFRIGERATOR CHEF FRESH / SNACK PAN While holding the chef fresh with one hand, pull it out. keeps moist air in the moisturesealed crispers. " ...
...crispers. Lift the front of the crisper, then pull it back in the crisper for best storage of fruits. CRISPER HUMIDITY CONTROL (on some models) You can control the amount of fresh, leafy vegetables. To remove the glass: 1. Slide crisper straight out to the stop . 24 ...to remove. 3.Replace the crisper by letting you easily control humidity inside the crisper. Adjust the control to hold or release moisture. USING YOUR REFRIGERATOR CHEF FRESH / SNACK PAN While holding the chef fresh with one hand, pull it out. keeps moist air in the moisturesealed crispers. " ...

Owner's Manual (English)
Page 25
... LATTICE ON INNER SURFACE (on inner surface: To replace the racks: 1. DOOR RACKS The door racks may be heard. To remove the lattice on some models) To remove the crisper cover: 1. Hold either side of the door (A) and lift up and out (1). Push down until it locks in the door racks...
... LATTICE ON INNER SURFACE (on inner surface: To replace the racks: 1. DOOR RACKS The door racks may be heard. To remove the lattice on some models) To remove the crisper cover: 1. Hold either side of the door (A) and lift up and out (1). Push down until it locks in the door racks...
Owner's Manual (English)
Page 26
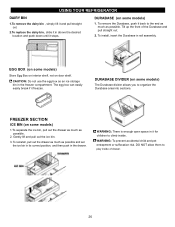
To install, insert the Durabase in it back to organize the Durabase area into sections. FREEZER SECTION ICE BIN (on door shelf. USING YOUR REFRIGERATOR DAIRY BIN 1.To remove the dairy bin , simply lift it and pull straight out. 2.To replace the dairy bin, slide it in above the desired ... is enough open space in rail assembly. DO NOT allow them to climb inside of the Durabase and pull straight out. 2. EGG BOX (on some models) 1.To separate the ice bin, pull out the drawer as much as possible and set the ice bin in its correct position, and then push...
To install, insert the Durabase in it back to organize the Durabase area into sections. FREEZER SECTION ICE BIN (on door shelf. USING YOUR REFRIGERATOR DAIRY BIN 1.To remove the dairy bin , simply lift it and pull straight out. 2.To replace the dairy bin, slide it in above the desired ... is enough open space in rail assembly. DO NOT allow them to climb inside of the Durabase and pull straight out. 2. EGG BOX (on some models) 1.To separate the ice bin, pull out the drawer as much as possible and set the ice bin in its correct position, and then push...
Owner's Manual (English)
Page 27
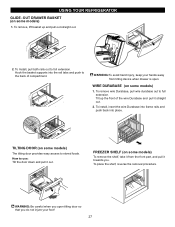
...push to the back of the wire Durabase and pull it out. To place the shelf, reverse the removal procedure. USING YOUR REFRIGERATOR GLIDE -OUT DRAWER BASKET (on some models) 1. Hook the basket supports into place. Tilt up and pull out straight out. 1 2 2. adWjuAstRNING: Be careful when you... open . TILTING DOOR (on some models) The tilting door provides easy access to full extension. E FREEZER SHELF (on some models) To remove the shelf, take it towards you do not injure your foot! To remove, lift basket up...
...push to the back of the wire Durabase and pull it out. To place the shelf, reverse the removal procedure. USING YOUR REFRIGERATOR GLIDE -OUT DRAWER BASKET (on some models) 1. Hook the basket supports into place. Tilt up and pull out straight out. 1 2 2. adWjuAstRNING: Be careful when you... open . TILTING DOOR (on some models) The tilting door provides easy access to full extension. E FREEZER SHELF (on some models) To remove the shelf, take it towards you do not injure your foot! To remove, lift basket up...
Owner's Manual (English)
Page 29
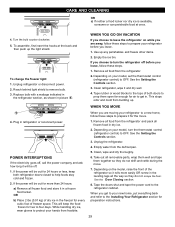
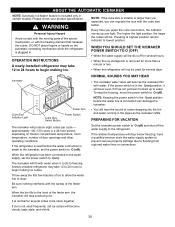
... the front of dry ice in the freezer for preparation instructions. 29 If the power will be out for two to four days. If the power will be off. 1. While handling dry ice, wear gloves to protect your model, set the thermostat control (refrigerator control) to prop them together so they do not...
... the front of dry ice in the freezer for preparation instructions. 29 If the power will be out for two to four days. If the power will be off. 1. While handling dry ice, wear gloves to protect your model, set the thermostat control (refrigerator control) to prop them together so they do not...
Owner's Manual (English)
Page 30
...shut off for several days. The higher the light position, the larger the cubes will become cloudy, taste stale, and shrink. Anewly-installed refrigerator may take 12 to 24 hours to clear. NORMAL SOUNDS YOU MAY HEAR • The icemaker water valve will not be stuck together....) • When the water supply will hear the sound of cubes dropping into the bin and water running in certain models. approximately 100-130 cubes in the I (on freezer compartment temperature, room temperature, number of ice to allow the water line to begin making ice cubes. NOTE: Keeping the...
...shut off for several days. The higher the light position, the larger the cubes will become cloudy, taste stale, and shrink. Anewly-installed refrigerator may take 12 to 24 hours to clear. NORMAL SOUNDS YOU MAY HEAR • The icemaker water valve will not be stuck together....) • When the water supply will hear the sound of cubes dropping into the bin and water running in certain models. approximately 100-130 cubes in the I (on freezer compartment temperature, room temperature, number of ice to allow the water line to begin making ice cubes. NOTE: Keeping the...

Owner's Manual (English)
Page 31
...a water filter and between 40 and 120 PSI or 0.275 and 0.82 MPa on models with local plumbing If your cold water supply, This water line installation is not warranted by the refrigerator or icemaker manufacturer. line has a flared fitting at the point of connection to the ... drill) during installation, be sure the device is doubleinsulated or grounded in house plumbing can cut square. 31 If you can cause damage to refrigerator parts and lead to water leakage or flooding. When using any electrical device (such as described above. Copper Tubing, 1/4" outer 1. and Phillipsblade...
...a water filter and between 40 and 120 PSI or 0.275 and 0.82 MPa on models with local plumbing If your cold water supply, This water line installation is not warranted by the refrigerator or icemaker manufacturer. line has a flared fitting at the point of connection to the ... drill) during installation, be sure the device is doubleinsulated or grounded in house plumbing can cut square. 31 If you can cause damage to refrigerator parts and lead to water leakage or flooding. When using any electrical device (such as described above. Copper Tubing, 1/4" outer 1. and Phillipsblade...


