

Owner's Manual
Page 1
OWNER'S MANUAL DEHUMIDIFIER Please read this manual carefully before operating your set and retain it for future reference. MODEL: LD651EBL P/NO:MFL63261215 www.lgappliances.com
OWNER'S MANUAL DEHUMIDIFIER Please read this manual carefully before operating your set and retain it for future reference. MODEL: LD651EBL P/NO:MFL63261215 www.lgappliances.com
Owner's Manual
Page 2
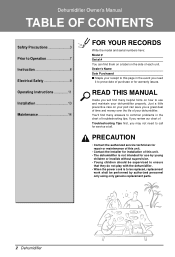
... replaced, replacement work shall be performed by authorized personnel only using only genuine replacement parts. 2 Dehumidifier Just a little preventive care on your dehumidifier. If you review our chart of Troubleshooting Tips first, you a great deal of time and ... of each unit. READ THIS MANUAL Inside you need to call for warranty issues. Dealer's Name Date Purchased s Staple your dehumidifier properly. Dehumidifier Owner's Manual TABLE OF CONTENTS Safety Precautions 3 Prior to Operation 7 Instruction 8 Electrical Safety 9 Operating Instructions 11 Installation 13 ...
... replaced, replacement work shall be performed by authorized personnel only using only genuine replacement parts. 2 Dehumidifier Just a little preventive care on your dehumidifier. If you review our chart of Troubleshooting Tips first, you a great deal of time and ... of each unit. READ THIS MANUAL Inside you need to call for warranty issues. Dealer's Name Date Purchased s Staple your dehumidifier properly. Dehumidifier Owner's Manual TABLE OF CONTENTS Safety Precautions 3 Prior to Operation 7 Instruction 8 Electrical Safety 9 Operating Instructions 11 Installation 13 ...
Owner's Manual
Page 4
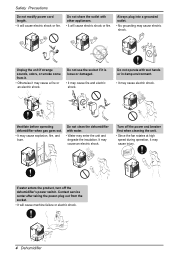
... Since the fan rotates at high speed during operation, it may cause electric shock. Bucket full HuCmoindtirtoyl Bucket full Turn off the dehumidifier's power switch. HuCmoindtirtoyl Bucket full Ventilate before operating defumidifier when gas goes out. • It may cause an electric shock. It... with wet hands or in damp environment. • It may cause a fire or an electric shock. Do not clean the dehumidifier with water. • Water may cause electric shock. HuCmondtirtoyli Bucket full Auto HuCmoindtirtoyl Bucket full Auto Rest Unplug the unit if strange...
... Since the fan rotates at high speed during operation, it may cause electric shock. Bucket full HuCmoindtirtoyl Bucket full Turn off the dehumidifier's power switch. HuCmoindtirtoyl Bucket full Ventilate before operating defumidifier when gas goes out. • It may cause an electric shock. It... with wet hands or in damp environment. • It may cause a fire or an electric shock. Do not clean the dehumidifier with water. • Water may cause electric shock. HuCmondtirtoyli Bucket full Auto HuCmoindtirtoyl Bucket full Auto Rest Unplug the unit if strange...
Owner's Manual
Page 5
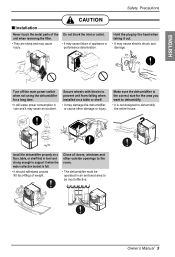
... in an enclosed area to support it may cause injury. Timer 2h4r.hOr.nO/Onf/fOff Fan Speed LoHwigh CHounmtriodlity Bucket full Install the dehumidifier properly on a table or shelf. • It may cause failure of weight. Hold the plug by the head when taking it out...bucket is level and strong enough to be most effective. nO/Onf/fOff Fan Speed LowHigh Owner's Manual 5 Secure wheels with blocks to dehumidify the entire house. Close all doors, windows and other damage or injury. ENGLISH Safety Precautions CAUTION ■Installation Never touch the metal ...
... in an enclosed area to support it may cause injury. Timer 2h4r.hOr.nO/Onf/fOff Fan Speed LoHwigh CHounmtriodlity Bucket full Install the dehumidifier properly on a table or shelf. • It may cause failure of weight. Hold the plug by the head when taking it out...bucket is level and strong enough to be most effective. nO/Onf/fOff Fan Speed LowHigh Owner's Manual 5 Secure wheels with blocks to dehumidify the entire house. Close all doors, windows and other damage or injury. ENGLISH Safety Precautions CAUTION ■Installation Never touch the metal ...
Owner's Manual
Page 6
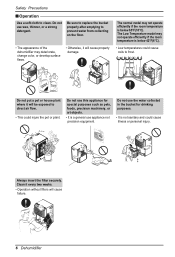
... Be sure to replace the bucket properly after emptying to prevent water from collecting on the floor. • The appearance of the dehumidifier may not operate efficiently if the room temperature is not sanitary and could cause illness or personal injury. Time Always insert the filter...• Otherwise, it every two weeks. • Operation without filters will cause failure. 2h4r.hOr.nO/Onf/fOff Timer Fan Speed LowHigh 6 Dehumidifier Do not use wax, thinner, or a strong detergent. Clean it will be exposed to clean. The Low Temperature model may not operate efficiently...
... Be sure to replace the bucket properly after emptying to prevent water from collecting on the floor. • The appearance of the dehumidifier may not operate efficiently if the room temperature is not sanitary and could cause illness or personal injury. Time Always insert the filter...• Otherwise, it every two weeks. • Operation without filters will cause failure. 2h4r.hOr.nO/Onf/fOff Timer Fan Speed LowHigh 6 Dehumidifier Do not use wax, thinner, or a strong detergent. Clean it will be exposed to clean. The Low Temperature model may not operate efficiently...
Owner's Manual
Page 7
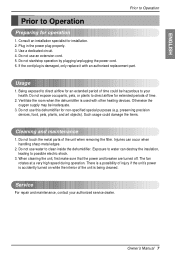
... cleaned. Such usage could be inadequate. 3. Do not touch the metal parts of time could damage the items. Cleaning and maintenance 1. Do not use this dehumidifier for non-specified special purposes (e.g. Being exposed to your authorized service dealer. There is a possibility of injury if the unit's power is accidently turned on... is used with an authorized replacement part. Do not use water to Operation Preparing for installation. 2. ENGLISH Prior to Operation Prior to clean inside the dehumidifier.
... cleaned. Such usage could be inadequate. 3. Do not touch the metal parts of time could damage the items. Cleaning and maintenance 1. Do not use this dehumidifier for non-specified special purposes (e.g. Being exposed to your authorized service dealer. There is a possibility of injury if the unit's power is accidently turned on... is used with an authorized replacement part. Do not use water to Operation Preparing for installation. 2. ENGLISH Prior to Operation Prior to clean inside the dehumidifier.
Owner's Manual
Page 8
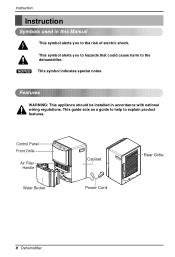
NOTICE This symbol indicates special notes. This guide acts as a guide to help to the dehumidifier. This symbol alerts you to the risk of electric shock. Features WARNING: This appliance should be installed in this Manual This symbol alerts you to hazards that could cause harm to explain product features. Instruction Instruction Symbols used in accordance with national wiring regulations. Control Panel Auto Restart Front Grille Air Filter Handle Water Bucket Cabinet Power Cord Rear Grille 8 Dehumidifier
NOTICE This symbol indicates special notes. This guide acts as a guide to help to the dehumidifier. This symbol alerts you to the risk of electric shock. Features WARNING: This appliance should be installed in this Manual This symbol alerts you to hazards that could cause harm to explain product features. Instruction Instruction Symbols used in accordance with national wiring regulations. Control Panel Auto Restart Front Grille Air Filter Handle Water Bucket Cabinet Power Cord Rear Grille 8 Dehumidifier
Owner's Manual
Page 9
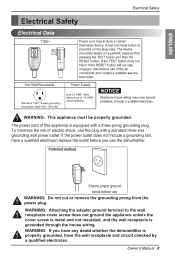
...before you have a qualified electrician replace the outlet before use the plug with a three-prong grounding plug. WARNING: If you use the dehumidifier. The power cord of electric shock, use WARNING: Do not cut or remove the grounding prong from the power plug. To minimize ...equipped with a standard three-slot grounding wall power outlet. If the power outlet does not include a grounding slot, have any doubt whether the dehumidifier is grounded through the house wiring. ENGLISH Electrical Safety RESET TEST WARNING: TEST BEFORE EACH USE! 1.PRESS RESET BUTTON. 2.PLUG LCDI INTO ...
...before you have a qualified electrician replace the outlet before use the plug with a three-prong grounding plug. WARNING: If you use the dehumidifier. The power cord of electric shock, use WARNING: Do not cut or remove the grounding prong from the power plug. To minimize ...equipped with a standard three-slot grounding wall power outlet. If the power outlet does not include a grounding slot, have any doubt whether the dehumidifier is grounded through the house wiring. ENGLISH Electrical Safety RESET TEST WARNING: TEST BEFORE EACH USE! 1.PRESS RESET BUTTON. 2.PLUG LCDI INTO ...
Owner's Manual
Page 10
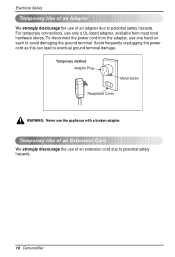
... Screw Receptacle Cover WARNING: Never use only a UL-listed adapter, available from the adapter, use of an extension cord due to potential safety hazards. 10 Dehumidifier Electrical Safety Temporary Use of an Adapter We strongly discourage the use of an Extension Cord We strongly discourage the use one hand on each...
... Screw Receptacle Cover WARNING: Never use only a UL-listed adapter, available from the adapter, use of an extension cord due to potential safety hazards. 10 Dehumidifier Electrical Safety Temporary Use of an Adapter We strongly discourage the use of an Extension Cord We strongly discourage the use one hand on each...
Owner's Manual
Page 11
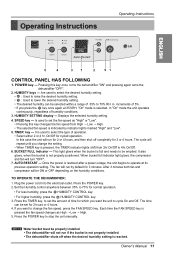
...--- AUTO RESTART --- Once the power is selected. The fan will not run if the bucket is not properly installed. • The dehumidifier shuts off completely for which you want the unit to select the type of 5%. • If you change the fan speed, press...Owner's Manual 11 Pressing this case the unit will turn "OFF". 7. HUMIDITY keys --- Is used to cycle On and Off. TO OPERATE THE DEHUMIDIFIER: 1. Set the Humidity control anywhere between 35% to stop the unit manually. The time can be emptied. Operating Instructions Operating Instructions ENGLISH Auto Restart ...
...--- AUTO RESTART --- Once the power is selected. The fan will not run if the bucket is not properly installed. • The dehumidifier shuts off completely for which you want the unit to select the type of 5%. • If you change the fan speed, press...Owner's Manual 11 Pressing this case the unit will turn "OFF". 7. HUMIDITY keys --- Is used to cycle On and Off. TO OPERATE THE DEHUMIDIFIER: 1. Set the Humidity control anywhere between 35% to stop the unit manually. The time can be emptied. Operating Instructions Operating Instructions ENGLISH Auto Restart ...
Owner's Manual
Page 12
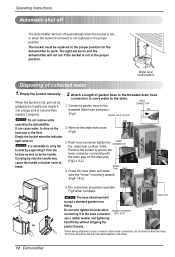
...full, or when the bucket is advisable to carry the 3. Push hose connector tightly into a large sink or tub and then replace it from the dehumidifier to drop on . TAKE OUT Fig5 When being attached to the hose connector, INTO SLOT use a rubber washer and tighten by hand firmly without ... when INSERT STOPPER connecting it to hose connector drain hose connection, do not bend or kink the hose. The light will be on and the dehumidifier will accept a standard garden hose fitting. HOSE 1. Remove the drain-hole cover. (Fig2) Empty the bucket when the indicator light turns on the ...
...full, or when the bucket is advisable to carry the 3. Push hose connector tightly into a large sink or tub and then replace it from the dehumidifier to drop on . TAKE OUT Fig5 When being attached to the hose connector, INTO SLOT use a rubber washer and tighten by hand firmly without ... when INSERT STOPPER connecting it to hose connector drain hose connection, do not bend or kink the hose. The light will be on and the dehumidifier will accept a standard garden hose fitting. HOSE 1. Remove the drain-hole cover. (Fig2) Empty the bucket when the indicator light turns on the ...
Owner's Manual
Page 13
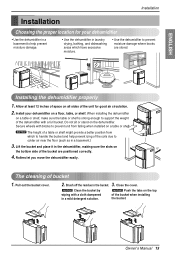
... shelf is strong enough to support the weight of the bucket when installing the bucket. Close the cover. Owner's Manual 13 Install your dehumidifier • Use the dehumidifier in a basement to help prevent icing of the coils due to colder air near the floor (such as in the... damage where books are positioned correctly. 4. Secure wheels with a cloth dampened in the bucket. 3. Pull out the bucket cover. 2. When installing the dehumidifier Auto Restart on a table or shelf. Allow at least 12 inches of space on 12" Auto Restart 12" the bottom side of the bucket are ...
... shelf is strong enough to support the weight of the bucket when installing the bucket. Close the cover. Owner's Manual 13 Install your dehumidifier • Use the dehumidifier in a basement to help prevent icing of the coils due to colder air near the floor (such as in the... damage where books are positioned correctly. 4. Secure wheels with a cloth dampened in the bucket. 3. Pull out the bucket cover. 2. When installing the dehumidifier Auto Restart on a table or shelf. Allow at least 12 inches of space on 12" Auto Restart 12" the bottom side of the bucket are ...
Owner's Manual
Page 14
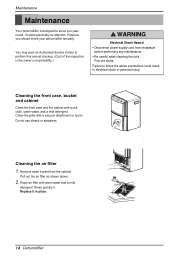
...brush. Do not use bleach or abrasives. Pull out the air filter as shown above precautions could result in place. 14 Dehumidifier You may want an Authorized Service Center to perform this annual checkup. (Cost of the inspection is designed to follow the above... Rinse and dry it in electrical shock or personal injury. Fins are sharp. Failure to serve you should check your dehumidifier annually. Maintenance Maintenance Your dehumidifier is the owner's responsibility.) Electrical Shock Hazard • Disconnect power supply cord from the cabinet. It needs practically no...
...brush. Do not use bleach or abrasives. Pull out the air filter as shown above precautions could result in place. 14 Dehumidifier You may want an Authorized Service Center to perform this annual checkup. (Cost of the inspection is designed to follow the above... Rinse and dry it in electrical shock or personal injury. Fins are sharp. Failure to serve you should check your dehumidifier annually. Maintenance Maintenance Your dehumidifier is the owner's responsibility.) Electrical Shock Hazard • Disconnect power supply cord from the cabinet. It needs practically no...
Owner's Manual
Page 15
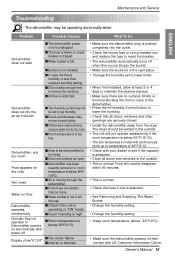
...dealer to see if the capacity is adequate. • Close all the way. Frost will continuously cycle up to temperature of the dehumidifier. • Press the Humidity Control button to lower the humidity. • Check that all doors, windows and other openings are ...back of 42°F(6°C). • Check with LG Customer Information Center. Maintenance and Service Troubleshooting ENGLISH The dehumidifier may be operating abnormally when: Problem Possible Causes What To Do Dehumidifier does not start ■The dehumidifier power cord is unplugged. ■The fuse is blown...
...dealer to see if the capacity is adequate. • Close all the way. Frost will continuously cycle up to temperature of the dehumidifier. • Press the Humidity Control button to lower the humidity. • Check that all doors, windows and other openings are ...back of 42°F(6°C). • Check with LG Customer Information Center. Maintenance and Service Troubleshooting ENGLISH The dehumidifier may be operating abnormally when: Problem Possible Causes What To Do Dehumidifier does not start ■The dehumidifier power cord is unplugged. ■The fuse is blown...
Owner's Manual
Page 31
...WARRANTY, EXPRESS OR IMPLIED, INCLUDING AND WITHOUT LIMITATION TO, ANY WARRANTY OF MERCHANTABILITY OR FITNESS FOR A PARTICULAR PURPOSE. WARRANTY LG DEHUMIDIFIER LIMITED WARRANTY - Note: Replacement products and repair parts may be responsible for the remaining portion of the original unit's warranty... AND YOU MAY ALSO HAVE OTHER RIGHTS THAT VARY FROM STATE TO STATE. USA WHAT THIS WARRANTY COVERS: LG Electronics U.S.A., Inc. ("LG") warrants your LG Dehumidifier ("product") against defect in the owner's manual. This limited warranty is used within seven (7) calendar days from...
...WARRANTY, EXPRESS OR IMPLIED, INCLUDING AND WITHOUT LIMITATION TO, ANY WARRANTY OF MERCHANTABILITY OR FITNESS FOR A PARTICULAR PURPOSE. WARRANTY LG DEHUMIDIFIER LIMITED WARRANTY - Note: Replacement products and repair parts may be responsible for the remaining portion of the original unit's warranty... AND YOU MAY ALSO HAVE OTHER RIGHTS THAT VARY FROM STATE TO STATE. USA WHAT THIS WARRANTY COVERS: LG Electronics U.S.A., Inc. ("LG") warrants your LG Dehumidifier ("product") against defect in the owner's manual. This limited warranty is used within seven (7) calendar days from...


