
Owner's Manual
Page 1
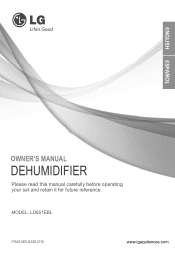
OWNER'S MANUAL DEHUMIDIFIER Please read this manual carefully before operating your set and retain it for future reference. MODEL: LD651EBL P/NO:MFL63261215 www.lgappliances.com
OWNER'S MANUAL DEHUMIDIFIER Please read this manual carefully before operating your set and retain it for future reference. MODEL: LD651EBL P/NO:MFL63261215 www.lgappliances.com
Owner's Manual
Page 2
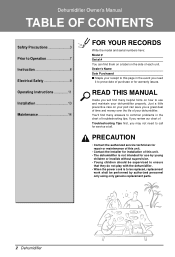
...your receipt to this page in the chart of your dehumidifier properly. You'll find many helpful hints on your part can find many answers to common problems in the event you need to call for warranty issues. READ THIS MANUAL Inside you will find them on a label on ... not intended for installation of Troubleshooting Tips first, you may not need it to prove date of each unit. Dehumidifier Owner's Manual TABLE OF CONTENTS Safety Precautions 3 Prior to Operation 7 Instruction 8 Electrical Safety 9 Operating Instructions 11 Installation 13 Maintenance 14 FOR YOUR RECORDS ...
...your receipt to this page in the chart of your dehumidifier properly. You'll find many helpful hints on your part can find many answers to common problems in the event you need to call for warranty issues. READ THIS MANUAL Inside you will find them on a label on ... not intended for installation of Troubleshooting Tips first, you may not need it to prove date of each unit. Dehumidifier Owner's Manual TABLE OF CONTENTS Safety Precautions 3 Prior to Operation 7 Instruction 8 Electrical Safety 9 Operating Instructions 11 Installation 13 Maintenance 14 FOR YOUR RECORDS ...
Owner's Manual
Page 5
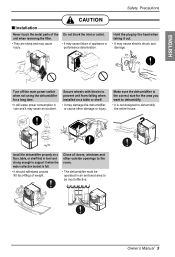
... full Turn off the main power switch when not using the dehumidifier for the area you want to the room. • The dehumidifier must be most effective. Timer 2h4r.hOr. nO/Onf/fOff Fan Speed LowHigh Owner's Manual 5 Close all doors, windows and other damage or injury.... Hold the plug by the head when taking it may damage the dehumidifier or cause other outside openings to dehumidify. • It is full. • It should withstand...
... full Turn off the main power switch when not using the dehumidifier for the area you want to the room. • The dehumidifier must be most effective. Timer 2h4r.hOr. nO/Onf/fOff Fan Speed LowHigh Owner's Manual 5 Close all doors, windows and other damage or injury.... Hold the plug by the head when taking it may damage the dehumidifier or cause other outside openings to dehumidify. • It is full. • It should withstand...
Owner's Manual
Page 7
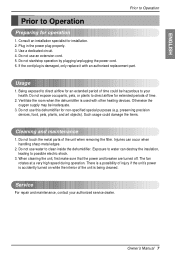
...heating devices. Do not expose occupants, pets, or plants to possible electric shock. 3. ENGLISH Prior to Operation Prior to clean inside the dehumidifier. Plug in the power plug properly. 3. If the cord/plug is accidently turned on while the interior of the unit when removing the... extension cord. 5. Do not use water to Operation Preparing for extended periods of time could damage the items. Cleaning and maintenance 1. Owner's Manual 7 When cleaning the unit, first make sure that the power and breaker are turned off. preserving precision devices, food, pets, plants, and...
...heating devices. Do not expose occupants, pets, or plants to possible electric shock. 3. ENGLISH Prior to Operation Prior to clean inside the dehumidifier. Plug in the power plug properly. 3. If the cord/plug is accidently turned on while the interior of the unit when removing the... extension cord. 5. Do not use water to Operation Preparing for extended periods of time could damage the items. Cleaning and maintenance 1. Owner's Manual 7 When cleaning the unit, first make sure that the power and breaker are turned off. preserving precision devices, food, pets, plants, and...
Owner's Manual
Page 8
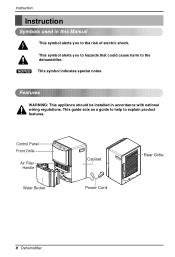
Control Panel Auto Restart Front Grille Air Filter Handle Water Bucket Cabinet Power Cord Rear Grille 8 Dehumidifier NOTICE This symbol indicates special notes. This guide acts as a guide to help to the dehumidifier. Features WARNING: This appliance should be installed in this Manual This symbol alerts you to hazards that could cause harm to explain product features. This symbol alerts you to the risk of electric shock. Instruction Instruction Symbols used in accordance with national wiring regulations.
Control Panel Auto Restart Front Grille Air Filter Handle Water Bucket Cabinet Power Cord Rear Grille 8 Dehumidifier NOTICE This symbol indicates special notes. This guide acts as a guide to help to the dehumidifier. Features WARNING: This appliance should be installed in this Manual This symbol alerts you to hazards that could cause harm to explain product features. This symbol alerts you to the risk of electric shock. Instruction Instruction Symbols used in accordance with national wiring regulations.
Owner's Manual
Page 9
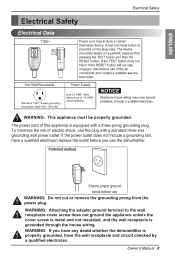
... USE! 1.PRESS RESET BUTTON. 2.PLUG LCDI INTO POWER RECEPTACLE. 3.PRESS TEST BUTTON, RESET BUTTON SHOULD POP UP. 4.PRESS RESET BUTTON FOR USE. Owner's Manual 9 Electrical Safety WARNING: This appliance must be properly grounded. To minimize the risk of this appliance is grounded through the house wiring. DO NOT USE... three-slot grounding wall power outlet. If the power outlet does not include a grounding slot, have a qualified electrician replace the outlet before use the dehumidifier. WARNING: If you use WARNING: Do not cut or remove the grounding prong from the power plug.
... USE! 1.PRESS RESET BUTTON. 2.PLUG LCDI INTO POWER RECEPTACLE. 3.PRESS TEST BUTTON, RESET BUTTON SHOULD POP UP. 4.PRESS RESET BUTTON FOR USE. Owner's Manual 9 Electrical Safety WARNING: This appliance must be properly grounded. To minimize the risk of this appliance is grounded through the house wiring. DO NOT USE... three-slot grounding wall power outlet. If the power outlet does not include a grounding slot, have a qualified electrician replace the outlet before use the dehumidifier. WARNING: If you use WARNING: Do not cut or remove the grounding prong from the power plug.
Owner's Manual
Page 11
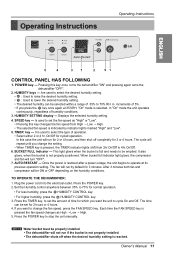
... the POWER key to operate at 35%RH, "On" mode is restored after a power outage, the unit begins to stop the unit manually. Owner's Manual 11 Is used to 70% RH in increments of time for 3 minutes. AUTO RESTART --- After 3 minutes both fan and compressor will turn...used to set for cycled operation. TIMER key --- BUCKET FULL Indicator --- Each time the FAN SPEED key is not properly installed. • The dehumidifier shuts off completely for normal operation. • For less humidity, press the HUMIDITY CONTROL key. • For higher humidity, press the HUMIDITY CONTROL...
... the POWER key to operate at 35%RH, "On" mode is restored after a power outage, the unit begins to stop the unit manually. Owner's Manual 11 Is used to 70% RH in increments of time for 3 minutes. AUTO RESTART --- After 3 minutes both fan and compressor will turn...used to set for cycled operation. TIMER key --- BUCKET FULL Indicator --- Each time the FAN SPEED key is not properly installed. • The dehumidifier shuts off completely for normal operation. • For less humidity, press the HUMIDITY CONTROL key. • For higher humidity, press the HUMIDITY CONTROL...
Owner's Manual
Page 12
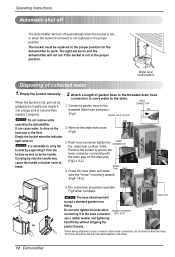
...pipe on the drain pan. (Fig3-1,3-2) break. Remove the drain-hole cover. (Fig2) Empty the bucket when the indicator light turns on and the dehumidifier will be on . DRAIN PAN Fig4-1 4. Press the hose down and make sure the "Arrow" is pointing upward. (Fig4-1,4-2) Fig3-1 Fig4-2... hose should be replaced in the proper position for the dehumidifier to hose connector drain hose connection, do not bend or kink the hose. Attach a length of collected water 1. Empty the bucket manually. Operating Instructions Automatic shut off automatically when the bucket is full, or when...
...pipe on the drain pan. (Fig3-1,3-2) break. Remove the drain-hole cover. (Fig2) Empty the bucket when the indicator light turns on and the dehumidifier will be on . DRAIN PAN Fig4-1 4. Press the hose down and make sure the "Arrow" is pointing upward. (Fig4-1,4-2) Fig3-1 Fig4-2... hose should be replaced in the proper position for the dehumidifier to hose connector drain hose connection, do not bend or kink the hose. Attach a length of collected water 1. Empty the bucket manually. Operating Instructions Automatic shut off automatically when the bucket is full, or when...
Owner's Manual
Page 13
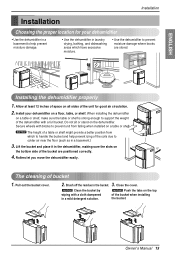
... sure the slots on 12" Auto Restart 12" the bottom side of bucket 1. Close the cover. Owner's Manual 13 When installing the dehumidifier Auto Restart on a table or shelf, make sure the table or shelf is strong enough to prevent moisture damage... a full bucket. ENGLISH Installation Installation Choosing the proper location for good air circulation. 2. Install your dehumidifier • Use the dehumidifier in a basement to help prevent moisture damage. • Use the dehumidifier in a basement.) 3. Do not sit or stand on a table or shelf. Pull out the bucket...
... sure the slots on 12" Auto Restart 12" the bottom side of bucket 1. Close the cover. Owner's Manual 13 When installing the dehumidifier Auto Restart on a table or shelf, make sure the table or shelf is strong enough to prevent moisture damage... a full bucket. ENGLISH Installation Installation Choosing the proper location for good air circulation. 2. Install your dehumidifier • Use the dehumidifier in a basement to help prevent moisture damage. • Use the dehumidifier in a basement.) 3. Do not sit or stand on a table or shelf. Pull out the bucket...
Owner's Manual
Page 15
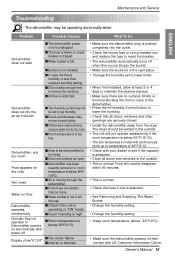
...176;C). • Check with LG Customer Information Center. The dryer should ■The Humidity Control may not be set to lower limits. • When first installed, allow enough time to remove the moisture. ■Airflow is restricted. Owner's Manual 15 Dehumidifier does not dry the air as... it should be loose. ■Water bucket is adequate. • Close all doors and windows to lower the humidity. • Check that all the way. Dehumidifier runs too much ■Area to low...
...176;C). • Check with LG Customer Information Center. The dryer should ■The Humidity Control may not be set to lower limits. • When first installed, allow enough time to remove the moisture. ■Airflow is restricted. Owner's Manual 15 Dehumidifier does not dry the air as... it should be loose. ■Water bucket is adequate. • Close all doors and windows to lower the humidity. • Check that all the way. Dehumidifier runs too much ■Area to low...
Owner's Manual
Page 31
...improper installation, repair or maintenance. Repairs when product is used within seven (7) calendar days from defects in the owner's manual. TO THE EXTENT ANY IMPLIED WARRANTY IS REQUIRED BY LAW, THIS WARRANTY IS LIMITED IN DURATION TO THE TERM PERIOD ...not approved or specified by unauthorized modification or alteration to replace defective parts. WARRANTY LG DEHUMIDIFIER LIMITED WARRANTY - USA WHAT THIS WARRANTY COVERS: LG Electronics U.S.A., Inc. ("LG") warrants your LG Dehumidifier ("product") against defect in any display, open box, discounted, or refurbished product. 8.
...improper installation, repair or maintenance. Repairs when product is used within seven (7) calendar days from defects in the owner's manual. TO THE EXTENT ANY IMPLIED WARRANTY IS REQUIRED BY LAW, THIS WARRANTY IS LIMITED IN DURATION TO THE TERM PERIOD ...not approved or specified by unauthorized modification or alteration to replace defective parts. WARRANTY LG DEHUMIDIFIER LIMITED WARRANTY - USA WHAT THIS WARRANTY COVERS: LG Electronics U.S.A., Inc. ("LG") warrants your LG Dehumidifier ("product") against defect in any display, open box, discounted, or refurbished product. 8.


