

Owner's Manual
Page 2
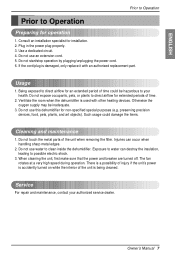
...on your part can find them on a label on how to prove date of purchase or for use and maintain your dehumidifier properly. READ THIS MANUAL Inside you will find many helpful hints on the side of each unit. Dealer's Name Date Purchased s Staple your ...• Contact the authorized service technician for repair or maintenance of this unit. • Contact the installer for service at all. Dehumidifier Owner's Manual TABLE OF CONTENTS Safety Precautions 3 Prior to Operation 7 Instruction 8 Electrical Safety 9 Operating Instructions 11 Installation 13 Maintenance 14 FOR YOUR...
...on your part can find them on a label on how to prove date of purchase or for use and maintain your dehumidifier properly. READ THIS MANUAL Inside you will find many helpful hints on the side of each unit. Dealer's Name Date Purchased s Staple your ...• Contact the authorized service technician for repair or maintenance of this unit. • Contact the installer for service at all. Dehumidifier Owner's Manual TABLE OF CONTENTS Safety Precautions 3 Prior to Operation 7 Instruction 8 Electrical Safety 9 Operating Instructions 11 Installation 13 Maintenance 14 FOR YOUR...
Owner's Manual
Page 5
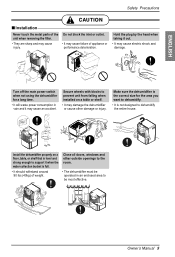
...removing the filter. • They are sharp and may damage the dehumidifier or cause other outside openings to the room. • The dehumidifier must be most effective. nO/Onf/fOff Fan Speed LowHigh Owner's Manual 5 Make sure the dehumidifier is the correct size for a long time. • It ...will waste power consumption in an enclosed area to be operated in vain and it when the water collection bucket is not designed to dehumidify. • It is full....
...removing the filter. • They are sharp and may damage the dehumidifier or cause other outside openings to the room. • The dehumidifier must be most effective. nO/Onf/fOff Fan Speed LowHigh Owner's Manual 5 Make sure the dehumidifier is the correct size for a long time. • It ...will waste power consumption in an enclosed area to be operated in vain and it when the water collection bucket is not designed to dehumidify. • It is full....
Owner's Manual
Page 7
... damaged, only replace it with other heating devices. Otherwise the oxygen supply may be hazardous to clean inside the dehumidifier. Do not use this dehumidifier for installation. 2. Do not use water to your authorized service dealer. Do not start/stop operation by plugging/unplugging the.... preserving precision devices, food, pets, plants, and art objects). Exposure to water can occur when handling sharp metal edges. 2. Owner's Manual 7 Do not touch the metal parts of the unit is accidently turned on while the interior of the unit when removing the filter. When...
... damaged, only replace it with other heating devices. Otherwise the oxygen supply may be hazardous to clean inside the dehumidifier. Do not use this dehumidifier for installation. 2. Do not use water to your authorized service dealer. Do not start/stop operation by plugging/unplugging the.... preserving precision devices, food, pets, plants, and art objects). Exposure to water can occur when handling sharp metal edges. 2. Owner's Manual 7 Do not touch the metal parts of the unit is accidently turned on while the interior of the unit when removing the filter. When...
Owner's Manual
Page 8
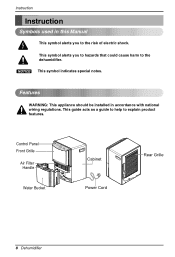
This guide acts as a guide to help to explain product features. NOTICE This symbol indicates special notes. Control Panel Auto Restart Front Grille Air Filter Handle Water Bucket Cabinet Power Cord Rear Grille 8 Dehumidifier This symbol alerts you to the risk of electric shock. Instruction Instruction Symbols used in accordance with national wiring regulations. Features WARNING: This appliance should be installed in this Manual This symbol alerts you to hazards that could cause harm to the dehumidifier.
This guide acts as a guide to help to explain product features. NOTICE This symbol indicates special notes. Control Panel Auto Restart Front Grille Air Filter Handle Water Bucket Cabinet Power Cord Rear Grille 8 Dehumidifier This symbol alerts you to the risk of electric shock. Instruction Instruction Symbols used in accordance with national wiring regulations. Features WARNING: This appliance should be installed in this Manual This symbol alerts you to hazards that could cause harm to the dehumidifier.
Owner's Manual
Page 9
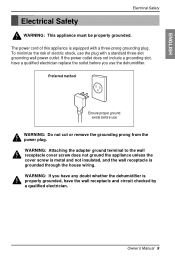
Owner's Manual 9 To minimize the risk of this appliance is properly grounded, have the wall receptacle and circuit checked by a qualified electrician. WARNING: If you use the dehumidifier. The power cord of electric shock, use WARNING: Do not cut or remove the grounding prong from the...WARNING: This appliance must be properly grounded. If the power outlet does not include a grounding slot, have any doubt whether the dehumidifier is equipped with a standard three-slot grounding wall power outlet. WARNING: Attaching the adapter ground terminal to the wall receptacle cover screw...
Owner's Manual 9 To minimize the risk of this appliance is properly grounded, have the wall receptacle and circuit checked by a qualified electrician. WARNING: If you use the dehumidifier. The power cord of electric shock, use WARNING: Do not cut or remove the grounding prong from the...WARNING: This appliance must be properly grounded. If the power outlet does not include a grounding slot, have any doubt whether the dehumidifier is equipped with a standard three-slot grounding wall power outlet. WARNING: Attaching the adapter ground terminal to the wall receptacle cover screw...
Owner's Manual
Page 11
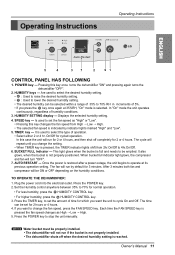
...then shut off when the desired humidity setting is restored after a power outage, the unit begins to 70% for 2 or 4 hours. Owner's Manual 11 HUMIDITY SETTING display --- Displays the selected humidity setting. 4. Once the power is reached. Press the POWER key. 2. If you press the ...operation. • For less humidity, press the HUMIDITY CONTROL key. • For higher humidity, press the HUMIDITY CONTROL key. 3. TO OPERATE THE DEHUMIDIFIER: 1. Press the TIMER key, to set for cycled operation. POWER key --- In this case the unit will turn "OFF". 7. AUTO RESTART ...
...then shut off when the desired humidity setting is restored after a power outage, the unit begins to 70% for 2 or 4 hours. Owner's Manual 11 HUMIDITY SETTING display --- Displays the selected humidity setting. 4. Once the power is reached. Press the POWER key. 2. If you press the ...operation. • For less humidity, press the HUMIDITY CONTROL key. • For higher humidity, press the HUMIDITY CONTROL key. 3. TO OPERATE THE DEHUMIDIFIER: 1. Press the TIMER key, to set for cycled operation. POWER key --- In this case the unit will turn "OFF". 7. AUTO RESTART ...
Owner's Manual
Page 12
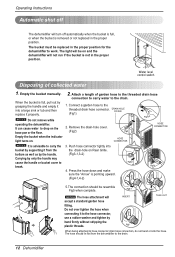
...hose to the threaded drain hose connection to carry water to the hose connector, use a rubber washer and tighten by the handle. Empty the bucket manually. Empty the bucket when the indicator light turns on Rear Grille. (Fig3-1,3-2) HOSE CONNECTOR Fig3-2 Fig3-1 4. Remove the drain-hole cover. (Fig2)... hose to hose connector drain hose connection, do not bend or kink the hose. Do not over tighten the hose when connecting it from the dehumidifier to break. 2. INSERT Fig5 TAKE OUT When being attached to the threaded drain hose connector. (Fig1) DRAIN HOLE COVER Fig1 2. It can...
...hose to the threaded drain hose connection to carry water to the hose connector, use a rubber washer and tighten by the handle. Empty the bucket manually. Empty the bucket when the indicator light turns on Rear Grille. (Fig3-1,3-2) HOSE CONNECTOR Fig3-2 Fig3-1 4. Remove the drain-hole cover. (Fig2)... hose to hose connector drain hose connection, do not bend or kink the hose. Do not over tighten the hose when connecting it from the dehumidifier to break. 2. INSERT Fig5 TAKE OUT When being attached to the threaded drain hose connector. (Fig1) DRAIN HOLE COVER Fig1 2. It can...
Owner's Manual
Page 13
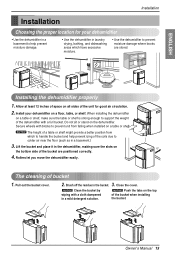
... as in the dehumidifier, making sure the slots on the top of bucket 1. ENGLISH Installation Installation Choosing the proper location for good air circulation. 2. Do not sit or stand on a table or shelf. Secure wheels with a cloth dampened in the bucket. 3. Pull out the bucket cover. 2. Owner's Manual 13 NOTICE Clean the...
... as in the dehumidifier, making sure the slots on the top of bucket 1. ENGLISH Installation Installation Choosing the proper location for good air circulation. 2. Do not sit or stand on a table or shelf. Secure wheels with a cloth dampened in the bucket. 3. Pull out the bucket cover. 2. Owner's Manual 13 NOTICE Clean the...

Owner's Manual
Page 15
...model will usually disappear within 60 minutes. • This is normal. • Check the hose if one is too large. s Airflow is moving through the dehumidifier. s Room temperature is operating in "ON" mode. s Area to lower the humidity. • Check that all the way. s Check if the unit ... not dry the air as it should be vented to the outside . • This is normal. Owner's Manual 15 ENGLISH Troubleshooting Maintenance and Service The dehumidifier may be set to lower limits. • When first installed, allow enough time to the outside . • The unit will not operate ...
...model will usually disappear within 60 minutes. • This is normal. • Check the hose if one is too large. s Airflow is moving through the dehumidifier. s Room temperature is operating in "ON" mode. s Area to lower the humidity. • Check that all the way. s Check if the unit ... not dry the air as it should be vented to the outside . • This is normal. Owner's Manual 15 ENGLISH Troubleshooting Maintenance and Service The dehumidifier may be set to lower limits. • When first installed, allow enough time to the outside . • The unit will not operate ...


