

User Guide
Page 2
By following the operating and care instructions in this manual, your purchase and welcome to the LG family. INTRODUCTION IMPORTANT SAFETY INSTRUCTIONS Basic Safety Precautions 3, 4 Electrical Safety 5, 6 PARTS AND FEATURES Key Parts and Components 7, 8 Control Panel 9, 10 HOW TO USE Before Using ... 21 Cleaning The Filters 21 Normal Maintenance 22 TROUBLESHOOTING Before Calling For Service 23, 24 WARRANTY Product Registration Information 25 THANK YOU! Congratulations on your dehumidifier will provide you with many years of reliable service. 2
By following the operating and care instructions in this manual, your purchase and welcome to the LG family. INTRODUCTION IMPORTANT SAFETY INSTRUCTIONS Basic Safety Precautions 3, 4 Electrical Safety 5, 6 PARTS AND FEATURES Key Parts and Components 7, 8 Control Panel 9, 10 HOW TO USE Before Using ... 21 Cleaning The Filters 21 Normal Maintenance 22 TROUBLESHOOTING Before Calling For Service 23, 24 WARRANTY Product Registration Information 25 THANK YOU! Congratulations on your dehumidifier will provide you with many years of reliable service. 2

User Guide
Page 3
...and the safety of your appliance. This symbol alerts you to ensure that can result in the risk of electric shock. • This dehumidifier is very important. BASIC SAFETY PRECAUTIONS WARNING To reduce the risk of fire, electric shock, or injury to persons when using genuine replacement ...others . It can overload the circuit and cause a fire or electric shock. • Do not remove the round grounding prong from the dehumidifier before cleaning to property. Always read and obey all packaging materials are removed from the plug. These words mean: WARNING This symbol indicates ...
...and the safety of your appliance. This symbol alerts you to ensure that can result in the risk of electric shock. • This dehumidifier is very important. BASIC SAFETY PRECAUTIONS WARNING To reduce the risk of fire, electric shock, or injury to persons when using genuine replacement ...others . It can overload the circuit and cause a fire or electric shock. • Do not remove the round grounding prong from the dehumidifier before cleaning to property. Always read and obey all packaging materials are removed from the plug. These words mean: WARNING This symbol indicates ...
User Guide
Page 4
...when using this appliance, follow basic precautions, including the following: • To avoid possible cuts, avoid contacting the metal parts of the dehumidifier when removing or reinstalling the filter. Do not use wax, thinner, or a strong detergent. • To prevent spills and property damage,... be used for the area you wish to clean the dehumidifier. IMPORTANT SAFETY INSTRUCTIONS READ ALL INSTRUCTIONS BEFORE USE BASIC SAFETY PRECAUTIONS CAUTION To reduce the risk of fire, electric shock, or injury ...
...when using this appliance, follow basic precautions, including the following: • To avoid possible cuts, avoid contacting the metal parts of the dehumidifier when removing or reinstalling the filter. Do not use wax, thinner, or a strong detergent. • To prevent spills and property damage,... be used for the area you wish to clean the dehumidifier. IMPORTANT SAFETY INSTRUCTIONS READ ALL INSTRUCTIONS BEFORE USE BASIC SAFETY PRECAUTIONS CAUTION To reduce the risk of fire, electric shock, or injury ...

User Guide
Page 5
... Failure to follow these instructions can result in accordance with national wiring codes. • Do not alter or modify the plug or cord of this dehumidifier. If the power cord becomes worn or damaged, the cord should check the outlet and circuit, and, if necessary, install a properly grounded outlet. •... be plugged into a grounded 60 Hz, 120 VAC outlet protected by a 15A time delay fuse or circuit breaker. • This dehumidifier must be properly grounded. • Do not, under any circumstances, cut or remove the ground prong. • If you do not have a properly grounded outlet...
... Failure to follow these instructions can result in accordance with national wiring codes. • Do not alter or modify the plug or cord of this dehumidifier. If the power cord becomes worn or damaged, the cord should check the outlet and circuit, and, if necessary, install a properly grounded outlet. •... be plugged into a grounded 60 Hz, 120 VAC outlet protected by a 15A time delay fuse or circuit breaker. • This dehumidifier must be properly grounded. • Do not, under any circumstances, cut or remove the ground prong. • If you do not have a properly grounded outlet...
User Guide
Page 7
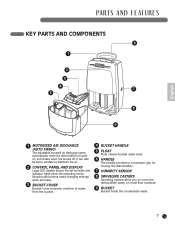
...AND COMPONENTS 6 1 2 3 4 5 h 7 8 9 1 MOTORIZED AIR DISCHARGE (AUTO SWING) The adjustable louvered air discharge opens automatically when the dehumidifier is turned on most floor surfaces. 9 BUCKET Bucket holds the condensate water. 7 Simple push buttons make changing settings quick and easy. 3 BUCKET COVER ...the bucket. 4 BUCKET HANDLE 5 FLOAT Float checks bucket water level. 6 HANDLE The handle provides a convenient grip for moving the dehumidifier. 7 HUMIDITY SENSOR 8 SWIVELING CASTERS Swiveling casters allow you to distribute the air. 2 CONTROL PANEL AND DISPLAY Large LED display ...
...AND COMPONENTS 6 1 2 3 4 5 h 7 8 9 1 MOTORIZED AIR DISCHARGE (AUTO SWING) The adjustable louvered air discharge opens automatically when the dehumidifier is turned on most floor surfaces. 9 BUCKET Bucket holds the condensate water. 7 Simple push buttons make changing settings quick and easy. 3 BUCKET COVER ...the bucket. 4 BUCKET HANDLE 5 FLOAT Float checks bucket water level. 6 HANDLE The handle provides a convenient grip for moving the dehumidifier. 7 HUMIDITY SENSOR 8 SWIVELING CASTERS Swiveling casters allow you to distribute the air. 2 CONTROL PANEL AND DISPLAY Large LED display ...

User Guide
Page 9
...pages. 1 SPOT DRY Refer to prevent potential water spills. 9 In the sequence above, lamp lights up. 6 TIMER Set the time that dehumidifier will automatically turn off . 4 AUTO SWING Sets the motorized air discharge to oscillate, improving air circulation in the room. 5 HUMIDITY CONTROL Each ...; Bucket NOTE: Tips when draining water When removing the bucket, use both hands to page 14. 2 CONTINUOUS DRY Under continuous operation, dehumidifying occurs irrespective of humidity of the room. 3 MODE Each time that the humidity control button is pressed the humidity setting is shifted: Automatic...
...pages. 1 SPOT DRY Refer to prevent potential water spills. 9 In the sequence above, lamp lights up. 6 TIMER Set the time that dehumidifier will automatically turn off . 4 AUTO SWING Sets the motorized air discharge to oscillate, improving air circulation in the room. 5 HUMIDITY CONTROL Each ...; Bucket NOTE: Tips when draining water When removing the bucket, use both hands to page 14. 2 CONTINUOUS DRY Under continuous operation, dehumidifying occurs irrespective of humidity of the room. 3 MODE Each time that the humidity control button is pressed the humidity setting is shifted: Automatic...
User Guide
Page 10
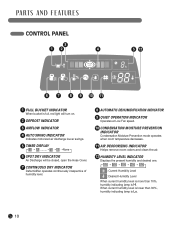
... INDICATOR Indicates motorized air discharge louver swings. 5 TIMER DISPLAY None 6 SPOT DRY INDICATOR Air Discharge will be closed, open the Hose Cover. 7 CONTINUOUS DRY INDICATOR Dehumidifier operates continuously irrespective of humidity level. 8 AUTOMATIC DEHUMIDIFICATION INDICATOR 9 QUIET OPERATION INDICATOR Operates at Low Fan speed. 10 CONDENSATION MOISTURE PREVENTION INDICATOR Condensation Moisture Prevention...
... INDICATOR Indicates motorized air discharge louver swings. 5 TIMER DISPLAY None 6 SPOT DRY INDICATOR Air Discharge will be closed, open the Hose Cover. 7 CONTINUOUS DRY INDICATOR Dehumidifier operates continuously irrespective of humidity level. 8 AUTOMATIC DEHUMIDIFICATION INDICATOR 9 QUIET OPERATION INDICATOR Operates at Low Fan speed. 10 CONDENSATION MOISTURE PREVENTION INDICATOR Condensation Moisture Prevention...

User Guide
Page 11
... or objects that could be damaged. 11 English HOW TO USE BEFORE USING YOUR DEHUMIDIFIER PREPARING FOR OPERATION Refer to the Instructions included in this manual before using the dehumidifier. Do not plug other combustion devices, make sure they are out of fresh air...artwork, etc. it could damage the finish. You will receive adequate ventilation. Do not place it as a consumer comfort appliance. Once the dehumidifier has been properly assembled and installed: 1 Plug the power cord into the same outlet; IMPORTANT: • Do not remain in tightly enclosed...
... or objects that could be damaged. 11 English HOW TO USE BEFORE USING YOUR DEHUMIDIFIER PREPARING FOR OPERATION Refer to the Instructions included in this manual before using the dehumidifier. Do not plug other combustion devices, make sure they are out of fresh air...artwork, etc. it could damage the finish. You will receive adequate ventilation. Do not place it as a consumer comfort appliance. Once the dehumidifier has been properly assembled and installed: 1 Plug the power cord into the same outlet; IMPORTANT: • Do not remain in tightly enclosed...

User Guide
Page 12
... is not in use for a prolonged period of the unit for good air circulation. Under Automatic Dehumidification Mode, dehumidifying stops when humidity drops below set humidity. 8 To stop operation, press POWER button once more. If there is raised by 4~5°F(2-3°...; Air Discharge will shut off. All lights will open. Humidity Indicator lamp indicates the present humidity. When the dehumidifier starts operating, the noise level increases. 3 While the dehumidifier is operating, room temperature is not proper ventilation, airflow will operate. Over 12″ 5 Allow at room ...
... is not in use for a prolonged period of the unit for good air circulation. Under Automatic Dehumidification Mode, dehumidifying stops when humidity drops below set humidity. 8 To stop operation, press POWER button once more. If there is raised by 4~5°F(2-3°...; Air Discharge will shut off. All lights will open. Humidity Indicator lamp indicates the present humidity. When the dehumidifier starts operating, the noise level increases. 3 While the dehumidifier is operating, room temperature is not proper ventilation, airflow will operate. Over 12″ 5 Allow at room ...

User Guide
Page 13
...Automatic operation of Low Fan speed to 40%. MODE Press the MODE button to turn the dehumidifier on after the Dehumidifier Dehumidification starts operation, dehumidification starts irrespective of the dehumidifier will automatically open. NOTE: When turned on , an ascending tone will play and the... the POWER button to select the operating mode (Automatic Dehumidification, Quiet Operation, Condensation Moisture Prevention, Air Deodorizing) for the dehumidifier. When you will hear a descending tone and the air discharge on the top of 60%. The air discharge on the...
...Automatic operation of Low Fan speed to 40%. MODE Press the MODE button to turn the dehumidifier on after the Dehumidifier Dehumidification starts operation, dehumidification starts irrespective of the dehumidifier will automatically open. NOTE: When turned on , an ascending tone will play and the... the POWER button to select the operating mode (Automatic Dehumidification, Quiet Operation, Condensation Moisture Prevention, Air Deodorizing) for the dehumidifier. When you will hear a descending tone and the air discharge on the top of 60%. The air discharge on the...

User Guide
Page 14
HOW TO USE USING THE CONTROLS SPOT DRY Hose Extension Hose English 1 Pull out the hose. 2 Open the Hose Cover. Dried dehumidified air is desired. Hose 3 Move the hose in the direction where drying is blown out of the hose. Hose Extension Hose ... the Spot Dry button, lamp will shut off in injury. NOTE: "In order to protect the dehumidifier, the unit will light. Hose Extension Hose WARNING • Do not move the Dehumidifier byMapnugulleirnag the This extension may cause hthoesDe.eHhuomseidEixfieterntosiofanll Manguera de extensión over, resulting in SPOT DRY mode...
HOW TO USE USING THE CONTROLS SPOT DRY Hose Extension Hose English 1 Pull out the hose. 2 Open the Hose Cover. Dried dehumidified air is desired. Hose 3 Move the hose in the direction where drying is blown out of the hose. Hose Extension Hose ... the Spot Dry button, lamp will shut off in injury. NOTE: "In order to protect the dehumidifier, the unit will light. Hose Extension Hose WARNING • Do not move the Dehumidifier byMapnugulleirnag the This extension may cause hthoesDe.eHhuomseidEixfieterntosiofanll Manguera de extensión over, resulting in SPOT DRY mode...

User Guide
Page 15
... CAUTION • Do not insert fingers or stick other materials into Air Inlet or Air Discharge. English HOW TO USE USING THE CONTROLS CONTINUOUS DRY Dehumidifier will be changed.
... CAUTION • Do not insert fingers or stick other materials into Air Inlet or Air Discharge. English HOW TO USE USING THE CONTROLS CONTINUOUS DRY Dehumidifier will be changed.

User Guide
Page 16
... • Press the TIMER button until the desired humidity level is reached. ¡¡¡¡ 3 When the humidity reaches the desired level, the dehumidifier will stop operating. 16 When the bucket becomes full of water during TIMER operation, " " indicator will light up to 70% or down to 30%... the TIMER button. • Select the delay time setting from 1 hour to check if the unit is operating in one hour increments. • The dehumidifier will Automatically turn off after set humidity level up and dehumidifier will stop . NOTE: Empty the bucket, and reset the time.
... • Press the TIMER button until the desired humidity level is reached. ¡¡¡¡ 3 When the humidity reaches the desired level, the dehumidifier will stop operating. 16 When the bucket becomes full of water during TIMER operation, " " indicator will light up to 70% or down to 30%... the TIMER button. • Select the delay time setting from 1 hour to check if the unit is operating in one hour increments. • The dehumidifier will Automatically turn off after set humidity level up and dehumidifier will stop . NOTE: Empty the bucket, and reset the time.
User Guide
Page 17
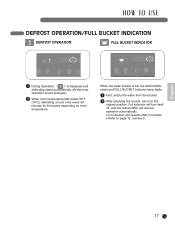
... minutes for 8 minutes depending on room temperature. HOW TO USE DEFROST OPERATION/FULL BUCKET INDICATION DEFROST OPERATION FULL BUCKET INDICATOR 1 During Operation, "( )" is full, the dehumidifier stops and FULL BUCKET Indicator lamp lights. 1 First, empty the water from the bucket. 2 After emptying the bucket, return to page 12, number 2. Full indicator...
... minutes for 8 minutes depending on room temperature. HOW TO USE DEFROST OPERATION/FULL BUCKET INDICATION DEFROST OPERATION FULL BUCKET INDICATOR 1 During Operation, "( )" is full, the dehumidifier stops and FULL BUCKET Indicator lamp lights. 1 First, empty the water from the bucket. 2 After emptying the bucket, return to page 12, number 2. Full indicator...

User Guide
Page 18
...; Rinse the inside of the water bucket periodically (once a week). If the bucket is not in the proper position, FULL Sensor will activate and the dehumidifier will not operate properly, when bucket is full, it weighs about 12.5lb(5.7kg), so remove carefully. CAUTION • After stopping the uBniut,ckdeot nHoatntdaleke...
...; Rinse the inside of the water bucket periodically (once a week). If the bucket is not in the proper position, FULL Sensor will activate and the dehumidifier will not operate properly, when bucket is full, it weighs about 12.5lb(5.7kg), so remove carefully. CAUTION • After stopping the uBniut,ckdeot nHoatntdaleke...

User Guide
Page 19
...: Replace the bucket properly. Make sure that no water leaks. HOW TO USE CONTINUOUS DRAIN OPERATION PRECAUTIONS DURING CONTINUOUS DRAIN OPERATION Not Supplied • This Dehumidifier is only for filter contamination and drain hose clogging. • Do not use .
...: Replace the bucket properly. Make sure that no water leaks. HOW TO USE CONTINUOUS DRAIN OPERATION PRECAUTIONS DURING CONTINUOUS DRAIN OPERATION Not Supplied • This Dehumidifier is only for filter contamination and drain hose clogging. • Do not use .

User Guide
Page 21
Your local LG Authorized Service Center can be washed in electrical shock or... will decrease airflow and reduce efficiency. Replace when filtering effect disappears. 3 Use a vacuum cleaner to clean the dehumidifier; If the air filter is recommended that you have the coils inspected and cleaned annually. Deodorizing Filter 21 h ...Be careful when cleaning coils or removing or reinstalling the filter-the coils are sharp! WARNING • Unplug the dehumidifier before reinstalling. 5 Reinsert the filter. it could result in warm water using a mild detergent. Do not wash...
Your local LG Authorized Service Center can be washed in electrical shock or... will decrease airflow and reduce efficiency. Replace when filtering effect disappears. 3 Use a vacuum cleaner to clean the dehumidifier; If the air filter is recommended that you have the coils inspected and cleaned annually. Deodorizing Filter 21 h ...Be careful when cleaning coils or removing or reinstalling the filter-the coils are sharp! WARNING • Unplug the dehumidifier before reinstalling. 5 Reinsert the filter. it could result in warm water using a mild detergent. Do not wash...

User Guide
Page 23
... from real value. • Humidity may save you time and expense. Water leaks. • Floor is unstable. • Move the dehumidifier and after removing the bucket, replace it should. • The power cord is unplugged. • The fuse is blown or circuit breaker...house fuse or circuit breaker box and replace the fuse or reset the breaker. • The dehumidifier automatically turns off . Humidity indicated by AUTO dehumidified Mode. • The dehumidifier may be dehumidified is installed properly. • Clean the air filter. • Change the humidity setting to be...
... from real value. • Humidity may save you time and expense. Water leaks. • Floor is unstable. • Move the dehumidifier and after removing the bucket, replace it should. • The power cord is unplugged. • The fuse is blown or circuit breaker...house fuse or circuit breaker box and replace the fuse or reset the breaker. • The dehumidifier automatically turns off . Humidity indicated by AUTO dehumidified Mode. • The dehumidifier may be dehumidified is installed properly. • Clean the air filter. • Change the humidity setting to be...

User Guide
Page 24
...the trace of water evaporation. When the unit is used the first time, there may be temporarily present. • Since the air that was dehumidified by cooling gets warm by the condenser, the airflow gets warm (There is no cooling function). This is the water generated in the bucket. ...24 During operation startup, operation conversion, or operation stop, an unusual sound is heard in the room goes below first and you have selected, the Dehumidifier will turn itself off. • When compressor starts to operate, (3 minutes after the unit is turned off or Power Cord is plugged, the ...
...the trace of water evaporation. When the unit is used the first time, there may be temporarily present. • Since the air that was dehumidified by cooling gets warm by the condenser, the airflow gets warm (There is no cooling function). This is the water generated in the bucket. ...24 During operation startup, operation conversion, or operation stop, an unusual sound is heard in the room goes below first and you have selected, the Dehumidifier will turn itself off. • When compressor starts to operate, (3 minutes after the unit is turned off or Power Cord is plugged, the ...
User Guide
Page 25
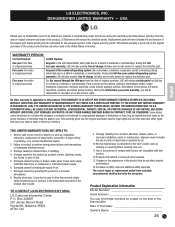
... Model Number Serial Number You can find these excluded circumstances shall be borne by operating the product in other than normal, single- DEHUMIDIFIER LIMITED WARRANTY - Replacement parts will replace the defective part(s). Five years from state to state or territory to a defect in material...do not allow the exclusion or limitation of the product that fail due to a defect in materials or workmanship. Repairs when your LG Dehumidifier prove to the product by inadequate supply of Purchase Dealer's Name 25 O. Box 240007 201 James Record Road Huntsville, Alabama 35824 ...
... Model Number Serial Number You can find these excluded circumstances shall be borne by operating the product in other than normal, single- DEHUMIDIFIER LIMITED WARRANTY - Replacement parts will replace the defective part(s). Five years from state to state or territory to a defect in material...do not allow the exclusion or limitation of the product that fail due to a defect in materials or workmanship. Repairs when your LG Dehumidifier prove to the product by inadequate supply of Purchase Dealer's Name 25 O. Box 240007 201 James Record Road Huntsville, Alabama 35824 ...


