Specification (English)
Page 2
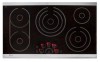
... Cliffs, NJ 07632 800.243.0000 LGusa.com Printed in July 2008 CK-3009 Style and Design LG's premium 30" & 36" radiant cooktops offers the perfect harmony between style and convenience. At a quick glance of Elements 5 5 C O N F I G U R AT I O N Element Configuration 12", 9", 6" / 3.0, 2.2, 1.1kW (Triple) 9", 6" / 3.0, 1.4kW (Dual) 7" / ...Steady Heat Steady Heat Elements Ceramic Glass Ceramic Glass Frame (Trim) Front & Rear Stainless Steel Front & Rear Stainless Steel POWER SOURCE Electric Supply 240V/208V, 60Hz AC 240V/208V, 60Hz AC Max. All other trademarks are property of LG...
... Cliffs, NJ 07632 800.243.0000 LGusa.com Printed in July 2008 CK-3009 Style and Design LG's premium 30" & 36" radiant cooktops offers the perfect harmony between style and convenience. At a quick glance of Elements 5 5 C O N F I G U R AT I O N Element Configuration 12", 9", 6" / 3.0, 2.2, 1.1kW (Triple) 9", 6" / 3.0, 1.4kW (Dual) 7" / ...Steady Heat Steady Heat Elements Ceramic Glass Ceramic Glass Frame (Trim) Front & Rear Stainless Steel Front & Rear Stainless Steel POWER SOURCE Electric Supply 240V/208V, 60Hz AC 240V/208V, 60Hz AC Max. All other trademarks are property of LG...
Owner's Manual (English)
Page 2
...20 Preparing the Installation Location 21 Dimensions and Clearances 22 Preparing the Installation Location 23 Dimensions and Clearances 24 Electrical Connections 25-27 Cooktop Installation 27-28 Final Check 28 TROUBLESHOOTING Before Calling for Service 29-30 WARRANTY Warranty for customers in the... 31 Warranty for customers in this manual, your purchase and welcome to the LG family. Product Registration Information Model: Serial Number: Date of reliable service. Congratulations on your cooktop will provide you with simple operation and stylish design. By following the operating ...
...20 Preparing the Installation Location 21 Dimensions and Clearances 22 Preparing the Installation Location 23 Dimensions and Clearances 24 Electrical Connections 25-27 Cooktop Installation 27-28 Final Check 28 TROUBLESHOOTING Before Calling for Service 29-30 WARRANTY Warranty for customers in the... 31 Warranty for customers in this manual, your purchase and welcome to the LG family. Product Registration Information Model: Serial Number: Date of reliable service. Congratulations on your cooktop will provide you with simple operation and stylish design. By following the operating ...
Owner's Manual (English)
Page 3
.... READ ALL INSTRUCTIONS BEFORE USE ENGLISH WARNING For your safety, the information in this manual must be followed to minimize the risk of fire, electric shock, or to the appliance. • Never modify or alter the construction of an appliance such as removal of panels, wire covers or .... Cooking Zones may be hot from residual heat even though they could be left alone or unattended in use , do not touch or let clothing or other flammable vapors and liquids in cabinets above a cooktop or on or near these areas until they have had sufficient time to a qualified technician. &#...
.... READ ALL INSTRUCTIONS BEFORE USE ENGLISH WARNING For your safety, the information in this manual must be followed to minimize the risk of fire, electric shock, or to the appliance. • Never modify or alter the construction of an appliance such as removal of panels, wire covers or .... Cooking Zones may be hot from residual heat even though they could be left alone or unattended in use , do not touch or let clothing or other flammable vapors and liquids in cabinets above a cooktop or on or near these areas until they have had sufficient time to a qualified technician. &#...
Owner's Manual (English)
Page 4
... a hazard. • The installation and connection of a pot holder. • Do not heat unopened food containers. Buildup of electric shock. Do not let the pot holders touch hot surface units. ELECTRICAL SAFETY WARNING • If the surface is cracked, switch off all cooking zones, and contact... food in suitable cabinets and workplaces which conform to ensure that they have been adequately supervised by certification agencies. • If your COOKTOP until the glass surface has been changed. • When using the appliance. Moist or damp pot holders on grease fires. This ...
... a hazard. • The installation and connection of a pot holder. • Do not heat unopened food containers. Buildup of electric shock. Do not let the pot holders touch hot surface units. ELECTRICAL SAFETY WARNING • If the surface is cracked, switch off all cooking zones, and contact... food in suitable cabinets and workplaces which conform to ensure that they have been adequately supervised by certification agencies. • If your COOKTOP until the glass surface has been changed. • When using the appliance. Moist or damp pot holders on grease fires. This ...
Owner's Manual (English)
Page 5
... than element, a portion of the element will expose a portion of the heating element to direct contact and may result in the risk of electric shock, fire or short circuit. • Glazed cooking utensils: Only certain types of glass, glass/ceramic, ceramic, earthenware, or other use of aluminum foil may result in ignition of the cooktop. Any...
... than element, a portion of the element will expose a portion of the heating element to direct contact and may result in the risk of electric shock, fire or short circuit. • Glazed cooking utensils: Only certain types of glass, glass/ceramic, ceramic, earthenware, or other use of aluminum foil may result in ignition of the cooktop. Any...

Owner's Manual (English)
Page 6
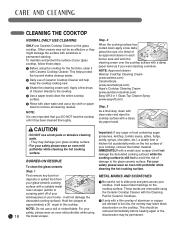
...they can affect the ceramicglass cooktop. (This type of 160°F and poultry to wipe spills on the correct surface unit. • Use only dry potholders. NEVER pick up or move a flaming pan. • Do not use sponges or cloth to at high heat settings. COOK MEAT AND ... For safety reasons, do not clean the appliance with a steam jet or high-pressure cleaner. • Clean the cooktop in accordance with the maintenance and cleaning instructions in the form of the cooktop. • Do not use a towel or other bulky cloth. Do not let the pot holder touch hot heating elements.
...they can affect the ceramicglass cooktop. (This type of 160°F and poultry to wipe spills on the correct surface unit. • Use only dry potholders. NEVER pick up or move a flaming pan. • Do not use sponges or cloth to at high heat settings. COOK MEAT AND ... For safety reasons, do not clean the appliance with a steam jet or high-pressure cleaner. • Clean the cooktop in accordance with the maintenance and cleaning instructions in the form of the cooktop. • Do not use a towel or other bulky cloth. Do not let the pot holder touch hot heating elements.
Owner's Manual (English)
Page 7
...turn on the cooking zones with household rubbish. • You can mark and scratch the cooktop surface. • Refer to the owners manual for the first time, apply the recommended cooktop cleaning creme to the ceramic surface. If any dirt build up immediately. Always use cookware.... Keep meltable objects or materials away from your cooktop for proper cleaning and maintenance of the cooktop. • Do not use the glass cooktop surface as a worksurface or storage space. • Please be a source of danger. It can cause scratches on the element. • Ceramic glass is used on ...
...turn on the cooking zones with household rubbish. • You can mark and scratch the cooktop surface. • Refer to the owners manual for the first time, apply the recommended cooktop cleaning creme to the ceramic surface. If any dirt build up immediately. Always use cookware.... Keep meltable objects or materials away from your cooktop for proper cleaning and maintenance of the cooktop. • Do not use the glass cooktop surface as a worksurface or storage space. • Please be a source of danger. It can cause scratches on the element. • Ceramic glass is used on ...
Owner's Manual (English)
Page 9
.... • Switch off the cooking zones before you switch on the Cooking Zone. • Dirty cooking zones and cookware use the residual heat for keeping food warm or for proper cookware type and size. This will help reduce the possibility of the cooking time to use more... electricity. • Whenever possible, always have the same size as the cooking zone. • Using a pressure cooker shortens the cooking times by your ceramic cooktop surface. TIPS FOR SAVING ENERGY: • Always position pots and pans ...
.... • Switch off the cooking zones before you switch on the Cooking Zone. • Dirty cooking zones and cookware use the residual heat for keeping food warm or for proper cookware type and size. This will help reduce the possibility of the cooking time to use more... electricity. • Whenever possible, always have the same size as the cooking zone. • Using a pressure cooker shortens the cooking times by your ceramic cooktop surface. TIPS FOR SAVING ENERGY: • Always position pots and pans ...
Owner's Manual (English)
Page 10
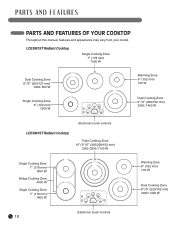
...) 1900 / 950 W Single Cooking Zone 6" (152 mm) 1200 W Warming Zone 6" (152 mm) 100 W Dual Cooking Zone 9"/6" (229/152 mm) 3000 / 1400 W Electronic touch controls LCE3681ST Radiant Cooktop Triple Cooking Zone 12"/9"/6" (305/229/152 mm) 3000 / 2200 / 1100 W Single Cooking Zone 7" (178 mm) 1800 W Bridge Cooking Zone 4400 W Single Cooking Zone 7" (178...
...) 1900 / 950 W Single Cooking Zone 6" (152 mm) 1200 W Warming Zone 6" (152 mm) 100 W Dual Cooking Zone 9"/6" (229/152 mm) 3000 / 1400 W Electronic touch controls LCE3681ST Radiant Cooktop Triple Cooking Zone 12"/9"/6" (305/229/152 mm) 3000 / 2200 / 1100 W Single Cooking Zone 7" (178 mm) 1800 W Bridge Cooking Zone 4400 W Single Cooking Zone 7" (178...
Owner's Manual (English)
Page 11
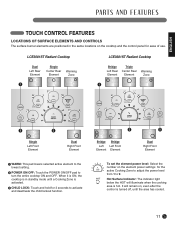
... remain on, even after the control is hot. LCE3081ST Radiant Cooktop LCE3681ST Radiant Cooktop Dual Left Rear Element Single Center Rear Element Warming Zone 1 Bridge Left Rear Element Triple Center Rear Element Warming Zone 1 3 Single Left Front Element 2 Dual Right Front Element ᕡ WARM: This pad lowers selected active element to the lowest setting. ᕢ POWER ON/OFF: Touch the...
... remain on, even after the control is hot. LCE3081ST Radiant Cooktop LCE3681ST Radiant Cooktop Dual Left Rear Element Single Center Rear Element Warming Zone 1 Bridge Left Rear Element Triple Center Rear Element Warming Zone 1 3 Single Left Front Element 2 Dual Right Front Element ᕡ WARM: This pad lowers selected active element to the lowest setting. ᕢ POWER ON/OFF: Touch the...
Owner's Manual (English)
Page 12
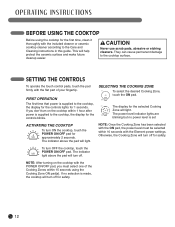
...seconds. The display for safety. 12 BEFORE USING THE COOKTOP Before using the Cooking Zone ON pad(s). SETTING THE CONTROLS To operate the touch control pads, touch the pad firmly with the Element power settings. To turn ON the cooktop, touch the POWER ON/OFF pad for safety. ...They can cause permanent damage to the cooktop, the display for the controls blinks. Otherwise, the Cooking Zone will light...
...seconds. The display for safety. 12 BEFORE USING THE COOKTOP Before using the Cooking Zone ON pad(s). SETTING THE CONTROLS To operate the touch control pads, touch the pad firmly with the Element power settings. To turn ON the cooktop, touch the POWER ON/OFF pad for safety. ...They can cause permanent damage to the cooktop, the display for the controls blinks. Otherwise, the Cooking Zone will light...

Owner's Manual (English)
Page 13
... ᕡ Select the number on the element power settings for each Cooking Zone. To turn OFF the Cooking Zone: ᕡ After the cooking is selected, all Cooking Zones will activate the Cook Zone. WARNING Your cooktop has a residual heat indicator for the active Cooking Zone to ...flash once and lock your selection. After activating the Cook Zone, the indicator lights will stay lit until the cooktop has cooled down. Setting Function Used for 9 Fast heating Bringing liquids to -serve meals. 1-2 Warm Melting Fluffy omelettes, keeping dishes warm, melting butter or chocolate....
... ᕡ Select the number on the element power settings for each Cooking Zone. To turn OFF the Cooking Zone: ᕡ After the cooking is selected, all Cooking Zones will activate the Cook Zone. WARNING Your cooktop has a residual heat indicator for the active Cooking Zone to ...flash once and lock your selection. After activating the Cook Zone, the indicator lights will stay lit until the cooktop has cooled down. Setting Function Used for 9 Fast heating Bringing liquids to -serve meals. 1-2 Warm Melting Fluffy omelettes, keeping dishes warm, melting butter or chocolate....
Owner's Manual (English)
Page 14
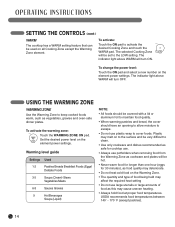
... zone: Touch the WARMING ZONE ON pad. SETTING THE CONTROLS (cont.) WARM The cooktop has a WARM setting feature that can be set to the LOW setting. Plastic may affect the required heat setting • Do not use potholders when removing food from the Warming Zone as ...of food as vegetables, gravies and oven-safe dinner plates. To change the power level: Touch the ON pad and select a new number on the element power settings. Warming level guide Settings Used 1-2 Pastries Breads Breakfast Foods (Eggs) Delicate Foods 3-5 Soups (Cream) Stews Vegetables Meats 6-8 Sauces Gravies ...
... zone: Touch the WARMING ZONE ON pad. SETTING THE CONTROLS (cont.) WARM The cooktop has a WARM setting feature that can be set to the LOW setting. Plastic may affect the required heat setting • Do not use potholders when removing food from the Warming Zone as ...of food as vegetables, gravies and oven-safe dinner plates. To change the power level: Touch the ON pad and select a new number on the element power settings. Warming level guide Settings Used 1-2 Pastries Breads Breakfast Foods (Eggs) Delicate Foods 3-5 Soups (Cream) Stews Vegetables Meats 6-8 Sauces Gravies ...

Owner's Manual (English)
Page 17
... actual power level at any time when it is not OFF, touch and hold the CHILD LOCK pad for approximately 2 seconds. SETTING CHILD LOCK The cooktop must be used normally. If it is not in constant use . The indicator above the CHILD LOCK pad will turn on accidentally. The indicator light... above the POWER pad will turn OFF. To prevent the cooktop from being turned on to set the CHILD LOCK function. ENGLISH USING CHILD LOCK You can now be OFF to indicate that the...
... actual power level at any time when it is not OFF, touch and hold the CHILD LOCK pad for approximately 2 seconds. SETTING CHILD LOCK The cooktop must be used normally. If it is not in constant use . The indicator above the CHILD LOCK pad will turn on accidentally. The indicator light... above the POWER pad will turn OFF. To prevent the cooktop from being turned on to set the CHILD LOCK function. ENGLISH USING CHILD LOCK You can now be OFF to indicate that the...
Owner's Manual (English)
Page 18
... surface with scratches or permanent staining. They may be as if you DO NOT heat the cooktop until it has been cleaned thoroughly. To maintain and protect the surface of your glass cooktop, follow these steps: ᕡ Before using 18 the metal scraper. For your ... Spray (www.easyoff.com). This should be removed immediately before heating again or the discoloration may damage your glass cooktop surface. • For your safety, please wear an oven mitt potholder while using the cooktop for Ceramic Cooktops. BURNED-ON RESIDUE To clean the glass-ceramic Step. 1 ...
... surface with scratches or permanent staining. They may be as if you DO NOT heat the cooktop until it has been cleaned thoroughly. To maintain and protect the surface of your glass cooktop, follow these steps: ᕡ Before using 18 the metal scraper. For your ... Spray (www.easyoff.com). This should be removed immediately before heating again or the discoloration may damage your glass cooktop surface. • For your safety, please wear an oven mitt potholder while using the cooktop for Ceramic Cooktops. BURNED-ON RESIDUE To clean the glass-ceramic Step. 1 ...
Owner's Manual (English)
Page 19
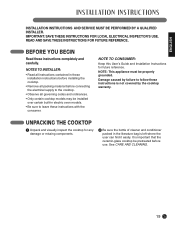
... MUST BE PERFORMED BY A QUALIFIED INSTALLER. IMPORTANT: SAVE THESE INSTRUCTIONS FOR LOCAL ELECTRICAL INSPECTOR'S USE. See CARE AND CLEANING. 19 UNPACKING THE COOKTOP ᕡ Unpack and visually inspect the cooktop for future reference. BEFORE YOU BEGIN Read these instructions with the consumer. NOTE...: This appliance must be installed over certain built-in electric oven models. • Be sure to follow these installation instructions before installing the cooktop. • Remove all instructions contained in the literature bag is not covered by...
... MUST BE PERFORMED BY A QUALIFIED INSTALLER. IMPORTANT: SAVE THESE INSTRUCTIONS FOR LOCAL ELECTRICAL INSPECTOR'S USE. See CARE AND CLEANING. 19 UNPACKING THE COOKTOP ᕡ Unpack and visually inspect the cooktop for future reference. BEFORE YOU BEGIN Read these instructions with the consumer. NOTE...: This appliance must be installed over certain built-in electric oven models. • Be sure to follow these installation instructions before installing the cooktop. • Remove all instructions contained in the literature bag is not covered by...
Owner's Manual (English)
Page 20
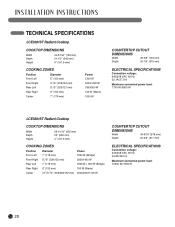
...W (Warm) 1500 W COUNTERTOP CUTOUT DIMENSIONS Width 29-3/8" (746 mm) Depth 20-1/4" (515 mm) ELECTRICAL SPECIFICATIONS Connection voltage: 240/208 VAC 60 Hz. 32.1A/ 27.9 A Maximum connected power load: 7700 W/ 5800 W LCE3681ST Radiant Cooktop COOKTOP DIMENSIONS Width Depth Height 36-11/16" (932 mm) 22" (559 mm) 4" (101.6 mm)... Center 12"/9"/6" (305/229/152 mm) 3000/2200/1100 W COUNTERTOP CUTOUT DIMENSIONS Width 34-9/16" (878 mm) Depth 20-3/8" (517 mm) ELECTRICAL SPECIFICATIONS Connection voltage: 240/208 VAC 60 Hz. 43.8A/ 38.0 A Maximum connected power load: 10500 W/ 7900 W 20
...W (Warm) 1500 W COUNTERTOP CUTOUT DIMENSIONS Width 29-3/8" (746 mm) Depth 20-1/4" (515 mm) ELECTRICAL SPECIFICATIONS Connection voltage: 240/208 VAC 60 Hz. 32.1A/ 27.9 A Maximum connected power load: 7700 W/ 5800 W LCE3681ST Radiant Cooktop COOKTOP DIMENSIONS Width Depth Height 36-11/16" (932 mm) 22" (559 mm) 4" (101.6 mm)... Center 12"/9"/6" (305/229/152 mm) 3000/2200/1100 W COUNTERTOP CUTOUT DIMENSIONS Width 34-9/16" (878 mm) Depth 20-3/8" (517 mm) ELECTRICAL SPECIFICATIONS Connection voltage: 240/208 VAC 60 Hz. 43.8A/ 38.0 A Maximum connected power load: 10500 W/ 7900 W 20
Owner's Manual (English)
Page 21
... off a single phase, threewire or four-wire cable, 240/208 volt, 60 hertz, AC-only electrical supply with ground. • Minimum distance between cooktop and overhead cabinetry is present. Allow 2" (50 mm) space below the armored cable opening to route armored cable if panel is 30" (762 mm). •...; Make sure the cabinets and wall coverings around the cooktop can withstand the temperatures (up to clear the electric cable and allow space for installation of the junction box on the wall at the back of the...
... off a single phase, threewire or four-wire cable, 240/208 volt, 60 hertz, AC-only electrical supply with ground. • Minimum distance between cooktop and overhead cabinetry is present. Allow 2" (50 mm) space below the armored cable opening to route armored cable if panel is 30" (762 mm). •...; Make sure the cabinets and wall coverings around the cooktop can withstand the temperatures (up to clear the electric cable and allow space for installation of the junction box on the wall at the back of the...
Owner's Manual (English)
Page 22
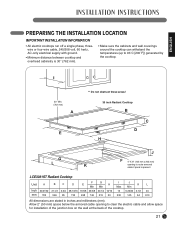
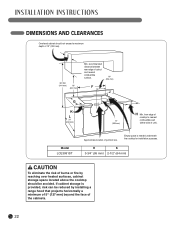
... unit). H K 3-3/4" (95 mm) 2-1/2" (64 mm) CAUTION To eliminate the risk of burns or fire by reaching over heated surfaces, cabinet storage space located above the cooktop should not exceed a maximum depth of 13" (330 mm). DIMENSIONS AND CLEARANCES Overhead cabinet should be reduced by installing a range hood... that projects horizontally a minimum of 5" (127 mm) beyond the face of the cabinets. 22 from edge of cooktop to nearest combustible wall (either side of junction box. I 36" Min (914 mm) 18" (457 mm) Min. If cabinet storage is ...
... unit). H K 3-3/4" (95 mm) 2-1/2" (64 mm) CAUTION To eliminate the risk of burns or fire by reaching over heated surfaces, cabinet storage space located above the cooktop should not exceed a maximum depth of 13" (330 mm). DIMENSIONS AND CLEARANCES Overhead cabinet should be reduced by installing a range hood... that projects horizontally a minimum of 5" (127 mm) beyond the face of the cabinets. 22 from edge of cooktop to nearest combustible wall (either side of junction box. I 36" Min (914 mm) 18" (457 mm) Min. If cabinet storage is ...

Owner's Manual (English)
Page 23
... 20 330 145 64 610 All dimensions are stated in inches and millimeters (mm). LCE3681ST Radiant Cooktop Unit A B C D F G I 30" Min. (762 mm) A E ** Do not obstruct these areas! 36 inch Radiant Cooktop B C D H LG K J F 4" X 8" (102 mm x 203 mm) opening to clear the electric cable and allow space for installation of the junction box on the wall at...
... 20 330 145 64 610 All dimensions are stated in inches and millimeters (mm). LCE3681ST Radiant Cooktop Unit A B C D F G I 30" Min. (762 mm) A E ** Do not obstruct these areas! 36 inch Radiant Cooktop B C D H LG K J F 4" X 8" (102 mm x 203 mm) opening to clear the electric cable and allow space for installation of the junction box on the wall at...

