Owner's Manual (English)
Page 2
... and welcome to the LG family. INTRODUCTION IMPORTANT SAFETY INFORMATION Important Notice: Radio Interference 3 Important Safety Precautions 4-8 INTRODUCTION TO INDUCTION COOKING Induction Cooking 9 Selecting Cookware 9-11 PARTS AND FEATURES Parts and Features of Purchase By following the operating and care instructions in Canada 30 THANK YOU! Congratulations on your cooktop will provide you with...
... and welcome to the LG family. INTRODUCTION IMPORTANT SAFETY INFORMATION Important Notice: Radio Interference 3 Important Safety Precautions 4-8 INTRODUCTION TO INDUCTION COOKING Induction Cooking 9 Selecting Cookware 9-11 PARTS AND FEATURES Parts and Features of Purchase By following the operating and care instructions in Canada 30 THANK YOU! Congratulations on your cooktop will provide you with...

Owner's Manual (English)
Page 3
... of the following measures: • Reorient or relocate the radio and/or television receiving antennae. • Increase the distance between the cooktop unit and radio or television receiver. • Connect the cooktop unit into an outlet or a circuit different from that interference will not occur in a particular installation. This unit generates, uses...
... of the following measures: • Reorient or relocate the radio and/or television receiving antennae. • Increase the distance between the cooktop unit and radio or television receiver. • Connect the cooktop unit into an outlet or a circuit different from that interference will not occur in a particular installation. This unit generates, uses...
Owner's Manual (English)
Page 4
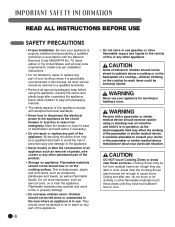
... and damage to children should be stored in the United States, and all tape and packaging wrap before using or standing near an induction unit while it is specifically recommended in use. All other service should be referred to cool. Areas near the appliance. Do not store...The safety aspects of this appliance comply with the National Electrical Code ANSI/NFPA No. 70, latest edition in cabinets above a cooktop or on the cooktop to reach items could be allowed to repair or replace any other flammable materials touch these surfaces. CAUTION DO NOT touch Cooking Zones...
... and damage to children should be stored in the United States, and all tape and packaging wrap before using or standing near an induction unit while it is specifically recommended in use. All other service should be referred to cool. Areas near the appliance. Do not store...The safety aspects of this appliance comply with the National Electrical Code ANSI/NFPA No. 70, latest edition in cabinets above a cooktop or on the cooktop to reach items could be allowed to repair or replace any other flammable materials touch these surfaces. CAUTION DO NOT touch Cooking Zones...

Owner's Manual (English)
Page 5
... not use a towel or other flammable materials contact hot surfaces. • Do not use . Young children should never be worn while using the COOKTOP, never use baking soda, a dry chemical or foam-type extinguisher. • When heating fat or grease, watch it must only be replaced by...containers. Do not let clothing or other bulky cloth instead of the new appliance must be carried out by certification agencies. • If your COOKTOP until the glass surface has been changed. • When using the appliance. Fat or grease may result in aluminum cookware. • If ...
... not use a towel or other flammable materials contact hot surfaces. • Do not use . Young children should never be worn while using the COOKTOP, never use baking soda, a dry chemical or foam-type extinguisher. • When heating fat or grease, watch it must only be replaced by...containers. Do not let clothing or other bulky cloth instead of the new appliance must be carried out by certification agencies. • If your COOKTOP until the glass surface has been changed. • When using the appliance. Fat or grease may result in aluminum cookware. • If ...

Owner's Manual (English)
Page 6
...• Glazed cooking utensils: Only certain types of glass, glass/ceramic, ceramic, earthenware, or other glazed utensils are suitable for cooktop use aluminum foil to line any combustible items or aerosol cans in order to prevent accidental activation of electric shock. Check the manufacturer's... recommendations for rangetop service without a pan present. 6 • Do not place any object on the cooktop controls area. IMPORTANT SAFETY INFORMATION READ ALL INSTRUCTIONS BEFORE USE SAFETY DURING USE • This appliance may only be turned inward and ...
...• Glazed cooking utensils: Only certain types of glass, glass/ceramic, ceramic, earthenware, or other glazed utensils are suitable for cooktop use aluminum foil to line any combustible items or aerosol cans in order to prevent accidental activation of electric shock. Check the manufacturer's... recommendations for rangetop service without a pan present. 6 • Do not place any object on the cooktop controls area. IMPORTANT SAFETY INFORMATION READ ALL INSTRUCTIONS BEFORE USE SAFETY DURING USE • This appliance may only be turned inward and ...

Owner's Manual (English)
Page 7
...may ignite. ENGLISH IMPORTANT SAFETY INFORMATION READ ALL INSTRUCTIONS BEFORE USE SAFETY DURING USE (cont.) • Do not place hot cookware on cold cooktop glass. SAFETY WHEN CLEANING • Always switch off the appliance before cleaning. • For safety reasons, do not clean the appliance with ...a steam jet or high-pressure cleaner. • Clean the cooktop in accordance with the maintenance and cleaning instructions in the form of breakage, fusion, or marking that may cause permanent damage in this manual...
...may ignite. ENGLISH IMPORTANT SAFETY INFORMATION READ ALL INSTRUCTIONS BEFORE USE SAFETY DURING USE (cont.) • Do not place hot cookware on cold cooktop glass. SAFETY WHEN CLEANING • Always switch off the appliance before cleaning. • For safety reasons, do not clean the appliance with ...a steam jet or high-pressure cleaner. • Clean the cooktop in accordance with the maintenance and cleaning instructions in the form of breakage, fusion, or marking that may cause permanent damage in this manual...

Owner's Manual (English)
Page 8
...materials or foodstuffs melt on the ceramic-glass surface, these can be a source of old appliances please make cleaning easier when soiled from your cooktop for example, plastic utensils, aluminum foil, or cooking wraps. To do this, have the cooking zones on glass. • If sugar ...on the glass to cool down, it . • Be very cautious if using your local health council or environmental health office. The special cooktop cleaning cream leaves a protective finish on a hot cooking zone! • Keep meltable objects or materials away from the house circuitry. Moving ...
...materials or foodstuffs melt on the ceramic-glass surface, these can be a source of old appliances please make cleaning easier when soiled from your cooktop for example, plastic utensils, aluminum foil, or cooking wraps. To do this, have the cooking zones on glass. • If sugar ...on the glass to cool down, it . • Be very cautious if using your local health council or environmental health office. The special cooktop cleaning cream leaves a protective finish on a hot cooking zone! • Keep meltable objects or materials away from the house circuitry. Moving ...

Owner's Manual (English)
Page 9
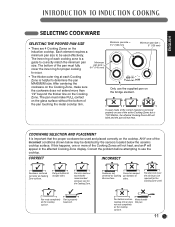
...start the heating process on the Cooking Zones as such. SELECTING COOKWARE The magnetic Cooking Zone sensors located below the cooktop surface require the use with your induction cooktop, you can affect electronic circuits and interfere with a mixed metal base (sandwich base, e.g. In that case ... in the base. • If you are in use a very thin pan. NOTE: Some cookware can also check cookware suitability with induction cooktops. This generates magnetic fields, which act directly on the cooking zone, there is generated directly in any of the pots and pans as ...
...start the heating process on the Cooking Zones as such. SELECTING COOKWARE The magnetic Cooking Zone sensors located below the cooktop surface require the use with your induction cooktop, you can affect electronic circuits and interfere with a mixed metal base (sandwich base, e.g. In that case ... in the base. • If you are in use a very thin pan. NOTE: Some cookware can also check cookware suitability with induction cooktops. This generates magnetic fields, which act directly on the cooking zone, there is generated directly in any of the pots and pans as ...

Owner's Manual (English)
Page 10
...lid firmly placed on your warranty.) • Match the pan size and Cooking Zone to prevent scratching. INTRODUCTION TO INDUCTION COOKING SELECTING COOKWARE (continued) AVOIDING SCRATCHES It is not covered by rotating a ruler across the cooking surface. Low...cooktop surface to the amount of the cooktop. Cookware should always be lifted over the ceramic cooktop can also result from grains of food being prepared. Eventually, the buildup of scratches can scratch the cooktop surface. FOR BEST RESULTS: Always follow the recommendations for flatness by your induction cooktop...
...lid firmly placed on your warranty.) • Match the pan size and Cooking Zone to prevent scratching. INTRODUCTION TO INDUCTION COOKING SELECTING COOKWARE (continued) AVOIDING SCRATCHES It is not covered by rotating a ruler across the cooking surface. Low...cooktop surface to the amount of the cooktop. Cookware should always be lifted over the ceramic cooktop can also result from grains of food being prepared. Eventually, the buildup of scratches can scratch the cooktop surface. FOR BEST RESULTS: Always follow the recommendations for flatness by your induction cooktop...
Owner's Manual (English)
Page 11
..., the affected Cooking Zone LED will blink and the pan will appear in the affected Cooking Zone display. Pan bottom rests on the induction cooktop. If this happens, one of the active Cooking Zones but is properly on any of the incorrect conditions shown below may be used...that the proper cookware be detected by the sensors located below the ceramic cooktop surface. INTRODUCTION TO INDUCTION COOKING ENGLISH SELECTING COOKWARE SELECTING THE PROPER PAN SIZE • There are 4 Cooking Zones on Heavy handle cooktop trim or does tilts pan. Each element requires a minimum pan size ...
..., the affected Cooking Zone LED will blink and the pan will appear in the affected Cooking Zone display. Pan bottom rests on the induction cooktop. If this happens, one of the active Cooking Zones but is properly on any of the incorrect conditions shown below may be used...that the proper cookware be detected by the sensors located below the ceramic cooktop surface. INTRODUCTION TO INDUCTION COOKING ENGLISH SELECTING COOKWARE SELECTING THE PROPER PAN SIZE • There are 4 Cooking Zones on Heavy handle cooktop trim or does tilts pan. Each element requires a minimum pan size ...
Owner's Manual (English)
Page 12
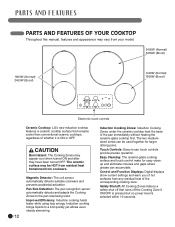
... cooking zone. PARTS AND FEATURES PARTS AND FEATURES OF YOUR COOKTOP Throughout this manual, features and appearance may vary from your model. 2400W (Normal) 3300W (Boost) 1800W (Normal) 2400W (Boost) 1400W (Normal) 1800W (Boost) Electronic touch controls Ceramic Cooktop: LG's new induction cooktop features a ceramic cooktop surface that turns off that remains cooler than conventional ceramic...
... cooking zone. PARTS AND FEATURES PARTS AND FEATURES OF YOUR COOKTOP Throughout this manual, features and appearance may vary from your model. 2400W (Normal) 3300W (Boost) 1800W (Normal) 2400W (Boost) 1400W (Normal) 1800W (Boost) Electronic touch controls Ceramic Cooktop: LG's new induction cooktop features a ceramic cooktop surface that turns off that remains cooler than conventional ceramic...

Owner's Manual (English)
Page 13
... with the or pads for either left Cooking Zones together as a single large Cooking Zone. Use the or pads for 3 seconds to turn the 5 entire cooktop ON and OFF. WARM: This pad automatically lowers the last 4 selected active element to adjust the power level from too and (Boost). When it is... ON, the cooktop is in the display. Use the or pads to adjust the timer. 3 CHILD LOCK: Press and hold for the active Cooking Zone to the lowest...
... with the or pads for either left Cooking Zones together as a single large Cooking Zone. Use the or pads for 3 seconds to turn the 5 entire cooktop ON and OFF. WARM: This pad automatically lowers the last 4 selected active element to adjust the power level from too and (Boost). When it is... ON, the cooktop is in the display. Use the or pads to adjust the timer. 3 CHILD LOCK: Press and hold for the active Cooking Zone to the lowest...

Owner's Manual (English)
Page 14
...the flat part of the Cooking Zones within 5 seconds with the ON/OFF pad, the power level must be selected within 20 seconds using the cooktop for approximately 2 seconds. This will light. The indicator above the pad will remove any help protect the ceramic surface and make future cleanup easier.... If no power level is supplied to the cooktop surface. The display for the selected Cooking Zone will show and and an indicator will light to indicate that power is set. CAUTION Never...
...the flat part of the Cooking Zones within 5 seconds with the ON/OFF pad, the power level must be selected within 20 seconds using the cooktop for approximately 2 seconds. This will light. The indicator above the pad will remove any help protect the ceramic surface and make future cleanup easier.... If no power level is supplied to the cooktop surface. The display for the selected Cooking Zone will show and and an indicator will light to indicate that power is set. CAUTION Never...

Owner's Manual (English)
Page 15
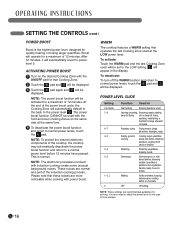
...active Cooking Zone for any reason, a sensor will detect this indicator is still giving off . Touch the or pad of ON/OFF, the entire cooktop will automatically shut off enough heat to cause burns. NOTE: Normal power settings range in 1/2 step increments for power levels from ttoo and (Boost...2 The corresponding cooking zone display witll turn off after 5 seconds. 2 For faster power level adjustments, touch and hold the or pads until the cooktop has cooled down. 15 The display for that this error message, press the ON/OFF pad for the Cooking Zone you were setting. WARNING Your...
...active Cooking Zone for any reason, a sensor will detect this indicator is still giving off . Touch the or pad of ON/OFF, the entire cooktop will automatically shut off enough heat to cause burns. NOTE: Normal power settings range in 1/2 step increments for power levels from ttoo and (Boost...2 The corresponding cooking zone display witll turn off after 5 seconds. 2 For faster power level adjustments, touch and hold the or pads until the cooktop has cooled down. 15 The display for that this error message, press the ON/OFF pad for the Cooking Zone you were setting. WARNING Your...
Owner's Manual (English)
Page 16
...quickly heating or boiling larger quantities. NOTE: To protect the internal electronic components of the induction cooking process. Please note that these noises are normal and part of the cooktop, the cooktop may need to adjust the power level for that operates the last Cooking Zone used ..., heating ready-to power level 9. NOTE: The electronic processes involved with power boost. These noises are more noticeable while cooking with induction cooking create some unusual background noises. will automatically default to the back to the LOW setting. After 12 minutes, it will be ...
...quickly heating or boiling larger quantities. NOTE: To protect the internal electronic components of the induction cooking process. Please note that these noises are normal and part of the cooktop, the cooktop may need to adjust the power level for that operates the last Cooking Zone used ..., heating ready-to power level 9. NOTE: The electronic processes involved with power boost. These noises are more noticeable while cooking with induction cooking create some unusual background noises. will automatically default to the back to the LOW setting. After 12 minutes, it will be ...

Owner's Manual (English)
Page 17
... , the digital display between the timer or pads will begin to count down the remaining time in the display. 2 The timer display will turn the cooktop ON or OFF. You may be set time. NOTE: The timer function is up or down after no pad has been touched for both Cooking...
... , the digital display between the timer or pads will begin to count down the remaining time in the display. 2 The timer display will turn the cooktop ON or OFF. You may be set time. NOTE: The timer function is up or down after no pad has been touched for both Cooking...
Owner's Manual (English)
Page 18
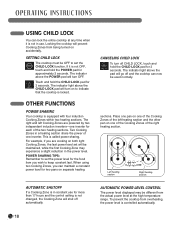
..., touch and hold the CHILD LOCK pad for the food item you are powered by two independent induction inverters-one inverter. POWER SHARING TIPS: Remember to indicate that the cooktop is not changed, the Cooking Zone will go off automatically. The indicator light above the pad will...17 hours and the control setting is locked. Touch and hold the CHILD LOCK pad for approximately 2 seconds. This is equipped with four induction Cooking Zones within two heating sections. sections. Left heating section Right heating section AUTOMATIC SHUTOFF If a Cooking Zone is not in the power...
..., touch and hold the CHILD LOCK pad for the food item you are powered by two independent induction inverters-one inverter. POWER SHARING TIPS: Remember to indicate that the cooktop is not changed, the Cooking Zone will go off automatically. The indicator light above the pad will...17 hours and the control setting is locked. Touch and hold the CHILD LOCK pad for approximately 2 seconds. This is equipped with four induction Cooking Zones within two heating sections. sections. Left heating section Right heating section AUTOMATIC SHUTOFF If a Cooking Zone is not in the power...

Owner's Manual (English)
Page 19
...with a glass scraper and ceramic-glass cleaner. Use care and wear an oven mitt. 2 Then clean the cooktop normally when it has cooled down , warm it is considerably easier than for induction ceramic glass cooking surfaces is warm to the touch or cold. ENGLISH CARE AND CLEANING CLEANING THE... COOKTOP General cleaning for cooking surfaces with radiant heating. REMOVING HEAVY SOIL To remove food that you set...
...with a glass scraper and ceramic-glass cleaner. Use care and wear an oven mitt. 2 Then clean the cooktop normally when it has cooled down , warm it is considerably easier than for induction ceramic glass cooking surfaces is warm to the touch or cold. ENGLISH CARE AND CLEANING CLEANING THE... COOKTOP General cleaning for cooking surfaces with radiant heating. REMOVING HEAVY SOIL To remove food that you set...

Owner's Manual (English)
Page 20
...: 240/208 VAC, 60 Hz. READ AND SAVE THESE INSTRUCTIONS FOR FUTURE REFERENCE. It is important that the ceramic-glass cooktop be properly grounded. BEFORE YOU BEGIN Read these instructions is left where the user can find it easily. Damage caused by ...follow these instructions completely and carefully. NOTE: This appliance must be pretreated before connecting the electrical supply to the cooktop. • Observe all packing material before use. TECHNICAL SPECIFICATIONS COOKTOP DIMENSIONS Width Depth Height 307⁄8″ (783 mm) 211⁄2″ (546 mm) 2 3⁄...
...: 240/208 VAC, 60 Hz. READ AND SAVE THESE INSTRUCTIONS FOR FUTURE REFERENCE. It is important that the ceramic-glass cooktop be properly grounded. BEFORE YOU BEGIN Read these instructions is left where the user can find it easily. Damage caused by ...follow these instructions completely and carefully. NOTE: This appliance must be pretreated before connecting the electrical supply to the cooktop. • Observe all packing material before use. TECHNICAL SPECIFICATIONS COOKTOP DIMENSIONS Width Depth Height 307⁄8″ (783 mm) 211⁄2″ (546 mm) 2 3⁄...

Owner's Manual (English)
Page 21
... armored cable opening to clear the electric cable and allow space for installation of the junction box on the wall at the back of the cooktop. 21 I LM Min Max Min 201/4 203/8 13/16 15/16 24 30 43/16 11/2 24 515 518 20 33 610 762 106 ...) opening to route armored cable if panel is 30″ (76.2 cm). ENGLISH INSTALLATION INSTRUCTIONS PREPARING THE INSTALLATION LOCATION IMPORTANT INSTALLATION INFORMATION • All electric cooktops run off a single phase, three-wire or four-wire cable, 240/208 volt, 60 hertz, AC-only electrical supply with ground. • Minimum distance ...
... armored cable opening to clear the electric cable and allow space for installation of the junction box on the wall at the back of the cooktop. 21 I LM Min Max Min 201/4 203/8 13/16 15/16 24 30 43/16 11/2 24 515 518 20 33 610 762 106 ...) opening to route armored cable if panel is 30″ (76.2 cm). ENGLISH INSTALLATION INSTRUCTIONS PREPARING THE INSTALLATION LOCATION IMPORTANT INSTALLATION INFORMATION • All electric cooktops run off a single phase, three-wire or four-wire cable, 240/208 volt, 60 hertz, AC-only electrical supply with ground. • Minimum distance ...

