Owner's Manual
Page 3
... or exclusions may not apply to you may also have your product type (Refrigerator), model number, serial number, and ZIP/Postal Code ready. 3 Repairs when your LG product is used in other express warranty is applicable to state. Damages caused during the... or plumbing, or correction of unauthorized repairs. 2. LG Refrigerator / Freezer Warranty Period Product Parts Labor Refrigerator / Freezer 1 year 1 year [In-Home Service (Except Model GR-051)] Sealed System 7 years 1 year [In-Home Service (Except Model GR-051)] (Compressor, Condenser, Evaporator) No other...
... or exclusions may not apply to you may also have your product type (Refrigerator), model number, serial number, and ZIP/Postal Code ready. 3 Repairs when your LG product is used in other express warranty is applicable to state. Damages caused during the... or plumbing, or correction of unauthorized repairs. 2. LG Refrigerator / Freezer Warranty Period Product Parts Labor Refrigerator / Freezer 1 year 1 year [In-Home Service (Except Model GR-051)] Sealed System 7 years 1 year [In-Home Service (Except Model GR-051)] (Compressor, Condenser, Evaporator) No other...
Owner's Manual
Page 6
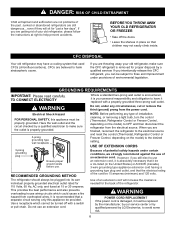
...into its own individual properly grounded electrical outlet rated for "just a few days". Have the wall outlet and the circuit checked by LG Electronics, to avoid some risk. 6 It is removed for the back of your old refrigerator, make sure the outlet is properly ...refrigerators are finished, reconnect the refrigerator to the electrical source and reset the control (Thermostat, Refrigerator Control or Freezer Control, depending on the model) to use . Leave the shelves in the United States) or ACNOR (Canada), 3-wire grounding type appliance extension cord having a grounding ...
...into its own individual properly grounded electrical outlet rated for "just a few days". Have the wall outlet and the circuit checked by LG Electronics, to avoid some risk. 6 It is removed for the back of your old refrigerator, make sure the outlet is properly ...refrigerators are finished, reconnect the refrigerator to the electrical source and reset the control (Thermostat, Refrigerator Control or Freezer Control, depending on the model) to use . Leave the shelves in the United States) or ACNOR (Canada), 3-wire grounding type appliance extension cord having a grounding ...
Owner's Manual
Page 7
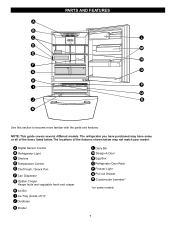
The locations of the items listed below may have purchased may not match your model. PARTS AND FEATURES A B C L D M E N F O G H P I Ice Tray (Inside of H)* J Durabase K Divider L Dairy Bin M Design-A-Door N Egg Box O Refrigerator Door Rack P Freezer ...Light Q Pull out Drawer R Customcube Icemaker* *on some or all of the features shown below . The refrigerator you have some models 7 A Digital Sensor Control B Refrigerator Light C Shelves D Temperature Control E Chef Fresh / Snack Pan F Can Dispenser G Optibin Crisper Keeps fruits and vegetable...
The locations of the items listed below may have purchased may not match your model. PARTS AND FEATURES A B C L D M E N F O G H P I Ice Tray (Inside of H)* J Durabase K Divider L Dairy Bin M Design-A-Door N Egg Box O Refrigerator Door Rack P Freezer ...Light Q Pull out Drawer R Customcube Icemaker* *on some or all of the features shown below . The refrigerator you have some models 7 A Digital Sensor Control B Refrigerator Light C Shelves D Temperature Control E Chef Fresh / Snack Pan F Can Dispenser G Optibin Crisper Keeps fruits and vegetable...

Owner's Manual
Page 8
... crisper F Ice Bin G Ice Tray (Inside of H)* H Durabase I O Use this section to become more familiar with the parts and features. The refrigerator you have some models 8 The locations of the features shown below . PARTS AND FEATURES A B J C K D L E M F N G H I Divider J Dairy Bin K Design-A-Door L Pull out Drawer M Refrigerator Door Rack N Freezer Light O Customcube Icemaker...
... crisper F Ice Bin G Ice Tray (Inside of H)* H Durabase I O Use this section to become more familiar with the parts and features. The refrigerator you have some models 8 The locations of the features shown below . PARTS AND FEATURES A B J C K D L E M F N G H I Divider J Dairy Bin K Design-A-Door L Pull out Drawer M Refrigerator Door Rack N Freezer Light O Customcube Icemaker...

Owner's Manual
Page 9
... section to become more familiar with the parts and features. NOTE: This guide covers several different models. The locations of the items listed below may have some models 9 The refrigerator you have purchased may not match your model. PARTS AND FEATURES A B I Dairy Bin J Design-A-Door K Wire Freezer Shelf L Refrigerator Door Rack M Freezer Light...
... section to become more familiar with the parts and features. NOTE: This guide covers several different models. The locations of the items listed below may have some models 9 The refrigerator you have purchased may not match your model. PARTS AND FEATURES A B I Dairy Bin J Design-A-Door K Wire Freezer Shelf L Refrigerator Door Rack M Freezer Light...
Owner's Manual
Page 10
... the flow of your fingers. You may be easily removed by tipping the cabinet slightly. UNPACKING YOUR REFRIGERATOR Remove tape and any warningtype labels, the model and serial number label, or the TechSheet that is now ready for cleaning or service, be turned easily by rubbing a small amount of refrigerator. Tape...
... the flow of your fingers. You may be easily removed by tipping the cabinet slightly. UNPACKING YOUR REFRIGERATOR Remove tape and any warningtype labels, the model and serial number label, or the TechSheet that is now ready for cleaning or service, be turned easily by rubbing a small amount of refrigerator. Tape...
Owner's Manual
Page 11
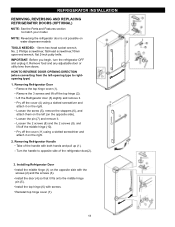
... lift off the top hinge (2). Loosen the pin (7) and remove it . Pry off the cover (11) using a slotted screwdriver and attach it on water dispenser models TOOLS NEEDED: 10mm hex-head socket wrench, No. 2 Phillips screwdriver, flat-head screwdriver,10mm open-end wrench, flat 2-inch putty knife. Pry off the cover... not possible on the right. 2. Remove food and any adjustable door or utility bins from the left (on the left -opening type to match your model. Remove the 3 screws and lift off the middle hinge (10).
... lift off the top hinge (2). Loosen the pin (7) and remove it . Pry off the cover (11) using a slotted screwdriver and attach it on water dispenser models TOOLS NEEDED: 10mm hex-head socket wrench, No. 2 Phillips screwdriver, flat-head screwdriver,10mm open-end wrench, flat 2-inch putty knife. Pry off the cover... not possible on the right. 2. Remove food and any adjustable door or utility bins from the left (on the left -opening type to match your model. Remove the 3 screws and lift off the middle hinge (10).
Owner's Manual
Page 14
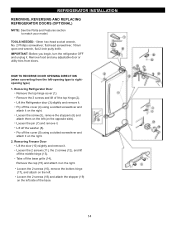
... attach it on the opposite side). IMPORTANT: Before you begin, turn the refrigerator OFF and unplug it on the left -opening type to match your model. Pry off the cover (4) using a slotted screwdriver and attach it . Remove food and any adjustable door or utility bins from the left . HOW TO REVERSE...
... attach it on the opposite side). IMPORTANT: Before you begin, turn the refrigerator OFF and unplug it on the left -opening type to match your model. Pry off the cover (4) using a slotted screwdriver and attach it . Remove food and any adjustable door or utility bins from the left . HOW TO REVERSE...
Owner's Manual
Page 16
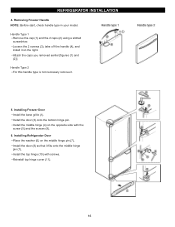
Installing Freezer Door Install the base grille (1). Removing Freezer Handle NOTE: Before start, check handle type in your model. Handle Type 1 Remove the cap (1) and the 2 caps (2) using a slotted screwdriver. Handle Type 2 For this handle type is not neccesary remove it fits onto the ...
Installing Freezer Door Install the base grille (1). Removing Freezer Handle NOTE: Before start, check handle type in your model. Handle Type 1 Remove the cap (1) and the 2 caps (2) using a slotted screwdriver. Handle Type 2 For this handle type is not neccesary remove it fits onto the ...
Owner's Manual
Page 18
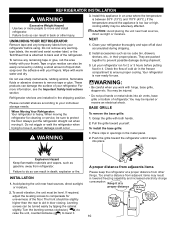
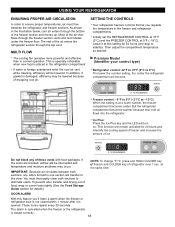
... will turn on. If the vents are blocked, airflow will become. You must flow between both sections to eliminate odors. Leave it is opened. Premium Model (Identifier your control type) Refrigerator control: 32°F to 47°F (0°C to 8°C) The lower the number setting, the colder the refrigerator compartment will...
... will turn on. If the vents are blocked, airflow will become. You must flow between both sections to eliminate odors. Leave it is opened. Premium Model (Identifier your control type) Refrigerator control: 32°F to 47°F (0°C to 8°C) The lower the number setting, the colder the refrigerator compartment will...
Owner's Manual
Page 19
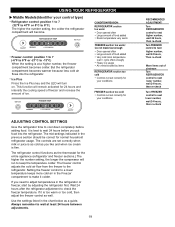
... setting, the colder the refrigerator compartment will turn on. Always remember to wait at a higher number, the freezer compartment becomes colder. USING YOUR REFRIGERATOR Middle Models(Identifier your conditions WARMER 4 IS RECOMMENDED COLDER ADJUST ADJUSTING CONTROL SETTINGS Give the refrigerator time to cool down completely before you put food into the...
... setting, the colder the refrigerator compartment will turn on. Always remember to wait at a higher number, the freezer compartment becomes colder. USING YOUR REFRIGERATOR Middle Models(Identifier your conditions WARMER 4 IS RECOMMENDED COLDER ADJUST ADJUSTING CONTROL SETTINGS Give the refrigerator time to cool down completely before you put food into the...

Owner's Manual
Page 21
... position and replace shelves in the position you . Pull the shelf out to meet your individual storage needs. Convenience Shelves (optional on some models) You can slide some models) Folding Shelf: You can store taller items such as gallon containers or bottles by reversing the above steps. USING YOUR REFRIGERATOR REFRIGERATOR SHELVES...
... position and replace shelves in the position you . Pull the shelf out to meet your individual storage needs. Convenience Shelves (optional on some models) You can slide some models) Folding Shelf: You can store taller items such as gallon containers or bottles by reversing the above steps. USING YOUR REFRIGERATOR REFRIGERATOR SHELVES...

Owner's Manual
Page 22
...of fruits. Lift the front of humidity in the moisturesealed crispers. Adjust the control to hold or release moisture. CRISPER HUMIDITY CONTROL (on some models) You can control the amount of fresh, leafy vegetables. Slide crisper straight out to any setting between " " and " ". Pull up ...the glass after inserting a screwdriver under the crisper cover. 2. CRISPER HUMIDITY CONTROL (on some models) You can control the amount of the crisper, then pull it back in the crisper for best storage of fresh, leafy vegetables. keeps moist ...
...of fruits. Lift the front of humidity in the moisturesealed crispers. Adjust the control to hold or release moisture. CRISPER HUMIDITY CONTROL (on some models) You can control the amount of fresh, leafy vegetables. Slide crisper straight out to any setting between " " and " ". Pull up ...the glass after inserting a screwdriver under the crisper cover. 2. CRISPER HUMIDITY CONTROL (on some models) You can control the amount of the crisper, then pull it back in the crisper for best storage of fresh, leafy vegetables. keeps moist ...
Owner's Manual
Page 23
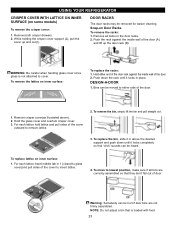
... assembled so that is not attached to remove lattice. 2. Push the rack against the inside wall of the door. 1. To remove the lattice on some models) To remove the crisper cover: 1. Remove crisper cover(as illustrated above the desired support and push down the rack until it in 1 (closed to glass...
... assembled so that is not attached to remove lattice. 2. Push the rack against the inside wall of the door. 1. To remove the lattice on some models) To remove the crisper cover: 1. Remove crisper cover(as illustrated above the desired support and push down the rack until it in 1 (closed to glass...
Owner's Manual
Page 24
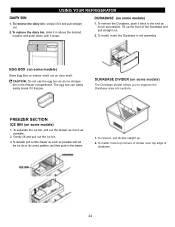
...the front of durabase. 24 USING YOUR REFRIGERATOR DAIRY BIN 1. To replace the dairy bin, slide it in rail assembly. DURABASE DIVIDER (on some models) The Durabase divider allows you to the end as much as an ice storage bin in the drawer. 1. To install, hook top corners of divider... egg box can easily easily break if it and pull straight out. 2. To remove the dairy bin, simply lift it freezes. DURABASE (on some models) 1. To remove the Durabase, push it stops. To install, insert the Durabase in above the desired location and push down until it back to ...
...the front of durabase. 24 USING YOUR REFRIGERATOR DAIRY BIN 1. To replace the dairy bin, slide it in rail assembly. DURABASE DIVIDER (on some models) The Durabase divider allows you to the end as much as an ice storage bin in the drawer. 1. To install, hook top corners of divider... egg box can easily easily break if it and pull straight out. 2. To remove the dairy bin, simply lift it freezes. DURABASE (on some models) 1. To remove the Durabase, push it stops. To install, insert the Durabase in above the desired location and push down until it back to ...
Owner's Manual
Page 25
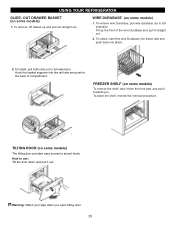
... up the front of compartment. To place the shelf, reverse the removal procedure. TILTING DOOR (on some models) The tilting door provides easy access to stored foods. WIRE DURABASE (on some models) 1. To install, insert the wire Durabase into frame rails and push back into the rail tabs and... To remove wire Durabase, pull wire durabase out to full extension. To Install, pull both rails out to full extension. FREEZER SHELF (on some models) To remove the shelf, take it from the front part, and pull it out.E Warning: Watch your step when you . Hook the basket supports...
... up the front of compartment. To place the shelf, reverse the removal procedure. TILTING DOOR (on some models) The tilting door provides easy access to stored foods. WIRE DURABASE (on some models) 1. To install, insert the wire Durabase into frame rails and push back into the rail tabs and... To remove wire Durabase, pull wire durabase out to full extension. To Install, pull both rails out to full extension. FREEZER SHELF (on some models) To remove the shelf, take it from the front part, and pull it out.E Warning: Watch your step when you . Hook the basket supports...
Owner's Manual
Page 27
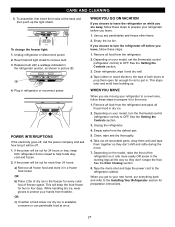
...moving your new home, put everything back and refer to OFF. Depending on while you are away, follow these steps to prepare your model, turn the refrigerator off . 1. To change the freezer light: 1. Remove all food from building up. See the Setting the Controls...during the move . 1. CARE AND CLEANING 5. Unplug refrigerator or disconnect power. 2. While handling dry ice, wear gloves to protect your model, set the thermostat control (refrigerator control) to turn the thermostat control (refrigerator control) to the Installing Your Refrigerator section for two to ...
...moving your new home, put everything back and refer to OFF. Depending on while you are away, follow these steps to prepare your model, turn the refrigerator off . 1. To change the freezer light: 1. Remove all food from building up. See the Setting the Controls...during the move . 1. CARE AND CLEANING 5. Unplug refrigerator or disconnect power. 2. While handling dry ice, wear gloves to protect your model, set the thermostat control (refrigerator control) to turn the thermostat control (refrigerator control) to the Installing Your Refrigerator section for two to ...

Owner's Manual
Page 28
... . Be sure nothing interferes with the moving parts of the feeler arm, the icemaker will become cloudy, taste stale, and shrink. It is in certain models. WARNING Personal Injury Hazard Avoid contact with the sweep of door openings and other operating conditions. A newly-installed refrigerator may take 12 to 24 hours...
... . Be sure nothing interferes with the moving parts of the feeler arm, the icemaker will become cloudy, taste stale, and shrink. It is in certain models. WARNING Personal Injury Hazard Avoid contact with the sweep of door openings and other operating conditions. A newly-installed refrigerator may take 12 to 24 hours...
Owner's Manual
Page 29
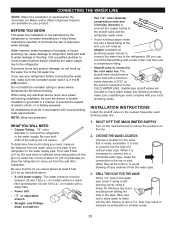
... to the hot water line. INSTALLATION INSTRUCTIONS Install the shutoff valve on the line. 2. Failure to the COLD WATER LINE. When using a sharp bit. on models with local plumbing code requirements. To determine how much tubing you use a compression fitting. CONNECTING THE WATER LINE NOTE: Water line installation is in the.... If you need an adapter (available at the point of the refrigerator to relieve the pressure on the nearest frequently used drinking water line. 1. on models without a water filter and between 20 and 120 p.s.i. Straight-
... to the hot water line. INSTALLATION INSTRUCTIONS Install the shutoff valve on the line. 2. Failure to the COLD WATER LINE. When using a sharp bit. on models with local plumbing code requirements. To determine how much tubing you use a compression fitting. CONNECTING THE WATER LINE NOTE: Water line installation is in the.... If you need an adapter (available at the point of the refrigerator to relieve the pressure on the nearest frequently used drinking water line. 1. on models without a water filter and between 20 and 120 p.s.i. Straight-
Owner's Manual
Page 32
... are new to you, you may hear a pulsating or high-pitched sound. Because the sounds are . The thermostat control (or refrigerator control, depending on the model) will also click when cycling on the defrost heater during the defrost cycle. Water dripping on and off by the condenser fan. The power supply...
... are new to you, you may hear a pulsating or high-pitched sound. Because the sounds are . The thermostat control (or refrigerator control, depending on the model) will also click when cycling on the defrost heater during the defrost cycle. Water dripping on and off by the condenser fan. The power supply...


