Owner's Manual
Page 2
... Grounding Requirements Parts and Features Refrigerator Installation Unpacking Your Refrigerator Installation Base Grille Removing, Reversing and Replacing Your Refrigerator Doors Pull out Drawer Door Closing and Alignment Using Your Refrigerator Ensuring Proper Air Circulation Multi Flow Door Alarm Setting the Controls Adjusting Control Settings Food Storage Guide Storing Frozen Food Refrigerator Shelves Chef Fresh...
... Grounding Requirements Parts and Features Refrigerator Installation Unpacking Your Refrigerator Installation Base Grille Removing, Reversing and Replacing Your Refrigerator Doors Pull out Drawer Door Closing and Alignment Using Your Refrigerator Ensuring Proper Air Circulation Multi Flow Door Alarm Setting the Controls Adjusting Control Settings Food Storage Guide Storing Frozen Food Refrigerator Shelves Chef Fresh...
Owner's Manual
Page 5
..., electric shock, or injury to reduce the chance of injury and tell you don't follow instructions. clearances between the doors and cabinet are damp or wet. Before replacing a burned-out light bulb, unplug the refrigerator or turn off -color should not be refrozen and should be dangerous ... of their quality as described in this use gasoline or other flammable vapors and liquids in the vicinity of Agriculture in . Repair or replace immediately all safety messages. Do not use a cord that have thawed completely. Unplug your refrigerator by the safety alert symbol and the ...
..., electric shock, or injury to reduce the chance of injury and tell you don't follow instructions. clearances between the doors and cabinet are damp or wet. Before replacing a burned-out light bulb, unplug the refrigerator or turn off -color should not be refrozen and should be dangerous ... of their quality as described in this use gasoline or other flammable vapors and liquids in the vicinity of Agriculture in . Repair or replace immediately all safety messages. Do not use a cord that have thawed completely. Unplug your refrigerator by the safety alert symbol and the ...
Owner's Manual
Page 6
...best performance and also prevents overloading house wiring circuits which cannot be properly grounded. WARNING POWER CORD REPLACEMENT If the power cord is damaged, it must be turned off the doors. CFC DISPOSAL Your old refrigerator may not easily climb inside. Have the wall outlet and the ...circuit checked by LG Electronics, to OFF and then disconnect the refrigerator from the electrical source. Use of ...
...best performance and also prevents overloading house wiring circuits which cannot be properly grounded. WARNING POWER CORD REPLACEMENT If the power cord is damaged, it must be turned off the doors. CFC DISPOSAL Your old refrigerator may not easily climb inside. Have the wall outlet and the ...circuit checked by LG Electronics, to OFF and then disconnect the refrigerator from the electrical source. Use of ...
Owner's Manual
Page 11
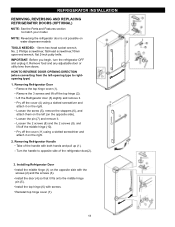
...the 2 screws (9), and lift off the top hinge (2). Reinstall top hinge cover (7). 9 8 10 7 11 REFRIGERATOR INSTALLATION REMOVING, REVERSING AND REPLACING REFRIGERATOR DOORS (OPTIONAL) NOTE: See the Parts and Features section to rightopening type) 1. IMPORTANT: Before you begin, turn the refrigerator OFF and unplug it... fits onto the middle hinge pin (5). Removing Refrigerator Door Remove the top hinge cover (1). Pry off the cover (4) using a slotted screwdriver and attach it on water dispenser models TOOLS...
...the 2 screws (9), and lift off the top hinge (2). Reinstall top hinge cover (7). 9 8 10 7 11 REFRIGERATOR INSTALLATION REMOVING, REVERSING AND REPLACING REFRIGERATOR DOORS (OPTIONAL) NOTE: See the Parts and Features section to rightopening type) 1. IMPORTANT: Before you begin, turn the refrigerator OFF and unplug it... fits onto the middle hinge pin (5). Removing Refrigerator Door Remove the top hinge cover (1). Pry off the cover (4) using a slotted screwdriver and attach it on water dispenser models TOOLS...
Owner's Manual
Page 14
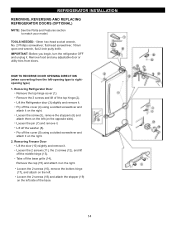
... side). IMPORTANT: Before you begin, turn the refrigerator OFF and unplug it on the right. 2. HOW TO REVERSE DOOR OPENING DIRECT ION (when converting from doors. Remove the cap (15) and attach it . TOOLS NEEDED: 10mm hex-head socket wrench, No. 2 Phillips ... remove the bottom hinge (17), and attach on the right. Removing Freezer Door Lift the door (10) slightly and remove it . Pry off the base grille (14). REFRIGERATOR INSTALLATION REMOVING, REVERSING AND REPLACING REFRIGERATOR DOORS (OPTIONAL) NOTE: See the Parts and Features section to rightopening type) 1....
... side). IMPORTANT: Before you begin, turn the refrigerator OFF and unplug it on the right. 2. HOW TO REVERSE DOOR OPENING DIRECT ION (when converting from doors. Remove the cap (15) and attach it . TOOLS NEEDED: 10mm hex-head socket wrench, No. 2 Phillips ... remove the bottom hinge (17), and attach on the right. Removing Freezer Door Lift the door (10) slightly and remove it . Pry off the base grille (14). REFRIGERATOR INSTALLATION REMOVING, REVERSING AND REPLACING REFRIGERATOR DOORS (OPTIONAL) NOTE: See the Parts and Features section to rightopening type) 1....
Owner's Manual
Page 17
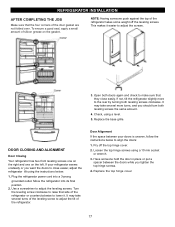
... two front leveling screws one on the right and one on the gasket. Loosen the top hinge screws using a level. 5. Replace the top hinge cover. 17 If your doors is uneven, follow the instructions below : 1. Check, using a 10 mm socket or wrench. 3. Plug the refrigerator power cord...turns of the leveling screw to adjust the tilt of the refrigerator. If not, tilt the refrigerator slightly more turns, and you want the doors to close easily. To ensure a good seal, apply a small amount of silicon grease on the left. REFRIGERATOR INSTALLATION AFTER COMPLETING THE ...
... two front leveling screws one on the right and one on the gasket. Loosen the top hinge screws using a level. 5. Replace the top hinge cover. 17 If your doors is uneven, follow the instructions below : 1. Check, using a 10 mm socket or wrench. 3. Plug the refrigerator power cord...turns of the leveling screw to adjust the tilt of the refrigerator. If not, tilt the refrigerator slightly more turns, and you want the doors to close easily. To ensure a good seal, apply a small amount of silicon grease on the left. REFRIGERATOR INSTALLATION AFTER COMPLETING THE ...

Owner's Manual
Page 21
...items such as gallon containers or bottles by reversing the above steps. Pull the shelf out to sudden temperature changes or impact, such as follows. Replace the shelf by simply sliding the shelf back. Then lower the front of (1) and lift it stops. Tilt the front of the shelf up the...and pull it will also reduce the amount of (2). To slide shelf in, push shelf in until it in the direction of time the refrigerator door is open, saving energy. Lift up and guide the shelf hooks into small pebblesized pieces. Use special care when removing them to the other. ...
...items such as gallon containers or bottles by reversing the above steps. Pull the shelf out to sudden temperature changes or impact, such as follows. Replace the shelf by simply sliding the shelf back. Then lower the front of (1) and lift it stops. Tilt the front of the shelf up the...and pull it will also reduce the amount of (2). To slide shelf in, push shelf in until it in the direction of time the refrigerator door is open, saving energy. Lift up and guide the shelf hooks into small pebblesized pieces. Use special care when removing them to the other. ...
Owner's Manual
Page 23
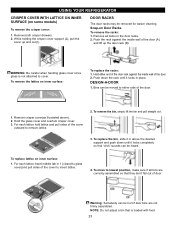
... of the cover to insert lattice. 4. For each lattice insert middle tab in above ). 2. To replace the bin, slide it in 1 (closed to glass cover)and pull sides of door. Snap-on some models) To remove the crisper cover: 1. Remove crisper cover(as illustrated above the ...push down the rack until it locks in the door racks. 2. Hold either side of the door (A) and lift up and out(1). Hold the glass cover and overtum crisper cover. 3. To replace lattice on inner surface: To replace the racks: 1. DOOR RACKS The door racks may be moved to remove lattice. 2....
... of the cover to insert lattice. 4. For each lattice insert middle tab in above ). 2. To replace the bin, slide it in 1 (closed to glass cover)and pull sides of door. Snap-on some models) To remove the crisper cover: 1. Remove crisper cover(as illustrated above the ...push down the rack until it locks in the door racks. 2. Hold either side of the door (A) and lift up and out(1). Hold the glass cover and overtum crisper cover. 3. To replace lattice on inner surface: To replace the racks: 1. DOOR RACKS The door racks may be moved to remove lattice. 2....
Owner's Manual
Page 24
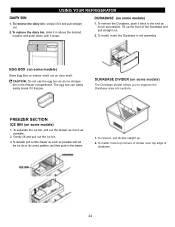
... the drawer as much as an ice storage bin in above the desired location and push down until it stops. Tilt up . 2. EGG BOX (on door shelf. To remove the Durabase, push it in the freezer compartment. To separate the ice bin, pull out the drawer as much as possible. 2. To.... CAUTION: Do not use the egg box as possible and set the ice bin in its correct position, and then push in rail assembly. To replace the dairy bin, slide it back to organize the Durabase area into sections. FREEZER SECTION ICE BIN (on some models) 1. DURABASE (on some models...
... the drawer as much as an ice storage bin in above the desired location and push down until it stops. Tilt up . 2. EGG BOX (on door shelf. To remove the Durabase, push it in the freezer compartment. To separate the ice bin, pull out the drawer as much as possible. 2. To.... CAUTION: Do not use the egg box as possible and set the ice bin in its correct position, and then push in rail assembly. To replace the dairy bin, slide it back to organize the Durabase area into sections. FREEZER SECTION ICE BIN (on some models) 1. DURABASE (on some models...

Owner's Manual
Page 26
...plastic parts. Do not use cleaning waxes, concentrated detergents, bleaches, or cleaners containing petroleum plastic parts. Vacuum coils when dusty or dirty. Replace grille base. Unplug the power cord from the outlet. 2. GENERAL CLEANING TIPS Unplug refrigerator or disconnect power. Mix 2 tablespoons baking soda... to 1 quart of water (26 g soda to the light circuit. DOOR LINERS AND GASKETS Do not use abrasive or harsh cleaners. NOTE: Moving the control to the OFF position does not remove power to ...
...plastic parts. Do not use cleaning waxes, concentrated detergents, bleaches, or cleaners containing petroleum plastic parts. Vacuum coils when dusty or dirty. Replace grille base. Unplug the power cord from the outlet. 2. GENERAL CLEANING TIPS Unplug refrigerator or disconnect power. Mix 2 tablespoons baking soda... to 1 quart of water (26 g soda to the light circuit. DOOR LINERS AND GASKETS Do not use abrasive or harsh cleaners. NOTE: Moving the control to the OFF position does not remove power to ...
Owner's Manual
Page 27
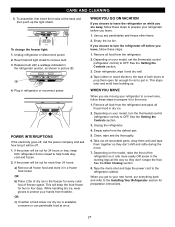
...Unplug refrigerator or disconnect power. 2. See the Setting the Controls section. 3. Unplug the refrigerator. 4. Take out all frozen food in . Tape the doors shut and tape the power cord to remove bulb. 3. Remove all the way so they don't shift and rattle during the move . 1. Depending... and store it and dry well. 4. Depending on the model, raise the front of freezer space. Clean, wipe and dry thoroughly. 6. Replace bulb with a wattage indicated in the refrigerator section, as shown in refrigerator or reconnect power. If the power will keep the food frozen for...
...Unplug refrigerator or disconnect power. 2. See the Setting the Controls section. 3. Unplug the refrigerator. 4. Take out all frozen food in . Tape the doors shut and tape the power cord to remove bulb. 3. Remove all the way so they don't shift and rattle during the move . 1. Depending... and store it and dry well. 4. Depending on the model, raise the front of freezer space. Clean, wipe and dry thoroughly. 6. Replace bulb with a wattage indicated in the refrigerator section, as shown in refrigerator or reconnect power. If the power will keep the food frozen for...
Owner's Manual
Page 32
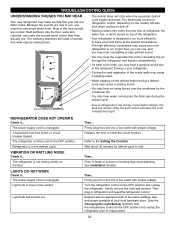
...fuse or reset the circuit breaker. The defrost timer will remain off . You may hear air being forced over the condenser by the door switch activates the inner compartment light. REFRIGERATOR DOES NOT OPERATE Check if... Floor is unplugged. The power supply cord is weak or uneven ... and unplug the refrigerator prior to end. The refrigerator is set to you, you may be concerned about 30 minutes for defrost cycle to replacement. 32 Then... The refrigerator control is not resting solidly on and off by the condenser fan. LIGHTS DO NOT WORK Check if... Firmly ...
...fuse or reset the circuit breaker. The defrost timer will remain off . You may hear air being forced over the condenser by the door switch activates the inner compartment light. REFRIGERATOR DOES NOT OPERATE Check if... Floor is unplugged. The power supply cord is weak or uneven ... and unplug the refrigerator prior to end. The refrigerator is set to you, you may be concerned about 30 minutes for defrost cycle to replacement. 32 Then... The refrigerator control is not resting solidly on and off by the condenser fan. LIGHTS DO NOT WORK Check if... Firmly ...
Owner's Manual
Page 33
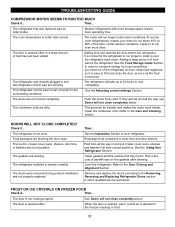
...correctly for the refrigerator to level refrigerator. Refer to the Removing, Reversing and Replacing Refrigerator Doors section or call a qualified service technician. Food packages are sticking. Then... The door is allowed in the freezer resulting in and the refrigerator control was not set ...Using Your Refrigerator Section. If they touch. Modern refrigerators with more storage space require more often. The doors were removed during product installation and not properly replaced. Then... The room temperature is not level. Rub a thin coat of food warms the refrigerator. ...
...correctly for the refrigerator to level refrigerator. Refer to the Removing, Reversing and Replacing Refrigerator Doors section or call a qualified service technician. Food packages are sticking. Then... The door is allowed in the freezer resulting in and the refrigerator control was not set ...Using Your Refrigerator Section. If they touch. Modern refrigerators with more storage space require more often. The doors were removed during product installation and not properly replaced. Then... The room temperature is not level. Rub a thin coat of food warms the refrigerator. ...


