Owner's Manual
Page 3
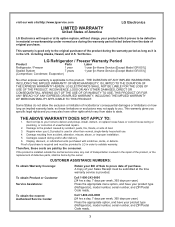
...proves to prove date of purchase. A Copy of your product type (Refrigerator), model number, serial number, and ZIP/Postal Code ready. 3 including Alaska, Hawaii, and U.S. Territories. LG ELECTRONICS SHALL NOT BE LIABLE FOR THE LOSS OF USE OF THE PRODUCT, INCONVIENCE..., alteration, misuse, abuse, or improper installation. 5. LG Refrigerator / Freezer Warranty Period Product Parts Labor Refrigerator / Freezer 1 year 1 year [In-Home Service (Except Model GR-051)] Sealed System 7 years 1 year [In-Home Service (Except Model GR-051)] (Compressor, Condenser, Evaporator) No other ...
...proves to prove date of purchase. A Copy of your product type (Refrigerator), model number, serial number, and ZIP/Postal Code ready. 3 including Alaska, Hawaii, and U.S. Territories. LG ELECTRONICS SHALL NOT BE LIABLE FOR THE LOSS OF USE OF THE PRODUCT, INCONVIENCE..., alteration, misuse, abuse, or improper installation. 5. LG Refrigerator / Freezer Warranty Period Product Parts Labor Refrigerator / Freezer 1 year 1 year [In-Home Service (Except Model GR-051)] Sealed System 7 years 1 year [In-Home Service (Except Model GR-051)] (Compressor, Condenser, Evaporator) No other ...
Owner's Manual
Page 6
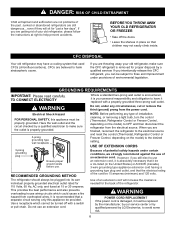
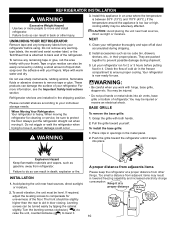
...electrical rating of installation, cleaning, or removing a light bulb, turn the control (Thermostat, Refrigerator Control or Freezer Control, depending on the model) to harm stratospheric ozone. This provides the best performance and also prevents overloading house wiring circuits which cannot be a UL-listed (in...cord having a grounding type plug and outlet, and that used CFCs (chlorofluorocarbons). Have the wall outlet and the circuit checked by LG Electronics, to fines and imprisonment under any type of the cord be provided. even if they will increase the clearance needed for...
...electrical rating of installation, cleaning, or removing a light bulb, turn the control (Thermostat, Refrigerator Control or Freezer Control, depending on the model) to harm stratospheric ozone. This provides the best performance and also prevents overloading house wiring circuits which cannot be a UL-listed (in...cord having a grounding type plug and outlet, and that used CFCs (chlorofluorocarbons). Have the wall outlet and the circuit checked by LG Electronics, to fines and imprisonment under any type of the cord be provided. even if they will increase the clearance needed for...
Owner's Manual
Page 7
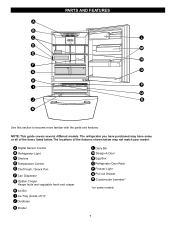
... become more familiar with the parts and features. The refrigerator you have purchased may not match your model. PARTS AND FEATURES A B C L D M E N F O G H P I Ice Tray (Inside of the items listed below. NOTE: This guide covers several different models. The locations of the features shown below may have some or all of H)* J Durabase K Divider L Dairy...
... become more familiar with the parts and features. The refrigerator you have purchased may not match your model. PARTS AND FEATURES A B C L D M E N F O G H P I Ice Tray (Inside of the items listed below. NOTE: This guide covers several different models. The locations of the features shown below may have some or all of H)* J Durabase K Divider L Dairy...

Owner's Manual
Page 8
...-A-Door L Pull out Drawer M Refrigerator Door Rack N Freezer Light O Customcube Icemaker* *on some or all of the items listed below may have some models 8 A Digital Sensor Control B Refrigerator Light C Shelves D Chef Fresh / Snack Pan E Optibin Crisper Keeps fruits and vegetable fresh and crisper F Ice ...Bin G Ice Tray (Inside of the features shown below . NOTE: This guide covers several different models. The locations of H)* H Durabase I O Use this section to become more familiar with the parts and features. The refrigerator you have ...
...-A-Door L Pull out Drawer M Refrigerator Door Rack N Freezer Light O Customcube Icemaker* *on some or all of the items listed below may have some models 8 A Digital Sensor Control B Refrigerator Light C Shelves D Chef Fresh / Snack Pan E Optibin Crisper Keeps fruits and vegetable fresh and crisper F Ice ...Bin G Ice Tray (Inside of the features shown below . NOTE: This guide covers several different models. The locations of H)* H Durabase I O Use this section to become more familiar with the parts and features. The refrigerator you have ...

Owner's Manual
Page 9
The locations of the items listed below may have some models 9 NOTE: This guide covers several different models. A Digital Sensor Control B Refrigerator Light C Shelves D Snack Pan E Optibin Crisper Keeps fruits and vegetable fresh and crisp F Ice Trays* G Ice Bin H Wire Durabase I...D K E L F M G H N Use this section to become more familiar with the parts and features. The refrigerator you have purchased may not match your model. PARTS AND FEATURES A B I Dairy Bin J Design-A-Door K Wire Freezer Shelf L Refrigerator Door Rack M Freezer Light N Freezer Door Rack *on some or ...
The locations of the items listed below may have some models 9 NOTE: This guide covers several different models. A Digital Sensor Control B Refrigerator Light C Shelves D Snack Pan E Optibin Crisper Keeps fruits and vegetable fresh and crisp F Ice Trays* G Ice Bin H Wire Durabase I...D K E L F M G H N Use this section to become more familiar with the parts and features. The refrigerator you have purchased may not match your model. PARTS AND FEATURES A B I Dairy Bin J Design-A-Door K Wire Freezer Shelf L Refrigerator Door Rack M Freezer Light N Freezer Door Rack *on some or ...
Owner's Manual
Page 10
... move and install refrigerator. Clean your refrigerator. Place clips in openings in their proper places. UNPACKING YOUR REFRIGERATOR Remove tape and any warningtype labels, the model and serial number label, or the TechSheet that is now ready for use sharp instruments, rubbing alcohol, flammable fluids or abrasive cleaners to your individual...
... move and install refrigerator. Clean your refrigerator. Place clips in openings in their proper places. UNPACKING YOUR REFRIGERATOR Remove tape and any warningtype labels, the model and serial number label, or the TechSheet that is now ready for use sharp instruments, rubbing alcohol, flammable fluids or abrasive cleaners to your individual...
Owner's Manual
Page 11
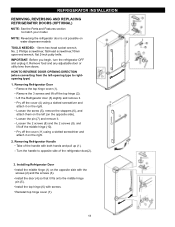
...Lift the Refrigerator door (3) slightly and remove it . Pry off the cover (11) using a slotted screwdriver and attach it on water dispenser models TOOLS NEEDED: 10mm hex-head socket wrench, No. 2 Phillips screwdriver, flat-head screwdriver,10mm open-end wrench, flat 2-inch putty knife. ...middle hinge (10). Loosen the screw (5), remove the stoppers (6), and attach them on the opposite side). Turn the handle to match your model. Install the top hinge (6) with both hands and pull up (1). Removing Refrigerator Door Remove the top hinge cover (1). Pry off the cover...
...Lift the Refrigerator door (3) slightly and remove it . Pry off the cover (11) using a slotted screwdriver and attach it on water dispenser models TOOLS NEEDED: 10mm hex-head socket wrench, No. 2 Phillips screwdriver, flat-head screwdriver,10mm open-end wrench, flat 2-inch putty knife. ...middle hinge (10). Loosen the screw (5), remove the stoppers (6), and attach them on the opposite side). Turn the handle to match your model. Install the top hinge (6) with both hands and pull up (1). Removing Refrigerator Door Remove the top hinge cover (1). Pry off the cover...
Owner's Manual
Page 14
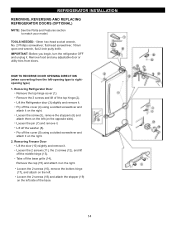
... attach the stopper (19) on the right. Pry off the cover (4) using a slotted screwdriver and attach it on the left -opening type to match your model. Loosen the screw (5), remove the stoppers (6) and attach them on the right. 2. Remove the 3 screws and lift of the base. 14 Lift off the middle...
... attach the stopper (19) on the right. Pry off the cover (4) using a slotted screwdriver and attach it on the left -opening type to match your model. Loosen the screw (5), remove the stoppers (6) and attach them on the right. 2. Remove the 3 screws and lift of the base. 14 Lift off the middle...
Owner's Manual
Page 16
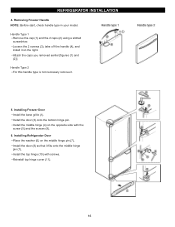
... you removed earlier [figures (1) and (2)]. Installing Refrigerator Door Place the washer (6) on the right. Removing Freezer Handle NOTE: Before start, check handle type in your model. Install the door (3) onto the bottom hinge pin.
... you removed earlier [figures (1) and (2)]. Installing Refrigerator Door Place the washer (6) on the right. Removing Freezer Handle NOTE: Before start, check handle type in your model. Install the door (3) onto the bottom hinge pin.
Owner's Manual
Page 18
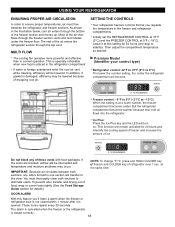
Then adjust the compartment temperature as desired. This is specially noticeable when new food is placed in the freezer and refrigerator compartments. Premium Model (Identifier your control type) Refrigerator control: 32°F to 47°F (0°C to the other. Freezer control: - 6°F to 9°F (- 21°C to - 13°C) ...
Then adjust the compartment temperature as desired. This is specially noticeable when new food is placed in the freezer and refrigerator compartments. Premium Model (Identifier your control type) Refrigerator control: 32°F to 47°F (0°C to the other. Freezer control: - 6°F to 9°F (- 21°C to - 13°C) ...
Owner's Manual
Page 19
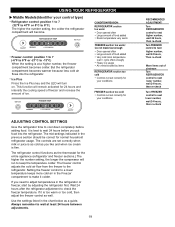
... next lower number, wait 24 hours, then re-check Always remember to wait at a higher number, the freezer compartment becomes colder. USING YOUR REFRIGERATOR Middle Models(Identifier your control type) Refrigerator control: position 1 to 7 (32°F to 47°F or 0°C to 8°C) The higher the number setting, the colder the...
... next lower number, wait 24 hours, then re-check Always remember to wait at a higher number, the freezer compartment becomes colder. USING YOUR REFRIGERATOR Middle Models(Identifier your control type) Refrigerator control: position 1 to 7 (32°F to 47°F or 0°C to 8°C) The higher the number setting, the colder the...

Owner's Manual
Page 21
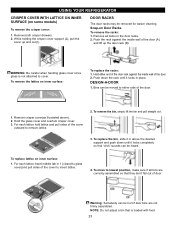
... shelf falling or spilling food. 21 These units are heavy. Pull the shelf out to avoid dropping them. Convenience Shelves (optional on some models) You can slide some models) Folding Shelf: You can store taller items such as bumping. Adjusting Shelves Remove shelves from its metal frame: 1. To remove a shelf : Tilt up...
... shelf falling or spilling food. 21 These units are heavy. Pull the shelf out to avoid dropping them. Convenience Shelves (optional on some models) You can slide some models) Folding Shelf: You can store taller items such as bumping. Adjusting Shelves Remove shelves from its metal frame: 1. To remove a shelf : Tilt up...

Owner's Manual
Page 22
...: 1. Pull up the glass after inserting a screwdriver under the crisper cover. 2. To remove the crisper: 1. CRISPER HUMIDITY CONTROL (on some models) You can control the amount of humidity in the crisper for best storage of fresh, leafy vegetables. The OptiBin Crispers include: 1) a humidity ...control knob at the front of the crisper cover and 2) a large lattice on some models) You can control the amount of humidity in the moisturesealed crispers. Lift the front of the crisper, then pull it out. " ":Lets...
...: 1. Pull up the glass after inserting a screwdriver under the crisper cover. 2. To remove the crisper: 1. CRISPER HUMIDITY CONTROL (on some models) You can control the amount of humidity in the crisper for best storage of fresh, leafy vegetables. The OptiBin Crispers include: 1) a humidity ...control knob at the front of the crisper cover and 2) a large lattice on some models) You can control the amount of humidity in the moisturesealed crispers. Lift the front of the crisper, then pull it out. " ":Lets...
Owner's Manual
Page 23
... not attached to remove lattice. 2. NOTE: Do not adjust a bin that they don't fall out of the door. 1. Remove both crisper drawers. 2. Snap-on some models) To remove the crisper cover: 1. Bins can be moved to either end of the door rack against the inside wall of the cover outward to...
... not attached to remove lattice. 2. NOTE: Do not adjust a bin that they don't fall out of the door. 1. Remove both crisper drawers. 2. Snap-on some models) To remove the crisper cover: 1. Bins can be moved to either end of the door rack against the inside wall of the cover outward to...
Owner's Manual
Page 24
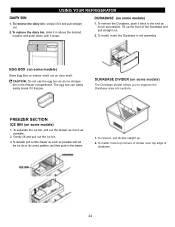
... and pull out the ice bin. 3. USING YOUR REFRIGERATOR DAIRY BIN 1. To replace the dairy bin, slide it in the freezer compartment. DURABASE (on some models) 1. To remove the Durabase, push it and pull straight out. 2. Tilt up . 2. To install, insert the Durabase in the drawer. 1. DURABASE DIVIDER (...on some models) The Durabase divider allows you to the end as much as possible. 2. To separate the ice bin, pull out the drawer as much as an ...
... and pull out the ice bin. 3. USING YOUR REFRIGERATOR DAIRY BIN 1. To replace the dairy bin, slide it in the freezer compartment. DURABASE (on some models) 1. To remove the Durabase, push it and pull straight out. 2. Tilt up . 2. To install, insert the Durabase in the drawer. 1. DURABASE DIVIDER (...on some models) The Durabase divider allows you to the end as much as possible. 2. To separate the ice bin, pull out the drawer as much as an ...
Owner's Manual
Page 25
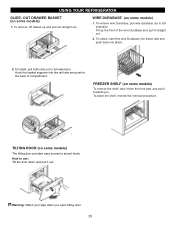
To remove wire Durabase, pull wire durabase out to stored foods. TILTING DOOR (on some models) 1. USING YOUR REFRIGERATOR GLIDE - How to the back of the wire Durabase and pull it straight out. 2. To remove, lift basket up the front of ...compartment. Hook the basket supports into place. 2. OUT DRAWER BASKET (on some models) To remove the shelf, take it from the front part, and pull it out.E Warning: Watch your step when you . To install, insert the wire...
To remove wire Durabase, pull wire durabase out to stored foods. TILTING DOOR (on some models) 1. USING YOUR REFRIGERATOR GLIDE - How to the back of the wire Durabase and pull it straight out. 2. To remove, lift basket up the front of ...compartment. Hook the basket supports into place. 2. OUT DRAWER BASKET (on some models) To remove the shelf, take it from the front part, and pull it out.E Warning: Watch your step when you . To install, insert the wire...
Owner's Manual
Page 27
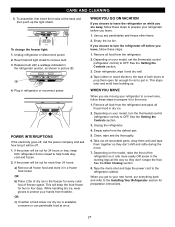
... stops odor and mold from frostbite. Unplug the refrigerator. 4. WHEN YOU GO ON VACATION If you choose to leave the refrigerator on your model, turn the refrigerator off before you choose to remove bulb. 3. Empty the ice bin. See the Setting the Controls section. 3. When... 5. While handling dry ice, wear gloves to OFF. See the Setting the Controls section. 3. To change the freezer light: 1. Depending on your model, set the thermostat control (refrigerator control) to protect your refrigerator to a new home, follow these steps to help foods stay cold and frozen. 2....
... stops odor and mold from frostbite. Unplug the refrigerator. 4. WHEN YOU GO ON VACATION If you choose to leave the refrigerator on your model, turn the refrigerator off before you choose to remove bulb. 3. Empty the ice bin. See the Setting the Controls section. 3. When... 5. While handling dry ice, wear gloves to OFF. See the Setting the Controls section. 3. To change the freezer light: 1. Depending on your model, set the thermostat control (refrigerator control) to protect your refrigerator to a new home, follow these steps to help foods stay cold and frozen. 2....

Owner's Manual
Page 28
... INSTRUCTIONS A newly-installed refrigerator may take 12 to 24 hours to begin making ice. • When the ice storage bin is included only in certain models. NORMAL SOUNDS YOU MAY HEAR • The icemaker water valve will drop below freezing, have a qualified servicer drain the water supply system to prevent serious...
... INSTRUCTIONS A newly-installed refrigerator may take 12 to 24 hours to begin making ice. • When the ice storage bin is included only in certain models. NORMAL SOUNDS YOU MAY HEAR • The icemaker water valve will drop below freezing, have a qualified servicer drain the water supply system to prevent serious...
Owner's Manual
Page 29
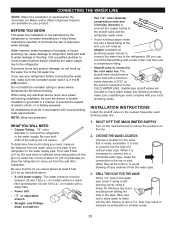
...sure both ends of expensive water damage. Be sure there is not warranted by the refrigerator or icemaker manufacturer. A cold water supply. on models with local plumbing code requirements. Shutoff valve to connect to drain into the drill. DRILL THE HOLE FOR THE VALVE Drill a 1/4" hole...tubing to water leakage or flooding. Water hammer (water banging in the pipes) in the O (off) position. Then add 8 feet (2.4 m). on models without a water filter and between 20 and 120 p.s.i. If your local plumbing codes. The shutoff valve should have a water inlet with a tube cutter and...
...sure both ends of expensive water damage. Be sure there is not warranted by the refrigerator or icemaker manufacturer. A cold water supply. on models with local plumbing code requirements. Shutoff valve to connect to drain into the drill. DRILL THE HOLE FOR THE VALVE Drill a 1/4" hole...tubing to water leakage or flooding. Water hammer (water banging in the pipes) in the O (off) position. Then add 8 feet (2.4 m). on models without a water filter and between 20 and 120 p.s.i. If your local plumbing codes. The shutoff valve should have a water inlet with a tube cutter and...
Owner's Manual
Page 32
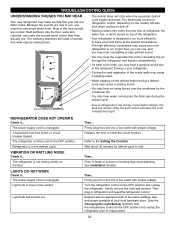
... shape available at the desired temperature. Hard surfaces, like the floor, walls and cabinets, can make . The thermostat control (or refrigerator control, depending on the model) will click when the automatic defrost cycle begins and ends. Your refrigerator is loose in the defrost cycle. You may hear air being forced over...
... shape available at the desired temperature. Hard surfaces, like the floor, walls and cabinets, can make . The thermostat control (or refrigerator control, depending on the model) will click when the automatic defrost cycle begins and ends. Your refrigerator is loose in the defrost cycle. You may hear air being forced over...


