Owner's Manual
Page 2
TABLE OF CONTENTS English Version Spanish Version Warranty (U.S.A.) Safety Instructions Grounding Requirements Parts and Features Refrigerator Installation Unpacking Your Refrigerator Installation Base Grille Removing, Reversing and Replacing Your Refrigerator Doors Pull out Drawer ...Out Drawer Basket Tilting Door Wire Durabase Frezzer Shelf Care and Cleaning General Cleaning Tips Outside Inside Walls Door Liner and Gaskets Plastic Parts Condenser Coils Light Bulb Replacement Power Interruptions When you go on vacation About the Custom Cube Icemaker Connecting the Water Line Troubleshooting ...
TABLE OF CONTENTS English Version Spanish Version Warranty (U.S.A.) Safety Instructions Grounding Requirements Parts and Features Refrigerator Installation Unpacking Your Refrigerator Installation Base Grille Removing, Reversing and Replacing Your Refrigerator Doors Pull out Drawer ...Out Drawer Basket Tilting Door Wire Durabase Frezzer Shelf Care and Cleaning General Cleaning Tips Outside Inside Walls Door Liner and Gaskets Plastic Parts Condenser Coils Light Bulb Replacement Power Interruptions When you go on vacation About the Custom Cube Icemaker Connecting the Water Line Troubleshooting ...
Owner's Manual
Page 3
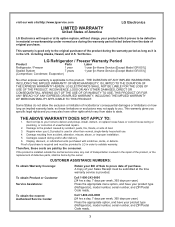
...warranty period as long as it is in the repair of the product, or the replacement of defective parts, shall be submitted at its option replace, without charge, your LG product is used in other than normal, single-family household use during and/or after delivery. 6.... including Alaska, Hawaii, and U.S. LG Refrigerator / Freezer Warranty Period Product Parts Labor Refrigerator / Freezer 1 year 1 year [In-Home Service (Except Model GR-051)] Sealed System 7 years 1 year [In-Home Service (...
...warranty period as long as it is in the repair of the product, or the replacement of defective parts, shall be submitted at its option replace, without charge, your LG product is used in other than normal, single-family household use during and/or after delivery. 6.... including Alaska, Hawaii, and U.S. LG Refrigerator / Freezer Warranty Period Product Parts Labor Refrigerator / Freezer 1 year 1 year [In-Home Service (Except Model GR-051)] Sealed System 7 years 1 year [In-Home Service (...
Owner's Manual
Page 5
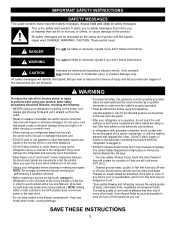
... off power at either or both controls to the OFF position does not remove power to roll over or damage the power cord. When moving parts of fire, electric shock, or injury to persons when using this appliance only for its length or at the circuit breaker or fuse box in...
... off power at either or both controls to the OFF position does not remove power to roll over or damage the power cord. When moving parts of fire, electric shock, or injury to persons when using this appliance only for its length or at the circuit breaker or fuse box in...
Owner's Manual
Page 7
... / Snack Pan F Can Dispenser G Optibin Crisper Keeps fruits and vegetable fresh and crisper H Ice Bin I Q J R K Use this section to become more familiar with the parts and features. PARTS AND FEATURES A B C L D M E N F O G H P I Ice Tray (Inside of the items listed below. The locations of the features shown below may have purchased may not match your...
... / Snack Pan F Can Dispenser G Optibin Crisper Keeps fruits and vegetable fresh and crisper H Ice Bin I Q J R K Use this section to become more familiar with the parts and features. PARTS AND FEATURES A B C L D M E N F O G H P I Ice Tray (Inside of the items listed below. The locations of the features shown below may have purchased may not match your...

Owner's Manual
Page 8
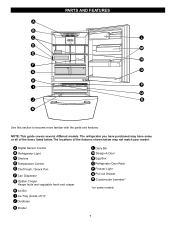
NOTE: This guide covers several different models. The locations of the features shown below . PARTS AND FEATURES A B J C K D L E M F N G H I Divider J Dairy Bin K Design-A-Door L Pull out Drawer M Refrigerator Door Rack N Freezer Light O Customcube Icemaker* *on some or all of the items listed ... E Optibin Crisper Keeps fruits and vegetable fresh and crisper F Ice Bin G Ice Tray (Inside of H)* H Durabase I O Use this section to become more familiar with the parts and features. The refrigerator you have purchased may have some models 8
NOTE: This guide covers several different models. The locations of the features shown below . PARTS AND FEATURES A B J C K D L E M F N G H I Divider J Dairy Bin K Design-A-Door L Pull out Drawer M Refrigerator Door Rack N Freezer Light O Customcube Icemaker* *on some or all of the items listed ... E Optibin Crisper Keeps fruits and vegetable fresh and crisper F Ice Bin G Ice Tray (Inside of H)* H Durabase I O Use this section to become more familiar with the parts and features. The refrigerator you have purchased may have some models 8

Owner's Manual
Page 9
... vegetable fresh and crisp F Ice Trays* G Ice Bin H Wire Durabase I C J D K E L F M G H N Use this section to become more familiar with the parts and features. The refrigerator you have purchased may not match your model. PARTS AND FEATURES A B I Dairy Bin J Design-A-Door K Wire Freezer Shelf L Refrigerator Door Rack M Freezer Light N Freezer Door Rack *on some...
... vegetable fresh and crisp F Ice Trays* G Ice Bin H Wire Durabase I C J D K E L F M G H N Use this section to become more familiar with the parts and features. The refrigerator you have purchased may not match your model. PARTS AND FEATURES A B I Dairy Bin J Design-A-Door K Wire Freezer Shelf L Refrigerator Door Rack M Freezer Light N Freezer Door Rack *on some...
Owner's Manual
Page 11
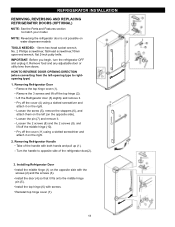
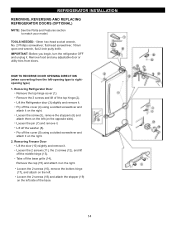
... refrigerator door(2). 11 2 1 3. Install the top hinge (6) with both hands and pull up (1). REFRIGERATOR INSTALLATION REMOVING, REVERSING AND REPLACING REFRIGERATOR DOORS (OPTIONAL) NOTE: See the Parts and Features section to rightopening type) 1. Remove the 3 screws and lift off the middle hinge (10). Pry off the cover (11) using a slotted screwdriver and...
... refrigerator door(2). 11 2 1 3. Install the top hinge (6) with both hands and pull up (1). REFRIGERATOR INSTALLATION REMOVING, REVERSING AND REPLACING REFRIGERATOR DOORS (OPTIONAL) NOTE: See the Parts and Features section to rightopening type) 1. Remove the 3 screws and lift off the middle hinge (10). Pry off the cover (11) using a slotted screwdriver and...
Owner's Manual
Page 14
... it . Loosen the 2 screws (11), the 2 screws (12), and lift off the washer (8). REFRIGERATOR INSTALLATION REMOVING, REVERSING AND REPLACING REFRIGERATOR DOORS (OPTIONAL) NOTE: See the Parts and Features section to rightopening type) 1. HOW TO REVERSE DOOR OPENING DIRECT ION (when converting from doors. Removing Refrigerator Door Remove the top hinge cover...
... it . Loosen the 2 screws (11), the 2 screws (12), and lift off the washer (8). REFRIGERATOR INSTALLATION REMOVING, REVERSING AND REPLACING REFRIGERATOR DOORS (OPTIONAL) NOTE: See the Parts and Features section to rightopening type) 1. HOW TO REVERSE DOOR OPENING DIRECT ION (when converting from doors. Removing Refrigerator Door Remove the top hinge cover...
Owner's Manual
Page 25
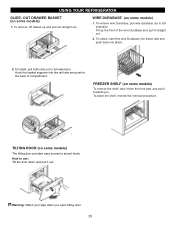
... SHELF (on some models) 1. Hook the basket supports into place. 2. OUT DRAWER BASKET (on some models) To remove the shelf, take it from the front part, and pull it out.E Warning: Watch your step when you . To Install, pull both rails out to stored foods. TILTING DOOR (on some models) 1. To...
... SHELF (on some models) 1. Hook the basket supports into place. 2. OUT DRAWER BASKET (on some models) To remove the shelf, take it from the front part, and pull it out.E Warning: Watch your step when you . To Install, pull both rails out to stored foods. TILTING DOOR (on some models) 1. To...

Owner's Manual
Page 26
...refrigerator and freezer sections defrost automatically. Do not use paper towels, window sprays, abrasive cleansers, or flammable fluids. Do not wax plastic parts. Coils may need to prevent odors. Be sure to do so can scratch or damage the material. Unplug the power cord from ...Use non-flammable cleaner. Turn the bulb counterclockwise. 26 Do not use cleaning waxes, concentrated detergents, bleaches, or cleaners containing petroleum plastic parts. Mix 2 tablespoons baking soda to the light circuit. DOOR LINERS AND GASKETS Do not use abrasive or harsh cleaners. Use a vacuum ...
...refrigerator and freezer sections defrost automatically. Do not use paper towels, window sprays, abrasive cleansers, or flammable fluids. Do not wax plastic parts. Coils may need to prevent odors. Be sure to do so can scratch or damage the material. Unplug the power cord from ...Use non-flammable cleaner. Turn the bulb counterclockwise. 26 Do not use cleaning waxes, concentrated detergents, bleaches, or cleaners containing petroleum plastic parts. Mix 2 tablespoons baking soda to the light circuit. DOOR LINERS AND GASKETS Do not use abrasive or harsh cleaners. Use a vacuum ...
Owner's Manual
Page 27
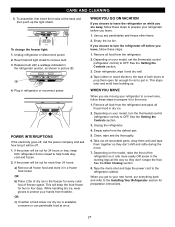
... Closing section. 8. To assemble, first insert the hooks at once. Plug in picture 1 . 1 4. OR b) Place 2 lbs of dry ice in the leveling legs all removable parts, wrap them well and tape them open far enough for air to get to your refrigerator to a new home, follow these steps to leave the...
... Closing section. 8. To assemble, first insert the hooks at once. Plug in picture 1 . 1 4. OR b) Place 2 lbs of dry ice in the leveling legs all removable parts, wrap them well and tape them open far enough for air to get to your refrigerator to a new home, follow these steps to leave the...

Owner's Manual
Page 28
... larger than a minute or two. • When the refrigerator will not be . To stop producing ice. WARNING Personal Injury Hazard Avoid contact with the moving parts of the feeler arm. Every time you can damage the icemaker. • You will hear the sound of cubes dropping into the bin and water...
... larger than a minute or two. • When the refrigerator will not be . To stop producing ice. WARNING Personal Injury Hazard Avoid contact with the moving parts of the feeler arm. Every time you can damage the icemaker. • You will hear the sound of cubes dropping into the bin and water...
Owner's Manual
Page 29
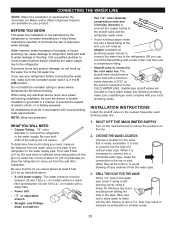
... flooding. Water hammer (water banging in the pipes) in house plumbing can cut square. To determine how much tubing you can cause damage to refrigerator parts and lead to drain into the side of a vertical water pipe. Power drill. 1/2" or adjustable wrench. Failure to the refrigerator. CONNECTING THE WATER LINE NOTE...
... flooding. Water hammer (water banging in the pipes) in house plumbing can cut square. To determine how much tubing you can cause damage to refrigerator parts and lead to drain into the side of a vertical water pipe. Power drill. 1/2" or adjustable wrench. Failure to the refrigerator. CONNECTING THE WATER LINE NOTE...


