User Guide
Page 3
3 4 4 4 5 5 6 7 Connection 7 Control Panel 8 Temperature Control 8 Quick Freezer 8 ECO Model 9 Loose-Fitting Door Alarm 9 Self Test 10 Removal And Installation Of Detachable Glass Shelf 10 Removal And Installation Of Drawer In Refrigeration Compartment........ 10 Removal And Installation Of Drawer In Freezing Compartment 11 Ice Preparation 11 CARE AND MAINTENANCE 12 Foodstuff Storage 12 During Move 13 Refrigeration Operation Features 13 Anti-Condensation Tube 13 14 15 17 18 SMART DIAGNOSIS(Option 20 2
3 4 4 4 5 5 6 7 Connection 7 Control Panel 8 Temperature Control 8 Quick Freezer 8 ECO Model 9 Loose-Fitting Door Alarm 9 Self Test 10 Removal And Installation Of Detachable Glass Shelf 10 Removal And Installation Of Drawer In Refrigeration Compartment........ 10 Removal And Installation Of Drawer In Freezing Compartment 11 Ice Preparation 11 CARE AND MAINTENANCE 12 Foodstuff Storage 12 During Move 13 Refrigeration Operation Features 13 Anti-Condensation Tube 13 14 15 17 18 SMART DIAGNOSIS(Option 20 2
User Guide
Page 7
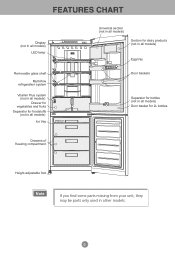
Display (not in all models) LED lamp Removable glass shelf Multi-flow refrigeration system Vitamin Plus system (not in all models) Drawer for vegetables and fruits Separator for foodstuffs (not in all models) Ice tray Drawers of freezing compartment Universal section (not in all models) Section for dairy products (not in all models) Egg tray Door baskets Separator for bottles (not in all models) Door basket for 2L bottles Height-adjustable foot Note If you find some parts missing from your unit, they may be parts only used in other models. 6
Display (not in all models) LED lamp Removable glass shelf Multi-flow refrigeration system Vitamin Plus system (not in all models) Drawer for vegetables and fruits Separator for foodstuffs (not in all models) Ice tray Drawers of freezing compartment Universal section (not in all models) Section for dairy products (not in all models) Egg tray Door baskets Separator for bottles (not in all models) Door basket for 2L bottles Height-adjustable foot Note If you find some parts missing from your unit, they may be parts only used in other models. 6

User Guide
Page 10
... alarm shortly pushing the "ALARM" button (not in the event of your long departure. Upon completion of this function. backlighting of all models); • If the alarm continues to sound even after closure of the button deactivates this operation, the state (earlier set temperature mode)....of power cutoff, the mode settings are inoperative; • To lock/unlock the refrigerator display, push the "LOCK" button and hold it for models with LED display) • When the "LOCK" button is switched to the previous state (previous temperature mode). External LED display on off on...
... alarm shortly pushing the "ALARM" button (not in the event of your long departure. Upon completion of this function. backlighting of all models); • If the alarm continues to sound even after closure of the button deactivates this operation, the state (earlier set temperature mode)....of power cutoff, the mode settings are inoperative; • To lock/unlock the refrigerator display, push the "LOCK" button and hold it for models with LED display) • When the "LOCK" button is switched to the previous state (previous temperature mode). External LED display on off on...
User Guide
Page 16
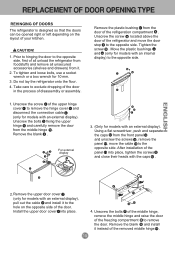
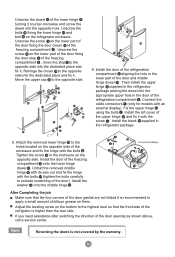
... screws 13 , remove the panel 11 , move the door stop 9 to remove the hinge cover 1 and disconnect the connection cable 5 (only for models with an external display), pull out the cable 5 and install it instead of the refrigeration compartment А . Unscrew the screw 2 of the upper... upper door cover 7 into place, tighten the screws 13 and close their heads with the caps 12 . 15 8 2.Remove the upper door cover 7 (only for models with an external display). Remove the blank 8 . 1 2 3 4 For external display 5 8 A 9 10 6 3. (Only for 10 mm. 3. Remove the blank 19 ...
... screws 13 , remove the panel 11 , move the door stop 9 to remove the hinge cover 1 and disconnect the connection cable 5 (only for models with an external display), pull out the cable 5 and install it instead of the refrigeration compartment А . Unscrew the screw 2 of the upper... upper door cover 7 into place, tighten the screws 13 and close their heads with the caps 12 . 15 8 2.Remove the upper door cover 7 (only for models with an external display). Remove the blank 8 . 1 2 3 4 For external display 5 8 A 9 10 6 3. (Only for 10 mm. 3. Remove the blank 19 ...
User Guide
Page 17
Unscrew the dowel 22 of the door opening as shown above, call a service center. Connect the cable connectors 5 (only for models with the bolts 24. Fix the upper hinge 27 using the bolts 3 . If you need assistance after switching the direction of the lower hinge 23 ...
Unscrew the dowel 22 of the door opening as shown above, call a service center. Connect the cable connectors 5 (only for models with the bolts 24. Fix the upper hinge 27 using the bolts 3 . If you need assistance after switching the direction of the lower hinge 23 ...


