User Guide
Page 7
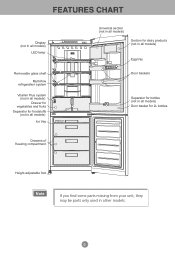
Display (not in all models) LED lamp Removable glass shelf Multi-flow refrigeration system Vitamin Plus system (not in all models) Drawer for vegetables and fruits Separator for foodstuffs (not in all models) Ice tray Drawers of freezing compartment Universal section (not in all models) Section for dairy products (not in all models) Egg tray Door baskets Separator for bottles (not in all models) Door basket for 2L bottles Height-adjustable foot Note If you find some parts missing from your unit, they may be parts only used in other models. 6
Display (not in all models) LED lamp Removable glass shelf Multi-flow refrigeration system Vitamin Plus system (not in all models) Drawer for vegetables and fruits Separator for foodstuffs (not in all models) Ice tray Drawers of freezing compartment Universal section (not in all models) Section for dairy products (not in all models) Egg tray Door baskets Separator for bottles (not in all models) Door basket for 2L bottles Height-adjustable foot Note If you find some parts missing from your unit, they may be parts only used in other models. 6

User Guide
Page 8
... less than 5 cm should be provided from above, from its rear and side faces for its use , carefully wash the refrigerator; • Install the removable parts, such as shown in the door basket of the refrigerator as ice tray, etc. To turn the adjustable feet to compensate irregularity of power consumption...
... less than 5 cm should be provided from above, from its rear and side faces for its use , carefully wash the refrigerator; • Install the removable parts, such as shown in the door basket of the refrigerator as ice tray, etc. To turn the adjustable feet to compensate irregularity of power consumption...
User Guide
Page 11
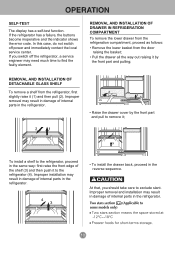
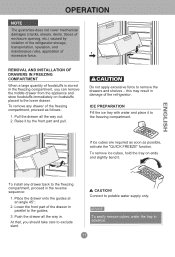
...-TEST The display has a self-test function. In this case, do not switch off the refrigerator, a service engineer may result in damage of internal parts in the refrigerator. 1 • To install the drawer back, proceed in the refrigerator. • Raise the drawer cover by the front... part and pulling; REMOVAL AND INSTALLATION OF DRAWER IN REFRIGERATION COMPARTMENT To remove the lower drawer from the refrigeration compartment, proceed as follows: • ...
...-TEST The display has a self-test function. In this case, do not switch off the refrigerator, a service engineer may result in damage of internal parts in the refrigerator. 1 • To install the drawer back, proceed in the refrigerator. • Raise the drawer cover by the front... part and pulling; REMOVAL AND INSTALLATION OF DRAWER IN REFRIGERATION COMPARTMENT To remove the lower drawer from the refrigeration compartment, proceed as follows: • ...
User Guide
Page 12
... lower drawer. NOTE The guarantee does not cover mechanical damages (cracks, shears, dents, traces of enclosure opening, etc.) caused by the front part and pull. To remove any drawer back to the freezing compartment, proceed in parallel to the freezing compartment. 2 1 If ice cubes are ...required as soon as follows: 1. Lower the front part of the drawer in the reverse sequence: 1. At that, you can remove the middle drawer from the appliance and store foodstuffs immediately on ends...
... lower drawer. NOTE The guarantee does not cover mechanical damages (cracks, shears, dents, traces of enclosure opening, etc.) caused by the front part and pull. To remove any drawer back to the freezing compartment, proceed in parallel to the freezing compartment. 2 1 If ice cubes are ...required as soon as follows: 1. Lower the front part of the drawer in the reverse sequence: 1. At that, you can remove the middle drawer from the appliance and store foodstuffs immediately on ends...
User Guide
Page 13
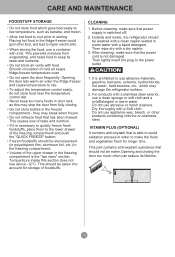
... eaten.Opening and closing . • Do not store bottles in warm water. Then tightly insert the plug to storing. Dry thoroughly with a dry napkin; 3. This part contains anti-oxydant substance that has been thawed. Then wipe dry with a Soft cloth. Do not use a container with food. CARE AND MAINTENANCE FOODSTUFF STORAGE...
... eaten.Opening and closing . • Do not store bottles in warm water. Then tightly insert the plug to storing. Dry thoroughly with a dry napkin; 3. This part contains anti-oxydant substance that has been thawed. Then wipe dry with a Soft cloth. Do not use a container with food. CARE AND MAINTENANCE FOODSTUFF STORAGE...
User Guide
Page 14
... absolutely normal. Do not allow it could cause light-headedness, fainting,suffocation, or death. 13 Dty ice frozen carbon dioxide. Firmly secure the internal detachable parts (shelves, drawers, door baskets); • To avoid damage of the floor and adjustable feet of the refrigerator, turn them counter-clockwise before transportation; • The...
... absolutely normal. Do not allow it could cause light-headedness, fainting,suffocation, or death. 13 Dty ice frozen carbon dioxide. Firmly secure the internal detachable parts (shelves, drawers, door baskets); • To avoid damage of the floor and adjustable feet of the refrigerator, turn them counter-clockwise before transportation; • The...
User Guide
Page 17
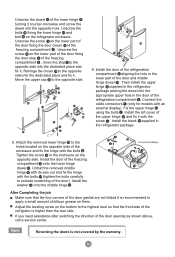
... the holes located on the opposite side of the enclosure and fix the hinge with an external display). Tighten the screw 25 in the lower part of the refrigeration compartment A . Install the door of the refrigeration compartment A aligning the hole in the enclosure on them. Connect the cable connectors 5 (only for... the dowel 22 of the lower hinge 23 turning it . Unscrew the bolts 24 fixing the lower hinge 23 and bolt 25 on the lower part of the door fixing the door closer 29 of the freezing compartment В . Unscrew the screw 10 on the bottom to the highest level so...
... the holes located on the opposite side of the enclosure and fix the hinge with an external display). Tighten the screw 25 in the lower part of the refrigeration compartment A . Install the door of the refrigeration compartment A aligning the hole in the enclosure on them. Connect the cable connectors 5 (only for... the dowel 22 of the lower hinge 23 turning it . Unscrew the bolts 24 fixing the lower hinge 23 and bolt 25 on the lower part of the door fixing the door closer 29 of the freezing compartment В . Unscrew the screw 10 on the bottom to the highest level so...


