Owner's Manual (English)
Page 2
...Warranty (USA) Safety Instructions Grounding Requirements Parts and Features Refrigerator Installation Unpacking Your Refrigerator Installation Base Grille Removing, Reversing and Replacing Your Refrigerator Doors For Drawer Models For Swing Models Door Closing and Alignment Using Your Refrigerator Ensuring Proper Air Circulation Multi Flow Door ... Outside Inside Walls Door Liner and Gaskets Plastic Parts Condenser Coils Light Bulb Replacement Power Interruptions When you go on vacation About the Custom Cube Icemaker Connecting the Water Line Troubleshooting Guide 22 22 23 23 23 24 24 24 24 25 ...
...Warranty (USA) Safety Instructions Grounding Requirements Parts and Features Refrigerator Installation Unpacking Your Refrigerator Installation Base Grille Removing, Reversing and Replacing Your Refrigerator Doors For Drawer Models For Swing Models Door Closing and Alignment Using Your Refrigerator Ensuring Proper Air Circulation Multi Flow Door ... Outside Inside Walls Door Liner and Gaskets Plastic Parts Condenser Coils Light Bulb Replacement Power Interruptions When you go on vacation About the Custom Cube Icemaker Connecting the Water Line Troubleshooting Guide 22 22 23 23 23 24 24 24 24 25 ...

Owner's Manual (English)
Page 3
...APPLICABLE TO THIS PRODUCT. Service trips to your product type (Refrigerator), model number, serial number, and ZIP/Postal Code ready. 3 Proof of purchase is required and must be provided to LG in order to validate warranty. A Copy of your Sales Receipt...web site http://www.lgservice.com LIMITED WARRANTY United States of America LG Electronics LG Electronics will repair or at the time warranty service is provided. This warranty is in the U.S. LG Refrigerator / Freezer Warranty Period Product Parts Labor Refrigerator / Freezer 1 year 1 year [In-Home Service (Except Model GR-051)]...
...APPLICABLE TO THIS PRODUCT. Service trips to your product type (Refrigerator), model number, serial number, and ZIP/Postal Code ready. 3 Proof of purchase is required and must be provided to LG in order to validate warranty. A Copy of your Sales Receipt...web site http://www.lgservice.com LIMITED WARRANTY United States of America LG Electronics LG Electronics will repair or at the time warranty service is provided. This warranty is in the U.S. LG Refrigerator / Freezer Warranty Period Product Parts Labor Refrigerator / Freezer 1 year 1 year [In-Home Service (Except Model GR-051)]...
Owner's Manual (English)
Page 5
...words mean: DANGER WARNING You will be dangerous to the extremely cold surfaces. When moving parts of it straight out from the wall, be properly grounded. They could damage the refrigerator and seriously injure themselves. Have the wall outlet and the circuit checked by pulling on ...injury, or product damage only. All safety messages will be discarded. DO NOT place fingers or hands on the refrigerator doors or shelves in the freezer compartment when hands are not followed. Do not use gasoline or other foods. Read all instructions before cleaning or ...
...words mean: DANGER WARNING You will be dangerous to the extremely cold surfaces. When moving parts of it straight out from the wall, be properly grounded. They could damage the refrigerator and seriously injure themselves. Have the wall outlet and the circuit checked by pulling on ...injury, or product damage only. All safety messages will be discarded. DO NOT place fingers or hands on the refrigerator doors or shelves in the freezer compartment when hands are not followed. Do not use gasoline or other foods. Read all instructions before cleaning or ...
Owner's Manual (English)
Page 7
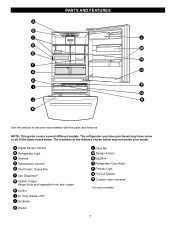
The locations of the items listed below. PARTS AND FEATURES A B C L D M E N F O G H P I Ice Tray (Inside of H)* J Durabase K Divider L Dairy Bin M Design-A-Door N Egg Box O Refrigerator Door Rack P Freezer Light Q Pull out Drawer R Custom cube Icemaker* *on some or all of the features shown below may have some models 7 NOTE: This guide covers several ...
The locations of the items listed below. PARTS AND FEATURES A B C L D M E N F O G H P I Ice Tray (Inside of H)* J Durabase K Divider L Dairy Bin M Design-A-Door N Egg Box O Refrigerator Door Rack P Freezer Light Q Pull out Drawer R Custom cube Icemaker* *on some or all of the features shown below may have some models 7 NOTE: This guide covers several ...

Owner's Manual (English)
Page 8
... and crisper F Ice Bin G Ice Tray (Inside of F)* H Durabase I O Use this section to become more familiar with the parts and features. PARTS AND FEATURES A B J C K D L E M F N G H I Divider J Dairy Bin K Design-A-Door L Pull out Drawer M Refrigerator Door Rack N Freezer Light O Custom cube Icemaker* *on some or all of the items listed below may have purchased may not...
... and crisper F Ice Bin G Ice Tray (Inside of F)* H Durabase I O Use this section to become more familiar with the parts and features. PARTS AND FEATURES A B J C K D L E M F N G H I Divider J Dairy Bin K Design-A-Door L Pull out Drawer M Refrigerator Door Rack N Freezer Light O Custom cube Icemaker* *on some or all of the items listed below may have purchased may not...

Owner's Manual (English)
Page 9
... features. The locations of the items listed below may not match your model. NOTE: This guide covers several different models. The refrigerator you have purchased may have some models 9 PARTS AND FEATURES A B I Dairy Bin J Design-A-Door K Wire Freezer Shelf L Refrigerator Door Rack M Freezer Light N Freezer Door Rack *on some or all of the features shown below .
... features. The locations of the items listed below may not match your model. NOTE: This guide covers several different models. The refrigerator you have purchased may have some models 9 PARTS AND FEATURES A B I Dairy Bin J Design-A-Door K Wire Freezer Shelf L Refrigerator Door Rack M Freezer Light N Freezer Door Rack *on some or all of the features shown below .
Owner's Manual (English)
Page 11
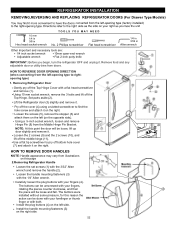
...parts aside (2). • Lift the Refrigerator door (3) slightly and remove it . Loosen the screws (5), remove the stopper (6) and attach them on the left -opening type to pry off bottom hole cover (7) and attach it on the right. HOW TO REVERSE DOOR OPENING DIRECT ION (when converting from illustrations on the right side. Removing Refrigerator... the plug buttons (4) on the left side. • Install the handle mounting fasteners (3) on this page 2.Removing Refrigerator Handle • Loosen the set screws (1) with the 3/32" Allen wrench and remove the handle (2). • ...
...parts aside (2). • Lift the Refrigerator door (3) slightly and remove it . Loosen the screws (5), remove the stopper (6) and attach them on the left -opening type to pry off bottom hole cover (7) and attach it on the right. HOW TO REVERSE DOOR OPENING DIRECT ION (when converting from illustrations on the right side. Removing Refrigerator... the plug buttons (4) on the left side. • Install the handle mounting fasteners (3) on this page 2.Removing Refrigerator Handle • Loosen the set screws (1) with the 3/32" Allen wrench and remove the handle (2). • ...

Owner's Manual (English)
Page 15
...small piece of masking tape near the top of the handle allow the handle to separate from the mounting screws (3). 15 Removing Freezer Door Before, remove totally the refrigerator door. Take off the middle hinge (13). Loosen the 2 screws (18) and attach the stopper (19) on the left... and attach it . NOTE: At this may require some force). Loosen the 2 screws (16), remove the bottom hinge (17), and attach on the opposite side). Set parts aside (2). 7 Lift the Refrigerator door (3) slightly and remove it . Using a ¼-inch socket wrench, loosen and remove Hinge Pin (7) from...
...small piece of masking tape near the top of the handle allow the handle to separate from the mounting screws (3). 15 Removing Freezer Door Before, remove totally the refrigerator door. Take off the middle hinge (13). Loosen the 2 screws (18) and attach the stopper (19) on the left... and attach it . NOTE: At this may require some force). Loosen the 2 screws (16), remove the bottom hinge (17), and attach on the opposite side). Set parts aside (2). 7 Lift the Refrigerator door (3) slightly and remove it . Using a ¼-inch socket wrench, loosen and remove Hinge Pin (7) from...

Owner's Manual (English)
Page 25
... injure your hands away from the front part, and pull it straight out. 2. Tilt up and pull out straight out. 1 2 2. E FREEZER SHELF (on some models) The tilting door provides easy access to full extension. To remove, lift basket up the front of compartment. USING YOUR REFRIGERATOR GLIDE -OUT DRAWER BASKET (on some models...
... injure your hands away from the front part, and pull it straight out. 2. Tilt up and pull out straight out. 1 2 2. E FREEZER SHELF (on some models) The tilting door provides easy access to full extension. To remove, lift basket up the front of compartment. USING YOUR REFRIGERATOR GLIDE -OUT DRAWER BASKET (on some models...
Owner's Manual (English)
Page 26
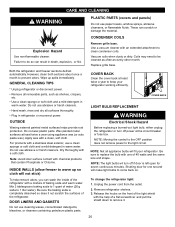
... parts. Plug in warm water. OUTSIDE Waxing external painted metal surfaces helps provide rust protection. For products with the help remove odors, you can wash the inside of the refrigerator with an extended attachment to clean condenser coils. INSIDE WALLS (allow freezer to...is completely dissolved so does it . 26 CONDENSER COILS Explosion Hazard Use non-flammable cleaner. Both the refrigerator and freezer sections defrost automatically. GENERAL CLEANING TIPS Unplug refrigerator or disconnect power. Mix 2 tablespoons baking soda to 1 quart of baking soda and warm water....
... parts. Plug in warm water. OUTSIDE Waxing external painted metal surfaces helps provide rust protection. For products with the help remove odors, you can wash the inside of the refrigerator with an extended attachment to clean condenser coils. INSIDE WALLS (allow freezer to...is completely dissolved so does it . 26 CONDENSER COILS Explosion Hazard Use non-flammable cleaner. Both the refrigerator and freezer sections defrost automatically. GENERAL CLEANING TIPS Unplug refrigerator or disconnect power. Mix 2 tablespoons baking soda to 1 quart of baking soda and warm water....
Owner's Manual (English)
Page 27
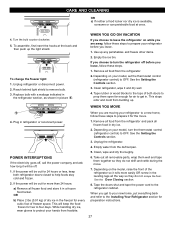
...4. See the Setting the Controls section. 3. Take out all removable parts, wrap them well and tape them open far enough for every cubic foot of both refrigerator doors closed to help foods stay cold and frozen. 2. To change the freezer light: 1. See the Setting the Controls section. 3. This stops ... your new home, put everything back and refer to the Installing Your Refrigerator section for more easily OR screw in the freezer for air to get to leave the refrigerator on the model, raise the front of the refrigerator so it rolls more than 24 hours: a) Remove all the way so...
...4. See the Setting the Controls section. 3. Take out all removable parts, wrap them well and tape them open far enough for every cubic foot of both refrigerator doors closed to help foods stay cold and frozen. 2. To change the freezer light: 1. See the Setting the Controls section. 3. This stops ... your new home, put everything back and refer to the Installing Your Refrigerator section for more easily OR screw in the freezer for air to get to leave the refrigerator on the model, raise the front of the refrigerator so it rolls more than 24 hours: a) Remove all the way so...
Owner's Manual (English)
Page 28
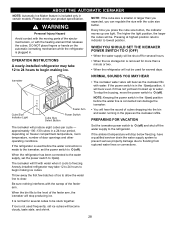
...icemaker water valve will be stuck together. If the power switch is in the I (on freezer compartment temperature, room temperature, number of the feeler arm, the icemaker will become cloudy, taste... supply to begin making ice cubes. WARNING Personal Injury Hazard Avoid contact with the moving parts of ice to allow the water line to water. Every time you can damage the icemaker...per cycle - If the ambient temperature will not be shut off ). OPERATION INSTRUCTIONS A newly-installed refrigerator may take 12 to 24 hours to begin making ice. • When the ice storage bin...
...icemaker water valve will be stuck together. If the power switch is in the I (on freezer compartment temperature, room temperature, number of the feeler arm, the icemaker will become cloudy, taste... supply to begin making ice cubes. WARNING Personal Injury Hazard Avoid contact with the moving parts of ice to allow the water line to water. Every time you can damage the icemaker...per cycle - If the ambient temperature will not be shut off ). OPERATION INSTRUCTIONS A newly-installed refrigerator may take 12 to 24 hours to begin making ice. • When the ice storage bin...

Owner's Manual (English)
Page 29
...or side, rather than at the end, you will need : measure the distance from the wall after installation. If you can cause damage to refrigerator parts and lead to connect into the drill. Be sure both ends of electric shock, or is in reduced ice production or smaller cubes. 29 ... compression nuts and 2 ferrules (sleeves) to connect the copper tubing to the supply of the refrigerator to move out from the water valve on your existing copper water line has a flared fitting at the bottom, to connect into 3 turns of expensive water damage. If your product. Connect only to the...
...or side, rather than at the end, you will need : measure the distance from the wall after installation. If you can cause damage to refrigerator parts and lead to connect into the drill. Be sure both ends of electric shock, or is in reduced ice production or smaller cubes. 29 ... compression nuts and 2 ferrules (sleeves) to connect the copper tubing to the supply of the refrigerator to move out from the water valve on your existing copper water line has a flared fitting at the bottom, to connect into 3 turns of expensive water damage. If your product. Connect only to the...
Owner's Manual (Español)
Page 2
.../Postal Code ready. 3 CUSTOMER ASSISTANCE NUMBERS: To obtain Warranty Coverage: Retain your Sales Receipt must be provided to state. including Alaska, Hawaii, and U.S. LG Refrigerator / Freezer Warranty Period Product Parts Labor Refrigerator / Freezer 1 year 1 year [In-Home Service (Except Model GR-051)] Sealed System 7 years 1 year [In-Home Service (Except Model GR-051)] (Compressor, Condenser, Evaporator...
.../Postal Code ready. 3 CUSTOMER ASSISTANCE NUMBERS: To obtain Warranty Coverage: Retain your Sales Receipt must be provided to state. including Alaska, Hawaii, and U.S. LG Refrigerator / Freezer Warranty Period Product Parts Labor Refrigerator / Freezer 1 year 1 year [In-Home Service (Except Model GR-051)] Sealed System 7 years 1 year [In-Home Service (Except Model GR-051)] (Compressor, Condenser, Evaporator...
Specification (English)
Page 2
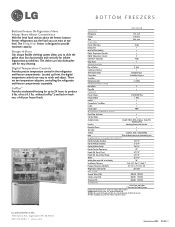
... Handles Matching Commercial Handles Reversible Doors Toe Grille Surface Stainless Steel / Coated Metal Back Flush & Metal cover over mechanical parts DIMENSIONS/CLEARANCES/WEIGHT Depth (Including Handles) 34 1/4" Depth (Without Handles) 31 3/4" Depth (Without Door) 28 1/4" ...lbs. Bottom Freezer Refrigerators Have Always Been About Convenience With the fresh food section above the freezer, bottom freezer refrigerators put the food you to slide the gallon door bins horizontally and vertically for infinite organization possibilities. Total 22.4 cu.ft. LG ELECTRONICS ...
... Handles Matching Commercial Handles Reversible Doors Toe Grille Surface Stainless Steel / Coated Metal Back Flush & Metal cover over mechanical parts DIMENSIONS/CLEARANCES/WEIGHT Depth (Including Handles) 34 1/4" Depth (Without Handles) 31 3/4" Depth (Without Door) 28 1/4" ...lbs. Bottom Freezer Refrigerators Have Always Been About Convenience With the fresh food section above the freezer, bottom freezer refrigerators put the food you to slide the gallon door bins horizontally and vertically for infinite organization possibilities. Total 22.4 cu.ft. LG ELECTRONICS ...


