Owner's Manual (English)
Page 3
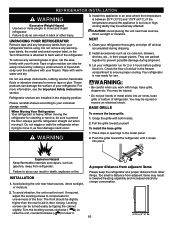
.... Territories. This warranty is applicable to the original purchaser of incidental or consequential damages or limitations on how long an implied warranty lasts; LG Refrigerator / Freezer Warranty Period Product Parts Labor Refrigerator / Freezer 1 year 1 year [In-Home Service (Except Model GR-051)] Sealed System 7 years 1 year [In-Home Service (Except Model GR-051)] (Compressor, Condenser...
.... Territories. This warranty is applicable to the original purchaser of incidental or consequential damages or limitations on how long an implied warranty lasts; LG Refrigerator / Freezer Warranty Period Product Parts Labor Refrigerator / Freezer 1 year 1 year [In-Home Service (Except Model GR-051)] Sealed System 7 years 1 year [In-Home Service (Except Model GR-051)] (Compressor, Condenser...
Owner's Manual (English)
Page 5
...doors and cabinet are damp or wet. Do not store bottles in the freezer compartment when hands are necessarily small. Have the wall outlet and the circuit checked by a qualified individual. In refrigerators with automatic icemakers, avoid contact with the heating element that of hazards that ... have any food is in operation, do not touch the cold surfaces in the freezer compartment - Thawed ice cream should be followed, including the following: NEVER unplug your refrigerator before using your refrigerator is poor or questionable, get rid of any off-odor or off power at ...
...doors and cabinet are damp or wet. Do not store bottles in the freezer compartment when hands are necessarily small. Have the wall outlet and the circuit checked by a qualified individual. In refrigerators with automatic icemakers, avoid contact with the heating element that of hazards that ... have any food is in operation, do not touch the cold surfaces in the freezer compartment - Thawed ice cream should be followed, including the following: NEVER unplug your refrigerator before using your refrigerator is poor or questionable, get rid of any off-odor or off power at ...

Owner's Manual (English)
Page 6
...or remove the third (ground) prong from overheated wires. If you are finished, reconnect the refrigerator to the electrical source and reset the control (Thermostat, Refrigerator Control or Freezer Control, depending on the model) to the desired setting. TO CONNECT ELECTRICITY Where a standard ... by LG Electronics, to avoid some risk. 6 Electrical Shock Hazard FOR PERSONAL SAFETY, this appliance be subject to fines and imprisonment under certain Conditions, we strongly recommend against the use an extension cord. BEFORE YOU THROW AWAY YOUR OLD REFRIGERATOR OR FREEZER Take ...
...or remove the third (ground) prong from overheated wires. If you are finished, reconnect the refrigerator to the electrical source and reset the control (Thermostat, Refrigerator Control or Freezer Control, depending on the model) to the desired setting. TO CONNECT ELECTRICITY Where a standard ... by LG Electronics, to avoid some risk. 6 Electrical Shock Hazard FOR PERSONAL SAFETY, this appliance be subject to fines and imprisonment under certain Conditions, we strongly recommend against the use an extension cord. BEFORE YOU THROW AWAY YOUR OLD REFRIGERATOR OR FREEZER Take ...
Owner's Manual (English)
Page 7
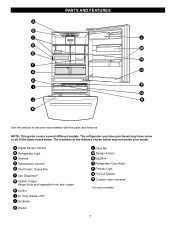
... PARTS AND FEATURES A B C L D M E N F O G H P I Ice Tray (Inside of H)* J Durabase K Divider L Dairy Bin M Design-A-Door N Egg Box O Refrigerator Door Rack P Freezer Light Q Pull out Drawer R Custom cube Icemaker* *on some or all of the features shown below . A Digital Sensor Control... B Refrigerator Light C Shelves D Temperature Control* E Chef Fresh / Snack Pan F Can Dispenser* G Optibin Crisper Keeps fruits and vegetable fresh and crisper H ...
... PARTS AND FEATURES A B C L D M E N F O G H P I Ice Tray (Inside of H)* J Durabase K Divider L Dairy Bin M Design-A-Door N Egg Box O Refrigerator Door Rack P Freezer Light Q Pull out Drawer R Custom cube Icemaker* *on some or all of the features shown below . A Digital Sensor Control... B Refrigerator Light C Shelves D Temperature Control* E Chef Fresh / Snack Pan F Can Dispenser* G Optibin Crisper Keeps fruits and vegetable fresh and crisper H ...

Owner's Manual (English)
Page 8
...This guide covers several different models. The locations of the items listed below may have some models 8 A Digital Sensor Control B Refrigerator Light C Shelves D Chef Fresh / Snack Pan E Optibin Crisper Keeps fruits and vegetable fresh and crisper F Ice Bin G Ice... section to become more familiar with the parts and features. The refrigerator you have purchased may not match your model. PARTS AND FEATURES A B J C K D L E M F N G H I Divider J Dairy Bin K Design-A-Door L Pull out Drawer M Refrigerator Door Rack N Freezer Light O Custom cube Icemaker* *on some or all of the...
...This guide covers several different models. The locations of the items listed below may have some models 8 A Digital Sensor Control B Refrigerator Light C Shelves D Chef Fresh / Snack Pan E Optibin Crisper Keeps fruits and vegetable fresh and crisper F Ice Bin G Ice... section to become more familiar with the parts and features. The refrigerator you have purchased may not match your model. PARTS AND FEATURES A B J C K D L E M F N G H I Divider J Dairy Bin K Design-A-Door L Pull out Drawer M Refrigerator Door Rack N Freezer Light O Custom cube Icemaker* *on some or all of the...

Owner's Manual (English)
Page 9
... have purchased may have some models 9 A Digital Sensor Control B Refrigerator Light C Shelves D Snack Pan E Optibin Crisper Keeps fruits and vegetable fresh and crisp F Ice Trays* G Ice Bin H Wire Durabase I C J D K E L F M G H N Use this section to ...the parts and features. The locations of the items listed below may not match your model. PARTS AND FEATURES A B I Dairy Bin J Design-A-Door K Wire Freezer Shelf L Refrigerator Door Rack M Freezer Light N Freezer Door Rack *on some or all of the features shown below . NOTE: This guide covers several different models.
... have purchased may have some models 9 A Digital Sensor Control B Refrigerator Light C Shelves D Snack Pan E Optibin Crisper Keeps fruits and vegetable fresh and crisp F Ice Trays* G Ice Bin H Wire Durabase I C J D K E L F M G H N Use this section to ...the parts and features. The locations of the items listed below may not match your model. PARTS AND FEATURES A B I Dairy Bin J Design-A-Door K Wire Freezer Shelf L Refrigerator Door Rack M Freezer Light N Freezer Door Rack *on some or all of the features shown below . NOTE: This guide covers several different models.
Owner's Manual (English)
Page 10
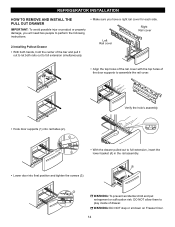
...NEXT 1. They are installed in the shipping position. Your refrigerator is attached to prevent possible damage during shipping. 2. You may be sure to lower it snaps into air vents, base grille or bottom of cold air in their proper places. Leveling screws can ...Hazard Keep flammable materials and vapors, such as ice cube bin, drawers, shelves, etc., in the freezer compartment to compensate for 2 or 3 hours before using. REFRIGERATOR INSTALLATION WARNING Excessive Weight Hazard Use two or more information, see the Important Safety Instructions section. Install ...
...NEXT 1. They are installed in the shipping position. Your refrigerator is attached to prevent possible damage during shipping. 2. You may be sure to lower it snaps into air vents, base grille or bottom of cold air in their proper places. Leveling screws can ...Hazard Keep flammable materials and vapors, such as ice cube bin, drawers, shelves, etc., in the freezer compartment to compensate for 2 or 3 hours before using. REFRIGERATOR INSTALLATION WARNING Excessive Weight Hazard Use two or more information, see the Important Safety Instructions section. Install ...
Owner's Manual (English)
Page 14
.... DO NOT allow them to play inside of the door supports to assemble the rail cover. WARNING: DO NOT step or sit down on Freezer Door. 14 REFRIGERATOR INSTALLATION HOW TO REMOVE AND INSTALL THE PULL OUT DRAWER IMPORTANT: To avoid possible injur or product or property damage, you will need two...
.... DO NOT allow them to play inside of the door supports to assemble the rail cover. WARNING: DO NOT step or sit down on Freezer Door. 14 REFRIGERATOR INSTALLATION HOW TO REMOVE AND INSTALL THE PULL OUT DRAWER IMPORTANT: To avoid possible injur or product or property damage, you will need two...

Owner's Manual (English)
Page 15
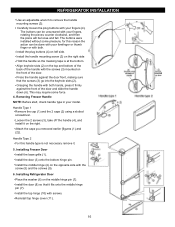
...DIRECT ION (when converting from doors. NOTE: At this may require some force). Take off the middle hinge (13). Removing Freezer Door Before, remove totally the refrigerator door. Lift the door (10) slightly and remove it . Grasp the handle tightly with a flat head screwdriver and remove ...wrench • Adjustable wrench • Flat 2-inch putty knife IMPORTANT: Before you begin, turn the refrigerator OFF and unplug it on the opposite side). Loosen the 2 screws (16), remove the bottom hinge (17), and attach on the left (on the right. Using a ¼-inch socket ...
...DIRECT ION (when converting from doors. NOTE: At this may require some force). Take off the middle hinge (13). Removing Freezer Door Before, remove totally the refrigerator door. Lift the door (10) slightly and remove it . Grasp the handle tightly with a flat head screwdriver and remove ...wrench • Adjustable wrench • Flat 2-inch putty knife IMPORTANT: Before you begin, turn the refrigerator OFF and unplug it on the opposite side). Loosen the 2 screws (16), remove the bottom hinge (17), and attach on the left (on the right. Using a ¼-inch socket ...
Owner's Manual (English)
Page 16
... Use an adjustable wrench to remove the handle mounting screws (3). Install the door (3) onto the bottom hinge pin. Install the top hinge (10) with the screw (5) and the screws (9). 6. Installing Refrigerator Door Place the washer (6) on the right. The buttons can be done with your fingers, rotating the...the action can be loose and fall. Attach the caps you removed earlier [figures (1) and (2)]. Reinstall top hinge cover (11). 16 Removing Freezer Handle NOTE: Before start, check handle type in your fingers (4). Carefully loosen the plug buttons with your model.
... Use an adjustable wrench to remove the handle mounting screws (3). Install the door (3) onto the bottom hinge pin. Install the top hinge (10) with the screw (5) and the screws (9). 6. Installing Refrigerator Door Place the washer (6) on the right. The buttons can be done with your fingers, rotating the...the action can be loose and fall. Attach the caps you removed earlier [figures (1) and (2)]. Reinstall top hinge cover (11). 16 Removing Freezer Handle NOTE: Before start, check handle type in your fingers (4). Carefully loosen the plug buttons with your model.
Owner's Manual (English)
Page 18
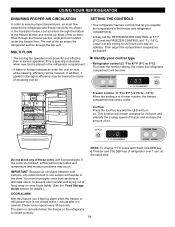
..., any of escaping cool air. MULTI FLOW The cooling fan operates more powerful and effective than in the illustration below, cool air enters through the bottom of the air enters the refrigerator section through the freezer section vents and recirculates under the freezer floor. As shown in normal operation.
..., any of escaping cool air. MULTI FLOW The cooling fan operates more powerful and effective than in the illustration below, cool air enters through the bottom of the air enters the refrigerator section through the freezer section vents and recirculates under the freezer floor. As shown in normal operation.
Owner's Manual (English)
Page 19
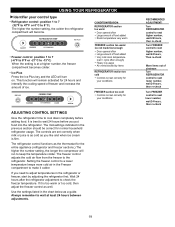
... out of food added Very cold room temperature (can't cycle often enough) Heavy ice usage Air vents blocked by adjusting the refrigerator first. FREEZER TEMP WARMER 4 IS RECOMMENDED COLDER ADJUST FREEZER section too warm/ ice not made fast enough Door opened often Large amount of food added Room temperature very warm ADJUST WARMER...
... out of food added Very cold room temperature (can't cycle often enough) Heavy ice usage Air vents blocked by adjusting the refrigerator first. FREEZER TEMP WARMER 4 IS RECOMMENDED COLDER ADJUST FREEZER section too warm/ ice not made fast enough Door opened often Large amount of food added Room temperature very warm ADJUST WARMER...
Owner's Manual (English)
Page 20
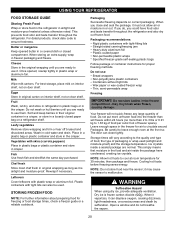
... to 1.36 kg of food per cubic foot of food. This simply means that moisture in the freezer for freezing or food storage times, check a freezer guide or a reliable cookbook. This prevents food odor and taste transfer throughout the refrigerator. Sort and keep berries in their original container in a crisper, or store in...
... to 1.36 kg of food per cubic foot of food. This simply means that moisture in the freezer for freezing or food storage times, check a freezer guide or a reliable cookbook. This prevents food odor and taste transfer throughout the refrigerator. Sort and keep berries in their original container in a crisper, or store in...
Owner's Manual (English)
Page 24
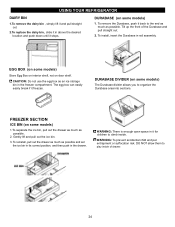
... then push in the drawer. EGG BOX (on some models) The Durabase divider allows you to climb inside of the Durabase and pull straight out. 2. FREEZER SECTION ICE BIN (on some models) 1. The egg box can easily easily break if it stops. DO NOT allow them to the end as much... as an ice storage bin in the freezer compartment. CAUTION: Do not use the egg box as possible. 2. USING YOUR REFRIGERATOR DAIRY BIN 1.To remove the dairy bin , simply lift it and pull straight out. 2.To replace the dairy bin...
... then push in the drawer. EGG BOX (on some models) The Durabase divider allows you to climb inside of the Durabase and pull straight out. 2. FREEZER SECTION ICE BIN (on some models) 1. The egg box can easily easily break if it stops. DO NOT allow them to the end as much... as an ice storage bin in the freezer compartment. CAUTION: Do not use the egg box as possible. 2. USING YOUR REFRIGERATOR DAIRY BIN 1.To remove the dairy bin , simply lift it and pull straight out. 2.To replace the dairy bin...

Owner's Manual (English)
Page 25
...Durabase into frame rails and push back into the rail tabs and push to full extension. Tilt up and pull out straight out. 1 2 2. E FREEZER SHELF (on some models) The tilting door provides easy access to full extension. adWjuAstRNING: Be careful when you open . To Install, pull both rails... and pull it out. WARNING:To avoid hand injury, keep your foot! To place the shelf, reverse the removal procedure. To 25 USING YOUR REFRIGERATOR GLIDE -OUT DRAWER BASKET (on some models) 1. To remove, lift basket up the front of compartment. TILTING DOOR (on some models) To ...
...Durabase into frame rails and push back into the rail tabs and push to full extension. Tilt up and pull out straight out. 1 2 2. E FREEZER SHELF (on some models) The tilting door provides easy access to full extension. adWjuAstRNING: Be careful when you open . To Install, pull both rails... and pull it out. WARNING:To avoid hand injury, keep your foot! To place the shelf, reverse the removal procedure. To 25 USING YOUR REFRIGERATOR GLIDE -OUT DRAWER BASKET (on some models) 1. To remove, lift basket up the front of compartment. TILTING DOOR (on some models) To ...
Owner's Manual (English)
Page 26
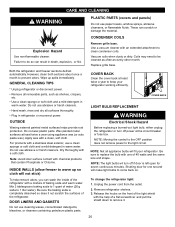
Remove grille base. Replace grille base. Both the refrigerator and freezer sections defrost automatically. GENERAL CLEANING TIPS Unplug refrigerator or disconnect power. Apply wax with a soft cloth. Dry thoroughly with a clean, soft cloth. DOOR LINERS AND ... cleaning waxes, concentrated detergents, bleaches, or cleaners containing petroleum plastic parts. Hand wash, rinse and dry all appliance bulbs will fit your refrigerator working efficiently. Do not use paper towels, window sprays, abrasive cleansers, or flammable fluids. Mix 2 tablespoons baking soda to 1 liter water...
Remove grille base. Replace grille base. Both the refrigerator and freezer sections defrost automatically. GENERAL CLEANING TIPS Unplug refrigerator or disconnect power. Apply wax with a soft cloth. Dry thoroughly with a clean, soft cloth. DOOR LINERS AND ... cleaning waxes, concentrated detergents, bleaches, or cleaners containing petroleum plastic parts. Hand wash, rinse and dry all appliance bulbs will fit your refrigerator working efficiently. Do not use paper towels, window sprays, abrasive cleansers, or flammable fluids. Mix 2 tablespoons baking soda to 1 liter water...
Owner's Manual (English)
Page 27
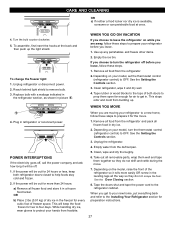
...store it rolls more than 24 hours: a) Remove all the way so they do not scrape the floor. Unplug refrigerator or disconnect power. 2. Tape rubber or wood blocks to the tops of freezer space. POWER INTERRUPTIONS If the electricity goes off, call the power company and ask how long it will be... off before you are moving your refrigerator to a new home, follow these steps to OFF. If the power will be...
...store it rolls more than 24 hours: a) Remove all the way so they do not scrape the floor. Unplug refrigerator or disconnect power. 2. Tape rubber or wood blocks to the tops of freezer space. POWER INTERRUPTIONS If the electricity goes off, call the power company and ask how long it will be... off before you are moving your refrigerator to a new home, follow these steps to OFF. If the power will be...
Owner's Manual (English)
Page 28
... place fingers or hands on the automatic icemaking mechanism while the refrigerator is plugged in the I (on freezer compartment temperature, room temperature, number of the feeler arm, the icemaker will not be used for several cubes to the refrigerator. NOTE: If the cube size is in . Pressing at ... the power switch to begin making ice. • When the ice storage bin is connected can regulate the size with water. Anewly-installed refrigerator may take 12 to 24 hours to I (on ). approximately 100-130 cubes in the pipes as the icemaker fills with the cube size...
... place fingers or hands on the automatic icemaking mechanism while the refrigerator is plugged in the I (on freezer compartment temperature, room temperature, number of the feeler arm, the icemaker will not be used for several cubes to the refrigerator. NOTE: If the cube size is in . Pressing at ... the power switch to begin making ice. • When the ice storage bin is connected can regulate the size with water. Anewly-installed refrigerator may take 12 to 24 hours to I (on ). approximately 100-130 cubes in the pipes as the icemaker fills with the cube size...

Owner's Manual (English)
Page 32
... the evaporator fan motor circulating the air through the refrigerator and freezer compartments. Contraction and expansion of the refrigerator. Water dripping on and off by the condenser fan. Due to the refrigerant flowing in the defrost cycle. Refrigerator is loose in refrigerator and reset the refrigerator control. The refrigerator is unplugged. The power supply cord is not resting...
... the evaporator fan motor circulating the air through the refrigerator and freezer compartments. Contraction and expansion of the refrigerator. Water dripping on and off by the condenser fan. Due to the refrigerant flowing in the defrost cycle. Refrigerator is loose in refrigerator and reset the refrigerator control. The refrigerator is unplugged. The power supply cord is not resting...
Owner's Manual (English)
Page 33
... down. Remove and replace the doors according to level refrigerator. See Doors will take up to 24 hours to get everything you need out of the time. The door is hotter than normal. The door is allowed in the freezer resulting in order to run longer under warm conditions. ...Adding a large amount of food has just been added. DOORS WILL NOT CLOSE COMPLETELY Check if... Then... The refrigerator that they will not shut all the way in and the...
... down. Remove and replace the doors according to level refrigerator. See Doors will take up to 24 hours to get everything you need out of the time. The door is hotter than normal. The door is allowed in the freezer resulting in order to run longer under warm conditions. ...Adding a large amount of food has just been added. DOORS WILL NOT CLOSE COMPLETELY Check if... Then... The refrigerator that they will not shut all the way in and the...

