Owner's Manual
Page 2
LG Refrigerator / Freezer Warranty Period Product Parts Labor Refrigerator / Freezer 1 year 1 year [In-Home Service (Except Model GR-051)] Sealed System (Compressor, Condenser, Evaporator) 7 years 1 year [In-Home Service (Except Model GR-051)] No other express warranty is in the repair of the product, or the replacement of defective parts..., 7 days per week, 365 days per year). WARRANTY Visit our web site http://www.lg.com LG Electronics LIMITED WARRANTY United States of America LG Electronics will repair or at the time warranty service is provided. THE DURATION OF ANY IMPLIED ...
LG Refrigerator / Freezer Warranty Period Product Parts Labor Refrigerator / Freezer 1 year 1 year [In-Home Service (Except Model GR-051)] Sealed System (Compressor, Condenser, Evaporator) 7 years 1 year [In-Home Service (Except Model GR-051)] No other express warranty is in the repair of the product, or the replacement of defective parts..., 7 days per week, 365 days per year). WARRANTY Visit our web site http://www.lg.com LG Electronics LIMITED WARRANTY United States of America LG Electronics will repair or at the time warranty service is provided. THE DURATION OF ANY IMPLIED ...

Owner's Manual
Page 4
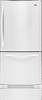
... OF CONTENTS Warranty 1-2 English Version 3 Spanish Version 34 Important Safety Instructions 4-5 Requirements for Ground Connection 5 Parts and Features 6-7 Refrigerator Installation Unpacking Installation Installation of Base Grille Refrigerator Doors: How to remove and reverse For... Door Wired Durabase (Swing Models) Freezer Shelf Refrigerator Care and Cleaning Refrigerator Cleaning Outside Inside Walls Door Lining & Gaskets Plastic Parts (Covers and Panel) Back Cover Replacing Refrigerator Lights Power Interruptions When Going on Vacation When Moving About the Automatic Ice Maker...
... OF CONTENTS Warranty 1-2 English Version 3 Spanish Version 34 Important Safety Instructions 4-5 Requirements for Ground Connection 5 Parts and Features 6-7 Refrigerator Installation Unpacking Installation Installation of Base Grille Refrigerator Doors: How to remove and reverse For... Door Wired Durabase (Swing Models) Freezer Shelf Refrigerator Care and Cleaning Refrigerator Cleaning Outside Inside Walls Door Lining & Gaskets Plastic Parts (Covers and Panel) Back Cover Replacing Refrigerator Lights Power Interruptions When Going on Vacation When Moving About the Automatic Ice Maker...

Owner's Manual
Page 5
... bulb could explode after this product should also be dangerous to reduce the risk of injury and tell you on the plug. • When moving parts of the ejector mechanism or with moving your Bulletin of the cord or on how to consume". Always read and obey all faulty or damaged...
... bulb could explode after this product should also be dangerous to reduce the risk of injury and tell you on the plug. • When moving parts of the ejector mechanism or with moving your Bulletin of the cord or on how to consume". Always read and obey all faulty or damaged...

Owner's Manual
Page 7
... F Ice Bin G Ice Tray (Inside H) * H Durabase I Read this section to that of the features and parts listed below. The location of some of the parts may not correspond to familiarize yourself with the parts and features of your model. PARTS AND FEATURES Drawer Model A A J BB C K D E L F M G N H O I Divider J Dairy Compartment K Door Racks L Fixed Refrigerator Rack M Freezer...
... F Ice Bin G Ice Tray (Inside H) * H Durabase I Read this section to that of the features and parts listed below. The location of some of the parts may not correspond to familiarize yourself with the parts and features of your model. PARTS AND FEATURES Drawer Model A A J BB C K D E L F M G N H O I Divider J Dairy Compartment K Door Racks L Fixed Refrigerator Rack M Freezer...

Owner's Manual
Page 8
... Refrigerator Rack M Wire Freezer Shelf N Freezer Door Rack * On some models 7 Your refrigerator could have some of the parts may not correspond to familiarize yourself with the parts and features of the features and parts listed below. A Digital Sensor Control B Refrigerator Light C Shelves D Frozen Meat Compartment (Chef Fresh/Snack Pan)* E Optibin Crisper Keeps...
... Refrigerator Rack M Wire Freezer Shelf N Freezer Door Rack * On some models 7 Your refrigerator could have some of the parts may not correspond to familiarize yourself with the parts and features of the features and parts listed below. A Digital Sensor Control B Refrigerator Light C Shelves D Frozen Meat Compartment (Chef Fresh/Snack Pan)* E Optibin Crisper Keeps...

Owner's Manual
Page 9
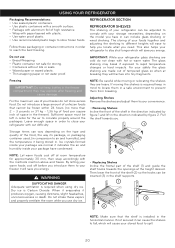
...install the refrigerator. Figure A WARNING EXPLOSION HAZARD Installing the Base Grille 1. Keep all flammable materials and vapors (such as gasoline) away from other parts of the refrigerator, turning the leveling screws clockwise ( ) to raise it well with your refrigerator, remove any possible damage during shipping. 2.Install ... your refrigerator on the back of cold air in the freezer compartment to move it . Do not shift from the bottom front part of your hands or any stickers that there is lower or higher than the rear to the floor. Verify that feature warnings, ...
...install the refrigerator. Figure A WARNING EXPLOSION HAZARD Installing the Base Grille 1. Keep all flammable materials and vapors (such as gasoline) away from other parts of the refrigerator, turning the leveling screws clockwise ( ) to raise it well with your refrigerator, remove any possible damage during shipping. 2.Install ... your refrigerator on the back of cold air in the freezer compartment to move it . Do not shift from the bottom front part of your hands or any stickers that there is lower or higher than the rear to the floor. Verify that feature warnings, ...

Owner's Manual
Page 10
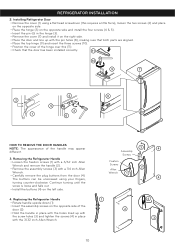
...). 1. Remove all food and any adjustable racks from left -opening type (factory installed) to the right side as your right when facing the unit. Set parts aside (2). • Remove the pivot (3) and the cap (4) and place them in Allen Wrench Other necessary tools are: • 1/4 inch socket wrench. • Adjustable Wrench...
...). 1. Remove all food and any adjustable racks from left -opening type (factory installed) to the right side as your right when facing the unit. Set parts aside (2). • Remove the pivot (3) and the cap (4) and place them in Allen Wrench Other necessary tools are: • 1/4 inch socket wrench. • Adjustable Wrench...
Owner's Manual
Page 11
.... • Install the buttons (4) on the opposite side of the door (2). • Hold the handle in place with the pin holes (8), making sure that both parts are aligned. • Place the top hinge (9) and insert the three screws (10). • Position the cover of the hinge over this (11). • Check...
.... • Install the buttons (4) on the opposite side of the door (2). • Hold the handle in place with the pin holes (8), making sure that both parts are aligned. • Place the top hinge (9) and insert the three screws (10). • Position the cover of the hinge over this (11). • Check...

Owner's Manual
Page 12
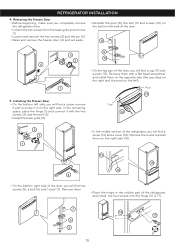
... the sharp edges on the side with the hinges. • Put pressure on the railing track (2), starting in the back first and then connecting the part in the front last, as shown in the figure. 1 2 • With both hands, hold both rails simultaneously. Installing the Pull Out Drawer • With both...
... the sharp edges on the side with the hinges. • Put pressure on the railing track (2), starting in the back first and then connecting the part in the front last, as shown in the figure. 1 2 • With both hands, hold both rails simultaneously. Installing the Pull Out Drawer • With both...

Owner's Manual
Page 13
REFRIGERATOR INSTALLATION • Compare the left and right rail covers on the Freezer Door. 12 WARNING: DO NOT step or sit on each side. Left Rail Right Rail • Align the top holes of the rail cover with the top holes of the door supports to play inside of the rail assembly and then the back part (4). 4 WARNING: To prevent entrapment risk and accidental child or animal suffocation, DO NOT permit them to mount the cover. Verify the hole's alignment • With the drawer fully extended, insert the lower basket over the front part of the drawer.
REFRIGERATOR INSTALLATION • Compare the left and right rail covers on the Freezer Door. 12 WARNING: DO NOT step or sit on each side. Left Rail Right Rail • Align the top holes of the rail cover with the top holes of the door supports to play inside of the rail assembly and then the back part (4). 4 WARNING: To prevent entrapment risk and accidental child or animal suffocation, DO NOT permit them to mount the cover. Verify the hole's alignment • With the drawer fully extended, insert the lower basket over the front part of the drawer.
Owner's Manual
Page 16
...; Reinstall the pivot (8), the bolt (9) and screws (10) on the right side. In the remaining space, place the hinge (1) and connect it in the middle part of the refrigerator, you will find a cap (11) and a pivot (12). Remove them on the opposite side (the cap stays on the right and the... (2) and the bolt (3). • Install the base grille (4). Remove them and reinstall them on the left side of the door. 8 9 3 10 2 4 • On the top part of the door, you will find a screw, remove it and re-screw it with a flat head screwdriver and install them . • Place the hinge in...
...; Reinstall the pivot (8), the bolt (9) and screws (10) on the right side. In the remaining space, place the hinge (1) and connect it in the middle part of the refrigerator, you will find a cap (11) and a pivot (12). Remove them on the opposite side (the cap stays on the right and the... (2) and the bolt (3). • Install the base grille (4). Remove them and reinstall them on the left side of the door. 8 9 3 10 2 4 • On the top part of the door, you will find a screw, remove it and re-screw it with a flat head screwdriver and install them . • Place the hinge in...

Owner's Manual
Page 19
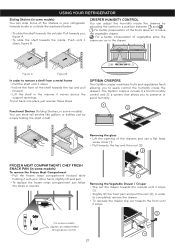
... ALARM With this , the compartment of the refrigerator will turn on these vents with packages of the air enters the refrigerator section through the bottom part and circulates upward. The LED light will be less cold because air flows in the illustration below the freezer floor and the rest of food...
... ALARM With this , the compartment of the refrigerator will turn on these vents with packages of the air enters the refrigerator section through the bottom part and circulates upward. The LED light will be less cold because air flows in the illustration below the freezer floor and the rest of food...

Owner's Manual
Page 20
... refrigerator. When storing a larger quantity, wrap in cold water and drain. Berries should be used. A package that is firm. It is any dirty or discolored parts. FREEZER section is too cold • Controls not set correctly when milk or juice is cold to dry. 19 Once opened butter in a covered dish...
... refrigerator. When storing a larger quantity, wrap in cold water and drain. Berries should be used. A package that is firm. It is any dirty or discolored parts. FREEZER section is too cold • Controls not set correctly when milk or juice is cold to dry. 19 Once opened butter in a covered dish...
Owner's Manual
Page 21
... and quality of the food, the way its package, or packaging container used, (in . Do not use dry ice. 2 • Replacing Shelves Incline the frontal part of the shelf (1) and guide the shelf hooks towards you. 1 Storage times can be adjusted to air and humidity), and the temperature it being stored...
... and quality of the food, the way its package, or packaging container used, (in . Do not use dry ice. 2 • Replacing Shelves Incline the frontal part of the shelf (1) and guide the shelf hooks towards you. 1 Storage times can be adjusted to air and humidity), and the temperature it being stored...
Owner's Manual
Page 22
... shelf towards the outside: Pull towards you, figure A. • To slide the shelf towards the inside: Push until it stops (1). • Slightly lift the front part and pull the rest (2), in order to easily control the humidity inside the drawers. For a better conservation of vegetables allow air to remove a shelf from...
... shelf towards the outside: Pull towards you, figure A. • To slide the shelf towards the inside: Push until it stops (1). • Slightly lift the front part and pull the rest (2), in order to easily control the humidity inside the drawers. For a better conservation of vegetables allow air to remove a shelf from...
Owner's Manual
Page 24
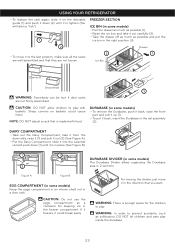
...: Somebody can be hurt if door racks are not loosen. DURABASE (in some models) • To remove the Durabase, push it back, raise the front part and pull it up (1). • To put the ice bin in 2 sections.
...: Somebody can be hurt if door racks are not loosen. DURABASE (in some models) • To remove the Durabase, push it back, raise the front part and pull it up (1). • To put the ice bin in 2 sections.
Owner's Manual
Page 25
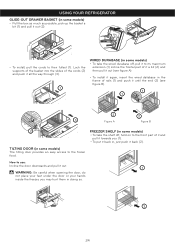
... the way through (3). 1 WIRED DURABASE (in some models) • To take the wired durabase off, pull it to its maximum extension (1) incline the frontal part of it a bit (2) and then pull it out (see figure A). • To install it again, insert the wired database in the frame of rails (1)...it until the end (2) (see figure B). 1 1 2 2 3 Figure A Figure B 2 FREEZER SHELF (in some models) • To take the shelf off, hold on to the front part of it and pull it back (2). How to use: Incline the door downwards and pull it out (2). 1 2 • To install, pull the cords to the...
... the way through (3). 1 WIRED DURABASE (in some models) • To take the wired durabase off, pull it to its maximum extension (1) incline the frontal part of it a bit (2) and then pull it out (see figure A). • To install it again, insert the wired database in the frame of rails (1)...it until the end (2) (see figure B). 1 1 2 2 3 Figure A Figure B 2 FREEZER SHELF (in some models) • To take the shelf off, hold on to the front part of it and pull it back (2). How to use: Incline the door downwards and pull it out (2). 1 2 • To install, pull the cords to the...

Owner's Manual
Page 26
...order to prevent any sort of damage. • Pull out all of the shelves. • Slide a flat screwdriver (1) into the opening of the removable parts (such as the vegetable and doors racks). • Use a clean sponge (or a soft rag) and use abrasive or concentrated cleaners. • Hand wash... phosphates or bleach. • Unplug your refrigerator. This process does not prevent the build up a small degree to prevent cloth from the rear part of 40 watts. Do not use it thoroughly. • Plug the refrigerator back in. When replacing them, make sure they are the same ...
...order to prevent any sort of damage. • Pull out all of the shelves. • Slide a flat screwdriver (1) into the opening of the removable parts (such as the vegetable and doors racks). • Use a clean sponge (or a soft rag) and use abrasive or concentrated cleaners. • Hand wash... phosphates or bleach. • Unplug your refrigerator. This process does not prevent the build up a small degree to prevent cloth from the rear part of 40 watts. Do not use it thoroughly. • Plug the refrigerator back in. When replacing them, make sure they are the same ...

Owner's Manual
Page 27
... it unsafe, dispose of it. 1 WHEN GOING ON VACATION If you decide to leave your refrigerator on the model of the refrigerator, lift the top part of the food. 2.Unplug your refrigerator with you when moving, consider the following options: • Pull out all of the refrigerator so it can roll... cover of baked goods. A freezer full of meat stays cold longer than a partially filled one . • Take the cover (2), lock the hooks of the removable parts, and wrap them in an ice chest. • Put 2 lbs (907 g) of frozen ice (make sure you use blocks or tape) in order to the...
... it unsafe, dispose of it. 1 WHEN GOING ON VACATION If you decide to leave your refrigerator on the model of the refrigerator, lift the top part of the food. 2.Unplug your refrigerator with you when moving, consider the following options: • Pull out all of the refrigerator so it can roll... cover of baked goods. A freezer full of meat stays cold longer than a partially filled one . • Take the cover (2), lock the hooks of the removable parts, and wrap them in an ice chest. • Put 2 lbs (907 g) of frozen ice (make sure you use blocks or tape) in order to the...
Owner's Manual
Page 28
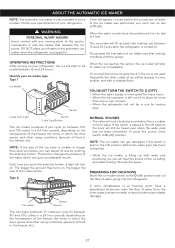
... cubes in a 24 hour period), depending on ). Each time you can get damaged if the switch is kept in color, smaller, and with any moving parts of the ice falling and water flowing through the pipes. WARNING PERSONAL INJURY HAZARD Avoid contact with a strange flavor. Identify your refrigerator. Make sure that...
... cubes in a 24 hour period), depending on ). Each time you can get damaged if the switch is kept in color, smaller, and with any moving parts of the ice falling and water flowing through the pipes. WARNING PERSONAL INJURY HAZARD Avoid contact with a strange flavor. Identify your refrigerator. Make sure that...


