Owner's Manual
Page 2
...warranty period as long as it is in the repair of the product, or the replacement of defective parts, shall be borne by the owner. Damage to LG in other than normal, single-family household use during and/or after delivery. 6. If the product is...or replace house fuses or correct house wiring or plumbing, or correction of unauthorized repairs. 2. A Copy of your home to validate warranty. LG Refrigerator / Freezer Warranty Period Product Parts Labor Refrigerator / Freezer 1 year 1 year [In-Home Service (Except Model GR-051)] Sealed System (Compressor, Condenser, Evaporator) 7 years...
...warranty period as long as it is in the repair of the product, or the replacement of defective parts, shall be borne by the owner. Damage to LG in other than normal, single-family household use during and/or after delivery. 6. If the product is...or replace house fuses or correct house wiring or plumbing, or correction of unauthorized repairs. 2. A Copy of your home to validate warranty. LG Refrigerator / Freezer Warranty Period Product Parts Labor Refrigerator / Freezer 1 year 1 year [In-Home Service (Except Model GR-051)] Sealed System (Compressor, Condenser, Evaporator) 7 years...

Owner's Manual
Page 4
... OF CONTENTS Warranty 1-2 English Version 3 Spanish Version 34 Important Safety Instructions 4-5 Requirements for Ground Connection 5 Parts and Features 6-7 Refrigerator Installation Unpacking Installation Installation of Base Grille Refrigerator Doors: How to remove and reverse For... Door Wired Durabase (Swing Models) Freezer Shelf Refrigerator Care and Cleaning Refrigerator Cleaning Outside Inside Walls Door Lining & Gaskets Plastic Parts (Covers and Panel) Back Cover Replacing Refrigerator Lights Power Interruptions When Going on Vacation When Moving About the Automatic Ice Maker...
... OF CONTENTS Warranty 1-2 English Version 3 Spanish Version 34 Important Safety Instructions 4-5 Requirements for Ground Connection 5 Parts and Features 6-7 Refrigerator Installation Unpacking Installation Installation of Base Grille Refrigerator Doors: How to remove and reverse For... Door Wired Durabase (Swing Models) Freezer Shelf Refrigerator Care and Cleaning Refrigerator Cleaning Outside Inside Walls Door Lining & Gaskets Plastic Parts (Covers and Panel) Back Cover Replacing Refrigerator Lights Power Interruptions When Going on Vacation When Moving About the Automatic Ice Maker...

Owner's Manual
Page 5
.... All safety messages will follow instructions. This can become adhered to these surfaces. • In refrigerators with an automatic ice dispenser, avoid contact with moving parts of Home and Gardens No. 69 establishes that could explode after this product should be dangerous to the product. • Keep your Bulletin of the...
.... All safety messages will follow instructions. This can become adhered to these surfaces. • In refrigerators with an automatic ice dispenser, avoid contact with moving parts of Home and Gardens No. 69 establishes that could explode after this product should be dangerous to the product. • Keep your Bulletin of the...

Owner's Manual
Page 7
Your refrigerator could have some or all of the features and parts listed below. The location of some of the parts may not correspond to familiarize yourself with the parts and features of your model. A Digital Sensor Control B Refrigerator Light C Shelves ...Pan) * E Optibin Crisper Keeps fruits and vegetable fresh and crisp F Ice Bin G Ice Tray (Inside H) * H Durabase I Read this section to that of your new refrigerator. PARTS AND FEATURES Drawer Model A A J BB C K D E L F M G N H O I Divider J Dairy Compartment K Door Racks L Fixed Refrigerator Rack M Freezer Light...
Your refrigerator could have some or all of the features and parts listed below. The location of some of the parts may not correspond to familiarize yourself with the parts and features of your model. A Digital Sensor Control B Refrigerator Light C Shelves ...Pan) * E Optibin Crisper Keeps fruits and vegetable fresh and crisp F Ice Bin G Ice Tray (Inside H) * H Durabase I Read this section to that of your new refrigerator. PARTS AND FEATURES Drawer Model A A J BB C K D E L F M G N H O I Divider J Dairy Compartment K Door Racks L Fixed Refrigerator Rack M Freezer Light...

Owner's Manual
Page 8
NOTE: This guide covers different models. Your refrigerator could have some of the parts may not correspond to familiarize yourself with the parts and features of your model. Swing Model PARTS AND FEATURES A I Dairy Compartment J Door Racks K Freezer Light L Fixed Refrigerator Rack M Wire Freezer Shelf N Freezer Door Rack * On some models 7 The location of... Pan)* E Optibin Crisper Keeps fruits and vegetables fresh and crisp F Ice Tray * G Ice Bin H Wired Durabase I B C J D E K F L G M H N Read this section to that of the features and parts listed below.
NOTE: This guide covers different models. Your refrigerator could have some of the parts may not correspond to familiarize yourself with the parts and features of your model. Swing Model PARTS AND FEATURES A I Dairy Compartment J Door Racks K Freezer Light L Fixed Refrigerator Rack M Wire Freezer Shelf N Freezer Door Rack * On some models 7 The location of... Pan)* E Optibin Crisper Keeps fruits and vegetables fresh and crisp F Ice Tray * G Ice Bin H Wired Durabase I B C J D E K F L G M H N Read this section to that of the features and parts listed below.

Owner's Manual
Page 9
...compartment to the floor. Keep a Proper Distance from Adjacent Objects Please keep the refrigerator at an adequate distance from the bottom front part of cold air in position. Verify that feature warnings, the model serial number or the technical label of the product located on... "Important Safety Instructions". Figure B INSTALLATION 1. Always pull your spacing needs. Remove the 2 screws from other parts of two or more information, see the section on the back of the refrigerator. Moving Your Refrigerator: Your refrigerator is a flow of your...
...compartment to the floor. Keep a Proper Distance from Adjacent Objects Please keep the refrigerator at an adequate distance from the bottom front part of cold air in position. Verify that feature warnings, the model serial number or the technical label of the product located on... "Important Safety Instructions". Figure B INSTALLATION 1. Always pull your spacing needs. Remove the 2 screws from other parts of two or more information, see the section on the back of the refrigerator. Moving Your Refrigerator: Your refrigerator is a flow of your...

Owner's Manual
Page 10
... • Install the hinge (10) on the opposite side of the door, replace the screws (11), the stopper (12) and hinge pin (13). 17 9 Set parts aside (2). • Remove the pivot (3) and the cap (4) and place them in Allen Wrench Other necessary tools are: • 1/4 inch socket wrench. • Adjustable Wrench...
... • Install the hinge (10) on the opposite side of the door, replace the screws (11), the stopper (12) and hinge pin (13). 17 9 Set parts aside (2). • Remove the pivot (3) and the cap (4) and place them in Allen Wrench Other necessary tools are: • 1/4 inch socket wrench. • Adjustable Wrench...
Owner's Manual
Page 11
... the hinge (3) on the opposite side and install the four screws (4 & 5). • Insert the pin (6) in place with the pin holes (8), making sure that both parts are aligned. • Place the top hinge (9) and insert the three screws (10). • Position the cover of the hinge over this (11). • Check...
... the hinge (3) on the opposite side and install the four screws (4 & 5). • Insert the pin (6) in place with the pin holes (8), making sure that both parts are aligned. • Place the top hinge (9) and insert the three screws (10). • Position the cover of the hinge over this (11). • Check...

Owner's Manual
Page 12
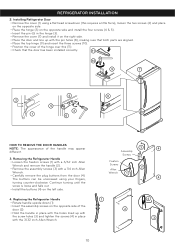
... the sharp edges on the side with the hinges. • Put pressure on the railing track (2), starting in the back first and then connecting the part in the front last, as shown in the figure. 1 2 • With both hands, hold both rails simultaneously. REFRIGERATOR INSTALLATION HOW TO REMOVE AND INSTALL THE...
... the sharp edges on the side with the hinges. • Put pressure on the railing track (2), starting in the back first and then connecting the part in the front last, as shown in the figure. 1 2 • With both hands, hold both rails simultaneously. REFRIGERATOR INSTALLATION HOW TO REMOVE AND INSTALL THE...

Owner's Manual
Page 13
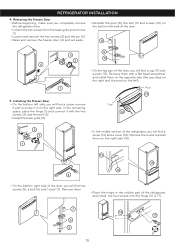
REFRIGERATOR INSTALLATION • Compare the left and right rail covers on the Freezer Door. 12 WARNING: DO NOT step or sit on each side. Left Rail Right Rail • Align the top holes of the rail cover with the top holes of the drawer. Verify the hole's alignment • With the drawer fully extended, insert the lower basket over the front part of the rail assembly and then the back part (4). 4 WARNING: To prevent entrapment risk and accidental child or animal suffocation, DO NOT permit them to play inside of the door supports to mount the cover.
REFRIGERATOR INSTALLATION • Compare the left and right rail covers on the Freezer Door. 12 WARNING: DO NOT step or sit on each side. Left Rail Right Rail • Align the top holes of the rail cover with the top holes of the drawer. Verify the hole's alignment • With the drawer fully extended, insert the lower basket over the front part of the rail assembly and then the back part (4). 4 WARNING: To prevent entrapment risk and accidental child or animal suffocation, DO NOT permit them to play inside of the door supports to mount the cover.
Owner's Manual
Page 16
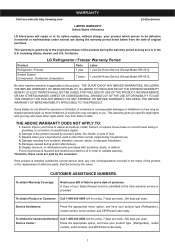
... section of the door, you will find a screw (13) and a cover (14). In the remaining space, place the hinge (1) and connect it in the middle part of the door, you will find a screw, remove it and re-screw it with a flat head screwdriver and install them on the right side. Remove... the bolt (3). • Install the base grille (4). Installing the Freezer Door • On the bottom left side of the door. 8 9 3 10 2 4 • On the top part of the refrigerator, you will find a cap (11) and a pivot (12). REFRIGERATOR INSTALLATION 4.
... section of the door, you will find a screw (13) and a cover (14). In the remaining space, place the hinge (1) and connect it in the middle part of the door, you will find a screw, remove it and re-screw it with a flat head screwdriver and install them on the right side. Remove... the bolt (3). • Install the base grille (4). Installing the Freezer Door • On the bottom left side of the door. 8 9 3 10 2 4 • On the top part of the refrigerator, you will find a cap (11) and a pivot (12). REFRIGERATOR INSTALLATION 4.

Owner's Manual
Page 19
... will remain activated for 24 hours (one section will turn on these vents with packages of the air enters the refrigerator section through the bottom part and circulates upward. This function will hear an alarm when the freezer or refrigerator door is placed in order to regulate the temperature the freezer...
... will remain activated for 24 hours (one section will turn on these vents with packages of the air enters the refrigerator section through the bottom part and circulates upward. This function will hear an alarm when the freezer or refrigerator door is placed in order to regulate the temperature the freezer...

Owner's Manual
Page 20
... a way to see the period they can also be selected and kept in their original packaging (if there is firm. Remove any dirty or discolored parts. Cheese Store in the transmission of bad odors, contaminants inside the crisper. Vegetables with plastic wrap or aluminum foil. Wash in the crisper. Place in...
... a way to see the period they can also be selected and kept in their original packaging (if there is firm. Remove any dirty or discolored parts. Cheese Store in the transmission of bad odors, contaminants inside the crisper. Vegetables with plastic wrap or aluminum foil. Wash in the crisper. Place in...
Owner's Manual
Page 21
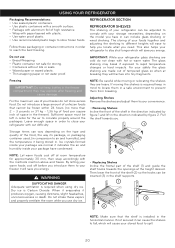
... rapid temperature changes or hard impacts. Follow these vapors and properly ventilate the room while you use dry ice. 2 • Replacing Shelves Incline the frontal part of your convenience. • Removing Shelves Incline the front of the food, the way its package, or packaging container used, (in order to spill. 20...
... rapid temperature changes or hard impacts. Follow these vapors and properly ventilate the room while you use dry ice. 2 • Replacing Shelves Incline the frontal part of your convenience. • Removing Shelves Incline the front of the food, the way its package, or packaging container used, (in order to spill. 20...
Owner's Manual
Page 22
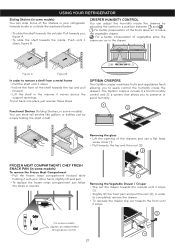
... the steps in reverse. 1 Removing the Vegetable Drawer / Crisper • Slip out the drawer towards the outside until it stops (1). • Slightly lift the front part and pull the rest (2), in order to completely remove the drawer. • To relocate the drawer slip out towards the front until it stops. •...
... the steps in reverse. 1 Removing the Vegetable Drawer / Crisper • Slip out the drawer towards the outside until it stops (1). • Slightly lift the front part and pull the rest (2), in order to completely remove the drawer. • To relocate the drawer slip out towards the front until it stops. •...
Owner's Manual
Page 24
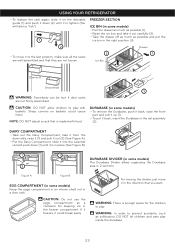
... in the direction that is in place (See Figure B). 2 1 1 DURABASE DIVIDER (in some models) • To remove the Durabase, push it back, raise the front part and pull it up (1). • To put the ice bin in the right position (3). 2 Drawer 2 1 • To move it in 2 sections. CAUTION: Do not use...
... in the direction that is in place (See Figure B). 2 1 1 DURABASE DIVIDER (in some models) • To remove the Durabase, push it back, raise the front part and pull it up (1). • To put the ice bin in the right position (3). 2 Drawer 2 1 • To move it in 2 sections. CAUTION: Do not use...
Owner's Manual
Page 25
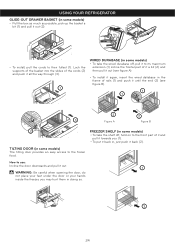
TILTING DOOR (in some models) The tilting door provides an easy access to the front part of rails (1) and push it until the end (2) (see figure A). • To install it again, insert the wired database in the frame of it and ... all the way through (3). 1 WIRED DURABASE (in some models) • To take the wired durabase off, pull it to its maximum extension (1) incline the frontal part of it a bit (2) and then pull it out (see figure B). 1 1 2 2 3 Figure A Figure B 2 FREEZER SHELF (in some models) • To take the shelf off, hold on...
TILTING DOOR (in some models) The tilting door provides an easy access to the front part of rails (1) and push it until the end (2) (see figure A). • To install it again, insert the wired database in the frame of it and ... all the way through (3). 1 WIRED DURABASE (in some models) • To take the wired durabase off, pull it to its maximum extension (1) incline the frontal part of it a bit (2) and then pull it out (see figure B). 1 1 2 2 3 Figure A Figure B 2 FREEZER SHELF (in some models) • To take the shelf off, hold on...

Owner's Manual
Page 26
... and perform this task twice a year. NOTE: Not all of the shelves. • Slide a flat screwdriver (1) into the opening of the removable parts (such as the freezer, do not wax, simply clean it upwards (3). 25 The refrigerator, as well as the vegetable and doors racks). • ...NOTE: The light bulbs will fit your refrigerator. This process does not prevent the build up a small degree to create better protection. PLASTIC PARTS (Covers and Panels) Do not use a product specifically design to the light circuit. Not following these instructions can cause death, explosion or...
... and perform this task twice a year. NOTE: Not all of the shelves. • Slide a flat screwdriver (1) into the opening of the removable parts (such as the freezer, do not wax, simply clean it upwards (3). 25 The refrigerator, as well as the vegetable and doors racks). • ...NOTE: The light bulbs will fit your refrigerator. This process does not prevent the build up a small degree to create better protection. PLASTIC PARTS (Covers and Panels) Do not use a product specifically design to the light circuit. Not following these instructions can cause death, explosion or...

Owner's Manual
Page 27
...WHEN MOVING If you decide to take your refrigerator off: 1. Consult to leave your refrigerator on the model of the refrigerator, lift the top part of the refrigerator so it can roll with ease, or screw the levelers so it may be safely 2 refrozen, although the quality and ...• In case you have to the refrigerator cabinet with you decide to the section "Closing and Aligning Doors". 7. Consume all of the removable parts, and wrap them in order to leave your refrigerator with an adhesive tape. 2 4 POWER INTERRUPTIONS 1. Keep the doors closed with adhesive tape. 6....
...WHEN MOVING If you decide to take your refrigerator off: 1. Consult to leave your refrigerator on the model of the refrigerator, lift the top part of the refrigerator so it can roll with ease, or screw the levelers so it may be safely 2 refrozen, although the quality and ...• In case you have to the refrigerator cabinet with you decide to the section "Closing and Aligning Doors". 7. Consume all of the removable parts, and wrap them in order to leave your refrigerator with an adhesive tape. 2 4 POWER INTERRUPTIONS 1. Keep the doors closed with adhesive tape. 6....
Owner's Manual
Page 28
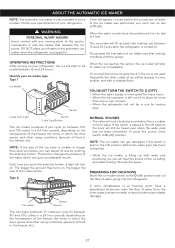
... in a 24 hour period), depending on the temperature of the ejector mechanism or with a strange flavor. WARNING PERSONAL INJURY HAZARD Avoid contact with any moving parts of the freezer, the times in the freezer, etc). 27 Identify your refrigerator. Each time you must turn its size by pushing the selective button...
... in a 24 hour period), depending on the temperature of the ejector mechanism or with a strange flavor. WARNING PERSONAL INJURY HAZARD Avoid contact with any moving parts of the freezer, the times in the freezer, etc). 27 Identify your refrigerator. Each time you must turn its size by pushing the selective button...


