Owner's Manual
Page 2
...wiring or plumbing, or correction of unauthorized repairs. 2. CUSTOMER ASSISTANCE NUMBERS: To obtain Warranty Coverage: Retain your LG product is provided. Territories. LG Refrigerator / Freezer Warranty Period Product Parts Labor Refrigerator / Freezer 1 year 1 year [In-Home Service (Except Model GR-051)] Sealed System (Compressor... rights which proves to prove date of purchase. Some States do not allow the exclusion or limitation of defective parts, shall be defective in order to state. Damage to this product. Therefore, these limitations or exclusions may also...
...wiring or plumbing, or correction of unauthorized repairs. 2. CUSTOMER ASSISTANCE NUMBERS: To obtain Warranty Coverage: Retain your LG product is provided. Territories. LG Refrigerator / Freezer Warranty Period Product Parts Labor Refrigerator / Freezer 1 year 1 year [In-Home Service (Except Model GR-051)] Sealed System (Compressor... rights which proves to prove date of purchase. Some States do not allow the exclusion or limitation of defective parts, shall be defective in order to state. Damage to this product. Therefore, these limitations or exclusions may also...

Owner's Manual
Page 4
... OF CONTENTS Warranty 1-2 English Version 3 Spanish Version 34 Important Safety Instructions 4-5 Requirements for Ground Connection 5 Parts and Features 6-7 Refrigerator Installation Unpacking Installation Installation of Base Grille Refrigerator Doors: How to remove and reverse For... Door Wired Durabase (Swing Models) Freezer Shelf Refrigerator Care and Cleaning Refrigerator Cleaning Outside Inside Walls Door Lining & Gaskets Plastic Parts (Covers and Panel) Back Cover Replacing Refrigerator Lights Power Interruptions When Going on Vacation When Moving About the Automatic Ice Maker...
... OF CONTENTS Warranty 1-2 English Version 3 Spanish Version 34 Important Safety Instructions 4-5 Requirements for Ground Connection 5 Parts and Features 6-7 Refrigerator Installation Unpacking Installation Installation of Base Grille Refrigerator Doors: How to remove and reverse For... Door Wired Durabase (Swing Models) Freezer Shelf Refrigerator Care and Cleaning Refrigerator Cleaning Outside Inside Walls Door Lining & Gaskets Plastic Parts (Covers and Panel) Back Cover Replacing Refrigerator Lights Power Interruptions When Going on Vacation When Moving About the Automatic Ice Maker...

Owner's Manual
Page 5
... safety, this or any repair services be properly grounded. All safety messages inform you of potential danger, advise you on the plug. • When moving parts of injury and tell you , others or the product. The Department of Agriculture of fire, electrical shock or personal injury, the following safety messages. This...
... safety, this or any repair services be properly grounded. All safety messages inform you of potential danger, advise you on the plug. • When moving parts of injury and tell you , others or the product. The Department of Agriculture of fire, electrical shock or personal injury, the following safety messages. This...

Owner's Manual
Page 7
... Tray (Inside H) * H Durabase I Read this section to that of the features and parts listed below. NOTE: This guide covers different models. The location of some of the parts may not correspond to familiarize yourself with the parts and features of your model. PARTS AND FEATURES Drawer Model A A J BB C K D E L F M G N H O I Divider J Dairy Compartment K Door Racks L Fixed...
... Tray (Inside H) * H Durabase I Read this section to that of the features and parts listed below. NOTE: This guide covers different models. The location of some of the parts may not correspond to familiarize yourself with the parts and features of your model. PARTS AND FEATURES Drawer Model A A J BB C K D E L F M G N H O I Divider J Dairy Compartment K Door Racks L Fixed...

Owner's Manual
Page 8
... Compartment J Door Racks K Freezer Light L Fixed Refrigerator Rack M Wire Freezer Shelf N Freezer Door Rack * On some of the parts may not correspond to familiarize yourself with the parts and features of the features and parts listed below. A Digital Sensor Control B Refrigerator Light C Shelves D Frozen Meat Compartment (Chef Fresh/Snack Pan)* E Optibin Crisper Keeps...
... Compartment J Door Racks K Freezer Light L Fixed Refrigerator Rack M Wire Freezer Shelf N Freezer Door Rack * On some of the parts may not correspond to familiarize yourself with the parts and features of the features and parts listed below. A Digital Sensor Control B Refrigerator Light C Shelves D Frozen Meat Compartment (Chef Fresh/Snack Pan)* E Optibin Crisper Keeps...

Owner's Manual
Page 9
... INSTALLATION OF BASE GRILLE Uninstalling or Replacing the Base Grille 1. Keep all flammable materials and vapors (such as gasoline) away from other parts of the body. 3.Install the refrigerator in the bottom of the refrigerator. Not following these instructions may injure yourself. • DO not... 2 screws from side to side or "walk" the refrigerator when attempting to ensure proper cooling. Do not shift from the bottom front part of your refrigerator and remove and dust accumulated during shipping. 3. WARNING: • Take care when working with warm water and let dry...
... INSTALLATION OF BASE GRILLE Uninstalling or Replacing the Base Grille 1. Keep all flammable materials and vapors (such as gasoline) away from other parts of the body. 3.Install the refrigerator in the bottom of the refrigerator. Not following these instructions may injure yourself. • DO not... 2 screws from side to side or "walk" the refrigerator when attempting to ensure proper cooling. Do not shift from the bottom front part of your refrigerator and remove and dust accumulated during shipping. 3. WARNING: • Take care when working with warm water and let dry...

Owner's Manual
Page 10
... side mode to right-opening type. HOW TO REVERSE DOOR SWING (when converting from left -opening type (factory installed) to the right-opening mode). 1. Set parts aside (2). • Remove the pivot (3) and the cap (4) and place them in Allen Wrench Other necessary tools are: • 1/4 inch socket wrench. • Adjustable Wrench...
... side mode to right-opening type. HOW TO REVERSE DOOR SWING (when converting from left -opening type (factory installed) to the right-opening mode). 1. Set parts aside (2). • Remove the pivot (3) and the cap (4) and place them in Allen Wrench Other necessary tools are: • 1/4 inch socket wrench. • Adjustable Wrench...
Owner's Manual
Page 11
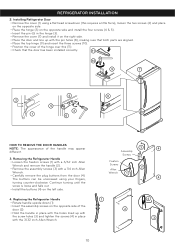
... inch Allen Wrench. 3 4 Assembly Screws Fixation Screws Allen 2 Wrench 1 4 1 4 2 3 10 The buttons can be unscrewed using a flat head screwdriver (this (11). • Check that both parts are aligned. • Place the top hinge (9) and insert the three screws (10). • Position the cover of the handle may appear different. 3. REFRIGERATOR INSTALLATION...
... inch Allen Wrench. 3 4 Assembly Screws Fixation Screws Allen 2 Wrench 1 4 1 4 2 3 10 The buttons can be unscrewed using a flat head screwdriver (this (11). • Check that both parts are aligned. • Place the top hinge (9) and insert the three screws (10). • Position the cover of the handle may appear different. 3. REFRIGERATOR INSTALLATION...

Owner's Manual
Page 12
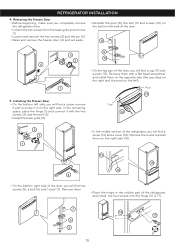
... the sharp edges on the side with the hinges. • Put pressure on the railing track (2), starting in the back first and then connecting the part in the front last, as shown in the figure. 1 2 • With both hands, hold both rails simultaneously. Remove the bottom rack (1) by tilting it back...
... the sharp edges on the side with the hinges. • Put pressure on the railing track (2), starting in the back first and then connecting the part in the front last, as shown in the figure. 1 2 • With both hands, hold both rails simultaneously. Remove the bottom rack (1) by tilting it back...

Owner's Manual
Page 13
Verify the hole's alignment • With the drawer fully extended, insert the lower basket over the front part of the drawer. Left Rail Right Rail • Align the top holes of the rail cover with the top holes of the door supports to play inside of the rail assembly and then the back part (4). 4 WARNING: To prevent entrapment risk and accidental child or animal suffocation, DO NOT permit them to mount the cover. WARNING: DO NOT step or sit on each side. REFRIGERATOR INSTALLATION • Compare the left and right rail covers on the Freezer Door. 12
Verify the hole's alignment • With the drawer fully extended, insert the lower basket over the front part of the drawer. Left Rail Right Rail • Align the top holes of the rail cover with the top holes of the door supports to play inside of the rail assembly and then the back part (4). 4 WARNING: To prevent entrapment risk and accidental child or animal suffocation, DO NOT permit them to mount the cover. WARNING: DO NOT step or sit on each side. REFRIGERATOR INSTALLATION • Compare the left and right rail covers on the Freezer Door. 12
Owner's Manual
Page 16
...opposite side (the cap stays on the right and the pivot on the bottom left side of the door. 8 9 3 10 2 4 • On the top part of the refrigerator and install the four screws into the hinge (16 & 17). 7 16 17 6 5 15 Installing the Freezer Door • On the bottom ... with the two screws (2) and the bolt (3). • Install the base grille (4). In the remaining space, place the hinge (1) and connect it in the middle part of the door, you will find two screws (5), a bolt (6) and 1 pivot (7). Cap 12 2 3 1 • In the middle section of the door, you will find ...
...opposite side (the cap stays on the right and the pivot on the bottom left side of the door. 8 9 3 10 2 4 • On the top part of the refrigerator and install the four screws into the hinge (16 & 17). 7 16 17 6 5 15 Installing the Freezer Door • On the bottom ... with the two screws (2) and the bolt (3). • Install the base grille (4). In the remaining space, place the hinge (1) and connect it in the middle part of the door, you will find two screws (5), a bolt (6) and 1 pivot (7). Cap 12 2 3 1 • In the middle section of the door, you will find ...

Owner's Manual
Page 19
... or refrigerator door is placed in one day) in normal operation. After this , the compartment of the air enters the refrigerator section through the bottom part and circulates upward. DOOR ALARM With this feature you may adjust the compartments to your desired temperature. • Refrigerator Control: Position 1 to 7 (32 °F to...
... or refrigerator door is placed in one day) in normal operation. After this , the compartment of the air enters the refrigerator section through the bottom part and circulates upward. DOOR ALARM With this feature you may adjust the compartments to your desired temperature. • Refrigerator Control: Position 1 to 7 (32 °F to...

Owner's Manual
Page 20
... the refrigerator first. Setting the freezer control to a lower temperature keeps more information on how great you package the food. Remove any dirty or discolored parts. Leafy Vegetables Remove original packaging and trim any objects blocking air flow. STORING FROZEN FOOD NOTE: For more cold air in airtight and moisture-proof...
... the refrigerator first. Setting the freezer control to a lower temperature keeps more information on how great you package the food. Remove any dirty or discolored parts. Leafy Vegetables Remove original packaging and trim any objects blocking air flow. STORING FROZEN FOOD NOTE: For more cold air in airtight and moisture-proof...
Owner's Manual
Page 21
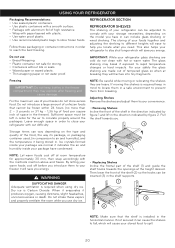
... they will save you have condensed. Follow these vapors and properly ventilate the room while you use dry ice. 2 • Replacing Shelves Incline the frontal part of your stored food to air and humidity), and the temperature it can vary depending on the model you energy. IMPORTANT: While your refrigerator glass...
... they will save you have condensed. Follow these vapors and properly ventilate the room while you use dry ice. 2 • Replacing Shelves Incline the frontal part of your stored food to air and humidity), and the temperature it can vary depending on the model you energy. IMPORTANT: While your refrigerator glass...
Owner's Manual
Page 22
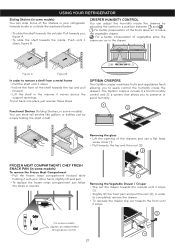
... CONTROL You can store tall articles like explained below. • To slide the shelf towards the outside until it stops (1). • Slightly lift the front part and pull the rest (2), in a position between and . For better preservation of the fruits allow the maximum air in some models applies an independent temperature...
... CONTROL You can store tall articles like explained below. • To slide the shelf towards the outside until it stops (1). • Slightly lift the front part and pull the rest (2), in a position between and . For better preservation of the fruits allow the maximum air in some models applies an independent temperature...
Owner's Manual
Page 24
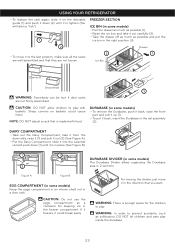
...: There is tighten (You will listen a "tick"). 1 FREEZER SECTION ICE BIN (in some models) • To remove the Durabase, push it back, raise the front part and pull it up (1). • To put the ice bin in a door rack. For moving the divider, just move it in the rail assembly (2). CAUTION...
...: There is tighten (You will listen a "tick"). 1 FREEZER SECTION ICE BIN (in some models) • To remove the Durabase, push it back, raise the front part and pull it up (1). • To put the ice bin in a door rack. For moving the divider, just move it in the rail assembly (2). CAUTION...
Owner's Manual
Page 25
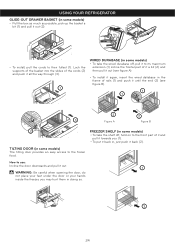
... (2) (see figure B). 1 1 2 2 3 Figure A Figure B 2 FREEZER SHELF (in some models) • To take the wired durabase off, pull it to its maximum extension (1) incline the frontal part of it a bit (2) and then pull it out (see figure A). • To install it again, insert the wired database in the frame of it and... of the cords (2) and push it all the way through (3). 1 WIRED DURABASE (in some models) The tilting door provides an easy access to the front part of rails (1) and push it back (2). TILTING DOOR (in doing so. 2 24
... (2) (see figure B). 1 1 2 2 3 Figure A Figure B 2 FREEZER SHELF (in some models) • To take the wired durabase off, pull it to its maximum extension (1) incline the frontal part of it a bit (2) and then pull it out (see figure A). • To install it again, insert the wired database in the frame of it and... of the cords (2) and push it all the way through (3). 1 WIRED DURABASE (in some models) The tilting door provides an easy access to the front part of rails (1) and push it back (2). TILTING DOOR (in doing so. 2 24

Owner's Manual
Page 26
... Pull out all of the shelves. • Slide a flat screwdriver (1) into the opening of your refrigerator. NOTE: Not all of the removable parts (such as the freezer, do not wax, simply clean it with a mixture of baking powder and lukewarm water (one teaspoon of baking powder per... or abrasive products. OUTSIDE Wax the outside in . REFRIGERATOR CARE AND CLEANING WARNING EXPLOSION HAZARD BACK COVER WARNING ELECTRICAL SHOCK HAZARD Before you clean both parts once a month; clean spilled liquids immediately. Do not use it . • Install the new light bulb. • Take the cover (1), lock...
... Pull out all of the shelves. • Slide a flat screwdriver (1) into the opening of your refrigerator. NOTE: Not all of the removable parts (such as the freezer, do not wax, simply clean it with a mixture of baking powder and lukewarm water (one teaspoon of baking powder per... or abrasive products. OUTSIDE Wax the outside in . REFRIGERATOR CARE AND CLEANING WARNING EXPLOSION HAZARD BACK COVER WARNING ELECTRICAL SHOCK HAZARD Before you clean both parts once a month; clean spilled liquids immediately. Do not use it . • Install the new light bulb. • Take the cover (1), lock...

Owner's Manual
Page 27
.... When your refrigerator arrives to prevent bad odors and fungi from its tray. 4.Clean and dry it with a rag. 5.Pull out all of the removable parts, and wrap them with adhesive tape. 6.Depending on when going away, consider these steps: 1. Replacing the Freezer light • Unplug the refrigerator. • Unlock the... fro 2 to 4 days. • In case you use blocks or tape) in order to your refrigerator on the model of the refrigerator, lift the top part of the refrigerator so it can roll with ease, or screw the levelers so it will keep the food fresh. 3.In case of a longer black...
.... When your refrigerator arrives to prevent bad odors and fungi from its tray. 4.Clean and dry it with a rag. 5.Pull out all of the removable parts, and wrap them with adhesive tape. 6.Depending on when going away, consider these steps: 1. Replacing the Freezer light • Unplug the refrigerator. • Unlock the... fro 2 to 4 days. • In case you use blocks or tape) in order to your refrigerator on the model of the refrigerator, lift the top part of the refrigerator so it can roll with ease, or screw the levelers so it will keep the food fresh. 3.In case of a longer black...
Owner's Manual
Page 28
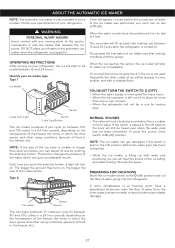
WARNING PERSONAL INJURY HAZARD Avoid contact with any moving parts of the ejector mechanism or with the sensor. The ice maker will fill up with a strange flavor. Throw away the first batch of the ice ...
WARNING PERSONAL INJURY HAZARD Avoid contact with any moving parts of the ejector mechanism or with the sensor. The ice maker will fill up with a strange flavor. Throw away the first batch of the ice ...


