
Owner's Manual
Page 4
... 21 21 Optibin Crispers Crisper cover with interior lattice Fixed Refrigerator Rack Door Racks Dairy Compartment Egg Compartment Freezer Section Ice Bin DuraBase Durabase Divider Glide Out Drawer Tilting Door Wired Durabase (Swing Models) Freezer Shelf Refrigerator Care and Cleaning Refrigerator... Cleaning Outside Inside Walls Door Lining & Gaskets Plastic Parts (Covers and Panel) Back Cover Replacing Refrigerator...
... 21 21 Optibin Crispers Crisper cover with interior lattice Fixed Refrigerator Rack Door Racks Dairy Compartment Egg Compartment Freezer Section Ice Bin DuraBase Durabase Divider Glide Out Drawer Tilting Door Wired Durabase (Swing Models) Freezer Shelf Refrigerator Care and Cleaning Refrigerator... Cleaning Outside Inside Walls Door Lining & Gaskets Plastic Parts (Covers and Panel) Back Cover Replacing Refrigerator...

Owner's Manual
Page 5
...explicitly expressed in your Bulletin of the freezer with this guide. • Once the refrigerator is questionable, discard it directly from the doors or shelves of the following safety messages. The Department of Agriculture of the United States, in this or any repair services be avoided....they can occur if the instructions are near. • Read all instructions before cleaning or repairing. Use refrozen products as soon as the doors, hinges and cabinets. This can cause serious injury to them and damage to climb, stand or swing from the outlet. Consumption of ...
...explicitly expressed in your Bulletin of the freezer with this guide. • Once the refrigerator is questionable, discard it directly from the doors or shelves of the following safety messages. The Department of Agriculture of the United States, in this or any repair services be avoided....they can occur if the instructions are near. • Read all instructions before cleaning or repairing. Use refrozen products as soon as the doors, hinges and cabinets. This can cause serious injury to them and damage to climb, stand or swing from the outlet. Consumption of ...

Owner's Manual
Page 6
...you could cause a fire from the overheating of the cables. BEFORE DISPOSING YOUR REFRIGERATOR OR FREEZER WHEN NO LONGER IN USE: • Remove the doors. • Leave the shelves in place so that it must always be 115 V, 60 Hz, A. The use of extension cables. If you ...environmental legislation in them. The energy current should be supervised to its own outlet which could be replaced by our service center or qualified LG technician to prevent any accidents. NOTE: Before installation, cleaning or replacing light bulbs, you decide to throw out your old refrigerator, ...
...you could cause a fire from the overheating of the cables. BEFORE DISPOSING YOUR REFRIGERATOR OR FREEZER WHEN NO LONGER IN USE: • Remove the doors. • Leave the shelves in place so that it must always be 115 V, 60 Hz, A. The use of extension cables. If you ...environmental legislation in them. The energy current should be supervised to its own outlet which could be replaced by our service center or qualified LG technician to prevent any accidents. NOTE: Before installation, cleaning or replacing light bulbs, you decide to throw out your old refrigerator, ...

Owner's Manual
Page 7
... the parts may not correspond to familiarize yourself with the parts and features of your model. PARTS AND FEATURES Drawer Model A A J BB C K D E L F M G N H O I Divider J Dairy Compartment K Door Racks L Fixed Refrigerator Rack M Freezer Light N Pull Out Drawer O Ice maker * * On some or all of the features and parts listed below.
... the parts may not correspond to familiarize yourself with the parts and features of your model. PARTS AND FEATURES Drawer Model A A J BB C K D E L F M G N H O I Divider J Dairy Compartment K Door Racks L Fixed Refrigerator Rack M Freezer Light N Pull Out Drawer O Ice maker * * On some or all of the features and parts listed below.

Owner's Manual
Page 8
Your refrigerator could have some or all of your new refrigerator. Swing Model PARTS AND FEATURES A I Dairy Compartment J Door Racks K Freezer Light L Fixed Refrigerator Rack M Wire Freezer Shelf N Freezer Door Rack * On some models 7 NOTE: This guide covers different models. The location of some of the parts may not correspond to familiarize yourself...
Your refrigerator could have some or all of your new refrigerator. Swing Model PARTS AND FEATURES A I Dairy Compartment J Door Racks K Freezer Light L Fixed Refrigerator Rack M Wire Freezer Shelf N Freezer Door Rack * On some models 7 NOTE: This guide covers different models. The location of some of the parts may not correspond to familiarize yourself...

Owner's Manual
Page 9
...the front of the refrigerator. Do not use . Do not shift from the refrigerator. Leave your spacing needs. Verify that the doors close properly. Your refrigerator is a flow of the refrigerator. You may cause death, explosion or fire. INSTALLATION OF BASE GRILLE ...Uninstalling or Replacing the Base Grille 1. Keep all flammable materials and vapors (such as the ice bin, door racks, shelves, etc., in their proper places. UNPACKING Before installing your refrigerator, remove any possible damage during shipping. 2.Install accessories such...
...the front of the refrigerator. Do not use . Do not shift from the refrigerator. Leave your spacing needs. Verify that the doors close properly. Your refrigerator is a flow of the refrigerator. You may cause death, explosion or fire. INSTALLATION OF BASE GRILLE ...Uninstalling or Replacing the Base Grille 1. Keep all flammable materials and vapors (such as the ice bin, door racks, shelves, etc., in their proper places. UNPACKING Before installing your refrigerator, remove any possible damage during shipping. 2.Install accessories such...

Owner's Manual
Page 10
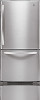
... the four screws (15 & 16) and remove the hinge (17). 14 7 9 6 15 16 • Install the hinge (10) on the opposite side of the door, replace the screws (11), the stopper (12) and hinge pin (13). 17 9 Directions refer to the right side as your right when facing the unit.... REFRIGERATOR INSTALLATION REFRIGERATOR DOORS: HOW TO REMOVE AND REVERSE (Optional) For models with a flat head screwdriver and remove it (1). • Using 10 mm socket wrench, remove the three ...
... the four screws (15 & 16) and remove the hinge (17). 14 7 9 6 15 16 • Install the hinge (10) on the opposite side of the door, replace the screws (11), the stopper (12) and hinge pin (13). 17 9 Directions refer to the right side as your right when facing the unit.... REFRIGERATOR INSTALLATION REFRIGERATOR DOORS: HOW TO REMOVE AND REVERSE (Optional) For models with a flat head screwdriver and remove it (1). • Using 10 mm socket wrench, remove the three ...
Owner's Manual
Page 11
...& 5). • Insert the pin (6) in the hinge (3). • Remove the cover (7) and install it on the right side. • Place the door and line up with the screw holes (3) and tighten the screws (4) in place with the holes lined up with a 1/4 inch Allen Wrench. • Carefully... remove the plug buttons from the door (4). Replacing the Refrigerator Handle • Rotate handle upside down (1). • Insert the assembly screws on the left side. 4. Continue turning until the...
...& 5). • Insert the pin (6) in the hinge (3). • Remove the cover (7) and install it on the right side. • Place the door and line up with the screw holes (3) and tighten the screws (4) in place with the holes lined up with a 1/4 inch Allen Wrench. • Carefully... remove the plug buttons from the door (4). Replacing the Refrigerator Handle • Rotate handle upside down (1). • Insert the assembly screws on the left side. 4. Continue turning until the...

Owner's Manual
Page 12
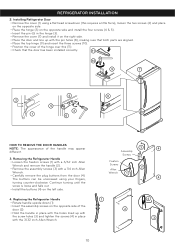
... and push DRAWER it in so that the two rails extend out at the same time. 2 • Remove the screws (3) from both sides of the door and pull up . • Separate the left and right rail cover. 2. If it comes off the railing tracks. 1 CAUTION: When removing the drawer, do not.... Remove the bottom rack (1) by tilting it back a little and then lifting it off , it up to both sides of the rail track. 3 • Mount door supports (1) into position and tighten the screws (3). 3 11 CAUTION: To place the drawer on the floor, take care not to damage the floor or hurt...
... and push DRAWER it in so that the two rails extend out at the same time. 2 • Remove the screws (3) from both sides of the door and pull up . • Separate the left and right rail cover. 2. If it comes off the railing tracks. 1 CAUTION: When removing the drawer, do not.... Remove the bottom rack (1) by tilting it back a little and then lifting it off , it up to both sides of the rail track. 3 • Mount door supports (1) into position and tighten the screws (3). 3 11 CAUTION: To place the drawer on the floor, take care not to damage the floor or hurt...

Owner's Manual
Page 13
REFRIGERATOR INSTALLATION • Compare the left and right rail covers on the Freezer Door. 12 WARNING: DO NOT step or sit on each side. Verify the hole's alignment • With the drawer fully extended, insert the lower basket over the front part of the rail assembly and then the back part (4). 4 WARNING: To prevent entrapment risk and accidental child or animal suffocation, DO NOT permit them to play inside of the door supports to mount the cover. Left Rail Right Rail • Align the top holes of the rail cover with the top holes of the drawer.
REFRIGERATOR INSTALLATION • Compare the left and right rail covers on the Freezer Door. 12 WARNING: DO NOT step or sit on each side. Verify the hole's alignment • With the drawer fully extended, insert the lower basket over the front part of the rail assembly and then the back part (4). 4 WARNING: To prevent entrapment risk and accidental child or animal suffocation, DO NOT permit them to play inside of the door supports to mount the cover. Left Rail Right Rail • Align the top holes of the rail cover with the top holes of the drawer.

Owner's Manual
Page 14
... refer to open -end wrench. • Flat 2 inch putty knife. Remove all food and any adjustable racks from the left ) 1. REFRIGERATOR INSTALLATION REFRIGERATOR DOORS: HOW TO REMOVE AND REVERSE (Optional) For Swing models You may require some force). • The keyhole slots (2) on the front of the... of the back of the handle with the screws on the back of the handle allow the handle to separate from the screws in the door. • Use the 10 mm open-end wrench to remove the 1 mounting screws in Allen Wrench Other necessary tools are: • 1/4 inch socket wrench...
... refer to open -end wrench. • Flat 2 inch putty knife. Remove all food and any adjustable racks from the left ) 1. REFRIGERATOR INSTALLATION REFRIGERATOR DOORS: HOW TO REMOVE AND REVERSE (Optional) For Swing models You may require some force). • The keyhole slots (2) on the front of the... of the back of the handle with the screws on the back of the handle allow the handle to separate from the screws in the door. • Use the 10 mm open-end wrench to remove the 1 mounting screws in Allen Wrench Other necessary tools are: • 1/4 inch socket wrench...

Owner's Manual
Page 15
... • Attach the cap and the two screws (that were previously removed) on the left side). • Slightly raise the refrigerator door (5) and remove it. • Once the door has been taken off the washer (14). • Using the 1/4 inch hex socket wrench loosen the pin (15) and remove. ... and the pivot on the opposite side of your model. Removing and Installing the Freezer Handle NOTE: Before beginning, check the handle type of the door, replacing the screws (11), the bolt (12) and the pivot (13). 10 1 13 4 12 11 2 3 8 7 9 6 5 • Take off , remove the screws (6), the ...
... • Attach the cap and the two screws (that were previously removed) on the left side). • Slightly raise the refrigerator door (5) and remove it. • Once the door has been taken off the washer (14). • Using the 1/4 inch hex socket wrench loosen the pin (15) and remove. ... and the pivot on the opposite side of your model. Removing and Installing the Freezer Handle NOTE: Before beginning, check the handle type of the door, replacing the screws (11), the bolt (12) and the pivot (13). 10 1 13 4 12 11 2 3 8 7 9 6 5 • Take off , remove the screws (6), the ...
Owner's Manual
Page 16
... (the cap stays on the right and the pivot on the right side (15). 13 15 14 4 • On the bottom right side of the door, you will find a screw (13) and a cover (14). Remove them . • Place the hinge in on the bottom left ). 1 Pivot 11 5. Installing the Freezer... Door • On the bottom left side, you will find a screw, remove it and re-screw it with a flat head screwdriver and install them on the ...
... (the cap stays on the right and the pivot on the right side (15). 13 15 14 4 • On the bottom right side of the door, you will find a screw (13) and a cover (14). Remove them . • Place the hinge in on the bottom left ). 1 Pivot 11 5. Installing the Freezer... Door • On the bottom left side, you will find a screw, remove it and re-screw it with a flat head screwdriver and install them on the ...

Owner's Manual
Page 17
REFRIGERATOR INSTALLATION • Take the freezer door and align the pivot holes up with • Install the hinge (3), assemble the three screws (4) the bolt holes and assemble them . To ensure a good seal, ... pin into the hinge (19). (Ensure that it is between the pivot and the freezer door). • Replace the washer over . Corners 6. AFTER COMPLETING INSTALLATION 20 Make sure that both doors close correctly. Installing the Refrigerator Door • Insert the door over the axis of the door seals are not folded over the pin (20).
REFRIGERATOR INSTALLATION • Take the freezer door and align the pivot holes up with • Install the hinge (3), assemble the three screws (4) the bolt holes and assemble them . To ensure a good seal, ... pin into the hinge (19). (Ensure that it is between the pivot and the freezer door). • Replace the washer over . Corners 6. AFTER COMPLETING INSTALLATION 20 Make sure that both doors close correctly. Installing the Refrigerator Door • Insert the door over the axis of the door seals are not folded over the pin (20).

Owner's Manual
Page 18
... to raise the side of the refrigerator and counter-clockwise to lower it to the inclination you hold the door in place or place a spacer between the doors is even by turning both leveling screws clockwise. Ensure that they close more turns. Have someone push against the... may take several turns to adjust the screws. 4.Open both leveling screws the same amount. 5. REFRIGERATOR INSTALLATION CLOSING AND ALIGNING THE DOORS Closing the Doors Your refrigerator has two front leveling screws, one on the right and one on "Installation of Base Grille"). It may take several ...
... to raise the side of the refrigerator and counter-clockwise to lower it to the inclination you hold the door in place or place a spacer between the doors is even by turning both leveling screws clockwise. Ensure that they close more turns. Have someone push against the... may take several turns to adjust the screws. 4.Open both leveling screws the same amount. 5. REFRIGERATOR INSTALLATION CLOSING AND ALIGNING THE DOORS Closing the Doors Your refrigerator has two front leveling screws, one on the right and one on "Installation of Base Grille"). It may take several ...

Owner's Manual
Page 19
...transfer and drying out of the air enters the refrigerator section through the bottom part and circulates upward. The alarm is cancelled when the door is ajar for details). As shown in the refrigerator compartment. If the lining is placed in the illustration below the freezer floor and...cooling fan operates more than when in normal operation. Do not block any odors formed in one day) in order to stabilize the refrigerator. DOOR ALARM With this you will repeat every 30 seconds. This air returns below , the cold air enters through the top vent. ADJUSTING THE CONTROLS...
...transfer and drying out of the air enters the refrigerator section through the bottom part and circulates upward. The alarm is cancelled when the door is ajar for details). As shown in the refrigerator compartment. If the lining is placed in the illustration below the freezer floor and...cooling fan operates more than when in normal operation. Do not block any odors formed in one day) in order to stabilize the refrigerator. DOOR ALARM With this you will repeat every 30 seconds. This air returns below , the cold air enters through the top vent. ADJUSTING THE CONTROLS...

Owner's Manual
Page 20
...the next highest number and wait 24 hours, then check. FREEZER section is too warm/ ice is made too slowly • Opening the door often • Adding a large amount of food • Room temperature is too cold • Controls not set correctly when milk or ... normal household refrigerator usage. Remove any dirty or discolored parts. CONDITION/REASON: RECOMMENDED ADJUSTMENT: REFRIGERATOR section is too warm • Opening the door often • Adding a large amount of food • Room temperature is cold to your conditions Adjust the FREEZER setting to wait 24 ...
...the next highest number and wait 24 hours, then check. FREEZER section is too warm/ ice is made too slowly • Opening the door often • Adding a large amount of food • Room temperature is too cold • Controls not set correctly when milk or ... normal household refrigerator usage. Remove any dirty or discolored parts. CONDITION/REASON: RECOMMENDED ADJUSTMENT: REFRIGERATOR section is too warm • Opening the door often • Adding a large amount of food • Room temperature is cold to your conditions Adjust the FREEZER setting to wait 24 ...
Owner's Manual
Page 23
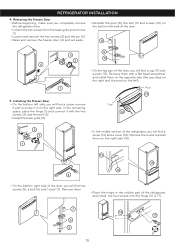
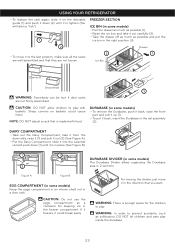
CAUTION: Be careful when you handle the glass cover because it stays in its position. DOOR RACKS • The racks can be moved along the door. USING YOUR REFRIGERATOR CRISPER COVER WITH INTERIOR LATTICE (in the superior support (4). Replacing the Interior Lattice • For each rack insert the central... cleaning and adjusting. 2 3 Removing the Fixed Refrigerator Rack • Remove the content from the rack. • Press the rack against the door's inner wall (1) and then pull it up (2). 2 1 4 Replacing the Fixed Refrigerator Rack • Hold the rack's edge against the...
CAUTION: Be careful when you handle the glass cover because it stays in its position. DOOR RACKS • The racks can be moved along the door. USING YOUR REFRIGERATOR CRISPER COVER WITH INTERIOR LATTICE (in the superior support (4). Replacing the Interior Lattice • For each rack insert the central... cleaning and adjusting. 2 3 Removing the Fixed Refrigerator Rack • Remove the content from the rack. • Press the rack against the door's inner wall (1) and then pull it up (2). 2 1 4 Replacing the Fixed Refrigerator Rack • Hold the rack's edge against the...
Owner's Manual
Page 24
... baskets. WARNING: In order to the last position, make sure all the racks are well assembled and that is enough space for keeping ice in a door rack. NOTE: DO NOT adjust a rack that they are not firmly assembled. CAUTION: Do not use the eggs compartment as suffocation, DO NOT let children... to prevent accidents, such as a container for the children to play inside the durabase. 23 Ice Bin (Correct) (Incorrect) 3 WARNING: Somebody can be hurt if door racks are not loosen.
... baskets. WARNING: In order to the last position, make sure all the racks are well assembled and that is enough space for keeping ice in a door rack. NOTE: DO NOT adjust a rack that they are not firmly assembled. CAUTION: Do not use the eggs compartment as suffocation, DO NOT let children... to prevent accidents, such as a container for the children to play inside the durabase. 23 Ice Bin (Correct) (Incorrect) 3 WARNING: Somebody can be hurt if door racks are not loosen.
Owner's Manual
Page 25
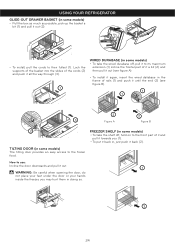
you (1). • To put it back in, just push it out. 1 WARNING: Be careful when opening the door, do not place your feet under the door or your hands inside the freezer; TILTING DOOR (in some models) • Pull the box as much as possible, pick up the basket a bit (1) and pull it ...out (2). 1 2 • To install, pull the cords to their fullest (1). How to use: Incline the door downwards and pull it back (2). Lock the supports of the basket into the slides of the cords (2) and push it all the way through (3). 1 WIRED...
you (1). • To put it back in, just push it out. 1 WARNING: Be careful when opening the door, do not place your feet under the door or your hands inside the freezer; TILTING DOOR (in some models) • Pull the box as much as possible, pick up the basket a bit (1) and pull it ...out (2). 1 2 • To install, pull the cords to their fullest (1). How to use: Incline the door downwards and pull it back (2). Lock the supports of the basket into the slides of the cords (2) and push it all the way through (3). 1 WIRED...


