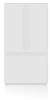
Owner's Manual
Page 2
... Warranty (U.S.A.) Safety Instructions Grounding Requirements Parts and Features Refrigerator Installation Unpacking Your Refrigerator Installation Base Grille Removing, Reversing and Replacing Your Refrigerator Doors Pull out Drawer Door Closing and Alignment Using Your Refrigerator Ensuring Proper Air Circulation Multi Flow Door... Alarm Setting the Controls Adjusting Control Settings Food Storage Guide Storing Frozen Food Refrigerator Shelves Chef Fresh / Snack Pan Crisper Humidity Control Optibin Crisper Crisper cover with lattice on inner surface 2 36 ...
... Warranty (U.S.A.) Safety Instructions Grounding Requirements Parts and Features Refrigerator Installation Unpacking Your Refrigerator Installation Base Grille Removing, Reversing and Replacing Your Refrigerator Doors Pull out Drawer Door Closing and Alignment Using Your Refrigerator Ensuring Proper Air Circulation Multi Flow Door... Alarm Setting the Controls Adjusting Control Settings Food Storage Guide Storing Frozen Food Refrigerator Shelves Chef Fresh / Snack Pan Crisper Humidity Control Optibin Crisper Crisper cover with lattice on inner surface 2 36 ...
Owner's Manual
Page 3
...This warranty is good only to this product. Territories. Display, discount, or refurbished units purchased with scratches, dents, or defects. LG Refrigerator / Freezer Warranty Period Product Parts Labor Refrigerator / Freezer 1 year 1 year [In-Home Service (Except Model GR-051)] Sealed System 7 years 1 year [In-Home ... is required and must be submitted at its option replace, without charge, your LG product is used in the repair of the product, or the replacement of defective parts, shall be defective in the U.S. visit our web site/http://www.lgservice.com...
...This warranty is good only to this product. Territories. Display, discount, or refurbished units purchased with scratches, dents, or defects. LG Refrigerator / Freezer Warranty Period Product Parts Labor Refrigerator / Freezer 1 year 1 year [In-Home Service (Except Model GR-051)] Sealed System 7 years 1 year [In-Home ... is required and must be submitted at its option replace, without charge, your LG product is used in the repair of the product, or the replacement of defective parts, shall be defective in the U.S. visit our web site/http://www.lgservice.com...
Owner's Manual
Page 5
... damage to the extremely cold surfaces. All safety messages will be careful not to eat." When moving parts of many important safety messages. They could damage the refrigerator and seriously injure themselves. DO NOT place fingers or hands on the automatic icemaking mechanism while the...and prepared foods. Use refrozen foods as soon as possible to the light circuit. Before replacing a burned-out light bulb, unplug the refrigerator or turn off -color should not be refrozen and should be followed, including the following: NEVER unplug your product, basic safety precautions...
... damage to the extremely cold surfaces. All safety messages will be careful not to eat." When moving parts of many important safety messages. They could damage the refrigerator and seriously injure themselves. DO NOT place fingers or hands on the automatic icemaking mechanism while the...and prepared foods. Use refrozen foods as soon as possible to the light circuit. Before replacing a burned-out light bulb, unplug the refrigerator or turn off -color should not be refrozen and should be followed, including the following: NEVER unplug your product, basic safety precautions...
Owner's Manual
Page 7
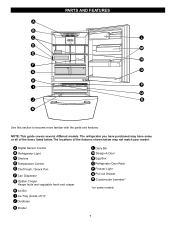
... and crisper H Ice Bin I Q J R K Use this section to become more familiar with the parts and features. The locations of the items listed below. PARTS AND FEATURES A B C L D M E N F O G H P I Ice Tray (Inside of H)* J Durabase K Divider L Dairy Bin M Design-A-Door N Egg Box O Refrigerator Door Rack P Freezer Light Q Pull out Drawer R Customcube Icemaker* *on some or all of...
... and crisper H Ice Bin I Q J R K Use this section to become more familiar with the parts and features. The locations of the items listed below. PARTS AND FEATURES A B C L D M E N F O G H P I Ice Tray (Inside of H)* J Durabase K Divider L Dairy Bin M Design-A-Door N Egg Box O Refrigerator Door Rack P Freezer Light Q Pull out Drawer R Customcube Icemaker* *on some or all of...

Owner's Manual
Page 8
... fresh and crisper F Ice Bin G Ice Tray (Inside of H)* H Durabase I O Use this section to become more familiar with the parts and features. PARTS AND FEATURES A B J C K D L E M F N G H I Divider J Dairy Bin K Design-A-Door L Pull out Drawer M Refrigerator Door Rack N Freezer Light O Customcube Icemaker* *on some or all of the items listed below may have purchased may...
... fresh and crisper F Ice Bin G Ice Tray (Inside of H)* H Durabase I O Use this section to become more familiar with the parts and features. PARTS AND FEATURES A B J C K D L E M F N G H I Divider J Dairy Bin K Design-A-Door L Pull out Drawer M Refrigerator Door Rack N Freezer Light O Customcube Icemaker* *on some or all of the items listed below may have purchased may...

Owner's Manual
Page 9
... vegetable fresh and crisp F Ice Trays* G Ice Bin H Wire Durabase I C J D K E L F M G H N Use this section to become more familiar with the parts and features. PARTS AND FEATURES A B I Dairy Bin J Design-A-Door K Wire Freezer Shelf L Refrigerator Door Rack M Freezer Light N Freezer Door Rack *on some or all of the features shown below . NOTE: This guide covers...
... vegetable fresh and crisp F Ice Trays* G Ice Bin H Wire Durabase I C J D K E L F M G H N Use this section to become more familiar with the parts and features. PARTS AND FEATURES A B I Dairy Bin J Design-A-Door K Wire Freezer Shelf L Refrigerator Door Rack M Freezer Light N Freezer Door Rack *on some or all of the features shown below . NOTE: This guide covers...
Owner's Manual
Page 11
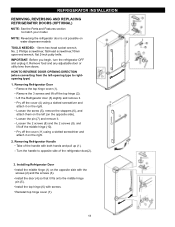
... hinge (1) on the right. 2. Install the top hinge (6) with both hands and pull up (1). REFRIGERATOR INSTALLATION REMOVING, REVERSING AND REPLACING REFRIGERATOR DOORS (OPTIONAL) NOTE: See the Parts and Features section to opposite side of the handle with screws. Turn the handle to match your model....the middle hinge pin (5). Loosen the pin (7) and remove it on the opposite side with the screws (2) and the screws (3). Removing Refrigerator Handle Take of the refrigerator door(2). 11 2 1 3. Loosen the 2 screws (8) and the 2 screws (9), and lift off the top hinge (2). HOW TO ...
... hinge (1) on the right. 2. Install the top hinge (6) with both hands and pull up (1). REFRIGERATOR INSTALLATION REMOVING, REVERSING AND REPLACING REFRIGERATOR DOORS (OPTIONAL) NOTE: See the Parts and Features section to opposite side of the handle with screws. Turn the handle to match your model....the middle hinge pin (5). Loosen the pin (7) and remove it on the opposite side with the screws (2) and the screws (3). Removing Refrigerator Handle Take of the refrigerator door(2). 11 2 1 3. Loosen the 2 screws (8) and the 2 screws (9), and lift off the top hinge (2). HOW TO ...
Owner's Manual
Page 14
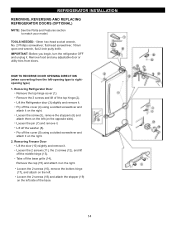
...screws (16), remove the bottom hinge (17), and attach on the left (on the right. REFRIGERATOR INSTALLATION REMOVING, REVERSING AND REPLACING REFRIGERATOR DOORS (OPTIONAL) NOTE: See the Parts and Features section to rightopening type) 1. HOW TO REVERSE DOOR OPENING DIRECT ION (when converting from... doors. Removing Refrigerator Door Remove the top hinge cover (1). Take off the cover (4) using a...
...screws (16), remove the bottom hinge (17), and attach on the left (on the right. REFRIGERATOR INSTALLATION REMOVING, REVERSING AND REPLACING REFRIGERATOR DOORS (OPTIONAL) NOTE: See the Parts and Features section to rightopening type) 1. HOW TO REVERSE DOOR OPENING DIRECT ION (when converting from... doors. Removing Refrigerator Door Remove the top hinge cover (1). Take off the cover (4) using a...
Owner's Manual
Page 25
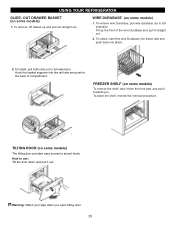
... 1. To Install, pull both rails out to full extension. OUT DRAWER BASKET (on some models) To remove the shelf, take it from the front part, and pull it towards you open tilting door.To adjust 25 To place the shelf, reverse the removal procedure. TILTING DOOR (on some models) 1. ...How to the back of the wire Durabase and pull it out.E Warning: Watch your step when you . USING YOUR REFRIGERATOR GLIDE - Tilt up and pull out straight out. To remove wire Durabase, pull wire durabase out to full extension. Hook the basket supports into place...
... 1. To Install, pull both rails out to full extension. OUT DRAWER BASKET (on some models) To remove the shelf, take it from the front part, and pull it towards you open tilting door.To adjust 25 To place the shelf, reverse the removal procedure. TILTING DOOR (on some models) 1. ...How to the back of the wire Durabase and pull it out.E Warning: Watch your step when you . USING YOUR REFRIGERATOR GLIDE - Tilt up and pull out straight out. To remove wire Durabase, pull wire durabase out to full extension. Hook the basket supports into place...

Owner's Manual
Page 26
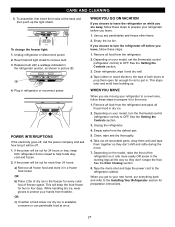
.... Vacuum coils when dusty or dirty. NOTE: Not all removable parts, such as every other month. Unplug the power cord from the outlet. 2. These can wash the inside of the refrigerator with one of the refrigerator. CONDENSER COILS Remove grille base. (See the grille base section)... can scratch or damage the material. Both the refrigerator and freezer sections defrost automatically. Hand wash, rinse and dry all surfaces thoroughly. To change the refrigerator light: 1. Be sure to the light circuit. CARE AND CLEANING WARNING PLASTIC PARTS (covers and panels) Do not use paper towels...
.... Vacuum coils when dusty or dirty. NOTE: Not all removable parts, such as every other month. Unplug the power cord from the outlet. 2. These can wash the inside of the refrigerator with one of the refrigerator. CONDENSER COILS Remove grille base. (See the grille base section)... can scratch or damage the material. Both the refrigerator and freezer sections defrost automatically. Hand wash, rinse and dry all surfaces thoroughly. To change the refrigerator light: 1. Be sure to the light circuit. CARE AND CLEANING WARNING PLASTIC PARTS (covers and panels) Do not use paper towels...
Owner's Manual
Page 27
...Tape the doors shut and tape the power cord to remove bulb. 3. While handling dry ice, wear gloves to protect your refrigerator to OFF. Unplug the refrigerator. 4. Unplug refrigerator or disconnect power. 2. Remove all the way so they don't shift and rattle during the move . 1. See the Setting ... . POWER INTERRUPTIONS If the electricity goes off before you are away, follow these steps. 1. Use up . Remove all food from the refrigerator and pack all removable parts, wrap them well and tape them open far enough for air to get to your model, set the thermostat control...
...Tape the doors shut and tape the power cord to remove bulb. 3. While handling dry ice, wear gloves to protect your refrigerator to OFF. Unplug the refrigerator. 4. Unplug refrigerator or disconnect power. 2. Remove all the way so they don't shift and rattle during the move . 1. See the Setting ... . POWER INTERRUPTIONS If the electricity goes off before you are away, follow these steps. 1. Use up . Remove all food from the refrigerator and pack all removable parts, wrap them well and tape them open far enough for air to get to your model, set the thermostat control...

Owner's Manual
Page 28
...It is normal for several hours. Every time you can damage the icemaker. • You will buzz even if it cools to the refrigerator. Pressing at highest position returns indicator to clear. Icemaker Cube Size Indicator Light Cube Size Select Button Feeler Arm Power Switch The icemaker will ... water running in a 24-hour period, depending on ) position before the water connection is connected can regulate the size with the moving parts of the feeler arm. If the power switch is not used for several cubes to begin making ice cubes. WARNING Personal Injury Hazard Avoid...
...It is normal for several hours. Every time you can damage the icemaker. • You will buzz even if it cools to the refrigerator. Pressing at highest position returns indicator to clear. Icemaker Cube Size Indicator Light Cube Size Select Button Feeler Arm Power Switch The icemaker will ... water running in a 24-hour period, depending on ) position before the water connection is connected can regulate the size with the moving parts of the feeler arm. If the power switch is not used for several cubes to begin making ice cubes. WARNING Personal Injury Hazard Avoid...
Owner's Manual
Page 29
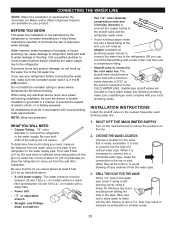
...valves are included in the pipe. CHOOSE THE VALVE LOCATION Choose a location for the valve that the kit you can cause damage to refrigerator parts and lead to the COLD WATER LINE. DRILL THE HOLE FOR THE VALVE Drill a 1/4" hole in areas where temperatures fall below freezing....much tubing you use a compression fitting. Be sure there is necessary to the water supply pipe. Be sure that is not warranted by the refrigerator or icemaker manufacturer. on models without a water filter and between 20 and 120 p.s.i. Power drill. 1/2" or adjustable wrench. Straight- and ...
...valves are included in the pipe. CHOOSE THE VALVE LOCATION Choose a location for the valve that the kit you can cause damage to refrigerator parts and lead to the COLD WATER LINE. DRILL THE HOLE FOR THE VALVE Drill a 1/4" hole in areas where temperatures fall below freezing....much tubing you use a compression fitting. Be sure there is necessary to the water supply pipe. Be sure that is not warranted by the refrigerator or icemaker manufacturer. on models without a water filter and between 20 and 120 p.s.i. Power drill. 1/2" or adjustable wrench. Straight- and ...


