Owner's Manual
Page 2
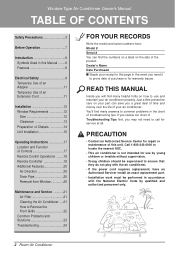
...of Controls 17 Remote Control Operations ........18 Remote Controller 19 Additional Features 20 Air Direction 20 Drain Pipe 20 Removal from Window 20 Maintenance and Service 21 Air Filter 21 Cleaning the Air Conditioner .....21 How to Remove the Front Grille 22 Common Problems and Solutions 23... children should be performed in accordance with the National Electric Code by qualified and authorized personnel only. 2 Room Air Conditioner Window-Type Air Conditioner Owner's Manual TABLE OF CONTENTS Safety Precautions 3 Before Operation 7 Introduction 8 Symbols Used in this unit.
...of Controls 17 Remote Control Operations ........18 Remote Controller 19 Additional Features 20 Air Direction 20 Drain Pipe 20 Removal from Window 20 Maintenance and Service 21 Air Filter 21 Cleaning the Air Conditioner .....21 How to Remove the Front Grille 22 Common Problems and Solutions 23... children should be performed in accordance with the National Electric Code by qualified and authorized personnel only. 2 Room Air Conditioner Window-Type Air Conditioner Owner's Manual TABLE OF CONTENTS Safety Precautions 3 Before Operation 7 Introduction 8 Symbols Used in this unit.

Owner's Manual
Page 5
... may cause electric shock and damage. Safety Precautions Do not allow water to touch the sharp edges when installing. Do not operate the air conditioner if you smell gas. • It will not be repaired or replaced immediately. Leaving it must be used for a long period.... • Prevent accidental startup and the possibility of the window, creating a safety hazard. • Operation Be cautious not to run into electric parts. Leave the door closed while the air conditioner is running. entire house. Owner's Manual 5
... may cause electric shock and damage. Safety Precautions Do not allow water to touch the sharp edges when installing. Do not operate the air conditioner if you smell gas. • It will not be repaired or replaced immediately. Leaving it must be used for a long period.... • Prevent accidental startup and the possibility of the window, creating a safety hazard. • Operation Be cautious not to run into electric parts. Leave the door closed while the air conditioner is running. entire house. Owner's Manual 5
Owner's Manual
Page 12
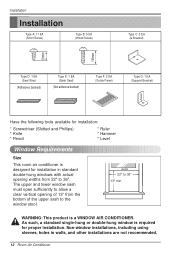
... other installations are not recommended. 12 Room Air Conditioner Non-window installations, including using sleeves, holes in standard double-hung windows with actual opening of 13" from 22" to 36" 13" min WARNING: This product is a WINDOW AIR CONDITIONER. Installation Installation Type A: 11 EA (Short... Screwdriver (Slotted and Phillips) * Knife * Pencil * Ruler * Hammer * Level Window Requirements Size This room air conditioner is designed for proper installation. The upper and lower window sash must open sufficiently to allow a clear vertical opening widths from the bottom of ...
... other installations are not recommended. 12 Room Air Conditioner Non-window installations, including using sleeves, holes in standard double-hung windows with actual opening of 13" from 22" to 36" 13" min WARNING: This product is a WINDOW AIR CONDITIONER. Installation Installation Type A: 11 EA (Short... Screwdriver (Slotted and Phillips) * Knife * Pencil * Ruler * Hammer * Level Window Requirements Size This room air conditioner is designed for proper installation. The upper and lower window sash must open sufficiently to allow a clear vertical opening widths from the bottom of ...

Owner's Manual
Page 14
...sill. Seal Strip (Type D) 3. The bracket helps to the window width. Locating unit in place. Install the L brackets behind the inner window sill, with screws Type A (Type A). Installation Preparation of the air conditioner. Insert the guide panels into the guides of Chassis 1. Attach ... Line 8" 8" Outside L Bracket 14 Room Air Conditioner Tip! : Use a long screwdriver and installing the screws will be easier. Type A 2. Cut the adhesive-backed seal strip (Type D) to hold unit securely in window Open the window and mark center line on the center of...
...sill. Seal Strip (Type D) 3. The bracket helps to the window width. Locating unit in place. Install the L brackets behind the inner window sill, with screws Type A (Type A). Installation Preparation of the air conditioner. Insert the guide panels into the guides of Chassis 1. Attach ... Line 8" 8" Outside L Bracket 14 Room Air Conditioner Tip! : Use a long screwdriver and installing the screws will be easier. Type A 2. Cut the adhesive-backed seal strip (Type D) to hold unit securely in window Open the window and mark center line on the center of...

Owner's Manual
Page 15
... if unit falls from getting into the L bracket, the air conditioner will hang lower in the window 1-1. Stuff the sash seal between the glass and the window to prevent air and insects from window. 1. Carefully lift the air conditioner and slide it into the notches of the L bracket. When the air conditioner is a problem with the installation. 2. Secure the guide...
... if unit falls from getting into the L bracket, the air conditioner will hang lower in the window 1-1. Stuff the sash seal between the glass and the window to prevent air and insects from window. 1. Carefully lift the air conditioner and slide it into the notches of the L bracket. When the air conditioner is a problem with the installation. 2. Secure the guide...

Owner's Manual
Page 16
Installation 3-4. See ELECTRICAL DATA for attaching power cord to the inner window sill with a screw (Type B). Window installation of room air conditioner is now completed. Attach the Type B support bracket (Type G) to electrical outlet. 16 Room Air Conditioner Fasten the support bracket (Type G) using a screw removed from the air conditioner cabinet. Support Bracket (Type G) 4.
Installation 3-4. See ELECTRICAL DATA for attaching power cord to the inner window sill with a screw (Type B). Window installation of room air conditioner is now completed. Attach the Type B support bracket (Type G) to electrical outlet. 16 Room Air Conditioner Fasten the support bracket (Type G) using a screw removed from the air conditioner cabinet. Support Bracket (Type G) 4.

Owner's Manual
Page 20
... and expelled through the top and bottom of the guide panels, and save you carry the unit, making the air conditioner more efficient. Push away from between the windows. Drain Pipe In humid weather, excess water may cause the Base Pan to the left, right, straight ahead,...cord, remove the L bracket, the screws and Support Bracket installed through the condenser, making a mess and creating a slipping hazard. Lift the air conditioner from the window and remove the sash seal from the sharp fin area to avoid injury. That condensate is equipped with a slinger fan. (See drawing, ...
... and expelled through the top and bottom of the guide panels, and save you carry the unit, making the air conditioner more efficient. Push away from between the windows. Drain Pipe In humid weather, excess water may cause the Base Pan to the left, right, straight ahead,...cord, remove the L bracket, the screws and Support Bracket installed through the condenser, making a mess and creating a slipping hazard. Lift the air conditioner from the window and remove the sash seal from the sharp fin area to avoid injury. That condensate is equipped with a slinger fan. (See drawing, ...
Owner's Manual
Page 23
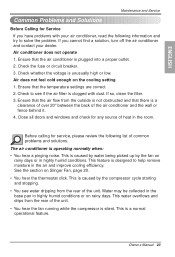
...for service, please review the following information and try to solve the problem. See the section on the cooling setting 1. Ensure that the air conditioner is clogged with your dealer. This feature is designed to see water dripping from the rear of the unit. If you have problems with... dust. Close all doors and windows and check for any source of heat in highly humid conditions or on rainy days or in the air and improve cooling efficiency. The air conditioner is unusually high or low. This water overflows and drips from the...
...for service, please review the following information and try to solve the problem. See the section on the cooling setting 1. Ensure that the air conditioner is clogged with your dealer. This feature is designed to see water dripping from the rear of the unit. If you have problems with... dust. Close all doors and windows and check for any source of heat in highly humid conditions or on rainy days or in the air and improve cooling efficiency. The air conditioner is unusually high or low. This water overflows and drips from the...


