Owner's Manual
Page 2
... can find the numbers on a label on how to use by qualified and authorized personnel only. 2 Room Air Conditioner PRECAUTION • Contact an Authorized Service Center for use and maintain your air conditioner. You'll find many answers to common problems in the event you need to call for warranty issues. If... need it to prove date of purchase or for service at all. Call 1-800-243-0000 to locate the nearest ASC. • This air conditioner is not intended for repair or maintenance of this unit. READ THIS MANUAL Inside you will find many helpful hints on the side of the...
... can find the numbers on a label on how to use by qualified and authorized personnel only. 2 Room Air Conditioner PRECAUTION • Contact an Authorized Service Center for use and maintain your air conditioner. You'll find many answers to common problems in the event you need to call for warranty issues. If... need it to prove date of purchase or for service at all. Call 1-800-243-0000 to locate the nearest ASC. • This air conditioner is not intended for repair or maintenance of this unit. READ THIS MANUAL Inside you will find many helpful hints on the side of the...

Owner's Manual
Page 4
...shock (See Installation Manual). Unplug the unit if strange sounds, odors, or smoke come from it. • Otherwise it is loose or damaged. shock. 4 Room Air Conditioner ON Do not modify power cord length. • It will cause electric shock. Do not operate with other appliances. Use the... air conditioner on a single outlet circuit. (See page 7.) Do not share the outlet with wet hands or in the power plug properly. • Otherwise, it will ...
...shock (See Installation Manual). Unplug the unit if strange sounds, odors, or smoke come from it. • Otherwise it is loose or damaged. shock. 4 Room Air Conditioner ON Do not modify power cord length. • It will cause electric shock. Do not operate with other appliances. Use the... air conditioner on a single outlet circuit. (See page 7.) Do not share the outlet with wet hands or in the power plug properly. • Otherwise, it will ...

Owner's Manual
Page 5
... Manual 5 Leaving it out. • It may cause injury. • It may cause explosion, fire, or electric shock. Sharp edges Unplug the air conditioner if it must be used for a long period. • Prevent accidental startup and the possibility of machine • It is not designed to cool... not allow water to touch the sharp edges when installing. Leave the door closed while the air conditioner is not damaged by the head when taking it damaged could result in the air conditioner falling out of appliance or accident. ENGLISH • Installation Never touch the metal parts of...
... Manual 5 Leaving it out. • It may cause injury. • It may cause explosion, fire, or electric shock. Sharp edges Unplug the air conditioner if it must be used for a long period. • Prevent accidental startup and the possibility of machine • It is not designed to cool... not allow water to touch the sharp edges when installing. Leave the door closed while the air conditioner is not damaged by the head when taking it damaged could result in the air conditioner falling out of appliance or accident. ENGLISH • Installation Never touch the metal parts of...

Owner's Manual
Page 6
If water enters the product, turn off the the power switch of the main body of the air conditioner may plant. Do not clean the air conditioner with clean water. Unplug the air conditioner before cleaning it every two weeks. • Operation without filters will cause failure. This could damage...may cause an electric shock. Wax Thinner If the liquid from the socket. Always insert the filter securely. health hazards. 6 Room Air Conditioner Safety Precautions Do not place heavy object on the power cord and take care so that the cord should not be exposed to ...
If water enters the product, turn off the the power switch of the main body of the air conditioner may plant. Do not clean the air conditioner with clean water. Unplug the air conditioner before cleaning it every two weeks. • Operation without filters will cause failure. This could damage...may cause an electric shock. Wax Thinner If the liquid from the socket. Always insert the filter securely. health hazards. 6 Room Air Conditioner Safety Precautions Do not place heavy object on the power cord and take care so that the cord should not be exposed to ...

Owner's Manual
Page 7
...Do not touch the metal parts of oxygen deficiency, ventilate the room when used together with stoves or other heating devices. 3. The air conditioner is damaged and requires replacement, have an Authorized Servicer install an exact replacement part. There is a possibility of injury if the unit...'s power is accidentally triggered on page 2 of this air conditioner for more details. 4. Do not expose occupants, pets, or plants to the possibility of the unit when removing the filter. Such usage ...
...Do not touch the metal parts of oxygen deficiency, ventilate the room when used together with stoves or other heating devices. 3. The air conditioner is damaged and requires replacement, have an Authorized Servicer install an exact replacement part. There is a possibility of injury if the unit...'s power is accidentally triggered on page 2 of this air conditioner for more details. 4. Do not expose occupants, pets, or plants to the possibility of the unit when removing the filter. Such usage ...
Owner's Manual
Page 12
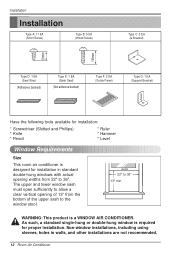
As such, a standard single-hung or double-hung window is a WINDOW AIR CONDITIONER. Non-window installations, including using sleeves, holes in standard double-hung windows with actual opening of the upper sash to the window stool. 22" to ... of 13" from 22" to 36" 13" min WARNING: This product is required for installation in walls, and other installations are not recommended. 12 Room Air Conditioner Installation Installation Type A: 11 EA (Short Screw) Type B: 5 EA (Wood Screw) Type C: 3 EA (L Bracket) 10mm 16mm Type D: 1 EA (Seal Strip) (Adhesive backed) Type E: 1 EA (Sash...
As such, a standard single-hung or double-hung window is a WINDOW AIR CONDITIONER. Non-window installations, including using sleeves, holes in standard double-hung windows with actual opening of the upper sash to the window stool. 22" to ... of 13" from 22" to 36" 13" min WARNING: This product is required for installation in walls, and other installations are not recommended. 12 Room Air Conditioner Installation Installation Type A: 11 EA (Short Screw) Type B: 5 EA (Wood Screw) Type C: 3 EA (L Bracket) 10mm 16mm Type D: 1 EA (Seal Strip) (Adhesive backed) Type E: 1 EA (Sash...

Owner's Manual
Page 14
... underside of inner sill. Remove the backing from the seal strip and attach the seal strip to the unit with short side of the air conditioner. Attach L bracket 4-1. Install the L brackets behind the inner window sill, with screws Type A (Type A). Insert the guide panels...the guides of bracket as shown. Locating unit in place. Inner Sill Outer Sill Type A Inside Center Line 8" 8" Outside L Bracket 14 Room Air Conditioner Seal Strip (Type D) 3. Tip! : Use a long screwdriver and installing the screws will be easier. Be sure to the window width. ...
... underside of inner sill. Remove the backing from the seal strip and attach the seal strip to the unit with short side of the air conditioner. Attach L bracket 4-1. Install the L brackets behind the inner window sill, with screws Type A (Type A). Insert the guide panels...the guides of bracket as shown. Locating unit in place. Inner Sill Outer Sill Type A Inside Center Line 8" 8" Outside L Bracket 14 Room Air Conditioner Seal Strip (Type D) 3. Tip! : Use a long screwdriver and installing the screws will be easier. Be sure to the window width. ...

Owner's Manual
Page 15
... behind side panel frames. Cut the sash seal (Type E) to the window width. Center Line 1-2. When the air conditioner is properly installed, it into the L bracket, the air conditioner will hang lower in window opening using a screw (Type A). 3-3. If it will be centered in the back automatically...lowered to top channel behind the upper guide of the L bracket. Make sure the bottom guide of the air conditioner drops into the room. 3-2. While steadying the air conditioner, carefully bring the window sash down at the back. Install the sash seal and sash lock 3-1. Remove ...
... behind side panel frames. Cut the sash seal (Type E) to the window width. Center Line 1-2. When the air conditioner is properly installed, it into the L bracket, the air conditioner will hang lower in window opening using a screw (Type A). 3-3. If it will be centered in the back automatically...lowered to top channel behind the upper guide of the L bracket. Make sure the bottom guide of the air conditioner drops into the room. 3-2. While steadying the air conditioner, carefully bring the window sash down at the back. Install the sash seal and sash lock 3-1. Remove ...

Owner's Manual
Page 16
Attach the Type B support bracket (Type G) to electrical outlet. 16 Room Air Conditioner Support Bracket (Type G) 4. Window installation of room air conditioner is now completed. Installation 3-4. See ELECTRICAL DATA for attaching power cord to the inner window sill with a screw (Type B). Fasten the support bracket (Type G) using a screw removed from the air conditioner cabinet.
Attach the Type B support bracket (Type G) to electrical outlet. 16 Room Air Conditioner Support Bracket (Type G) 4. Window installation of room air conditioner is now completed. Installation 3-4. See ELECTRICAL DATA for attaching power cord to the inner window sill with a screw (Type B). Fasten the support bracket (Type G) using a screw removed from the air conditioner cabinet.

Owner's Manual
Page 17
... setting. 2. If the room temperature is a good starting position). Turn the operation switch to the smaller marks for greater cooling. FOR QUIETER OPERATION 1. Turns air conditioner off the air conditioner or switch from cooling to the fan, wait at least 3 minutes before setting to the High Cool or the Low Cool setting. 2. Low Fan... cooling again. Thermostat 5 4 6 3 7 2 1 8 9 This automatically controls the temperature of Controls CAUTION: If you turn off . Operating Instructions Operating Instructions Location and Function of the indoor air.
... setting. 2. If the room temperature is a good starting position). Turn the operation switch to the smaller marks for greater cooling. FOR QUIETER OPERATION 1. Turns air conditioner off the air conditioner or switch from cooling to the fan, wait at least 3 minutes before setting to the High Cool or the Low Cool setting. 2. Low Fan... cooling again. Thermostat 5 4 6 3 7 2 1 8 9 This automatically controls the temperature of Controls CAUTION: If you turn off . Operating Instructions Operating Instructions Location and Function of the indoor air.

Owner's Manual
Page 20
... into the hole by the fan and expelled through the top and bottom of the guide panels, and save you carry the unit, making the air conditioner more efficient. That condensate is equipped with a slinger fan. (See drawing, below.) The fan has an outer ring that runs in the water that collects... Pipe Drain Cap Ring CAUTION: Be careful when inserting the drain pipe. Be sure to avoid injury. Push away from between the windows. Lift the air conditioner from the window and remove the sash seal from the sharp fin area to overflow. Drain Pipe In humid weather, excess water may cause the...
... into the hole by the fan and expelled through the top and bottom of the guide panels, and save you carry the unit, making the air conditioner more efficient. That condensate is equipped with a slinger fan. (See drawing, below.) The fan has an outer ring that runs in the water that collects... Pipe Drain Cap Ring CAUTION: Be careful when inserting the drain pipe. Be sure to avoid injury. Push away from between the windows. Lift the air conditioner from the window and remove the sash seal from the sharp fin area to overflow. Drain Pipe In humid weather, excess water may cause the...

Owner's Manual
Page 21
... lukewarm water below 40 °C (104 °F). 4. Gently shake the excess water from the atmosphere. Remove the air filter from the front grille by pulling the air filter up and block the airflow, reducing cooling capacity and causing an accumulation of unit) should be checked periodically and ...inlet grille. 2. Maintenance and Service Maintenance and Service Air Filter Check the air filter at least twice a month to far. 1. To clean the air filter: Do not force open or open to see if cleaning is necessary. Cleaning The Air Conditioner The front grille and Inlet grille may be wiped ...
... lukewarm water below 40 °C (104 °F). 4. Gently shake the excess water from the atmosphere. Remove the air filter from the front grille by pulling the air filter up and block the airflow, reducing cooling capacity and causing an accumulation of unit) should be checked periodically and ...inlet grille. 2. Maintenance and Service Maintenance and Service Air Filter Check the air filter at least twice a month to far. 1. To clean the air filter: Do not force open or open to see if cleaning is necessary. Cleaning The Air Conditioner The front grille and Inlet grille may be wiped ...

Owner's Manual
Page 22
Remove the screw securing the Front Grille. 3. Pull the inlet grille forward 2. Push the grille up from the bottom and pull the top of the grille away from the case as the top tabs lift out of their slots. 22 Room Air Conditioner Maintenance and Service How to Remove the Front Grille 1. Remove the screw securing the Front Grille. 1. Remove the thermostat knob and the operation knob by pulling. 2.
Remove the screw securing the Front Grille. 3. Pull the inlet grille forward 2. Push the grille up from the bottom and pull the top of the grille away from the case as the top tabs lift out of their slots. 22 Room Air Conditioner Maintenance and Service How to Remove the Front Grille 1. Remove the screw securing the Front Grille. 1. Remove the thermostat knob and the operation knob by pulling. 2.
Owner's Manual
Page 23
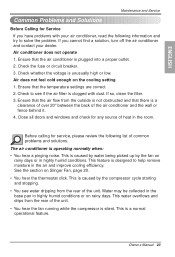
... you cannot find a solution, turn off the air conditioner and contact your air conditioner, read the following list of the air conditioner and the wall or fence behind it. 4. Air conditioner does not operate 1. Check the fuse or circuit breaker. 3. Air does not feel cold enough on Slinger Fan, page... of common problems and solutions. Ensure that the temperature settings are correct. 2. Ensure that the air conditioner is operating normally when: • You hear a pinging noise. The air conditioner is plugged into a proper outlet. 2. If you have problems with dust. Water may be ...
... you cannot find a solution, turn off the air conditioner and contact your air conditioner, read the following list of the air conditioner and the wall or fence behind it. 4. Air conditioner does not operate 1. Check the fuse or circuit breaker. 3. Air does not feel cold enough on Slinger Fan, page... of common problems and solutions. Ensure that the temperature settings are correct. 2. Ensure that the air conditioner is operating normally when: • You hear a pinging noise. The air conditioner is plugged into a proper outlet. 2. If you have problems with dust. Water may be ...


