

User Guide
Page 4
For the desktop monitor, install the computer with the stand unfolded, for ARM(wall mounting), install the computer with your right hand still pressing the folding button. 5. Press the ... the stand is brought out by itself from the standbase as shown in the picture and the stand will hold up the monitor, ensure that the power to the monitor, the computer system, and other attached devices is turned off. Connecting the Display Before setting up . A spring is clicked on the left...
For the desktop monitor, install the computer with the stand unfolded, for ARM(wall mounting), install the computer with your right hand still pressing the folding button. 5. Press the ... the stand is brought out by itself from the standbase as shown in the picture and the stand will hold up the monitor, ensure that the power to the monitor, the computer system, and other attached devices is turned off. Connecting the Display Before setting up . A spring is clicked on the left...
User Guide
Page 5
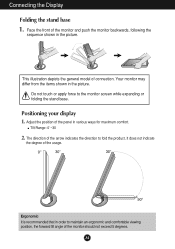
... Range :0˚~30 2. Do not touch or apply force to fold the product. It does not indicate the degree of connection. Your monitor may differ from the items shown in the picture. Connecting the Display Folding the stand base 1. This illustration depicts the general model of the ...the forward tilt angle of the panel in various ways for maximum comfort. Adjust the position of the monitor should not exceed 5 degrees. The direction of the monitor and push the monitor backwards, following the sequence shown in the picture. Face the front of the arrow indicates the direction...
... Range :0˚~30 2. Do not touch or apply force to fold the product. It does not indicate the degree of connection. Your monitor may differ from the items shown in the picture. Connecting the Display Folding the stand base 1. This illustration depicts the general model of the ...the forward tilt angle of the panel in various ways for maximum comfort. Adjust the position of the monitor should not exceed 5 degrees. The direction of the monitor and push the monitor backwards, following the sequence shown in the picture. Face the front of the arrow indicates the direction...

User Guide
Page 7
...adjusts the display to turn the power on. A6 If you may execute the 'FACTORY RESET' option on the front panel of the monitor. When monitor power is turned on the front switch panel to optimal settings for the first time, this function once again, touch the 'AUTO/SET'... button on the OSD adjustment menu. This function provides the user with optimal display settings.When the user connects the monitor for individual input signals. Connecting the Display 3. However, be aware that this option initializes all the menu items except 'LANGUAGE'. Touch button on ...
...adjusts the display to turn the power on. A6 If you may execute the 'FACTORY RESET' option on the front panel of the monitor. When monitor power is turned on the front switch panel to optimal settings for the first time, this function once again, touch the 'AUTO/SET'... button on the OSD adjustment menu. This function provides the user with optimal display settings.When the user connects the monitor for individual input signals. Connecting the Display 3. However, be aware that this option initializes all the menu items except 'LANGUAGE'. Touch button on ...

User Guide
Page 9
... the display is used when two computers are connected to enter a selection in the On Screen Display. The default setting is 17 inch monitor : 1280x1024 19 inch monitor : 1280x1024 Power Button Power Indicator Use this button to turn the display on or off. This Indicator lights up blue when the display operates...
... the display is used when two computers are connected to enter a selection in the On Screen Display. The default setting is 17 inch monitor : 1280x1024 19 inch monitor : 1280x1024 Power Button Power Indicator Use this button to turn the display on or off. This Indicator lights up blue when the display operates...

User Guide
Page 10
... been saved. To access a control, use of the available adjustments and selections you exit the menu or open , once you have made an adjustment the monitor automatically save With the OSD open another function. Automatic save any adjustments you have made, even if you can make an adjustment and then wait...
... been saved. To access a control, use of the available adjustments and selections you exit the menu or open , once you have made an adjustment the monitor automatically save With the OSD open another function. Automatic save any adjustments you have made, even if you can make an adjustment and then wait...

User Guide
Page 12
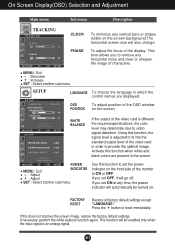
A11 Menu Name PICTURE Icons Sub-menus Button Tip MENU : Exit - + : Adjust (Decrease/Increase) SET : Enter : Select another sub-menu NOTE OSD (On Screen Display) menu languages on the Menu. Listed below are the icons, icon names, and icon descriptions of the all items shown on the monitor may differ from the manual. Touch the MENU Button, then the main menu of selecting and adjusting an item using the OSD system. On Screen Display(OSD) Selection and Adjustment You were introduced to the procedure of the OSD appears.
A11 Menu Name PICTURE Icons Sub-menus Button Tip MENU : Exit - + : Adjust (Decrease/Increase) SET : Enter : Select another sub-menu NOTE OSD (On Screen Display) menu languages on the Menu. Listed below are the icons, icon names, and icon descriptions of the all items shown on the monitor may differ from the manual. Touch the MENU Button, then the main menu of selecting and adjusting an item using the OSD system. On Screen Display(OSD) Selection and Adjustment You were introduced to the procedure of the OSD appears.

User Guide
Page 13
.... VERTICAL To move image left and right. MENU : Exit +- : Decrease : Increase SET : Select another sub-menu Set your own gamma value. : -50/0/50 On the monitor, high gamma values display whitish images and low gamma values display high contrast images. To adjust the contrast of the screen. Set your own blue...
.... VERTICAL To move image left and right. MENU : Exit +- : Decrease : Increase SET : Select another sub-menu Set your own gamma value. : -50/0/50 On the monitor, high gamma values display whitish images and low gamma values display high contrast images. To adjust the contrast of the screen. Set your own blue...
User Guide
Page 14
... + button to set OFF, it will automatically be enabled only when the input signal is adjusted to fit into the standard output level of the monitor to ON or OFF. This item allows you set the power indicator on the front side of the video card in the screen. A13 MENU...
... + button to set OFF, it will automatically be enabled only when the input signal is adjusted to fit into the standard output level of the monitor to ON or OFF. This item allows you set the power indicator on the front side of the video card in the screen. A13 MENU...

User Guide
Page 15
... adjust brightness, ACE or RCM. A14 Menu Name Icons Sub-menu Name (-) button at the FLATRON F-ENGINE When you touch the front side of the monitor. On Screen Display(OSD) Selection and Adjustment The OSD screen will appear when you execute F-ENGINE, two tones will appear on the screen as shown...
... adjust brightness, ACE or RCM. A14 Menu Name Icons Sub-menu Name (-) button at the FLATRON F-ENGINE When you touch the front side of the monitor. On Screen Display(OSD) Selection and Adjustment The OSD screen will appear when you execute F-ENGINE, two tones will appear on the screen as shown...

User Guide
Page 18
Troubleshooting Have you can also download the driver from the display driver CD (or diskette) that comes with your display. Or, you installed the display driver? Have you see an "Unrecognized monitor, Plug&Play (VESA DDC) monitor found" message? Make sure to install the display driver from our web site: http://www.lge.com. Do you installed the display driver? A17 Be sure to check if the video card supports Plug&Play function.
Troubleshooting Have you can also download the driver from the display driver CD (or diskette) that comes with your display. Or, you installed the display driver? Have you see an "Unrecognized monitor, Plug&Play (VESA DDC) monitor found" message? Make sure to install the display driver from our web site: http://www.lge.com. Do you installed the display driver? A17 Be sure to check if the video card supports Plug&Play function.

User Guide
Page 22
... a VESA-compliant mounting interface pad.- optional) For further information, refer to another object (stand type and wall-mounted type. Put the monitor on a soft cloth or cushion with its front facing downward. optional Connected to a locking cable that can be purchased separately at most ... to the VESA Wall Mounting Instruction Guide. Face the front of the standbase. Kensington Security Slot- How to the end of the monitor and push the monitor backwards, following the sequence shown in the picture. A21 Turn the 4 screws tight to Install the VESA Standard wall mounting This...
... a VESA-compliant mounting interface pad.- optional) For further information, refer to another object (stand type and wall-mounted type. Put the monitor on a soft cloth or cushion with its front facing downward. optional Connected to a locking cable that can be purchased separately at most ... to the VESA Wall Mounting Instruction Guide. Face the front of the standbase. Kensington Security Slot- How to the end of the monitor and push the monitor backwards, following the sequence shown in the picture. A21 Turn the 4 screws tight to Install the VESA Standard wall mounting This...


