
User Guide
Page 2
... display is easily accessible after installation. Some internal parts carry hazardous voltages. In order to allow the proper operation of all safeguards incorporated in the specifications of this display, observe the following basic rules for its installation, use another power cord, make sure that it can be left unattended for replacement...
... display is easily accessible after installation. Some internal parts carry hazardous voltages. In order to allow the proper operation of all safeguards incorporated in the specifications of this display, observe the following basic rules for its installation, use another power cord, make sure that it can be left unattended for replacement...

User Guide
Page 13
... : Exit BLUE : Decrease : Increase SET : Select another sub-menu Selects the color temperature. • sRGB: Set the screen color to fit the sRGB standard color specification. • 6500K: Slightly reddish white. • 9300K: Slightly bluish white. Adjusts blue color levels. On Screen Display(OSD) Selection and Adjustment Main menu Sub menu...
... : Exit BLUE : Decrease : Increase SET : Select another sub-menu Selects the color temperature. • sRGB: Set the screen color to fit the sRGB standard color specification. • 6500K: Slightly reddish white. • 9300K: Slightly bluish white. Adjusts blue color levels. On Screen Display(OSD) Selection and Adjustment Main menu Sub menu...

User Guide
Page 15
Activate this function to set OFF, it will go off. If this function, the signal level is different the required specifications, the color level may deteriorate due to provide the optimal image. A14 Use this function when white and black colors are displayed. FACTORY RESET Restore ...
Activate this function to set OFF, it will go off. If this function, the signal level is different the required specifications, the color level may deteriorate due to provide the optimal image. A14 Use this function when white and black colors are displayed. FACTORY RESET Restore ...

User Guide
Page 16
... • Check and see a "OSD LOCKED" message on and the • Adjust the brightness and the contrast. properly to turn on the PC. See the 'Specifications' section of this manual and configure your display is out of the display. Check the signal cable and try moving the mouse or pressing any...
... • Check and see a "OSD LOCKED" message on and the • Adjust the brightness and the contrast. properly to turn on the PC. See the 'Specifications' section of this manual and configure your display is out of the display. Check the signal cable and try moving the mouse or pressing any...

User Guide
Page 19
... % non-Condensing Attached ( ), Detached ( O ) Wall-outlet type or PC-outlet type NOTE Information in this document is subject to change without notice. Vertical Freq. A18 Specifications Display Sync Input Video Input Resolution Plug&Play Power Consumption Dimensions & Weight Range Power Input Environmental Conditions Stand Base Power cord 17 inches (43 cm...
... % non-Condensing Attached ( ), Detached ( O ) Wall-outlet type or PC-outlet type NOTE Information in this document is subject to change without notice. Vertical Freq. A18 Specifications Display Sync Input Video Input Resolution Plug&Play Power Consumption Dimensions & Weight Range Power Input Environmental Conditions Stand Base Power cord 17 inches (43 cm...

User Guide
Page 20
Specifications Preset Modes (Resolution) Display Modes (Resolution) 1 VGA 640 x 350 2 VGA 720 x 400 3 VGA 640 x 480 4 VESA 640 x 480 5 VESA 800 x 600 6 VESA 800 x 600 7 MAC 832 x 624 8 VESA 1024 x 768 9 VESA 1024 x 768 10 MAC 1152 x 870 11 VESA 1152 x 900 *12 VESA 1280 x 1024 13 VESA 1280 x 1024 Horizontal Freq. (kHz) 31.469 31.469 31.469 37.500 37.879 46.875 49.725 48.363 60.023 68.681 61.805 63.981 79.976 Vertical Freq. (Hz) 70 70 60 75 60 75 74.5 60 75 75 65 60 75 *Recommend Mode Indicator MODE On Mode Sleep Mode Off Mode LED Color Blue Amber Off A19
Specifications Preset Modes (Resolution) Display Modes (Resolution) 1 VGA 640 x 350 2 VGA 720 x 400 3 VGA 640 x 480 4 VESA 640 x 480 5 VESA 800 x 600 6 VESA 800 x 600 7 MAC 832 x 624 8 VESA 1024 x 768 9 VESA 1024 x 768 10 MAC 1152 x 870 11 VESA 1152 x 900 *12 VESA 1280 x 1024 13 VESA 1280 x 1024 Horizontal Freq. (kHz) 31.469 31.469 31.469 37.500 37.879 46.875 49.725 48.363 60.023 68.681 61.805 63.981 79.976 Vertical Freq. (Hz) 70 70 60 75 60 75 74.5 60 75 75 65 60 75 *Recommend Mode Indicator MODE On Mode Sleep Mode Off Mode LED Color Blue Amber Off A19
User Guide
Page 21
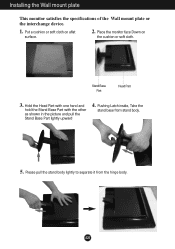
Please pull the stand body lightly to separate it from stand body. 5. Stand Base Part Head Part 3. A20 Pushing Latch inside, Take the stand base from the hinge body. Installing the Wall mount plate This monitor satisfies the specifications of the Wall mount plate or the interchange device. 1. Put a cushion or soft cloth on the cushion or soft cloth. Hold the Head Part with one hand and hold the Stand Base Part with the other as shown in the picture and pull the Stand Base Part lightly upward 4. Place the monitor face Down on aflat surface. 2.
Please pull the stand body lightly to separate it from stand body. 5. Stand Base Part Head Part 3. A20 Pushing Latch inside, Take the stand base from the hinge body. Installing the Wall mount plate This monitor satisfies the specifications of the Wall mount plate or the interchange device. 1. Put a cushion or soft cloth on the cushion or soft cloth. Hold the Head Part with one hand and hold the Stand Base Part with the other as shown in the picture and pull the Stand Base Part lightly upward 4. Place the monitor face Down on aflat surface. 2.
