
Service Manual
Page 1
website http://www.lgservice.com LG LG Room Air Conditioner SERVICE MANUAL MODEL: ACQ058PL KG5200ER LW5200ER WG5200ER WG6000R KG6000R M5404R WG5200R M6004R HBLG6000R HBLG5200E ACQ052PK LW7000R WM-5031 LW050CE LWJ0515PAG LW5200R CAUTION • BEFORE SERVICING THE UNIT, READ THE SAFETY PRECAUTIONS IN THIS MANUAL. • ONLY FOR AUTHORIZED SERVICE PERSONNEL.
website http://www.lgservice.com LG LG Room Air Conditioner SERVICE MANUAL MODEL: ACQ058PL KG5200ER LW5200ER WG5200ER WG6000R KG6000R M5404R WG5200R M6004R HBLG6000R HBLG5200E ACQ052PK LW7000R WM-5031 LW050CE LWJ0515PAG LW5200R CAUTION • BEFORE SERVICING THE UNIT, READ THE SAFETY PRECAUTIONS IN THIS MANUAL. • ONLY FOR AUTHORIZED SERVICE PERSONNEL.
Service Manual
Page 3
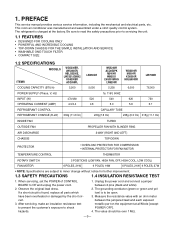
... SPECIFICATIONS MODELS ITEMS WG5200ER, LW5200ER, HBLG5200E, LWC051JGMK2 KG5200ER ACQ058PL COOLING CAPACITY (BTU/h) 5,200 LW050CE 5,050 WG5200R ACQ052PK M5404R WM5031 LWJ0515PAG LW5200R 5,250 WG6000R M6004R KG6000R HBLG6000R 6,000 LW7000R 76,000 POWER SUPPLY (Phase, V, Hz) 1ø, 115V, 60HZ INPUT (W) 470/480 520 540 620 720 OPERATING CURRENT (AMP.) 4.3/4.4 4.8...a jumper between the jumpered lead and each exposed metallic part on the equipment at the factory. PREFACE This service manual provides various service information, including the mechanical and electrical parts, etc.
... SPECIFICATIONS MODELS ITEMS WG5200ER, LW5200ER, HBLG5200E, LWC051JGMK2 KG5200ER ACQ058PL COOLING CAPACITY (BTU/h) 5,200 LW050CE 5,050 WG5200R ACQ052PK M5404R WM5031 LWJ0515PAG LW5200R 5,250 WG6000R M6004R KG6000R HBLG6000R 6,000 LW7000R 76,000 POWER SUPPLY (Phase, V, Hz) 1ø, 115V, 60HZ INPUT (W) 470/480 520 540 620 720 OPERATING CURRENT (AMP.) 4.3/4.4 4.8...a jumper between the jumpered lead and each exposed metallic part on the equipment at the factory. PREFACE This service manual provides various service information, including the mechanical and electrical parts, etc.

Service Manual
Page 6
.... (Refer to control board. (See Figure 1) 3. NOTE : Controls, wires, and capacitor are now accessible for procedures. 6. Re-install components by placing the tabs in this manual or inside control board.) Figure 3 Figure 4 Figure 5 -6- DISASSEMBLY INSTRUCTIONS 2.1 MECHANICAL PARTS 2.1.1 FRONT GRILLE 1. Pull the control board toward yourself. Using a screwdriver, remove the screw that...
.... (Refer to control board. (See Figure 1) 3. NOTE : Controls, wires, and capacitor are now accessible for procedures. 6. Re-install components by placing the tabs in this manual or inside control board.) Figure 3 Figure 4 Figure 5 -6- DISASSEMBLY INSTRUCTIONS 2.1 MECHANICAL PARTS 2.1.1 FRONT GRILLE 1. Pull the control board toward yourself. Using a screwdriver, remove the screw that...
Owners Manual
Page 2
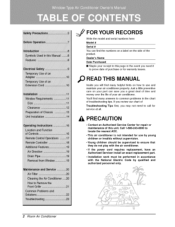
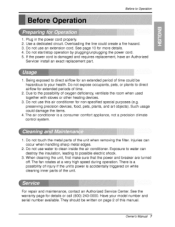
... may rlo¢ r_ed to, ca[I for • Contact an Authorized _r_ Center for repair or maintenance of purchase or for warranty issues, READ THiS MANUAL Inside you will {ind many _lp{u{ hints oin how to ensure that they do not p|ay wRh the ai_ ,_nditioner, • if the power cord...
... may rlo¢ r_ed to, ca[I for • Contact an Authorized _r_ Center for repair or maintenance of purchase or for warranty issues, READ THiS MANUAL Inside you will {ind many _lp{u{ hints oin how to ensure that they do not p|ay wRh the ai_ ,_nditioner, • if the power cord...
Owners Manual
Page 3
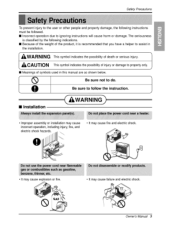
.... [] Because of the weight of the product, it is re_mmended that you have a helper to assist in the installation. [] Meanings of symbols us_ in this manual are as shown below. "/ q Be sure to do. Be sure not to follow t [] Installation . improper assemNy or installation may cause failure and ,ele_ric sho_. Owner_...
.... [] Because of the weight of the product, it is re_mmended that you have a helper to assist in the installation. [] Meanings of symbols us_ in this manual are as shown below. "/ q Be sure to do. Be sure not to follow t [] Installation . improper assemNy or installation may cause failure and ,ele_ric sho_. Owner_...

Owners Manual
Page 5
It will cause failure of injury_ Owner_ Manual 5 Leaving it must _ repaired or repEaced immediately. enfire house. • It may cause iniury. They are sharp and may cause injury, . _ may cause failure of ...
It will cause failure of injury_ Owner_ Manual 5 Leaving it must _ repaired or repEaced immediately. enfire house. • It may cause iniury. They are sharp and may cause injury, . _ may cause failure of ...
Owners Manual
Page 7
...). Do not touch the metal parts of oxygen deficiency, ventilate the room when used together with stoves or other heating devices, 3 Do not use this manual. The, fan rotates at a very high speed during operation. Owner_...
...). Do not touch the metal parts of oxygen deficiency, ventilate the room when used together with stoves or other heating devices, 3 Do not use this manual. The, fan rotates at a very high speed during operation. Owner_...
Owners Manual
Page 9
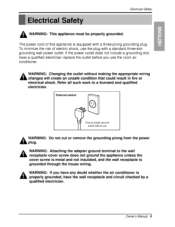
... an uncle condition that could result in fire or electrical shock. To minimize the rusk of this appliance is grounded through the house wiring. Owner_ Manual 9 The power cord of electric shock, use the room air conditioner,. W'ARNING: If you use the plug with a three-prong grounding plug. ElectricalSafety WARNING: This...
... an uncle condition that could result in fire or electrical shock. To minimize the rusk of this appliance is grounded through the house wiring. Owner_ Manual 9 The power cord of electric shock, use the room air conditioner,. W'ARNING: If you use the plug with a three-prong grounding plug. ElectricalSafety WARNING: This...
Owners Manual
Page 13
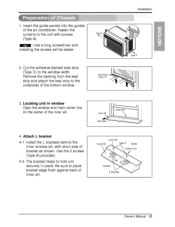
... flush against back of the air conditioner. Be sure to the unit with short side of bracket as shown. A Inside ,CenCeLr ime O{_id,e ILBracket Owne, s Manual 13 1.
... flush against back of the air conditioner. Be sure to the unit with short side of bracket as shown. A Inside ,CenCeLr ime O{_id,e ILBracket Owne, s Manual 13 1.
Owners Manual
Page 15
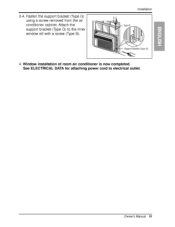
Attach the support bracket (Type G) to the inner window sili with a screw (Type B)_ Installation 4 Window installation of room air conditioner is now completed,, S_ ELEi'CTRICAL DATA for attaching power cord to electrical outlet. Owner_ Manual 15 Fasten the support bracket (Type G) using a screw removed from the air conditioner cabinet. 3-4.
Attach the support bracket (Type G) to the inner window sili with a screw (Type B)_ Installation 4 Window installation of room air conditioner is now completed,, S_ ELEi'CTRICAL DATA for attaching power cord to electrical outlet. Owner_ Manual 15 Fasten the support bracket (Type G) using a screw removed from the air conditioner cabinet. 3-4.
Owners Manual
Page 17
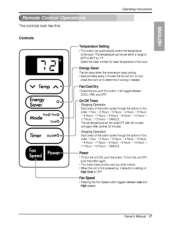
... the b_ton cycles through the options in this order: 1 Hour _, 2 Hours _, 3 Hours _ 4 Hours ....5 Hours .._..6..H..ours-_,7Hours 8Hours 9Hours lOHours .... 11 Hours ....12 Hours CANCLE - Owne, s Manual 17 The tem_rature can automatica!ly control the tem_r_ure of the room. The controls look like this r Operatinginstructions Temp ature Se ing , This button can...
... the b_ton cycles through the options in this order: 1 Hour _, 2 Hours _, 3 Hours _ 4 Hours ....5 Hours .._..6..H..ours-_,7Hours 8Hours 9Hours lOHours .... 11 Hours ....12 Hours CANCLE - Owne, s Manual 17 The tem_rature can automatica!ly control the tem_r_ure of the room. The controls look like this r Operatinginstructions Temp ature Se ing , This button can...
Owners Manual
Page 19
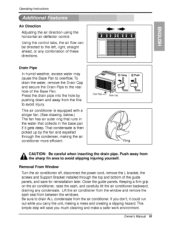
... in the base pan if it could run out while you much cl!eaning and make a safer work environment. IIfyou don't, it gets deep. Owne s Manual 19 Operatinginstructions Air Direction Adjusting the air direction using the hodzonta! Push away from between the windows. Press the drain pipe into the hole by...
... in the base pan if it could run out while you much cl!eaning and make a safer work environment. IIfyou don't, it gets deep. Owne s Manual 19 Operatinginstructions Air Direction Adjusting the air direction using the hodzonta! Push away from between the windows. Press the drain pipe into the hole by...
Owners Manual
Page 21
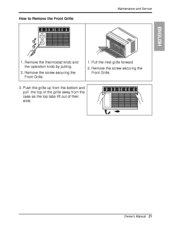
How to Remove the Front Grille Maintenanceand Service 1. Remove the screw securing the Front Gdlle. 1,.PuIll the inliet grille forward 2 Remove the screw securing the Front Gri]lle. 3. Owner_ Manual 21 Remo_e the thermostat knob and the operation knob by pulling. 2. Push the gri!le up, from the bosom and pull the top, of the grille, away from the case as the top tabs I[_ out of their slots.
How to Remove the Front Grille Maintenanceand Service 1. Remove the screw securing the Front Gdlle. 1,.PuIll the inliet grille forward 2 Remove the screw securing the Front Gri]lle. 3. Owner_ Manual 21 Remo_e the thermostat knob and the operation knob by pulling. 2. Push the gri!le up, from the bosom and pull the top, of the grille, away from the case as the top tabs I[_ out of their slots.
Owners Manual
Page 23
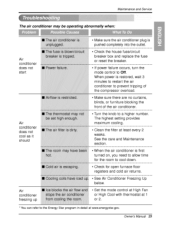
..., energystar.gov. See the care and Maintenance section. Make sure there are no curtains, blinds, or furniture blocking the front of the compressor overload. Owne, t"s Manual 23 See Air Conditioner Freezing Up below. The highest setting provides maximum cooling. Ma_htenance and Service The air conditioner may be o'_raiting abnormally when': Air...
..., energystar.gov. See the care and Maintenance section. Make sure there are no curtains, blinds, or furniture blocking the front of the compressor overload. Owne, t"s Manual 23 See Air Conditioner Freezing Up below. The highest setting provides maximum cooling. Ma_htenance and Service The air conditioner may be o'_raiting abnormally when': Air...


