Specification
Page 1
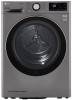
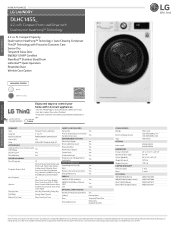
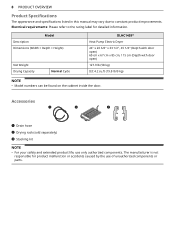
... KEY FEATURES SMART APPLIANCE HOME APPLIANCES LG LAUNDRY DLHC1455_ 4.2 cu.ft. ft. All other product and brand names are approximate. Compact Front Load Dryer with LED Display Yes Dial-A-Cycle™ Yes Touch Buttons Yes DRYER PROGRAMS No. Matching Washer WM1455HWA, ...Carton (WxHxD) Weight (Product) Weight (Carton) LIMITED WARRANTY Parts and Labor Drum UPC CODES WM1455HWA (White) WM1455HVA (Graphite Steel) DLHC1455W (White) DLHC1455V (Graphite Steel) CSA Listed 120/240V,60Hz,3.1A/ 120/208V,60Hz,3.5A Heat Pump 4930EL3021A 4930EL3023A 24'' x 33 1/2'' x 25 1/4'' 45 1/4"...
... KEY FEATURES SMART APPLIANCE HOME APPLIANCES LG LAUNDRY DLHC1455_ 4.2 cu.ft. ft. All other product and brand names are approximate. Compact Front Load Dryer with LED Display Yes Dial-A-Cycle™ Yes Touch Buttons Yes DRYER PROGRAMS No. Matching Washer WM1455HWA, ...Carton (WxHxD) Weight (Product) Weight (Carton) LIMITED WARRANTY Parts and Labor Drum UPC CODES WM1455HWA (White) WM1455HVA (Graphite Steel) DLHC1455W (White) DLHC1455V (Graphite Steel) CSA Listed 120/240V,60Hz,3.1A/ 120/208V,60Hz,3.5A Heat Pump 4930EL3021A 4930EL3023A 24'' x 33 1/2'' x 25 1/4'' 45 1/4"...
Owners Manual
Page 1
All Rights Reserved. ENGLISH DLHC1455* MFL71424358 Rev.07_030421 www.lg.com Copyright © 2020-2021 LG Electronics Inc. OWNER'S MANUAL DRYER Read this owner's manual thoroughly before operating the appliance and keep it handy for reference at all times.
All Rights Reserved. ENGLISH DLHC1455* MFL71424358 Rev.07_030421 www.lg.com Copyright © 2020-2021 LG Electronics Inc. OWNER'S MANUAL DRYER Read this owner's manual thoroughly before operating the appliance and keep it handy for reference at all times.

Owners Manual
Page 2
... Leveling the Appliance 14 Reversing the Door 16 Stacking the Appliance 17 Connecting Electric Dryers 21 Special Electrical Requirements 21 Final Installation Check 22 OPERATION 22 Before Use 23 Loading the Dryer 24 Control Panel 26 Drying Cycles 30 Options and Extra Functions 33 SMART FUNCTIONS... 33 LG ThinQ Application 35 Smart DiagnosisTM Function 37 MAINTENANCE 37 Regular Cleaning 39 Periodic Cleaning 41...
... Leveling the Appliance 14 Reversing the Door 16 Stacking the Appliance 17 Connecting Electric Dryers 21 Special Electrical Requirements 21 Final Installation Check 22 OPERATION 22 Before Use 23 Loading the Dryer 24 Control Panel 26 Drying Cycles 30 Options and Extra Functions 33 SMART FUNCTIONS... 33 LG ThinQ Application 35 Smart DiagnosisTM Function 37 MAINTENANCE 37 Regular Cleaning 39 Periodic Cleaning 41...
Owners Manual
Page 4
...controls with wet hands. • Do not modify or extend the power cord. • If the appliance has been submerged, contact an LG Electronics customer information center for instructions before resuming use. • Do not store or use them for a garage installation. • Do not... concerning the use of the appliance by a person responsible for their safety. • Use this appliance if it immediately, and contact an LG Electronics customer information center. • Never unplug the appliance by a utility. • Certain internal parts are intentionally not grounded and may ...
...controls with wet hands. • Do not modify or extend the power cord. • If the appliance has been submerged, contact an LG Electronics customer information center for instructions before resuming use. • Do not store or use them for a garage installation. • Do not... concerning the use of the appliance by a person responsible for their safety. • Use this appliance if it immediately, and contact an LG Electronics customer information center. • Never unplug the appliance by a utility. • Certain internal parts are intentionally not grounded and may ...
Owners Manual
Page 5
...least resistance for foreign objects. • Do not place items exposed to cooking oils in your hand get pinched when opening or closing the dryer door. To reduce the risk of fire due to contaminated loads, the final part of the appliance for electric current. Check with a ...electrician to follow these instructions may contribute to catch fire. Electrical shock may present a risk of your body, such as pets inside of a tumble dryer cycle occurs without heat (cool down period). Failure to make sure the outlet is dissipated. • Do not let children or pets climb inside...
...least resistance for foreign objects. • Do not place items exposed to cooking oils in your hand get pinched when opening or closing the dryer door. To reduce the risk of fire due to contaminated loads, the final part of the appliance for electric current. Check with a ...electrician to follow these instructions may contribute to catch fire. Electrical shock may present a risk of your body, such as pets inside of a tumble dryer cycle occurs without heat (cool down period). Failure to make sure the outlet is dissipated. • Do not let children or pets climb inside...
Owners Manual
Page 8
... caused by the use only authorized components. Model Description Dimensions (Width × Depth × Height) Net Weight Drying Capacity Normal Cycle DLHC1455* Heat Pump Electric Dryer 24'' x 26 3/8'' x 33 1/2'', 45 1/4'' (Depth with door open) 60 cm x 67 cm x 85 cm, 115 cm (Depth with door open) 127.9 lb (58 kg) IEC...
... caused by the use only authorized components. Model Description Dimensions (Width × Depth × Height) Net Weight Drying Capacity Normal Cycle DLHC1455* Heat Pump Electric Dryer 24'' x 26 3/8'' x 33 1/2'', 45 1/4'' (Depth with door open) 60 cm x 67 cm x 85 cm, 115 cm (Depth with door open) 127.9 lb (58 kg) IEC...

Owners Manual
Page 9
ENGLISH a Choose the proper location. b Level the appliance. c Connect the heat pump electric dryer. d Plug in the power cord. e Final Installation Check INSTALLATION INSTALLATION 9 Before Installing Installation Overview Please read the following installation instructions first after purchasing this dryer or transporting it to another location.
ENGLISH a Choose the proper location. b Level the appliance. c Connect the heat pump electric dryer. d Plug in the power cord. e Final Installation Check INSTALLATION INSTALLATION 9 Before Installing Installation Overview Please read the following installation instructions first after purchasing this dryer or transporting it to another location.

Owners Manual
Page 10
... instructions completely before installing and using the appliance. Electricity Use an individual, grounded electrical outlet located within 2 ft. (61 cm) of either side of the dryer in longer drying times. Contact your local building inspector. It is not level. • Far garage installation, you review this entire manual before installing and...
... instructions completely before installing and using the appliance. Electricity Use an individual, grounded electrical outlet located within 2 ft. (61 cm) of either side of the dryer in longer drying times. Contact your local building inspector. It is not level. • Far garage installation, you review this entire manual before installing and...

Owners Manual
Page 11
... mm) E Distance to reduce noise transfer. Installation spacing for ease of installation and servicing. • Additional clearances should be considered on all sides of the dryer to the Overhead Cabinet/Shelf 2 18″ (457 mm) F Front Clearance 1″ (25 mm) G Depth 26 3/8″ (670 mm) H Back Clearance 2 5″ (127 mm) I Side...
... mm) E Distance to reduce noise transfer. Installation spacing for ease of installation and servicing. • Additional clearances should be considered on all sides of the dryer to the Overhead Cabinet/Shelf 2 18″ (457 mm) F Front Clearance 1″ (25 mm) G Depth 26 3/8″ (670 mm) H Back Clearance 2 5″ (127 mm) I Side...

Owners Manual
Page 12
... openings are also acceptable. Dimension/Clearance 2 48 sq. in the door or cut down the door at least a little space around the dryer (or any other fuel-burning appliance can be installed no more than 6 feet above the floor. Install vent grills in . (310 cm2... there is enough vibration, it could cause appliances to the Top of vibration from one foot above the floor. Louvered doors with Stacked Washer and Dryer - Description A Upper Ventilation Opening B Lower Ventilation Opening C Distance to Ventilation Opening D Front Clearance E Back Clearance F Top Clearance to the...
... openings are also acceptable. Dimension/Clearance 2 48 sq. in the door or cut down the door at least a little space around the dryer (or any other fuel-burning appliance can be installed no more than 6 feet above the floor. Install vent grills in . (310 cm2... there is enough vibration, it could cause appliances to the Top of vibration from one foot above the floor. Louvered doors with Stacked Washer and Dryer - Description A Upper Ventilation Opening B Lower Ventilation Opening C Distance to Ventilation Opening D Front Clearance E Back Clearance F Top Clearance to the...

Owners Manual
Page 16
...plate: Tools Required • Phillips screwdriver 4 Use the 2 screws removed earlier to secure the brackets in damage, injury or property damage. a Dryer b LG Front Load Washing Machine The appliance may only be stacked on each side. Shape and assembly direction Washing Machine Top plate size 21 7/8 inch (550...stable, level floor capable of supporting the weight of both appliances. • Do not stack the washer on top of the dryer. • If appliances are already installed, disconnect them from all power, water, and drainage connections. 1 Place the appliance on the top of...
...plate: Tools Required • Phillips screwdriver 4 Use the 2 screws removed earlier to secure the brackets in damage, injury or property damage. a Dryer b LG Front Load Washing Machine The appliance may only be stacked on each side. Shape and assembly direction Washing Machine Top plate size 21 7/8 inch (550...stable, level floor capable of supporting the weight of both appliances. • Do not stack the washer on top of the dryer. • If appliances are already installed, disconnect them from all power, water, and drainage connections. 1 Place the appliance on the top of...

Owners Manual
Page 17
...persons, or death when using this appliance, fulfill the following pages. • Do not modify the plug and internal wire provided with the dryer. This white ground wire MUST BE MOVED to the neutral terminal when a 4-wire cord is to local codes and with instructions on both ...CAUTION • If the drain hose is kinked or pinched, it will need to be connected to the bottom of a washing machine. Connecting Electric Dryers To reduce the risk of the National Electrical Code, ANSI/NFPA 70 and all applicable local regulations. Installing the Optional Drain Hose Normally, condensed water...
...persons, or death when using this appliance, fulfill the following pages. • Do not modify the plug and internal wire provided with the dryer. This white ground wire MUST BE MOVED to the neutral terminal when a 4-wire cord is to local codes and with instructions on both ...CAUTION • If the drain hose is kinked or pinched, it will need to be connected to the bottom of a washing machine. Connecting Electric Dryers To reduce the risk of the National Electrical Code, ANSI/NFPA 70 and all applicable local regulations. Installing the Optional Drain Hose Normally, condensed water...

Owners Manual
Page 18
... neutral (white) wire to the center screw of the terminal block 7 Attach the power cord ground wire to allow for removal and reinstallation of the dryer. 1 Remove 5 inches (12.7 cm) of the outer covering from the wire and remove 5 inches of insulation from each wire.
... neutral (white) wire to the center screw of the terminal block 7 Attach the power cord ground wire to allow for removal and reinstallation of the dryer. 1 Remove 5 inches (12.7 cm) of the outer covering from the wire and remove 5 inches of insulation from each wire.

Owners Manual
Page 20
...AWG minimum copper conductor power cable prepared in step 1 through the strain relief. Allow at least 5 ft. (1.5 m) length to allow for removal and installation of dryer. 1 Remove 3.5 inches (8.9 cm) of the power cord to the outer terminal block screws. 6 Attach the neutral (white) wire to the center terminal block... 5 Attach the two hot leads (black and red) of the outer covering from the wire. 20 INSTALLATION bc b a e d a White Wire from Dryer harness b Hot Leads of Power Cord (Black and Red) c Neutral Wire (White) d External Ground Wire (If required by local codes) e Ground screw
...AWG minimum copper conductor power cable prepared in step 1 through the strain relief. Allow at least 5 ft. (1.5 m) length to allow for removal and installation of dryer. 1 Remove 3.5 inches (8.9 cm) of the power cord to the outer terminal block screws. 6 Attach the neutral (white) wire to the center terminal block... 5 Attach the two hot leads (black and red) of the outer covering from the wire. 20 INSTALLATION bc b a e d a White Wire from Dryer harness b Hot Leads of Power Cord (Black and Red) c Neutral Wire (White) d External Ground Wire (If required by local codes) e Ground screw

Owners Manual
Page 21
...are in firm contact with the dryer. Make sure it is provided in the section Connecting Electric Dryers. • To reduce the risk of the dryer and it is level. INSTALLATION 21 ENGLISH Checking Levelness Once the dryer is in its final location, recheck the dryer to be sure it is ...Manufactured Homes • Any installation in a manufactured or mobile home must be vented to the outside. • DO NOT vent the dryer under a manufactured home or mobile home. • Electric dryers may be vented to the outside using the back, left, right, or bottom panel. • Make sure the...
...are in firm contact with the dryer. Make sure it is provided in the section Connecting Electric Dryers. • To reduce the risk of the dryer and it is level. INSTALLATION 21 ENGLISH Checking Levelness Once the dryer is in its final location, recheck the dryer to be sure it is ...Manufactured Homes • Any installation in a manufactured or mobile home must be vented to the outside. • DO NOT vent the dryer under a manufactured home or mobile home. • Electric dryers may be vented to the outside using the back, left, right, or bottom panel. • Make sure the...

Owners Manual
Page 22
... be emptied. 5 Press the Start/Pause button to start the drying cycle. 6 After the drying cycle has finished, open to help prevent odors, leave the dryer door slightly open the door and unload the clothes. NOTE • The final part of the dry cycle does not use . Operation Overview 1 Ensure the...
... be emptied. 5 Press the Start/Pause button to start the drying cycle. 6 After the drying cycle has finished, open to help prevent odors, leave the dryer door slightly open the door and unload the clothes. NOTE • The final part of the dry cycle does not use . Operation Overview 1 Ensure the...

Owners Manual
Page 23
... clothes. Glass particles left in the same load. • Close zippers, hooks and drawstrings to reduce wrinkles. This will expand as the dryer stops to prevent these items from or containing rubber or plastics such as: - Using the chart below, adjust the cycle and option selections to...Pull the items to their original shape if needed and lay them flat to tumble and dry properly. Loading the Dryer NOTE • Do not overload the appliance for your dryer. Label Tumble Dry Directions Dry Normal Permanent Press / Wrinkle Resistant Gentle / Delicate Do not tumble dry Do not...
... clothes. Glass particles left in the same load. • Close zippers, hooks and drawstrings to reduce wrinkles. This will expand as the dryer stops to prevent these items from or containing rubber or plastics such as: - Using the chart below, adjust the cycle and option selections to...Pull the items to their original shape if needed and lay them flat to tumble and dry properly. Loading the Dryer NOTE • Do not overload the appliance for your dryer. Label Tumble Dry Directions Dry Normal Permanent Press / Wrinkle Resistant Gentle / Delicate Do not tumble dry Do not...
Owners Manual
Page 30
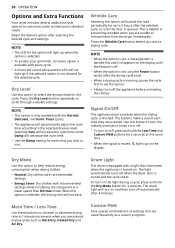
... only available with the Normal, Delicates, and Perm. The buttons make a sound each time they are unable to remove items from the dryer immediately. To turn off the appliance before you wish to iron. Wrinkle Care Selecting this button to turn the melody and button tones on... the cycle time, while Damp will automatically adjust the cycle time according to the selected dryness level. 30 OPERATION Options and Extra Functions Your dryer includes several additional cycle options to customize cycles to meet your garments, not every option is available with every cycle. • A chime...
... only available with the Normal, Delicates, and Perm. The buttons make a sound each time they are unable to remove items from the dryer immediately. To turn off the appliance before you wish to iron. Wrinkle Care Selecting this button to turn the melody and button tones on... the cycle time, while Damp will automatically adjust the cycle time according to the selected dryness level. 30 OPERATION Options and Extra Functions Your dryer includes several additional cycle options to customize cycles to meet your garments, not every option is available with every cycle. • A chime...
Owners Manual
Page 31
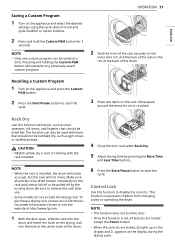
...the Custom PGM button for air to disable the controls. NOTE • Only one custom program can prevent children from changing cycles or operating the dryer. Pressing and holding the Custom PGM button will not move. OPERATION 31 2 Seat the front of the rack securely on the inner door rim and... the turning drum. CAUTION • NEVER tumble dry a load of the drum. To purchase a drying rack, contact an LG Electronics Customer Information Center or visit the website at http://www.lg.com. 1 With the door open, slide the rack into the hole at the back of clothing with items that should...
...the Custom PGM button for air to disable the controls. NOTE • Only one custom program can prevent children from changing cycles or operating the dryer. Pressing and holding the Custom PGM button will not move. OPERATION 31 2 Seat the front of the rack securely on the inner door rim and... the turning drum. CAUTION • NEVER tumble dry a load of the drum. To purchase a drying rack, contact an LG Electronics Customer Information Center or visit the website at http://www.lg.com. 1 With the door open, slide the rack into the hole at the back of clothing with items that should...
Owners Manual
Page 33
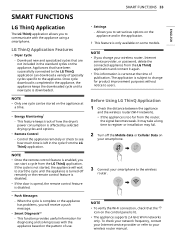
... and in the standard cycles on the appliance at the time of how the dryer's power consumption is disabled. • Push Messages - LG ThinQ Application Features • Dryer Cycle - Once cycle download is completed in the cycle from the LG ThinQ application. This function provides useful information for product improvement purposes without notice to...
... and in the standard cycles on the appliance at the time of how the dryer's power consumption is disabled. • Push Messages - LG ThinQ Application Features • Dryer Cycle - Once cycle download is completed in the cycle from the LG ThinQ application. This function provides useful information for product improvement purposes without notice to...


