
Owners Manual
Page 2
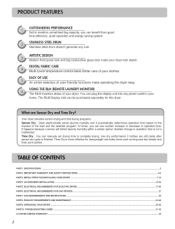
...power outlet in operation time. The RLM Display Unit can benefit from good time efficiency, quiet operation and energy saving system. TROUBLESHOOTING GUIDE ...LG DRYER LIMITED WARRANTY ...2 3 4-6 7-14 15-16 17-20 21 22 23-24 25-30 31-33 34 ARTISTICDESIGN Modern front panel look and...MONITOR) The RLM monitors status of the load and the selected program. IMPORTANT WARRANTY AND SAFETY INSTRUCTIONS ...PART& INITIAL STEPS FOR INSTALLING YOUR DRYER ...PART4. Sudden change in operation time is finished. Use dry performance if clothes are still damp after sensor dry cycle is not a...
...power outlet in operation time. The RLM Display Unit can benefit from good time efficiency, quiet operation and energy saving system. TROUBLESHOOTING GUIDE ...LG DRYER LIMITED WARRANTY ...2 3 4-6 7-14 15-16 17-20 21 22 23-24 25-30 31-33 34 ARTISTICDESIGN Modern front panel look and...MONITOR) The RLM monitors status of the load and the selected program. IMPORTANT WARRANTY AND SAFETY INSTRUCTIONS ...PART& INITIAL STEPS FOR INSTALLING YOUR DRYER ...PART4. Sudden change in operation time is finished. Use dry performance if clothes are still damp after sensor dry cycle is not a...
Owners Manual
Page 3
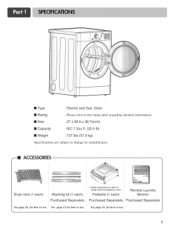
See page 13 for how to use . 3 See page 14 for how to use. ACCESSORIES Dryer rack (1 each) Stacking kit (1 each ) Purchased Separately Remote Laundry Monitor Purchased Separately See page 26 for how to use . Pedestal (1 each ) Purchased ...Separately _': Design of pedestals are subject to change by manufacturer. [] Type Electric and Gas Dryer [] Rating [] Size Please refer to the rating label regarding detailed information. 27 x 29.9 x 38.7(inch) [] Capacity IEC 7.3cu.ft. (22.5 Ib) [] Weight :...
See page 13 for how to use . 3 See page 14 for how to use. ACCESSORIES Dryer rack (1 each) Stacking kit (1 each ) Purchased Separately Remote Laundry Monitor Purchased Separately See page 26 for how to use . Pedestal (1 each ) Purchased ...Separately _': Design of pedestals are subject to change by manufacturer. [] Type Electric and Gas Dryer [] Rating [] Size Please refer to the rating label regarding detailed information. 27 x 29.9 x 38.7(inch) [] Capacity IEC 7.3cu.ft. (22.5 Ib) [] Weight :...
Owners Manual
Page 4
... this manual must be followed. If this product is installed and operated per this manual, LG will need the complete Model and Serial Number when requesting Warranty Service. Warranty Restriction: If the dryer is effective for your nearest LG Service Center. Proof of purchase date is located at the end of Purchase -_ Staple.... RNING! You will repair or replace any parts defective in this manual. J To reduce the risk of Purchase. Warranty Service is available by contacting your Dryer is required. SEEKING WARRANTY ASSISTANCE The Warranty for only 90 days.
... this manual must be followed. If this product is installed and operated per this manual, LG will need the complete Model and Serial Number when requesting Warranty Service. Warranty Restriction: If the dryer is effective for your nearest LG Service Center. Proof of purchase date is located at the end of Purchase -_ Staple.... RNING! You will repair or replace any parts defective in this manual. J To reduce the risk of Purchase. Warranty Service is available by contacting your Dryer is required. SEEKING WARRANTY ASSISTANCE The Warranty for only 90 days.
Owners Manual
Page 5
...14) Do not use heat to dry articles containing foam rubber or similarly textured rubber-like materials. 10) Clean lint screen before using your dryer. This appliance must be connected to a grounded metal permanent wiring sy stem or an eq uipment -ground ing conductor must be exposed to...recommended in the user-maintenance instructions. 9) Do not use fabric softners or products to the equipment-grounding terminal or lead on or in your dryer, please exercise care and follow basic safety 1) Read all local codes and ordinances. This appliance is properly grounded. Do not modify the ...
...14) Do not use heat to dry articles containing foam rubber or similarly textured rubber-like materials. 10) Clean lint screen before using your dryer. This appliance must be connected to a grounded metal permanent wiring sy stem or an eq uipment -ground ing conductor must be exposed to...recommended in the user-maintenance instructions. 9) Do not use fabric softners or products to the equipment-grounding terminal or lead on or in your dryer, please exercise care and follow basic safety 1) Read all local codes and ordinances. This appliance is properly grounded. Do not modify the ...

Owners Manual
Page 6
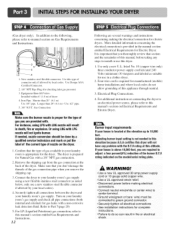
...perform installation and service of this appliance. Exposure to do so can be air dried. • Failure to the outdoors. 6 Properly adjusted dryers will minimize combustion. WARNING! • Keep flammable materials and vapors, such as gasoline, away from a neighbor's phone. ,_ WHAT TO DO...fuels. Follow the gas supplier's instructions carefully. • If you cannot reach your gas supplier, call your gas supplier from dryer. • Place dryer at least 18 inches above the floor for a garage installation. • Failure to these substances, namely benzene, carbon monoxide, ...
...perform installation and service of this appliance. Exposure to do so can be air dried. • Failure to the outdoors. 6 Properly adjusted dryers will minimize combustion. WARNING! • Keep flammable materials and vapors, such as gasoline, away from a neighbor's phone. ,_ WHAT TO DO...fuels. Follow the gas supplier's instructions carefully. • If you cannot reach your gas supplier, call your gas supplier from dryer. • Place dryer at least 18 inches above the floor for a garage installation. • Failure to these substances, namely benzene, carbon monoxide, ...
Owners Manual
Page 7
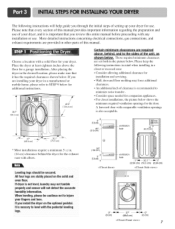
... servicing. • Wall, door and floor molding may not tumble properly and sensor will help guide you are required above, behind the dryer for the exhaust vent with any installation or use. Choose a location with comparable ventilation openings is not level, laundry may force additional clearances... below . Those required minimum clearances are stably placed on the optional pedstal. A louvered door with a solid floor for your dryer. When leveling, please be secured. If you review this manual. Please note that every section of this manual provides important information...
... servicing. • Wall, door and floor molding may not tumble properly and sensor will help guide you are required above, behind the dryer for the exhaust vent with any installation or use. Choose a location with comparable ventilation openings is not level, laundry may force additional clearances... below . Those required minimum clearances are stably placed on the optional pedstal. A louvered door with a solid floor for your dryer. When leveling, please be secured. If you review this manual. Please note that every section of this manual provides important information...

Owners Manual
Page 8
...left to right or front to back should not exceed 2.5 cm (1 inch). The door on the floor and the dryer should not rock. i 8 The maximum slope of the dryer from left to right and front to back. Follow these instructions to reverse the direction in position, adjust the leveling... legs of and clearances for your dryei: Please review this manual also provide important information concerning the placement of the dryer until it is not level, and if the slope exceeds 2.5 cm (1 inch), a load may not tumble properly and internal sensors may malfunction. ...
...left to right or front to back should not exceed 2.5 cm (1 inch). The door on the floor and the dryer should not rock. i 8 The maximum slope of the dryer from left to right and front to back. Follow these instructions to reverse the direction in position, adjust the leveling... legs of and clearances for your dryei: Please review this manual also provide important information concerning the placement of the dryer until it is not level, and if the slope exceeds 2.5 cm (1 inch), a load may not tumble properly and internal sensors may malfunction. ...
Owners Manual
Page 11
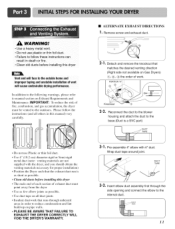
...joints • Insulate ductwork that the exhaust duct run is a SVC part) TAPE 3-1. Insert elbow duct assembly first through unheated areas in this dryer • The male end of each section of vent will face to the outside home and improper taping and unstable installation of exhaust duct must...following warnings, please refer to the internal duct. 11 IMPORTANT: To reduce the risk of fire, combustion, and gas accumulation, the dryer must point away from the dryer • Use as few elbow joints as possible. • Use duct tape on all others in order to the base.(Duct ...
...joints • Insulate ductwork that the exhaust duct run is a SVC part) TAPE 3-1. Insert elbow duct assembly first through unheated areas in this dryer • The male end of each section of vent will face to the outside home and improper taping and unstable installation of exhaust duct must...following warnings, please refer to the internal duct. 11 IMPORTANT: To reduce the risk of fire, combustion, and gas accumulation, the dryer must point away from the dryer • Use as few elbow joints as possible. • Use duct tape on all others in order to the base.(Duct ...
Owners Manual
Page 12
...• Disconnect power before taking any steps to 10,000 Adjustingburner input setting isnot neededin this eievatian because A.G.Acertifies this dryer will result in death, fire or explosion, Or using a new flexible stainless steel connector (as suitable for manufactured (mobile...) home installations and where local codes do so can result in a clothes dryer. 2. Electrical Plug Connections. 4. More detailed information concerning the electrical connection is important that you are several warnings and instructions ...
...• Disconnect power before taking any steps to 10,000 Adjustingburner input setting isnot neededin this eievatian because A.G.Acertifies this dryer will result in death, fire or explosion, Or using a new flexible stainless steel connector (as suitable for manufactured (mobile...) home installations and where local codes do so can result in a clothes dryer. 2. Electrical Plug Connections. 4. More detailed information concerning the electrical connection is important that you are several warnings and instructions ...
Owners Manual
Page 13
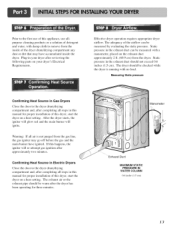
.... Static pressure in the exhaust duct can be warm after completing all air is running with no load. The dryer should be measured with a manometer, placed on a heat setting. Static pressure in the exhaust duct should be measured by evaluating the ...Measuring Static pressure Confirming Heat Source in Gas Dryers Close the door to the dryer drum/drying compartment and, after the dryer has been operating for proper installation of this dryer, start the dryer on your dryer after approximately two minutes. The adequacy of the dryer drum/drying compartment any dust or dirt that...
.... Static pressure in the exhaust duct can be warm after completing all air is running with no load. The dryer should be measured with a manometer, placed on a heat setting. Static pressure in the exhaust duct should be measured by evaluating the ...Measuring Static pressure Confirming Heat Source in Gas Dryers Close the door to the dryer drum/drying compartment and, after the dryer has been operating for proper installation of this dryer, start the dryer on your dryer after approximately two minutes. The adequacy of the dryer drum/drying compartment any dust or dirt that...
Owners Manual
Page 14
... The electrical connection for assistance. If you use a rigid or flexible metal pipe. 7) DO NOT connect the exhaust duct with the dryer. WARNING! Gas dryer may be a 4-wire connection. DO NOT vent the exhaust duct under the manufactured or mobile home. 14 Any installation in a manufactured...manual section entitled Electrical Requirements for proper installation. /(. 7 L_ L WARNING! The opening for outside using the right side panel because of the dryer in a manufactured or mobile home must be at least 25 iw' (163 cm_). 9) It is important that the clearance of the duct...
... The electrical connection for assistance. If you use a rigid or flexible metal pipe. 7) DO NOT connect the exhaust duct with the dryer. WARNING! Gas dryer may be a 4-wire connection. DO NOT vent the exhaust duct under the manufactured or mobile home. 14 Any installation in a manufactured...manual section entitled Electrical Requirements for proper installation. /(. 7 L_ L WARNING! The opening for outside using the right side panel because of the dryer in a manufactured or mobile home must be at least 25 iw' (163 cm_). 9) It is important that the clearance of the duct...
Owners Manual
Page 15
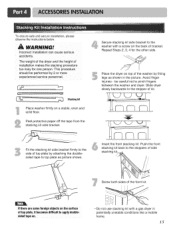
.... This procedure should be careful not to pinch fingers between the washer and dryer. Stackin9kit Place washer firmly on the back of the washer by fitting legs as picture shows. Slide dryer slowly backwards to the washer with a gas dryer in the picture. To ensure safe and secure installation, please observe the instructions... the surface of top plate, it becomes difficult to the side of the front kit. The weight of the dryer and the height of kit. Peel protective paper off the tape from the stacking kit side bracket. Secure stacking kit side bracket to the stopper ...
.... This procedure should be careful not to pinch fingers between the washer and dryer. Stackin9kit Place washer firmly on the back of the washer by fitting legs as picture shows. Slide dryer slowly backwards to the washer with a gas dryer in the picture. To ensure safe and secure installation, please observe the instructions... the surface of top plate, it becomes difficult to the side of the front kit. The weight of the dryer and the height of kit. Peel protective paper off the tape from the stacking kit side bracket. Secure stacking kit side bracket to the stopper ...

Owners Manual
Page 16
...Disconnect venting. NOTE : Attach the lower side first. Removepedestali,nstallatiohnardwarea,nd instructionfsromtheshippingcarton. combo -- NOTE • Because of the weight of the dryer two or more people may be placed on top of the pedestal. " F Remove the paper from the wall enough to the pedestal. ...wrench. Be sure to press the adhesive parts of the brackets align with the edge and can be attached to the dryer as follows: A. NOTE : If dryer was previously installed, uninstall it as shown so the bent parts of the brackets firmly to the desired place. Adjust ...
...Disconnect venting. NOTE : Attach the lower side first. Removepedestali,nstallatiohnardwarea,nd instructionfsromtheshippingcarton. combo -- NOTE • Because of the weight of the dryer two or more people may be placed on top of the pedestal. " F Remove the paper from the wall enough to the pedestal. ...wrench. Be sure to press the adhesive parts of the brackets align with the edge and can be attached to the dryer as follows: A. NOTE : If dryer was previously installed, uninstall it as shown so the bent parts of the brackets firmly to the desired place. Adjust ...

Owners Manual
Page 17
.... If over fifteen feet (4.50 m), use U.L. (Underwriters Laboratories) listed No. 10 A.W.G. Allow sufficient slack in dryers which to wire your Electric Dryer: a) This dryer must be connected to a grounded metal, permanent wiring system or an equipment-grounding conductor must be run with the ...VOLT CIRCUIT. Following are to be connected to electrical service of different voltage than that must be connected to the equipment-grounding dryer. Refer to the latest edition of the National Electrical Code, ANSI/NFPA 70 and all applicable local regulations. J_, Important Warning...
.... If over fifteen feet (4.50 m), use U.L. (Underwriters Laboratories) listed No. 10 A.W.G. Allow sufficient slack in dryers which to wire your Electric Dryer: a) This dryer must be connected to a grounded metal, permanent wiring system or an equipment-grounding conductor must be run with the ...VOLT CIRCUIT. Following are to be connected to electrical service of different voltage than that must be connected to the equipment-grounding dryer. Refer to the latest edition of the National Electrical Code, ANSI/NFPA 70 and all applicable local regulations. J_, Important Warning...

Owners Manual
Page 18
...cord External ground connector you will be using a UL listed, 120/240 volt minimum, 30 amp, dryer power supply cord. Center terminal block screw(silver) Neutral grounding wire(white) Neutral wire (white or... will be using a UL listed, 120/240 volt minimum, 30 amp, dryer power supply cord. Wire color indicated on manual is applied resulting in damages on tight and power cord ...is prohibited for dryer to a fused disconnect or circuit breaker box Important : Grounding through the neutral conductor is ...
...cord External ground connector you will be using a UL listed, 120/240 volt minimum, 30 amp, dryer power supply cord. Center terminal block screw(silver) Neutral grounding wire(white) Neutral wire (white or... will be using a UL listed, 120/240 volt minimum, 30 amp, dryer power supply cord. Wire color indicated on manual is applied resulting in damages on tight and power cord ...is prohibited for dryer to a fused disconnect or circuit breaker box Important : Grounding through the neutral conductor is ...

Owners Manual
Page 19
.... 3. Center terminal block screw(silver) Neutral grounding wire(white) Neutral grounding wire(white) relief External ground connector • If your dryer in a mobile home, you are on tight and power cord is in right position. 19 Make sure that the strain relief screw... recreational vehicles, and (4) areas where local codes prohibit grounding through the neutral conductor. Important : Grounding through the neutral conductor is prohibited for dryer to center terminal block screw. 2. Make sure that all terminal block nuts are on tight and power cord is in right position. Then,...
.... 3. Center terminal block screw(silver) Neutral grounding wire(white) Neutral grounding wire(white) relief External ground connector • If your dryer in a mobile home, you are on tight and power cord is in right position. 19 Make sure that the strain relief screw... recreational vehicles, and (4) areas where local codes prohibit grounding through the neutral conductor. Important : Grounding through the neutral conductor is prohibited for dryer to center terminal block screw. 2. Make sure that all terminal block nuts are on tight and power cord is in right position. Then,...
Owners Manual
Page 21
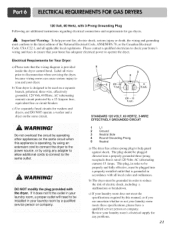
...0perating, by Using an extension cord to you are additional instructions regarding electrical connections and requirements for washers and dryers, and DO NOT operate a washer and a dryer on a separate branch, polarized, three-wire, effectively grounded, 120 Volt, 60 Hertz, AC (alternating ...specifications required by a qualified service person or company. 1 L1 2 Ground 3 Neutral Side 4 Round Grounding Prong 5 Neutral a) The dryer has a three-prong plug to be properly and fully effective, must be plugged directed into a properly installed outlet that the wiring diagram ...
...0perating, by Using an extension cord to you are additional instructions regarding electrical connections and requirements for washers and dryers, and DO NOT operate a washer and a dryer on a separate branch, polarized, three-wire, effectively grounded, 120 Volt, 60 Hertz, AC (alternating ...specifications required by a qualified service person or company. 1 L1 2 Ground 3 Neutral Side 4 Round Grounding Prong 5 Neutral a) The dryer has a three-prong plug to be properly and fully effective, must be plugged directed into a properly installed outlet that the wiring diagram ...
Owners Manual
Page 22
...off valve. • Securely tighten all local codes and ordinances. pipe plug must comply with all gas connections. • If connected to the dryer; It is also important that you use pipe joint compound that is identified. • DO NOT use an open flame to inspect for gas ...shown. . To reduce the danger of gas leaks, explosion, and fire, please follow and observe the following instructions and WARNINGS. • Connect the dryer to the type of gas shown on the nameplate. • Use new flexible stainless steel connectors. • Use Teflon tape and pipe joint compound insoluble...
...off valve. • Securely tighten all local codes and ordinances. pipe plug must comply with all gas connections. • If connected to the dryer; It is also important that you use pipe joint compound that is identified. • DO NOT use an open flame to inspect for gas ...shown. . To reduce the danger of gas leaks, explosion, and fire, please follow and observe the following instructions and WARNINGS. • Connect the dryer to the type of gas shown on the nameplate. • Use new flexible stainless steel connectors. • Use Teflon tape and pipe joint compound insoluble...
Owners Manual
Page 23
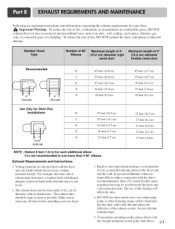
...and unventilated area, such as an attic, wall, ceiling, crawl space, chimney, gas vent, or concealed space of fire, DO NOT exhaust the dryer with duct tape. 5. Exhaust Requirements and Instructions: 1. Make sure to make a connection with the above . 23 To maximize operating results, please ... In special installations when it is not in diameter with no obstructions. Following are not provided with the dryer and you should be kept as short as transition ducting between the dryer and wall connection only. The use more than 4 90 ° elbows. Secure all joints with plastic...
...and unventilated area, such as an attic, wall, ceiling, crawl space, chimney, gas vent, or concealed space of fire, DO NOT exhaust the dryer with duct tape. 5. Exhaust Requirements and Instructions: 1. Make sure to make a connection with the above . 23 To maximize operating results, please ... In special installations when it is not in diameter with no obstructions. Following are not provided with the dryer and you should be kept as short as transition ducting between the dryer and wall connection only. The use more than 4 90 ° elbows. Secure all joints with plastic...
Owners Manual
Page 24
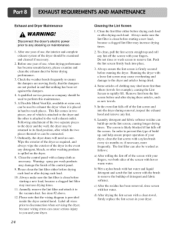
... with a loose lint screen may be returned to its final position, after drying each load. 10. d) After drying the lint screen with your dryer. 24 Cleaning the Lint Screen 1. Before one year of use , the interior and complete exhaust system of use , when drying performance has become ...as follows: a) After rolling the lint off the screen with a clean towel, firmly replace the lint screen in two pieces, one year of the dryer should be connected. 7. Please note that nothing has been set against the dampers. 4. Always make sure the lint filter is clean before starting a...
... with a loose lint screen may be returned to its final position, after drying each load. 10. d) After drying the lint screen with your dryer. 24 Cleaning the Lint Screen 1. Before one year of use , the interior and complete exhaust system of use , when drying performance has become ...as follows: a) After rolling the lint off the screen with a clean towel, firmly replace the lint screen in two pieces, one year of the dryer should be connected. 7. Please note that nothing has been set against the dampers. 4. Always make sure the lint filter is clean before starting a...


