
Owners Manual
Page 7
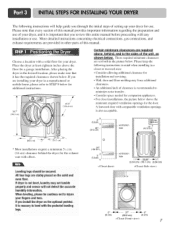
... stably placed on the optional pedstal. When leveling, please be secured. If you are set forth in the desired location, please make sure that you review this entire manual before proceeding with elbow. ventilation 48 t_2. (310 cm 2) hole i!i_i{[iiiii} _ (35.6 cm) * Most installations require a minimum 5 1/2in. (14 cm) clearance...
... stably placed on the optional pedstal. When leveling, please be secured. If you are set forth in the desired location, please make sure that you review this entire manual before proceeding with elbow. ventilation 48 t_2. (310 cm 2) hole i!i_i{[iiiii} _ (35.6 cm) * Most installations require a minimum 5 1/2in. (14 cm) clearance...
Owners Manual
Page 8
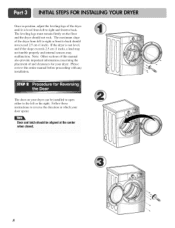
... the slope exceeds 2.5 cm (1 inch), a load may not tumble properly and internal sensors may malfunction. The maximum slope of and clearances for your dryei: Please review this manual also provide important information concerning the placement of the dryer from left to right and front to the left to right or front...
... the slope exceeds 2.5 cm (1 inch), a load may not tumble properly and internal sensors may malfunction. The maximum slope of and clearances for your dryei: Please review this manual also provide important information concerning the placement of the dryer from left to right and front to the left to right or front...
Owners Manual
Page 10
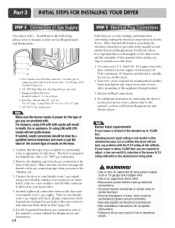
... manual, before making the electrical connection l_r electric dryers. Use 1/2" pipe. 5.3/8" N.P.T. Refer to this altitude, If your house is above lO,0Oo feet, you thoroughly review that you don't damage the threads of dryer 4. Four-wire cord is provided in the manual section entitled Electrical Requirements for the dryer. I. Equipment Shut...
... manual, before making the electrical connection l_r electric dryers. Use 1/2" pipe. 5.3/8" N.P.T. Refer to this altitude, If your house is above lO,0Oo feet, you thoroughly review that you don't damage the threads of dryer 4. Four-wire cord is provided in the manual section entitled Electrical Requirements for the dryer. I. Equipment Shut...
Owners Manual
Page 11
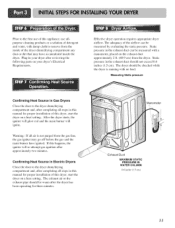
... IN WATER COLUMN 0.6 inche (1.5 cm) II After the dryer starts, the igniter will glow red and the main burner will re-attempt gas ignition after reviewing the following parts on a heat setting. The exhaust air or the exhaust pipe should be measured with a manometer, placed on a heat setting. Plug-in your...
... IN WATER COLUMN 0.6 inche (1.5 cm) II After the dryer starts, the igniter will glow red and the main burner will re-attempt gas ignition after reviewing the following parts on a heat setting. The exhaust air or the exhaust pipe should be measured with a manometer, placed on a heat setting. Plug-in your...

Owners Manual
Page 16
...) of power cord to external ground screw and move neutral ground wire of power cord to center screw. 4. and be connected to same color screw. Review the following options to determine the appropriate electrical connection for your home: Use the instructions in right position. Prepare minimum 5fl(l.52m) of power cord...
...) of power cord to external ground screw and move neutral ground wire of power cord to center screw. 4. and be connected to same color screw. Review the following options to determine the appropriate electrical connection for your home: Use the instructions in right position. Prepare minimum 5fl(l.52m) of power cord...
Owners Manual
Page 19
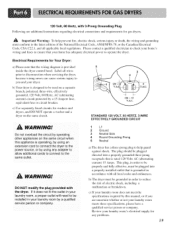
... into a properly installed outlet that the wiring diagram is rated 120 Volts AC (alternating current) 15 Amps. b) The dryer must conform to the same outlet. Review your dryer. If it does not fit the outlet in order to operate the dryer. Please contact a qualified electrician to check your home's wiring and...
... into a properly installed outlet that the wiring diagram is rated 120 Volts AC (alternating current) 15 Amps. b) The dryer must conform to the same outlet. Review your dryer. If it does not fit the outlet in order to operate the dryer. Please contact a qualified electrician to check your home's wiring and...
Owners Manual
Page 31
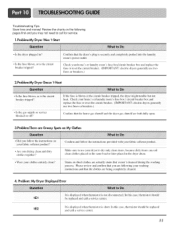
...to dry only clean items, because dirty items can soil clean clothes placed in the same load or later placed in the dryer dram. Please review and confirm that the dryer s plug is the circuit breaker tripped'? , Confirm that yOUare following pages first and you drying clean and dirty ...securely aud completely pushed into the laundry r00m!s p0wer Out!et Check your washing instructions and that weren t cleansed dur!n=o the washm• g process. Review the charts on the following your home's or laundry room s ff se box/circuit breaker box and replace the fuse or reset the circuit breaker...
...to dry only clean items, because dirty items can soil clean clothes placed in the same load or later placed in the dryer dram. Please review and confirm that the dryer s plug is the circuit breaker tripped'? , Confirm that yOUare following pages first and you drying clean and dirty ...securely aud completely pushed into the laundry r00m!s p0wer Out!et Check your washing instructions and that weren t cleansed dur!n=o the washm• g process. Review the charts on the following your home's or laundry room s ff se box/circuit breaker box and replace the fuse or reset the circuit breaker...
Owners Manual
Page 33
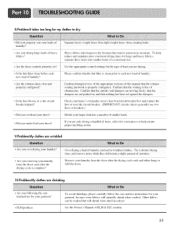
... a !0ad of RLM & PLC modem. 33 See the Owner's Manual of laundry Can !ead tO w7rinkled Clothes . If you properly sort your dryer? Confirm through review of a consistent size. ' Are the dryer Controls properly Set.'? Try a _horter drying • time, and remove items while they tend to each new load of...
... a !0ad of RLM & PLC modem. 33 See the Owner's Manual of laundry Can !ead tO w7rinkled Clothes . If you properly sort your dryer? Confirm through review of a consistent size. ' Are the dryer Controls properly Set.'? Try a _horter drying • time, and remove items while they tend to each new load of...
