
Owners Manual
Page 1
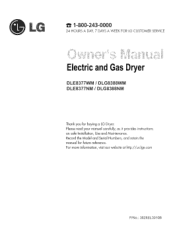
For more information, visit our website at http://us.lge.com P/No.: 3828EL3010B Record the Model and Serial Numbers, and retain the manual for buying a LG Dryer. Please read your manual carefully, as it provides instructions on safe Installation, Use and Maintenance. d'r'J,'_l_, ElectricandGasDryer DLE8377WM / DLG8388WIVl DLE8377NM / DLG8388NM Thank you for future reference. 1-800-243-0000 24 HOURS A DAY, 7 DAYS A WEEK FOR LG CUSTOMER SERVICE ,_J_, _ll__ I_r_ I' x! r,L_r _ "_ r,L_r r,L!'
For more information, visit our website at http://us.lge.com P/No.: 3828EL3010B Record the Model and Serial Numbers, and retain the manual for buying a LG Dryer. Please read your manual carefully, as it provides instructions on safe Installation, Use and Maintenance. d'r'J,'_l_, ElectricandGasDryer DLE8377WM / DLG8388WIVl DLE8377NM / DLG8388NM Thank you for future reference. 1-800-243-0000 24 HOURS A DAY, 7 DAYS A WEEK FOR LG CUSTOMER SERVICE ,_J_, _ll__ I_r_ I' x! r,L_r _ "_ r,L_r r,L!'
Owners Manual
Page 4
...Purchase. Model No. Date of Purchase _ Staple your appliance follow basic precautions, including the following. To reduce the risk of this manual. Use the space below to record the model number and serial number of your Dryer is located at the end of fire or explosion... Warranty Service is effective for your new LG dryer. Serial No. If this product is installed and operated per this manual must be followed. Warranty Restriction: If the dryer is required. You will repair or replace any parts defective in this manual, LG will need the complete Model and Serial Number...
...Purchase. Model No. Date of Purchase _ Staple your appliance follow basic precautions, including the following. To reduce the risk of this manual. Use the space below to record the model number and serial number of your Dryer is located at the end of fire or explosion... Warranty Service is effective for your new LG dryer. Serial No. If this product is installed and operated per this manual must be followed. Warranty Restriction: If the dryer is required. You will repair or replace any parts defective in this manual, LG will need the complete Model and Serial Number...
Owners Manual
Page 6
... not touch any other reproductive harm and requires businesses to warn customers of potential exposure to follow all instructions and information, including those in this manual and instructions provided by your building. • Clear the room, building or area of natural gas or LP fuels.
... not touch any other reproductive harm and requires businesses to warn customers of potential exposure to follow all instructions and information, including those in this manual and instructions provided by your building. • Clear the room, building or area of natural gas or LP fuels.
Owners Manual
Page 7
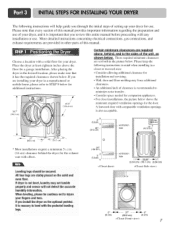
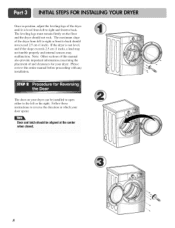
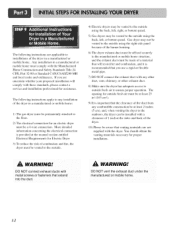
...installation and servicing. • Wall, door and floor molding may net tumble properly and sensor will help guide you review this manual. After placing the dryer in a manufactured or mobile home, please refer to level with comparable ventilation openings is not level, ...laundry may force additional clearances. • An additional inch of this entire manual before proceeding with a solid floor for a garage installation. it has the required clearances shown below shows the minimum required ventilation openings...
...installation and servicing. • Wall, door and floor molding may net tumble properly and sensor will help guide you review this manual. After placing the dryer in a manufactured or mobile home, please refer to level with comparable ventilation openings is not level, ...laundry may force additional clearances. • An additional inch of this entire manual before proceeding with a solid floor for a garage installation. it has the required clearances shown below shows the minimum required ventilation openings...
Owners Manual
Page 8
... proceeding with any installation. The maximum slope of and clearances for your door opens: Note: Other sections of this manual also provide important information concerning the placement of the dryer from left to right and front to back should not rock. If the dryer is ...
... proceeding with any installation. The maximum slope of and clearances for your door opens: Note: Other sections of this manual also provide important information concerning the placement of the dryer from left to right and front to back should not rock. If the dryer is ...
Owners Manual
Page 9
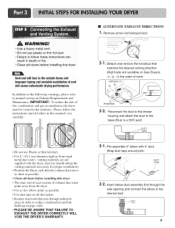
..., please refer to the base.(Duct is as short as possible. • Clean old duets beJbre installing this manual) very carefully. Reconnect the duct to the blower housing and attach the duct to manual section on Exhaust Requirements and Maintenance. N • Do not use plastic or thin foil duct. • Failure to...
..., please refer to the base.(Duct is as short as possible. • Clean old duets beJbre installing this manual) very carefully. Reconnect the duct to the blower housing and attach the duct to manual section on Exhaust Requirements and Maintenance. N • Do not use plastic or thin foil duct. • Failure to...
Owners Manual
Page 10
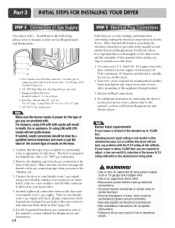
... (1.8 m) of the dryer. Confirm that you remove the shipping cap. 3. The dryer is important that the type of this manual, before making the electrical connection l_r electric dryers. Remove the shipping cap flom the gas connection at this dryer will not have...required to this appliance through neutral. 3. New stainless steel flexible connector. Use only a new U.L. Use this type of this manual's section entitled Gas Requirements and Instructions. 10 Following are several warnings and instructions concerning making electrical connections. • Connect neutral wire...
... (1.8 m) of the dryer. Confirm that you remove the shipping cap. 3. The dryer is important that the type of this manual, before making the electrical connection l_r electric dryers. Remove the shipping cap flom the gas connection at this dryer will not have...required to this appliance through neutral. 3. New stainless steel flexible connector. Use only a new U.L. Use this type of this manual's section entitled Gas Requirements and Instructions. 10 Following are several warnings and instructions concerning making electrical connections. • Connect neutral wire...
Owners Manual
Page 11
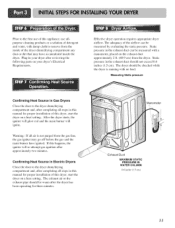
... and water, with damp cloth to the dryer drum/drying compartment and, after completing all steps in this manual for proper installation of this dryer, start the dryer on a heat setting. Plug-in this manual for three minutes. Warning: If all steps in your dryer's Electrical Requirements. Manometer j_ "Exhaust Duct MAXIMUM...
... and water, with damp cloth to the dryer drum/drying compartment and, after completing all steps in this manual for proper installation of this dryer, start the dryer on a heat setting. Plug-in this manual for three minutes. Warning: If all steps in your dryer's Electrical Requirements. Manometer j_ "Exhaust Duct MAXIMUM...
Owners Manual
Page 12
... electric dryer must be at least 25 iw' (163 cm_). 9) It is recommended that venting materials are not supplied with a clearance of 1 inch at the manual section entitled Electrical Requirements for Electric Dryer 3) To reduce the risk of combustion and fire, the dryer must be vented to the outside. 4) Electric dryers...
... electric dryer must be at least 25 iw' (163 cm_). 9) It is recommended that venting materials are not supplied with a clearance of 1 inch at the manual section entitled Electrical Requirements for Electric Dryer 3) To reduce the risk of combustion and fire, the dryer must be vented to the outside. 4) Electric dryers...

Owners Manual
Page 16
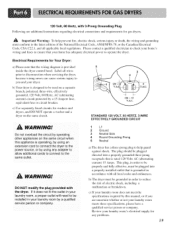
... (NEMA type 14-30R) and you will be using a UL listed, 120/240 volt minimum, 30 amp, dryer power supply cord. Wire color indicated on manual is in order for (1) new branch-circuit installations, (2) mobile homes, and (3) recreational vehicles, and (4) areas where local codes prohibit grounding through the neutral conductor. After...
... (NEMA type 14-30R) and you will be using a UL listed, 120/240 volt minimum, 30 amp, dryer power supply cord. Wire color indicated on manual is in order for (1) new branch-circuit installations, (2) mobile homes, and (3) recreational vehicles, and (4) areas where local codes prohibit grounding through the neutral conductor. After...
Owners Manual
Page 19
... Amps. Label all applicable local regulations. b) The dryer must be grounded in your laundry room by operating Other appliances On the same circuit when this manual, or if you and your dryer. DO NOT modify the plug provided with the dryer. This plug, in order to the power source, or by...
... Amps. Label all applicable local regulations. b) The dryer must be grounded in your laundry room by operating Other appliances On the same circuit when this manual, or if you and your dryer. DO NOT modify the plug provided with the dryer. This plug, in order to the power source, or by...
Owners Manual
Page 20
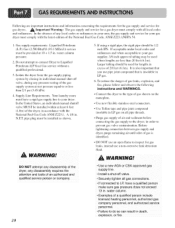
... dryer; Your laundry room must have a qualified person make sure gas pressure does not exceed 13 in. In the United States, an individual manual shutoff valve MUST be provided at test pressure equal to your gas dryer must be 1/2 inch IPS. pipe plug must comply with the National ... latest edition of the National Fuel Gas Code, ANSI Z223.1iNFPA 54. 1. Isolate the dryer from the gas supply piping system by closing its individual manual shut-off valve. • Securely tighten all pipe threads. A 1/8 in . It is also important that you use pipe joint compound that is identified. &#...
... dryer; Your laundry room must have a qualified person make sure gas pressure does not exceed 13 in. In the United States, an individual manual shutoff valve MUST be provided at test pressure equal to your gas dryer must be 1/2 inch IPS. pipe plug must comply with the National ... latest edition of the National Fuel Gas Code, ANSI Z223.1iNFPA 54. 1. Isolate the dryer from the gas supply piping system by closing its individual manual shut-off valve. • Securely tighten all pipe threads. A 1/8 in . It is also important that you use pipe joint compound that is identified. &#...

Owners Manual
Page 23
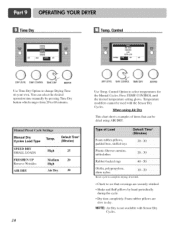
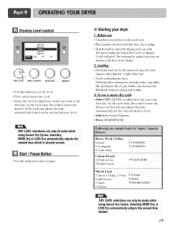
...instructions can result in death, explosion, or fire. Failure to person, read this entire manual, including the Important Safety lnstr.ctions, before operating this manual for more detailed information. CHECK FINER WRINKLE CARE INDICATOR EST.TIME REMAINING CHILD LOCK POWERBUTTON START... sections of fire, electric shock, or injury to follow these instructions can completely remove oil. WARNING! DLE8377WM/DLG8388WM/DLE8377NM/DLG8388NM CYCLESELECTOR TIME CHANGE BUTTON STATUS. PowerButton • Use this button for starting and using your new dryer. Do not ...
...instructions can result in death, explosion, or fire. Failure to person, read this entire manual, including the Important Safety lnstr.ctions, before operating this manual for more detailed information. CHECK FINER WRINKLE CARE INDICATOR EST.TIME REMAINING CHILD LOCK POWERBUTTON START... sections of fire, electric shock, or injury to follow these instructions can completely remove oil. WARNING! DLE8377WM/DLG8388WM/DLE8377NM/DLG8388NM CYCLESELECTOR TIME CHANGE BUTTON STATUS. PowerButton • Use this button for starting and using your new dryer. Do not ...

Owners Manual
Page 25
..., Time Dry and Rack Dry programs. EstimatedTimeRemaining • The Display shows the estimated time remaining. 2. When a Manual Cycle is running. Manual Dry Cycles Use Manual Cycles to remove wrinkles from items, such as rubber, plastic and heat-sensitive fabrics. Freshen Up Air Dr_ F Use this , if the dryer has some ...
..., Time Dry and Rack Dry programs. EstimatedTimeRemaining • The Display shows the estimated time remaining. 2. When a Manual Cycle is running. Manual Dry Cycles Use Manual Cycles to remove wrinkles from items, such as rubber, plastic and heat-sensitive fabrics. Freshen Up Air Dr_ F Use this , if the dryer has some ...
Owners Manual
Page 28
... securely stitched. • Shake and fluff pillows by pressing Time Dry button which ranges from 20 to select temperatures for the Manual Cycles. Time Dry Control DRY LEVEL TEMR CONTROL TIME DRY BEEPER Use Time Dry Option to dry. CONTROL until the desired temperature setting..., shear nylon 10' 20 Reset cycle to complete drying, if needed. • Check to see that can select the desired operation time manually by hand periodically during the cycle. • Dry item completely. Temperature modifiers cannot be dried using Air Dry This chart shows examples of items...
... securely stitched. • Shake and fluff pillows by pressing Time Dry button which ranges from 20 to select temperatures for the Manual Cycles. Time Dry Control DRY LEVEL TEMR CONTROL TIME DRY BEEPER Use Time Dry Option to dry. CONTROL until the desired temperature setting..., shear nylon 10' 20 Reset cycle to complete drying, if needed. • Check to see that can select the desired operation time manually by hand periodically during the cycle. • Dry item completely. Temperature modifiers cannot be dried using Air Dry This chart shows examples of items...
Owners Manual
Page 29
... using Sensor Dry Cycles. Before use a sensor dry cycle • Select DRY LEVEL to dry the load. The preset setting for Sensor Dry Cycles or Manual Cycles will show in minutes) will glow. hess Level control DRY LEVEL TEMRCONTROL TiME DRY BEEPER • Use this button for start or pause. Start...
... using Sensor Dry Cycles. Before use a sensor dry cycle • Select DRY LEVEL to dry the load. The preset setting for Sensor Dry Cycles or Manual Cycles will show in minutes) will glow. hess Level control DRY LEVEL TEMRCONTROL TiME DRY BEEPER • Use this button for start or pause. Start...
Owners Manual
Page 30
... connection or related winng error will can cause fire or electric shock or death II Clean the door and its opening . To use a manual dry cycle • Select a Manual Dry Cycle. • Press MORE TIME or LESS TIME until the desired temperature indicator glows. • (OPTIONAL STEP) If desired, select OPTIONS.... If the cycle is interrupted for more details, see Options. • Press START/PAUSE. The MORE TIME or LESS TIME feature canbe used with Manual Dry, Time Dry and Rack Dry Cyc!es, • Press TEMR CONTROL until the desired drying time is closed. • If you do not...
... connection or related winng error will can cause fire or electric shock or death II Clean the door and its opening . To use a manual dry cycle • Select a Manual Dry Cycle. • Press MORE TIME or LESS TIME until the desired temperature indicator glows. • (OPTIONAL STEP) If desired, select OPTIONS.... If the cycle is interrupted for more details, see Options. • Press START/PAUSE. The MORE TIME or LESS TIME feature canbe used with Manual Dry, Time Dry and Rack Dry Cyc!es, • Press TEMR CONTROL until the desired drying time is closed. • If you do not...
Owners Manual
Page 33
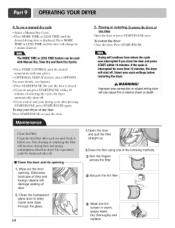
Divide your larger load into smaller loads of laundry? over drying a !0ad of RLM & PLC modem. 33 See the Owner's Manual of laundry Can !ead tO w7rinkled Clothes . Other fabrics can be washed but will naturally shrink when washed. If you are only drying a handful of ...
Divide your larger load into smaller loads of laundry? over drying a !0ad of RLM & PLC modem. 33 See the Owner's Manual of laundry Can !ead tO w7rinkled Clothes . Other fabrics can be washed but will naturally shrink when washed. If you are only drying a handful of ...


