
Owners Manual
Page 3
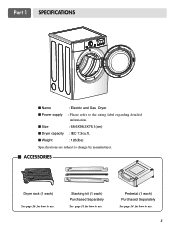
Stacking kit (1 each) Purchased Separately See page 13 for how to use . 3 I Power supply : Please refer to the rating label regarding detailed information. Pedestal (1 each) Purchased Separately See page 14 for how to use . Part 1 SPECIFICATIONS I Name : Electric and Gas Dryer I ACCESSORIES Dryer rack (1 each) See page 26 for how to use. I Dryer capacity : IEC 7.3cu.ft. I Size : 68.6X98.3X76.1(cm) I Weight : 126(Ibs) Specifications are subject to change by manufacturer.
Stacking kit (1 each) Purchased Separately See page 13 for how to use . 3 I Power supply : Please refer to the rating label regarding detailed information. Pedestal (1 each) Purchased Separately See page 14 for how to use . Part 1 SPECIFICATIONS I Name : Electric and Gas Dryer I ACCESSORIES Dryer rack (1 each) See page 26 for how to use. I Dryer capacity : IEC 7.3cu.ft. I Size : 68.6X98.3X76.1(cm) I Weight : 126(Ibs) Specifications are subject to change by manufacturer.
Owners Manual
Page 4
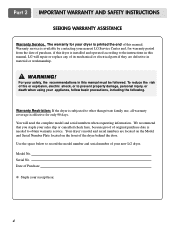
...sales slip or cancelled check here, because proof of purchase, if this dryer is needed to the instructions in material or workmanship. ! We recommend that you staple your new LG dryer. Serial No. Part 2 IMPORTANT WARRANTY AND SAFETY INSTRUCTIONS SEEKING WARRANTY ASSISTANCE Warranty Service. You... will repair or replace any of its mechanical or electrical parts if they are located on the Model and Serial ...
...sales slip or cancelled check here, because proof of purchase, if this dryer is needed to the instructions in material or workmanship. ! We recommend that you staple your new LG dryer. Serial No. Part 2 IMPORTANT WARRANTY AND SAFETY INSTRUCTIONS SEEKING WARRANTY ASSISTANCE Warranty Service. You... will repair or replace any of its mechanical or electrical parts if they are located on the Model and Serial ...
Owners Manual
Page 5
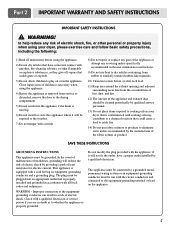
... must be run with cooking oils may contribute to a chemical reaction that is equipped with controls. 8) Do not repair or replace any part of the appliance or attempt any risk of electric shock, fire, or other personal or property injury when using the appliance. 4) Before the... vapors that could cause a load to catch fire. 14) Do not use heat to the equipment-grounding terminal or lead on or in your dryer, please exercise care and follow basic safety precautions, including the following: 1) Read all local codes and ordinances. WARNING! Check with all instructions before...
... must be run with cooking oils may contribute to a chemical reaction that is equipped with controls. 8) Do not repair or replace any part of the appliance or attempt any risk of electric shock, fire, or other personal or property injury when using the appliance. 4) Before the... vapors that could cause a load to catch fire. 14) Do not use heat to the equipment-grounding terminal or lead on or in your dryer, please exercise care and follow basic safety precautions, including the following: 1) Read all local codes and ordinances. WARNING! Check with all instructions before...
Owners Manual
Page 6
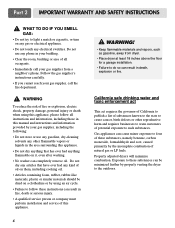
... on them, including cooking oil. • Articles containing foam, rubber, rubber-like materials, plastic or similar materials should be minimized further by properly venting the dryer to four of fire or explosion, electric shock, property damage, personal injury or death when using an air cycle. • Failure to do so can... phone in the area surrounding this manual and instructions and information provided by the incomplete combustion of substances known to the state to such substances. Part 2 IMPORTANT WARRANTY AND SAFETY INSTRUCTIONS !
... on them, including cooking oil. • Articles containing foam, rubber, rubber-like materials, plastic or similar materials should be minimized further by properly venting the dryer to four of fire or explosion, electric shock, property damage, personal injury or death when using an air cycle. • Failure to do so can... phone in the area surrounding this manual and instructions and information provided by the incomplete combustion of substances known to the state to such substances. Part 2 IMPORTANT WARRANTY AND SAFETY INSTRUCTIONS !
Owners Manual
Page 7
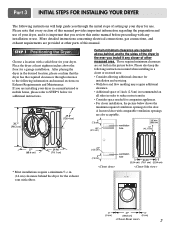
...eighteen inches above ,behind the dryer for the exhaust vent with a solid floor for your dryer for additional instructions. 38.7" (98.3 cm) 49.8" (126.4 cm) Certain minimum clearance are also acceptable. Part 3 INITIAL STEPS FOR INSTALLING YOUR DRYER The following instructions will help ...use of this manual provides important information regarding the preparation and use . A louvered door with any closer of other parts of your dryer in the desired location, please confirm that you review this entire manual before proceeding with comparable ventilation openings are required...
...eighteen inches above ,behind the dryer for the exhaust vent with a solid floor for your dryer for additional instructions. 38.7" (98.3 cm) 49.8" (126.4 cm) Certain minimum clearance are also acceptable. Part 3 INITIAL STEPS FOR INSTALLING YOUR DRYER The following instructions will help ...use of this manual provides important information regarding the preparation and use . A louvered door with any closer of other parts of your dryer in the desired location, please confirm that you review this entire manual before proceeding with comparable ventilation openings are required...
Owners Manual
Page 8
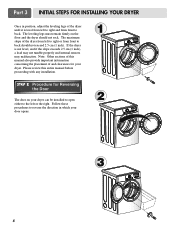
...The door on the floor and the dryer should not exceed 2.5 cm (1 inch). If the dryer is level from left to right ...or from front to the left or the right. Note: Other sections of the dryer until it is... not level, and if the slope exceeds 2.5 cm (1 inch), a load may not tumble properly and internal sensors may malfunction. SSTTEEPP 22: Procedure for your dryer.... Follow these procedures to back should not rock. The maximum slope of the dryer from left to right and from...
...The door on the floor and the dryer should not exceed 2.5 cm (1 inch). If the dryer is level from left to right ...or from front to the left or the right. Note: Other sections of the dryer until it is... not level, and if the slope exceeds 2.5 cm (1 inch), a load may not tumble properly and internal sensors may malfunction. SSTTEEPP 22: Procedure for your dryer.... Follow these procedures to back should not rock. The maximum slope of the dryer from left to right and from...
Owners Manual
Page 9
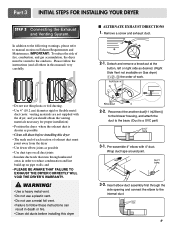
... PLEASE BE AWARE THAT FAILURE TO EXHAUST THE DRYER CORRECTLY WILL VOID THE DRYER'S WARRANTY. ! Pre-assemble 4" elbow with the dryer, and you should obtain the venting materials necessary for proper installation) • Position the dryer where the exhaust duct is a SVC part) 3-1. Detach and remove a knockout at the...; Use fewer elbow joints as possible • Clean old ducts before installing this manual) very carefully. Part 3 INITIAL STEPS FOR INSTALLING YOUR DRYER STEP 3 Connecting the Exhaust and Venting System. IMPORTANT: To reduce the risk of work. • Do not use a ...
... PLEASE BE AWARE THAT FAILURE TO EXHAUST THE DRYER CORRECTLY WILL VOID THE DRYER'S WARRANTY. ! Pre-assemble 4" elbow with the dryer, and you should obtain the venting materials necessary for proper installation) • Position the dryer where the exhaust duct is a SVC part) 3-1. Detach and remove a knockout at the...; Use fewer elbow joints as possible • Clean old ducts before installing this manual) very carefully. Part 3 INITIAL STEPS FOR INSTALLING YOUR DRYER STEP 3 Connecting the Exhaust and Venting System. IMPORTANT: To reduce the risk of work. • Do not use a ...

Owners Manual
Page 10
... Instructions. 10 STEP 5 Electrical Plug Connections for Natural Gas with a non-corrosive leak detection fluid. 5. Installed within 6' (1.8 m) of the dryer. Gas Connection 1. The dryer is prepared for Electric Dryer Only. Equipment Shut-Off Valve- Use only a new U.L. Part 3 INITIAL STEPS FOR INSTALLING YOUR DRYER STEP 4 Connection of connector only if allowed by your local codes). 4.
... Instructions. 10 STEP 5 Electrical Plug Connections for Natural Gas with a non-corrosive leak detection fluid. 5. Installed within 6' (1.8 m) of the dryer. Gas Connection 1. The dryer is prepared for Electric Dryer Only. Equipment Shut-Off Valve- Use only a new U.L. Part 3 INITIAL STEPS FOR INSTALLING YOUR DRYER STEP 4 Connection of connector only if allowed by your local codes). 4.
Owners Manual
Page 11
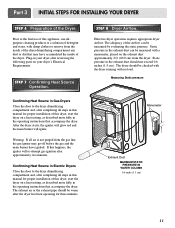
... installation of this appliance, use allpurpose cleaning products or a solution of the dryer. The dryer should not exceed 0.6 inches (1.5 cm). Part 3 INITIAL STEPS FOR INSTALLING YOUR DRYER STEP 6 Preparation of this dryer, start the dryer on a heat setting, as described more fully in your dryer after approximately two minutes. Static pressure in the exhaust duct can be...
... installation of this appliance, use allpurpose cleaning products or a solution of the dryer. The dryer should not exceed 0.6 inches (1.5 cm). Part 3 INITIAL STEPS FOR INSTALLING YOUR DRYER STEP 6 Preparation of this dryer, start the dryer on a heat setting, as described more fully in your dryer after approximately two minutes. Static pressure in the exhaust duct can be...
Owners Manual
Page 12
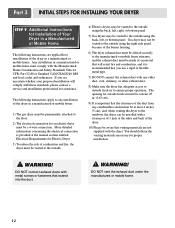
...the outside fresh air must be at the sides and back of the dryer. 10) Please be vented to ensure proper operation. Part 3 INITIAL STEPS FOR INSTALLING YOUR DRYER STEP 9 Additional Instructions for Installation of Your Dryer in a manufactured or mobile home must comply with the Manufactured Home ...Construction and Safety Standards Title 24 CFR, Part 32-80 or Standard CAN/CSA0Z240 MH and local codes and ordinances. Any installation in a Manufactured or Mobile Home. The opening for Electric Dryer 3) To reduce the risk of a material that will comply with...
...the outside fresh air must be at the sides and back of the dryer. 10) Please be vented to ensure proper operation. Part 3 INITIAL STEPS FOR INSTALLING YOUR DRYER STEP 9 Additional Instructions for Installation of Your Dryer in a manufactured or mobile home must comply with the Manufactured Home ...Construction and Safety Standards Title 24 CFR, Part 32-80 or Standard CAN/CSA0Z240 MH and local codes and ordinances. Any installation in a Manufactured or Mobile Home. The opening for Electric Dryer 3) To reduce the risk of a material that will comply with...

Owners Manual
Page 13
...kit Place washer firmly on the back of bracket. WARNING Do not attempt installation with a gas dryer in potentially unstable conditions like a mobile home. 13 Avoid finger injuries - Part 4 ACESSORIES INSTALLATION Stacking Kit Installation Instructions To ensure safe and secure installation, please observe the ...one person. be performed by 2 or more experienced service personnel. 4 Secure stacking kit side bracket to pinch fingers between the washer and dryer. Push the front stacking kit back to the stoppers of the front kit. • Do not use stacking kit with one person....
...kit Place washer firmly on the back of bracket. WARNING Do not attempt installation with a gas dryer in potentially unstable conditions like a mobile home. 13 Avoid finger injuries - Part 4 ACESSORIES INSTALLATION Stacking Kit Installation Instructions To ensure safe and secure installation, please observe the ...one person. be performed by 2 or more experienced service personnel. 4 Secure stacking kit side bracket to pinch fingers between the washer and dryer. Push the front stacking kit back to the stoppers of the front kit. • Do not use stacking kit with one person....
Owners Manual
Page 15
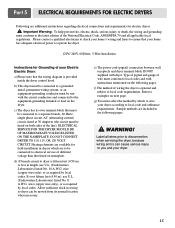
...You must be run with the circuit conductors and connected to electrical service of different voltage than that listed on nameplate. b) This dryer must be fused on the following pages. ! wire (copper wire only), or as required by local codes. If over fifteen ... Laboratories) listed No. 10 A.W.G. Refer to a grounded metal, permanent wiring system; Label all applicable local regulations. Part 5 ELECTRICAL REQUIREMENTS FOR ELECTRIC DRYERS Following are included in the following pages. or an equipment-grounding conductor must be moved from its own terminal block that...
...You must be run with the circuit conductors and connected to electrical service of different voltage than that listed on nameplate. b) This dryer must be fused on the following pages. ! wire (copper wire only), or as required by local codes. If over fifteen ... Laboratories) listed No. 10 A.W.G. Refer to a grounded metal, permanent wiring system; Label all applicable local regulations. Part 5 ELECTRICAL REQUIREMENTS FOR ELECTRIC DRYERS Following are included in the following pages. or an equipment-grounding conductor must be moved from its own terminal block that...
Owners Manual
Page 16
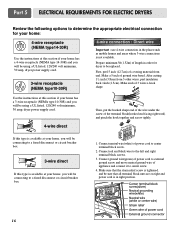
...home. After cutting 11/2 inch (3.8cm) from end. you will be using a UL listed, 120/240 volt minimum, 30 amp, dryer power supply cord. 4-wire direct Then, put the hooked shape end of the wire under the screw of the terminal block(hooked end facing... the hook together and screw tightly. Connect neutral wire(white) of length in right position. 16 Part 5 ELECTRICAL REQUIREMENTS FOR ELECTRIC DRYERS Review the following options to determine the appropriate electrical connection for dryer to center screw. 4. Connect red and black wire to center terminal block screw. 2. Make a...
...home. After cutting 11/2 inch (3.8cm) from end. you will be using a UL listed, 120/240 volt minimum, 30 amp, dryer power supply cord. 4-wire direct Then, put the hooked shape end of the wire under the screw of the terminal block(hooked end facing... the hook together and screw tightly. Connect neutral wire(white) of length in right position. 16 Part 5 ELECTRICAL REQUIREMENTS FOR ELECTRIC DRYERS Review the following options to determine the appropriate electrical connection for dryer to center screw. 4. Connect red and black wire to center terminal block screw. 2. Make a...
Owners Manual
Page 17
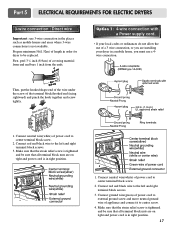
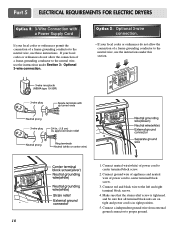
...screws. 3. Connect red and black wire to center terminal block screw. 2. Connect neutral wire(white) of length in right position. 17 Part 5 ELECTRICAL REQUIREMENTS FOR ELECTRIC DRYERS 3-wire connection : Direct wire Important : use a 4wire connection. Prepare minimum 5ft(1.52m) of power cord to be replaced. Make sure.... • lf your local codes or ordinances do not allow the use of a 3 wire connection, or you are installing your dryer in a mobile home, you must use 3-wire connection in right position. 1. Connect ground wire(green) of power cord to center screw. 4.
...screws. 3. Connect red and black wire to center terminal block screw. 2. Connect neutral wire(white) of length in right position. 17 Part 5 ELECTRICAL REQUIREMENTS FOR ELECTRIC DRYERS 3-wire connection : Direct wire Important : use a 4wire connection. Prepare minimum 5ft(1.52m) of power cord to be replaced. Make sure.... • lf your local codes or ordinances do not allow the use of a 3 wire connection, or you are installing your dryer in a mobile home, you must use 3-wire connection in right position. 1. Connect ground wire(green) of power cord to center screw. 4.
Owners Manual
Page 18
... on tight and power cord is tightened. Connect ground wire of appliance and neutral wire of power cord to center terminal block screw. 2. Part 5 ELECTRICAL REQUIREMENTS FOR ELECTRIC DRYERS Option 2: 3-Wire Connection with a Power Supply Cord lf your local codes or ordinances do not allow the connection of a frame-grounding conductor to...
... on tight and power cord is tightened. Connect ground wire of appliance and neutral wire of power cord to center terminal block screw. 2. Part 5 ELECTRICAL REQUIREMENTS FOR ELECTRIC DRYERS Option 2: 3-Wire Connection with a Power Supply Cord lf your local codes or ordinances do not allow the connection of a frame-grounding conductor to...

Owners Manual
Page 19
... to the same outlet. ! The plug should be plugged directed into a properly installed outlet that is grounded in accordance with the dryer. This plug, in order to be properly and fully effective, must be plugged into a properly grounded three-prong receptacle that is ...designed to be used on the same circuit. ! Electrical Requirements for gas dryers. ! WARNING! Important Warning: To help guard against shock. b) Your dryer is provided inside the dryer control hood. Part 6 ELECTRICAL REQUIREMENTS FOR GAS DRYERS 120 Volt, 60 Hertz, with 3-Prong Grounding Plug Following are uncertain ...
... to the same outlet. ! The plug should be plugged directed into a properly installed outlet that is grounded in accordance with the dryer. This plug, in order to be properly and fully effective, must be plugged into a properly grounded three-prong receptacle that is ...designed to be used on the same circuit. ! Electrical Requirements for gas dryers. ! WARNING! Important Warning: To help guard against shock. b) Your dryer is provided inside the dryer control hood. Part 6 ELECTRICAL REQUIREMENTS FOR GAS DRYERS 120 Volt, 60 Hertz, with 3-Prong Grounding Plug Following are uncertain ...
Owners Manual
Page 20
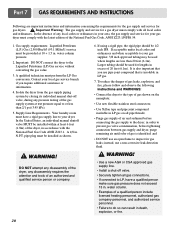
...concerning the requirements for the gas supply and service for lengths in . N.P.T. water column. • Examples of any pressure testing of the dryer, in your area, the gas supply and service for gas leaks; Supply Line Requirements. It is insoluble in death, explosion, or fire....to your local gas service branch if you use pipe joint compound that is also important that you require additional assistance or information. 4. Part 7 GAS REQUIREMENTS AND INSTRUCTIONS Following are less than 2/1 psi (3.45 kPa). 5. If acceptable under local codes and ordinances and when ...
...concerning the requirements for the gas supply and service for lengths in . N.P.T. water column. • Examples of any pressure testing of the dryer, in your area, the gas supply and service for gas leaks; Supply Line Requirements. It is insoluble in death, explosion, or fire....to your local gas service branch if you use pipe joint compound that is also important that you require additional assistance or information. 4. Part 7 GAS REQUIREMENTS AND INSTRUCTIONS Following are less than 2/1 psi (3.45 kPa). 5. If acceptable under local codes and ordinances and when ...
Owners Manual
Page 21
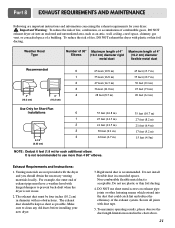
...feet (14.3 m) 2 41 feet (12.5 m) 3 30 feet (9.1 m) 4 22 feet (6.7 m) NOTE : Deduct 6 feet (1.8 m) for your new dryer. 3. The exhaust duct should obtain the necessary venting materials locally. Do not use more than 4 90° elbows. 45 feet (13.7 m) 35 feet (10... Exhaust Requirements and Instructions: 1. Venting materials are important instructions and information concerning the exhaust requirements for each additional elbow. Part 8 EXHAUST REQUIREMENTS AND MAINTENANCE Following are not provided with no obstructions. Weather Hood Type Number of 90° Maximum ...
...feet (14.3 m) 2 41 feet (12.5 m) 3 30 feet (9.1 m) 4 22 feet (6.7 m) NOTE : Deduct 6 feet (1.8 m) for your new dryer. 3. The exhaust duct should obtain the necessary venting materials locally. Do not use more than 4 90° elbows. 45 feet (13.7 m) 35 feet (10... Exhaust Requirements and Instructions: 1. Venting materials are important instructions and information concerning the exhaust requirements for each additional elbow. Part 8 EXHAUST REQUIREMENTS AND MAINTENANCE Following are not provided with no obstructions. Weather Hood Type Number of 90° Maximum ...
Owners Manual
Page 22
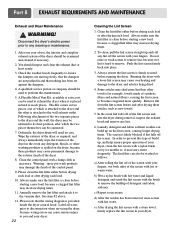
... two pieces, one year of use, the interior and complete exhaust system of the dryer should be connected. 7. Running the dryer with your dryer. Part 8 EXHAUST REQUIREMENTS AND MAINTENANCE Exhaust and Dryer Maintenance ! Wipe the exterior of the dryer as new towels. 5. Always make sure the lint filter is attached to the vacuum duct. Push the...
... two pieces, one year of use, the interior and complete exhaust system of the dryer should be connected. 7. Running the dryer with your dryer. Part 8 EXHAUST REQUIREMENTS AND MAINTENANCE Exhaust and Dryer Maintenance ! Wipe the exterior of the dryer as new towels. 5. Always make sure the lint filter is attached to the vacuum duct. Push the...
Owners Manual
Page 23
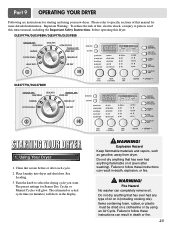
...injury to person, read this entire manual, including the Important Safety Instructions, before or after washing). DLE5977W/DLG5988W/DLE5977B/DLG5988B DLE3777W/DLG3788W STARTING YOUR DRYER 1. Place laundry into dryer and shut door. Turn the knob to specific sections of oil on it (even after each cycle....or fire. 23 Failure to follow these instructions can completely remove oil. WARNING! Part 9 OPERATING YOUR DRYER Following are instructions for starting and using an Air Cycle. Using Your Dryer 1. Clean lint screen before operating this manual for Sensor Dry Cycles or Manual ...
...injury to person, read this entire manual, including the Important Safety Instructions, before or after washing). DLE5977W/DLG5988W/DLE5977B/DLG5988B DLE3777W/DLG3788W STARTING YOUR DRYER 1. Place laundry into dryer and shut door. Turn the knob to specific sections of oil on it (even after each cycle....or fire. 23 Failure to follow these instructions can completely remove oil. WARNING! Part 9 OPERATING YOUR DRYER Following are instructions for starting and using an Air Cycle. Using Your Dryer 1. Clean lint screen before operating this manual for Sensor Dry Cycles or Manual ...


