
Owner's Manual
Page 3
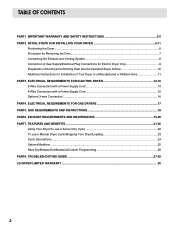
... PART5. FEATURES AND BENEFITS ...21-26 Using Your Dryer/To use a Sensor Dry Cycle 22 To use a Manual Dryer Cycle/Stopping Your Dryer/Loading 23 Cycle Descriptions...24 Options/Modifiers ...25 Rack Dry/Beeper/Anti-Bacterial/Custom Programming 26 ...Optional 3-wire Connection ...16 PART4. IMPORTANT WARRANTY AND SAFETY INSTRUCTIONS 3-5 PART2. TROUBLESHOOTING GUIDE ...27-29 LG DRYER LIMITED WARRANTY ...30 2 INITIAL STEPS FOR INSTALLING YOUR DRYER 6-11 Positioning the Dryer ...6 Procedure for Reversing the Door...7 Connecting the Exhaust and Venting System 8 Connection of Gas Supply/...
... PART5. FEATURES AND BENEFITS ...21-26 Using Your Dryer/To use a Sensor Dry Cycle 22 To use a Manual Dryer Cycle/Stopping Your Dryer/Loading 23 Cycle Descriptions...24 Options/Modifiers ...25 Rack Dry/Beeper/Anti-Bacterial/Custom Programming 26 ...Optional 3-wire Connection ...16 PART4. IMPORTANT WARRANTY AND SAFETY INSTRUCTIONS 3-5 PART2. TROUBLESHOOTING GUIDE ...27-29 LG DRYER LIMITED WARRANTY ...30 2 INITIAL STEPS FOR INSTALLING YOUR DRYER 6-11 Positioning the Dryer ...6 Procedure for Reversing the Door...7 Connecting the Exhaust and Venting System 8 Connection of Gas Supply/...
Owner's Manual
Page 4
... You will repair or replace any of Purchase ❈ Staple your nearest LG Service Center and, for warranty period from the date of purchase, if this dryer is needed to the instructions in this manual must be followed. Use the space below to record the model number and ...personal injury, or death when using your safety, the recommendations in this manual. We recommend that you staple your sales slip or cancelled check here, because proof of your dryer is effective for your new LG dryer. Your dryer's model and serial numbers are defective in material or workmanship. ! The ...
... You will repair or replace any of Purchase ❈ Staple your nearest LG Service Center and, for warranty period from the date of purchase, if this dryer is needed to the instructions in this manual must be followed. Use the space below to record the model number and ...personal injury, or death when using your safety, the recommendations in this manual. We recommend that you staple your sales slip or cancelled check here, because proof of your dryer is effective for your new LG dryer. Your dryer's model and serial numbers are defective in material or workmanship. ! The ...
Owner's Manual
Page 6
...surrounding this appliance, please follow these instructions can result in your building. • Clear the room, building or area of this manual and instructions and information provided by using an air cycle. • Failure to the outdoors. 5 California Safe Drinking Water and ...appliances can completely remove oil. Exposure to light a match, or cigarette, or turn on a clothesline or by your gas supplier from dryer. • Place dryer at least 18 inches above the floor for a garage installation. • Failure to such substances. Follow the gas supplier's instructions ...
...surrounding this appliance, please follow these instructions can result in your building. • Clear the room, building or area of this manual and instructions and information provided by using an air cycle. • Failure to the outdoors. 5 California Safe Drinking Water and ...appliances can completely remove oil. Exposure to light a match, or cigarette, or turn on a clothesline or by your gas supplier from dryer. • Place dryer at least 18 inches above the floor for a garage installation. • Failure to such substances. Follow the gas supplier's instructions ...
Owner's Manual
Page 7
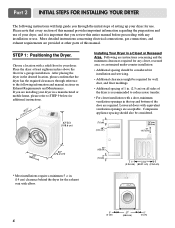
... Area. If you are required. STEP 1: Positioning the Dryer. More detailed instructions concerning electrical connections, gas connections, and exhaust requirements are acceptable. Part 2 INITIAL STEPS FOR INSTALLING YOUR DRYER The following information and manual sections on all sides of the dryer is important that the dryer has the required clearances through the initial steps of...
... Area. If you are required. STEP 1: Positioning the Dryer. More detailed instructions concerning electrical connections, gas connections, and exhaust requirements are acceptable. Part 2 INITIAL STEPS FOR INSTALLING YOUR DRYER The following information and manual sections on all sides of the dryer is important that the dryer has the required clearances through the initial steps of...

Owner's Manual
Page 8
STEP 2: Procedure for your dryer. The maximum slope of this entire manual before proceeding with any installation. Note: Other sections of the dryer from left to right or from front to back. If the dryer is level from left to right and from front to the left or the right. Follow...the leveling legs of and clearances for Reversing the Door The door on the floor and the dryer should not exceed 2.5 cm (1 inch). Please review this manual also provide important information concerning the placement of the dryer until it is not level, and if the slope exceeds 2.5 cm (1 inch), a ...
STEP 2: Procedure for your dryer. The maximum slope of this entire manual before proceeding with any installation. Note: Other sections of the dryer from left to right or from front to back. If the dryer is level from left to right and from front to the left or the right. Follow...the leveling legs of and clearances for Reversing the Door The door on the floor and the dryer should not exceed 2.5 cm (1 inch). Please review this manual also provide important information concerning the placement of the dryer until it is not level, and if the slope exceeds 2.5 cm (1 inch), a ...
Owner's Manual
Page 9
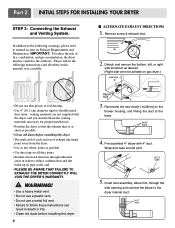
... male end of each section of fire, combustion, and gas accumulation, the dryer must point away from the dryer • Use as few elbow joints as possible • Clean old ducts before installing this manual) very carefully. Wrap duct tape around joint. 5. and • PLEASE BE... AWARE THAT FAILURE TO EXHAUST THE DRYER CORRECTLY WILL VOID THE DRYER'S WARRANTY. ! In addition to the following instructions (and all duct joints...
... male end of each section of fire, combustion, and gas accumulation, the dryer must point away from the dryer • Use as few elbow joints as possible • Clean old ducts before installing this manual) very carefully. Wrap duct tape around joint. 5. and • PLEASE BE... AWARE THAT FAILURE TO EXHAUST THE DRYER CORRECTLY WILL VOID THE DRYER'S WARRANTY. ! In addition to the following instructions (and all duct joints...
Owner's Manual
Page 10
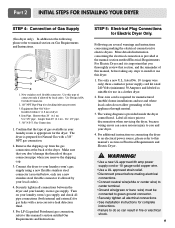
... the shipping cap. 3. Remove the shipping cap from the gas connection at the manual section entitled Electrical Requirements For Electric Dryer and it is important that section, and the remainder of this dryer. 1. Make sure that you don't damage the threads of gas available in fire...; Use a UL approved strain relief. • Disconnect power before taking any steps to do not allow grounding of this manual's section on Electrical Requirements and Electric Dryer. ! In addition to the following, please refer to you and your laundry room's gas supply. The wiring diagram is ...
... the shipping cap. 3. Remove the shipping cap from the gas connection at the manual section entitled Electrical Requirements For Electric Dryer and it is important that section, and the remainder of this dryer. 1. Make sure that you don't damage the threads of gas available in fire...; Use a UL approved strain relief. • Disconnect power before taking any steps to do not allow grounding of this manual's section on Electrical Requirements and Electric Dryer. ! In addition to the following, please refer to you and your laundry room's gas supply. The wiring diagram is ...
Owner's Manual
Page 11
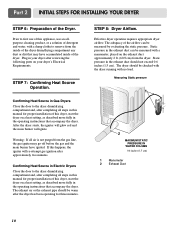
.... STEP 7: Confirming Heat Source Operation. If this appliance, use of the Dryer. Warning: If all steps in this manual for proper installation of the airflow can be checked with the dryer running with a manometer, placed on your dryer's Electrical Requirements. Prior to first use an allpurpose cleaning product, or a solution of detergent and water...
.... STEP 7: Confirming Heat Source Operation. If this appliance, use of the Dryer. Warning: If all steps in this manual for proper installation of the airflow can be checked with the dryer running with a manometer, placed on your dryer's Electrical Requirements. Prior to first use an allpurpose cleaning product, or a solution of detergent and water...
Owner's Manual
Page 12
..., and the exhaust duct must be vented to the outside. 4) Electric dryers may be installed with a clearances of 1 inch at the manual section entitled Electrical Requirements for an electric dryer must comply with these standards, please contact a service and installation professional for... Installation of the dryer in a manufactured or mobile home must be vented to the ...
..., and the exhaust duct must be vented to the outside. 4) Electric dryers may be installed with a clearances of 1 inch at the manual section entitled Electrical Requirements for an electric dryer must comply with these standards, please contact a service and installation professional for... Installation of the dryer in a manufactured or mobile home must be vented to the ...
Owner's Manual
Page 18
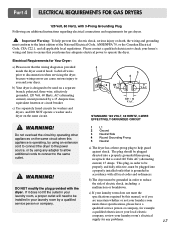
... by a qualified service person or company. 5 1 3 2 4 120 ± 12 V.A.C 0 V.A.C. 120 + 12 V.A.C. b) The dryer must be grounded in order to be used on the same circuit when this manual, or if you and your laundry room's electrical supply for Your Dryer: a) Please note that is grounded in your home has adequate electrical power to...
... by a qualified service person or company. 5 1 3 2 4 120 ± 12 V.A.C 0 V.A.C. 120 + 12 V.A.C. b) The dryer must be grounded in order to be used on the same circuit when this manual, or if you and your laundry room's electrical supply for Your Dryer: a) Please note that is grounded in your home has adequate electrical power to...
Owner's Manual
Page 19
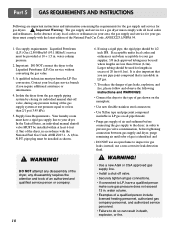
... requirements: Liquefied Petroleum (L.P.) Gas (2,500 Btu/ft3 (93.1 MJ/m3)) service must comply with all local codes and ordinances. Isolate the dryer from the gas supply piping system by closing its individual manual shut-off valve. • Securely tighten all pipe threads; • Purge gas supply of the...(1.8m) of air and sediment before tightening connection between gas supply and dryer, purge remaining air until odor of the National Fuel Cas Code, ANSI Z223.1/NFPA 54. 1. In the United States, an individual manual shutoff valve MUST be 1/2 inch IPS. To reduce the danger of gas...
... requirements: Liquefied Petroleum (L.P.) Gas (2,500 Btu/ft3 (93.1 MJ/m3)) service must comply with all local codes and ordinances. Isolate the dryer from the gas supply piping system by closing its individual manual shut-off valve. • Securely tighten all pipe threads; • Purge gas supply of the...(1.8m) of air and sediment before tightening connection between gas supply and dryer, purge remaining air until odor of the National Fuel Cas Code, ANSI Z223.1/NFPA 54. 1. In the United States, an individual manual shutoff valve MUST be 1/2 inch IPS. To reduce the danger of gas...
Owner's Manual
Page 22
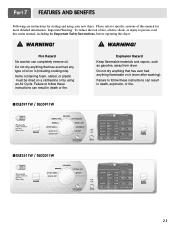
... dryer. ! WARNING! Failure to specific sections of fire, electric shock, or injury to follow these instructions can result in death, explosion, or fire. Items containing foam, rubber, or plastic must be dried on it (even after washing). Failure to person, read this entire manual,... including the Important Safety Instructions, before operating this manual for starting and using an Air Cycle. Do not dry anything flammable on it (including cooking oils). Part ...
... dryer. ! WARNING! Failure to specific sections of fire, electric shock, or injury to follow these instructions can result in death, explosion, or fire. Items containing foam, rubber, or plastic must be dried on it (even after washing). Failure to person, read this entire manual,... including the Important Safety Instructions, before operating this manual for starting and using an Air Cycle. Do not dry anything flammable on it (including cooking oils). Part ...
Owner's Manual
Page 23
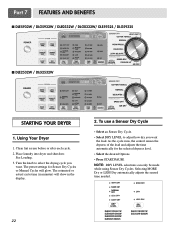
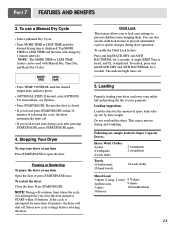
...using Sensor Dry Cycles. Selecting MORE Dry or LESS Dry automatically adjusts the sensed time needed. See Loading. 3. Using Your Dryer 1. Place laundry into dryer and shut door. Turn the knob to adjust how dry you want the load. To use a Sensor Dry Cycle •...of the load and adjusts the time automatically for Sensor Dry Cycles or Manual Cycles will show in minutes) will glow. Part 7 FEATURES AND BENEFITS I DLE5932W / DLG5932W / DLE0332W / DLG0332W/ DLE5932S / DLG5932S I DLE2532W / DLG2532W STARTING YOUR DRYER 1. The estimated or actual cycle time (in the display. 2. ...
...using Sensor Dry Cycles. Selecting MORE Dry or LESS Dry automatically adjusts the sensed time needed. See Loading. 3. Using Your Dryer 1. Place laundry into dryer and shut door. Turn the knob to adjust how dry you want the load. To use a Sensor Dry Cycle •...of the load and adjusts the time automatically for Sensor Dry Cycles or Manual Cycles will show in minutes) will glow. Part 7 FEATURES AND BENEFITS I DLE5932W / DLG5932W / DLE0332W / DLG0332W/ DLE5932S / DLG5932S I DLE2532W / DLG2532W STARTING YOUR DRYER 1. The estimated or actual cycle time (in the display. 2. ...
Owner's Manual
Page 24
...press START/PAUSE within 10 minutes. This causes uneven drying and wrinkling. You can be used with Manual Dry, Time Dry, and Rack Dry Cycles. Select new cycle settings before restarting the dryer. 5. Part 7 FEATURES AND BENEFITS 3. To enable the Child Lock feature: Press and hold ... TIME or LESS TIME feature can also use a Manual Dry Cycle • Select a Manual Dry Cycle. • Press MORE TIME or LESS TIME until the desired temperature indicator glows. • (OPTIONAL STEP) If desired, select OPTIONS. Stopping Your Dryer To stop your drying cycle after pressing START/PAUSE,...
...press START/PAUSE within 10 minutes. This causes uneven drying and wrinkling. You can be used with Manual Dry, Time Dry, and Rack Dry Cycles. Select new cycle settings before restarting the dryer. 5. Part 7 FEATURES AND BENEFITS 3. To enable the Child Lock feature: Press and hold ... TIME or LESS TIME feature can also use a Manual Dry Cycle • Select a Manual Dry Cycle. • Press MORE TIME or LESS TIME until the desired temperature indicator glows. • (OPTIONAL STEP) If desired, select OPTIONS. Stopping Your Dryer To stop your drying cycle after pressing START/PAUSE,...
Owner's Manual
Page 25
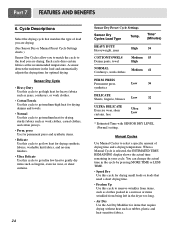
Part 7 FEATURES AND BENEFITS 6. When a Manual Cycle is selected, the ESTIMATED TIME REMAINING display shows the actual time remaining in the dryer too long. • Air Dry Use the Air Dry Modifier for items that require drying without heat such as rubber, plastic and heat-... curtains, lace Ultra Low 34 * Estimated Time with SENSOR DRY LEVEL (Normal) setting. Each cycle dries certain fabrics at the recommended temperature. Manual Cycles Use Manual Cycles to select a specific amount of load you to match the cycle to gently dry items such as clothes packed in a suitcase or items...
Part 7 FEATURES AND BENEFITS 6. When a Manual Cycle is selected, the ESTIMATED TIME REMAINING display shows the actual time remaining in the dryer too long. • Air Dry Use the Air Dry Modifier for items that require drying without heat such as rubber, plastic and heat-... curtains, lace Ultra Low 34 * Estimated Time with SENSOR DRY LEVEL (Normal) setting. Each cycle dries certain fabrics at the recommended temperature. Manual Cycles Use Manual Cycles to select a specific amount of load you to match the cycle to gently dry items such as clothes packed in a suitcase or items...
Owner's Manual
Page 26
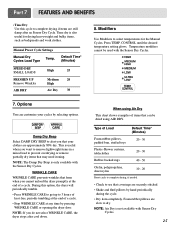
...to prevent overdrying or remove partially dry items that form when you do not select WRINKLE CARE, the dryer stops after an Sensor Dry Cycle. Press TEMP. This is also useful for the Manual Cycles. During this cycle to see that coverings are approximately 80% dry. NOTE: If you cannot ...unload the dryer promptly at any time by hand periodically during the cycle. • Dry item completely. Type of items...
...to prevent overdrying or remove partially dry items that form when you do not select WRINKLE CARE, the dryer stops after an Sensor Dry Cycle. Press TEMP. This is also useful for the Manual Cycles. During this cycle to see that coverings are approximately 80% dry. NOTE: If you cannot ...unload the dryer promptly at any time by hand periodically during the cycle. • Dry item completely. Type of items...
Owner's Manual
Page 29
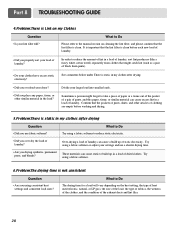
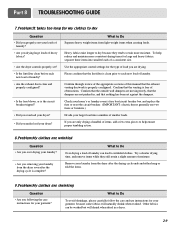
Please refer to the manual section on cleaning the lint filter, and please confirm that the pockets of pants, shirts, and other similar material in my clothes after drying. • ... of laundry. Try using a fabric softener to reduce static electricity. • Did you over dry the load of laundry? • Are you properly sort your dryer? • Did you place any paper, tissue, or other articles of clothing are empty before each new load of static electricity. See comments below under...
Please refer to the manual section on cleaning the lint filter, and please confirm that the pockets of pants, shirts, and other similar material in my clothes after drying. • ... of laundry. Try using a fabric softener to reduce static electricity. • Did you over dry the load of laundry? • Are you properly sort your dryer? • Did you place any paper, tissue, or other articles of clothing are empty before each new load of static electricity. See comments below under...
Owner's Manual
Page 30
...load of laundry. Heavy fabrics take longer to wrinkled clothes. To help ensure proper tumbling action. 8.Problem:My clothes are not pushed in a dryer. 29 Other fabrics can lead to dry because they still retain a slight amount of a consistent size. What to retain more consistent drying ...times for the type of this manual that the dampers are wrinkled Question • Are you over drying your laundry from light weight items when creating loads. Confirm that the ...
...load of laundry. Heavy fabrics take longer to wrinkled clothes. To help ensure proper tumbling action. 8.Problem:My clothes are not pushed in a dryer. 29 Other fabrics can lead to dry because they still retain a slight amount of a consistent size. What to retain more consistent drying ...times for the type of this manual that the dampers are wrinkled Question • Are you over drying your laundry from light weight items when creating loads. Confirm that the ...
Service Manual
Page 1
Website:http://www.LGservice.com [For U.S.A] www.lg.ca [For Canada] ELECTRIC & GAS DRYER SERVICE MANUAL CAUTION READ THIS MANUAL CAREFULLY TO DIAGNOSE TROUBLES CORRECTLY BEFORE OFFERING SERVICE. MODEL : DLE5911W DLE2511W DLE5932W DLE5932S DLE2532W DLE0332W DLG5911W DLG2511W DLG5932W DLG5932S DLG2532W DLG0332W
Website:http://www.LGservice.com [For U.S.A] www.lg.ca [For Canada] ELECTRIC & GAS DRYER SERVICE MANUAL CAUTION READ THIS MANUAL CAREFULLY TO DIAGNOSE TROUBLES CORRECTLY BEFORE OFFERING SERVICE. MODEL : DLE5911W DLE2511W DLE5932W DLE5932S DLE2532W DLE0332W DLG5911W DLG2511W DLG5932W DLG5932S DLG2532W DLG0332W

Service Manual
Page 10
... 34min Saturation 45±5°C (5min) 38±5°C Speed dry (High) - 25min Saturation (70±5°C) (5min) (47±5°C) Manual Dry ** Freshen Up (Medium High) - 20min Saturation (66±5°C) (5min) (47±5°C) 3Hr Air dry - - 30min Saturation No heater... for each cycle * Sense dry : "Dry Level" is set by users. ** Manual dry : "Temperature control" is set by users. 9 Temp- Dry Display erature Level time Electro- 4 COLUMBUS DRYER CYCLE PROCESS Cycle Default Conditions of operation and termination Drying Cooling Wrinkle care Temp-
... 34min Saturation 45±5°C (5min) 38±5°C Speed dry (High) - 25min Saturation (70±5°C) (5min) (47±5°C) Manual Dry ** Freshen Up (Medium High) - 20min Saturation (66±5°C) (5min) (47±5°C) 3Hr Air dry - - 30min Saturation No heater... for each cycle * Sense dry : "Dry Level" is set by users. ** Manual dry : "Temperature control" is set by users. 9 Temp- Dry Display erature Level time Electro- 4 COLUMBUS DRYER CYCLE PROCESS Cycle Default Conditions of operation and termination Drying Cooling Wrinkle care Temp-


