
Owner's Manual
Page 7
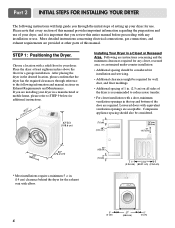
..., please refer to STEP 9 below for additional instructions. (12580.2.57"cm) 42"3/4 (108.6 cm) Installing Your Dryer in the desired location, please confirm that you review this entire manual before proceeding with elbow. 24"2 (155 cm2) 3" (7.6 cm) 1" 31.5" 1" (2.54 cm) (80.01 cm) (2.54 cm) 0" (0 cm) 27" (68.6 cm) 0" (0 cm) 6 More...
..., please refer to STEP 9 below for additional instructions. (12580.2.57"cm) 42"3/4 (108.6 cm) Installing Your Dryer in the desired location, please confirm that you review this entire manual before proceeding with elbow. 24"2 (155 cm2) 3" (7.6 cm) 1" 31.5" 1" (2.54 cm) (80.01 cm) (2.54 cm) 0" (0 cm) 27" (68.6 cm) 0" (0 cm) 6 More...

Owner's Manual
Page 8
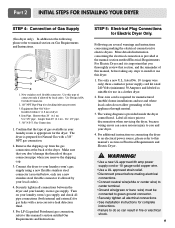
... door opens: 1 2 3 7 If the dryer is level from left or the right. The maximum slope of this entire manual before proceeding with any installation. Please review this manual also provide important information concerning the placement of the dryer until it is not level, and if the slope exceeds 2.5 cm (1 inch), a load...
... door opens: 1 2 3 7 If the dryer is level from left or the right. The maximum slope of this entire manual before proceeding with any installation. Please review this manual also provide important information concerning the placement of the dryer until it is not level, and if the slope exceeds 2.5 cm (1 inch), a load...
Owner's Manual
Page 10
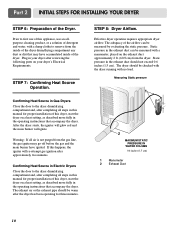
... codes). 4. New stainless steel flexible connector. Equipment Shut-Off Valve- Iron Pipe. Gas Connection 1. Use only a new U.L. The wiring diagram is important that you thoroughly review that section, and the remainder of this manual, before making the electrical connection for manufactured (mobile) home installations and use this manual's section entitled Gas...
... codes). 4. New stainless steel flexible connector. Equipment Shut-Off Valve- Iron Pipe. Gas Connection 1. Use only a new U.L. The wiring diagram is important that you thoroughly review that section, and the remainder of this manual, before making the electrical connection for manufactured (mobile) home installations and use this manual's section entitled Gas...
Owner's Manual
Page 11
... to first use of the Dryer. After the dryer starts, the igniter will glow red and the main burner will re-attempt gas ignition after reviewing the following parts on the exhaust duct approximately 2 ft. (60.9 cm) from the inside of the dryer drum/drying compartment any dust or dirt that...
... to first use of the Dryer. After the dryer starts, the igniter will glow red and the main burner will re-attempt gas ignition after reviewing the following parts on the exhaust duct approximately 2 ft. (60.9 cm) from the inside of the dryer drum/drying compartment any dust or dirt that...

Owner's Manual
Page 14
Part 3 ELECTRICAL REQUIREMENTS FOR ELECTRIC DRYERS Review the following options to the neutral wire, use the instructions under Option 3: Optional 3-wire connection. 13 Important: If your local codes or ordinances do not ...
Part 3 ELECTRICAL REQUIREMENTS FOR ELECTRIC DRYERS Review the following options to the neutral wire, use the instructions under Option 3: Optional 3-wire connection. 13 Important: If your local codes or ordinances do not ...
Owner's Manual
Page 18
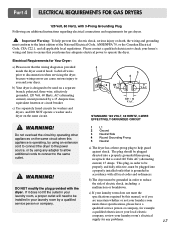
... wiring errors can cause serious injury to you are additional instructions regarding electrical connections and requirements for example a qualified electrician or your local electric company, review your laundry room does not meet the specifications required by a qualified service person or company. 5 1 3 2 4 120 ± 12 V.A.C 0 V.A.C. 120 + 12 V.A.C. Electrical Requirements for any adapter...
... wiring errors can cause serious injury to you are additional instructions regarding electrical connections and requirements for example a qualified electrician or your local electric company, review your laundry room does not meet the specifications required by a qualified service person or company. 5 1 3 2 4 120 ± 12 V.A.C 0 V.A.C. 120 + 12 V.A.C. Electrical Requirements for any adapter...

Owner's Manual
Page 28
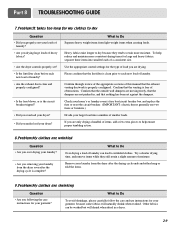
...not heat. Confirm that weren't cleansed during the washing process. Check your fabric softener product. Part 8 TROUBLESHOOTING GUIDE Troubleshooting Tips Save time and money! Review the charts on My Clothes Question • Did you follow the instructions provided with your home's or laundry room's fuse box / circuit breaker box and... and that the house gas shutoff and the dryer gas shutoff are both fully open. 3.Problem:There are being completely cleaned. 27 Please review and confirm that you are following pages first and you drying clean and dirty clothes together?
...not heat. Confirm that weren't cleansed during the washing process. Check your fabric softener product. Part 8 TROUBLESHOOTING GUIDE Troubleshooting Tips Save time and money! Review the charts on My Clothes Question • Did you follow the instructions provided with your home's or laundry room's fuse box / circuit breaker box and... and that the house gas shutoff and the dryer gas shutoff are both fully open. 3.Problem:There are being completely cleaned. 27 Please review and confirm that you are following pages first and you drying clean and dirty clothes together?
Owner's Manual
Page 30
...; Are you over drying your laundry? • Are you removing your laundry from the dryer after the drying cycle is free of moisture. Confirm through review of the appropriate sections of items, add a few extra pieces to dry Question • Did you properly sort your loads of laundry? • Are you...
...; Are you over drying your laundry? • Are you removing your laundry from the dryer after the drying cycle is free of moisture. Confirm through review of the appropriate sections of items, add a few extra pieces to dry Question • Did you properly sort your loads of laundry? • Are you...
