

User Guide
Page 5
... all instructions before or after each load. 11) Keep area around the exhaust opening and adjacent surrounding areas free from service or discarded, remove the door to cooking oils in your appliance, follow basic precautions, including the following: 8) Do not repair or replace any part of ... to catch fire. 6) Do not install or store this appliance where it will not fit the outlet, have come into the appliance if the drum is equipped with a cord having an equipment-grounding conductor and a grounding plug. Close supervision of children is necessary when using your dryer. WARNING ...
... all instructions before or after each load. 11) Keep area around the exhaust opening and adjacent surrounding areas free from service or discarded, remove the door to cooking oils in your appliance, follow basic precautions, including the following: 8) Do not repair or replace any part of ... to catch fire. 6) Do not install or store this appliance where it will not fit the outlet, have come into the appliance if the drum is equipped with a cord having an equipment-grounding conductor and a grounding plug. Close supervision of children is necessary when using your dryer. WARNING ...

User Guide
Page 10
... gas ignition. Safety Instructions Installation Instructions Operating Instruction Troubleshooting Tips Step 4: (Electric Dryer Only) Connect Electrical Plug For further assistance refer to remove shipping dust from inside the dryer drum. listed No. 10 (copper wire only) three conductor power supply cord kit rated 240 Volts (minimum)30 Amperes and labeled as suitable...
... gas ignition. Safety Instructions Installation Instructions Operating Instruction Troubleshooting Tips Step 4: (Electric Dryer Only) Connect Electrical Plug For further assistance refer to remove shipping dust from inside the dryer drum. listed No. 10 (copper wire only) three conductor power supply cord kit rated 240 Volts (minimum)30 Amperes and labeled as suitable...

User Guide
Page 29
...rack over the bottom of bacteria. Place wet items on the frame front to circulate. The rack does not move, but the drum will rotate. To remove the dryer rack, lift it straight up your load by using the Air Dry temperature setting. BEEPER The BEEPER controls the volume.... 7. Use RACK DRY to adjust the sound level or turn off the signal. Close the door. 5. NOTE: Check the lint screen and remove any lint accumulated from items dried on the dryer back ledge. Make sure items do not want . 4. Troubleshooting Tips Operating Instruction Installation Instructions Safety...
...rack over the bottom of bacteria. Place wet items on the frame front to circulate. The rack does not move, but the drum will rotate. To remove the dryer rack, lift it straight up your load by using the Air Dry temperature setting. BEEPER The BEEPER controls the volume.... 7. Use RACK DRY to adjust the sound level or turn off the signal. Close the door. 5. NOTE: Check the lint screen and remove any lint accumulated from items dried on the dryer back ledge. Make sure items do not want . 4. Troubleshooting Tips Operating Instruction Installation Instructions Safety...
Owners Manual
Page 4
...is moving. 6) Do not install or store lhis appli_mce where it will not fit the ontleL have come into _ae appliance if the drum is equipped with controls. 8) Do not rcpair or replace any part of the appliance or attempt any servicing unless st'_cifically recommend_ in... all local c{_des and ordinances. WARNING - Items contaminat_ with all instructions beli)re using the appliance. 4) Beti}re the appliance is removed ti'om service or di_arded, remove the d(×)r to the drying compartment. 5) Do not rcach into contact with the circuit conductors and connected to the weather. 7) Do...
...is moving. 6) Do not install or store lhis appli_mce where it will not fit the ontleL have come into _ae appliance if the drum is equipped with controls. 8) Do not rcpair or replace any part of the appliance or attempt any servicing unless st'_cifically recommend_ in... all local c{_des and ordinances. WARNING - Items contaminat_ with all instructions beli)re using the appliance. 4) Beti}re the appliance is removed ti'om service or di_arded, remove the d(×)r to the drying compartment. 5) Do not rcach into contact with the circuit conductors and connected to the weather. 7) Do...
Owners Manual
Page 28
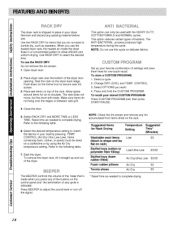
...time as needed to select the desired time,. RACK © BY The dryer rack is indicated. Remove and discard any lint accumulated from items dried on the rack Suggest_ Items for air to circulate. The... rack does not move, but the drum will rotate. This option can only be dried on top of the buttons on the frame front... the dryer back ledge, Push down on the control panel and the termination of the dryer. To remove the dryer rack, lift it straight up your stored CUSTOM PROGRAM Press CUSTOM PROGRAM pad, then press ...
...time as needed to select the desired time,. RACK © BY The dryer rack is indicated. Remove and discard any lint accumulated from items dried on the rack Suggest_ Items for air to circulate. The... rack does not move, but the drum will rotate. This option can only be dried on top of the buttons on the frame front... the dryer back ledge, Push down on the control panel and the termination of the dryer. To remove the dryer rack, lift it straight up your stored CUSTOM PROGRAM Press CUSTOM PROGRAM pad, then press ...


