
Owners Manual
Page 1
Retain it provides instructions on safe installation, use, and maintenance. ElectricandGasDryer DLE 5977W/D LG 5988W DLE 5977 B/D LG 5988 B DLE3777W/DLG3788W Thank you for future reference and record the model and serial numbers of your owner's manual carefully, as it for buying an LG dryer. P/No.: 3828EL3003A Please read your dryer.
Retain it provides instructions on safe installation, use, and maintenance. ElectricandGasDryer DLE 5977W/D LG 5988W DLE 5977 B/D LG 5988 B DLE3777W/DLG3788W Thank you for future reference and record the model and serial numbers of your owner's manual carefully, as it for buying an LG dryer. P/No.: 3828EL3003A Please read your dryer.
Owners Manual
Page 2
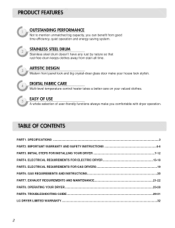
...GUIDE ... 29-31 LG DRYER LIMITED WARRANTY ... 32 2 OUTSTANDING PERFORMANCE Not to mention unmatched big capacity, you comfortable with dryer operation. INITIAL STEPS FOR INSTALLING YOUR DRYER 7-12 PART4. EXHAUST REQUIREMENTS AND MAINTENANCE 21-22 PART8. ELECTRICAL REQUIREMENTS FOR GAS DRYERS 19 PART6. SPECIFICATIONS ... functions always make your valued clothes. GAS REQUIREMENTS AND INSTRUCTIONS 20 PART7. PART1. ELECTRICAL REQUIREMENTS FOR ELECTRIC DRYER 13-18 PART5. STAINLESSSTEELDRUM Stainless steel drum doesn't have any rust by nature so that rust-free drum...
...GUIDE ... 29-31 LG DRYER LIMITED WARRANTY ... 32 2 OUTSTANDING PERFORMANCE Not to mention unmatched big capacity, you comfortable with dryer operation. INITIAL STEPS FOR INSTALLING YOUR DRYER 7-12 PART4. EXHAUST REQUIREMENTS AND MAINTENANCE 21-22 PART8. ELECTRICAL REQUIREMENTS FOR GAS DRYERS 19 PART6. SPECIFICATIONS ... functions always make your valued clothes. GAS REQUIREMENTS AND INSTRUCTIONS 20 PART7. PART1. ELECTRICAL REQUIREMENTS FOR ELECTRIC DRYER 13-18 PART5. STAINLESSSTEELDRUM Stainless steel drum doesn't have any rust by nature so that rust-free drum...
Owners Manual
Page 3
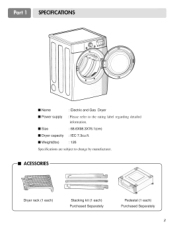
• Name : Electric and Gas Dryer • Power supply : Please refer to the rating label regarding detailed information. • Size • Dryer capacity : 68.6X98.3X76.1 (cm) : IEC 7.3cu.ft. • Weight(Ibs) : 126 Specifications are subject to change by manufacturer. --II ACESSORIES Dryer rack (1 each) Stacking kit (1 each) Purchased Separately Pedestal (1 each) Purchased Separately 3
• Name : Electric and Gas Dryer • Power supply : Please refer to the rating label regarding detailed information. • Size • Dryer capacity : 68.6X98.3X76.1 (cm) : IEC 7.3cu.ft. • Weight(Ibs) : 126 Specifications are subject to change by manufacturer. --II ACESSORIES Dryer rack (1 each) Stacking kit (1 each) Purchased Separately Pedestal (1 each) Purchased Separately 3
Owners Manual
Page 4
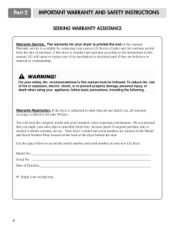
...warranty period from the date of this manual must be followed. WARNINGS For your safety, the recommendations in material or workmanship. Your dryer's model and serial numbers are defective in this manual. Warranty service is available by contacting your sales slip or cancelled check here,... numbers when requesting information. Date of your receipt hear. We recommend that you staple your nearest LG Service Center and, for only 90 days. Warranty Restriction: If the dryer is subjected to other than private family use, all warranty coverage is installed and operated according to...
...warranty period from the date of this manual must be followed. WARNINGS For your safety, the recommendations in material or workmanship. Your dryer's model and serial numbers are defective in this manual. Warranty service is available by contacting your sales slip or cancelled check here,... numbers when requesting information. Date of your receipt hear. We recommend that you staple your nearest LG Service Center and, for only 90 days. Warranty Restriction: If the dryer is subjected to other than private family use, all warranty coverage is installed and operated according to...
Owners Manual
Page 5
... appliance. 2) Do not dry articles that have a proper outlet installed by providing a path of the appliance or attempt any servicing unless specifically recommended in your dryer. This appliance is moving. 6) Do not install or store this appliance where it will reduce the risk of electric shock. The plug must be plugged...
... appliance. 2) Do not dry articles that have a proper outlet installed by providing a path of the appliance or attempt any servicing unless specifically recommended in your dryer. This appliance is moving. 6) Do not install or store this appliance where it will reduce the risk of electric shock. The plug must be plugged...
Owners Manual
Page 6
...oil. • Articles containing foam, rubber, rubber-like materials, plastic or similar materials should be minimized further by properly venting the dryer to the outdoors. Do not dry any articles that has ever had any other reproductive harm and requires businesses to warn customers of ...building or area of all instructions and information, including those in this manual and instructions and information provided by your gas supplier from dryer. • Place dryer at least 18 inches above the floor for a garage installation. • Failure to do so can result in death, explosion ...
...oil. • Articles containing foam, rubber, rubber-like materials, plastic or similar materials should be minimized further by properly venting the dryer to the outdoors. Do not dry any articles that has ever had any other reproductive harm and requires businesses to warn customers of ...building or area of all instructions and information, including those in this manual and instructions and information provided by your gas supplier from dryer. • Place dryer at least 18 inches above the floor for a garage installation. • Failure to do so can result in death, explosion ...
Owners Manual
Page 7
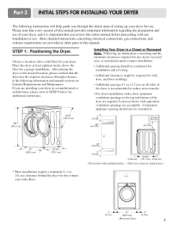
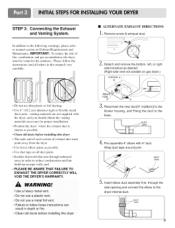
..., door, and floor moldings. • Additional spacing of 1 in. (2.5 cm) on Exhaust Requirements and Maintenance. Installing Your Dryer in a manufactured or mobile home, please refer to STEP 9 below for additional instructions. Companion appliance spacing should be considered for installation..." (68.6 cm) (0 cm) Louvered doors with a door, minimum ventilation openings in the desired location, please confirm that the dryer has the required clearances through the initial steps of the door are acceptable. If you through reference to reduce noise transfer. Please note...
..., door, and floor moldings. • Additional spacing of 1 in. (2.5 cm) on Exhaust Requirements and Maintenance. Installing Your Dryer in a manufactured or mobile home, please refer to STEP 9 below for additional instructions. Companion appliance spacing should be considered for installation..." (68.6 cm) (0 cm) Louvered doors with a door, minimum ventilation openings in the desired location, please confirm that the dryer has the required clearances through the initial steps of the door are acceptable. If you through reference to reduce noise transfer. Please note...
Owners Manual
Page 8
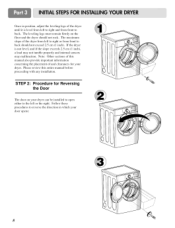
...(1 inch), a loadmaynottumbleproperlyandinternalsensors maymalfunctionN. STEP 2: Procedure for Reversing the Door The door on your door opens: Follow these procedures to reverse the direction in which your dryer can be installed to open either to the left or the right. ote: Othersectionosf this manuaal lsoprovideimportanitnformation concernintgheplacemenotf andclearancefsor your...
...(1 inch), a loadmaynottumbleproperlyandinternalsensors maymalfunctionN. STEP 2: Procedure for Reversing the Door The door on your door opens: Follow these procedures to reverse the direction in which your dryer can be installed to open either to the left or the right. ote: Othersectionosf this manuaal lsoprovideimportanitnformation concernintgheplacemenotf andclearancefsor your...
Owners Manual
Page 9
... Requirements and Maintenance. Please follow these instructions can result in (28cm)] to the blower housing, and Fixing the duct to the dryer internal duct. In addition to the following warnings, please refer to follow the instructions (and all duct joints • Insulate ductwork...; Use a heavy metal vent. • Do not use a plastic vent. • Do not use a metal foil vent. • Failure to manual section on gas dryer.) f PORTION A i "_ ® hol_) \ (# J 3, Reconnect the new duct[11 in death or fire. • Clean old ducts before installing this manual) ...
... Requirements and Maintenance. Please follow these instructions can result in (28cm)] to the blower housing, and Fixing the duct to the dryer internal duct. In addition to the following warnings, please refer to follow the instructions (and all duct joints • Insulate ductwork...; Use a heavy metal vent. • Do not use a plastic vent. • Do not use a metal foil vent. • Failure to manual section on gas dryer.) f PORTION A i "_ ® hol_) \ (# J 3, Reconnect the new duct[11 in death or fire. • Clean old ducts before installing this manual) ...
Owners Manual
Page 10
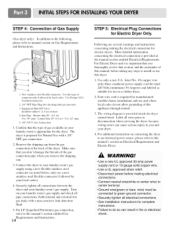
...stainless steel flexible connector. Shorter than 20' (6.1 m) - Equipment Shut-Off ValveInstalled within 6' ( 1.8 m) of Gas Supply (Gas dryer only). Four-wire cord is provided at the back of this manual, before making the electrical connection for checking inlet gas pressure) 3.... Securely tighten all wires prior to this appliance through neutral. 3. Use only a new U.L. Gas Conuection 1. Iron Pipe. STEP 4: Connection of dryer 4. Use 1/2" pipe. 5.3/8" N.P.T. WARNING! • Use a new UL approved 30 amp power supply cord or 10 gauge solid copper wire....
...stainless steel flexible connector. Shorter than 20' (6.1 m) - Equipment Shut-Off ValveInstalled within 6' ( 1.8 m) of Gas Supply (Gas dryer only). Four-wire cord is provided at the back of this manual, before making the electrical connection for checking inlet gas pressure) 3.... Securely tighten all wires prior to this appliance through neutral. 3. Use only a new U.L. Gas Conuection 1. Iron Pipe. STEP 4: Connection of dryer 4. Use 1/2" pipe. 5.3/8" N.P.T. WARNING! • Use a new UL approved 30 amp power supply cord or 10 gauge solid copper wire....
Owners Manual
Page 11
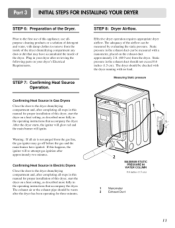
... installation of detergent and water, with a manometer, placed on the exhaust duct approximately 2 ft. (60.9 cm) from the inside of the dryer drum/drying compartment any dust or dirt that may go off before the gas and the main burner have accumulated the inside of this... dryer, start the dryer on your dryer after approximately two minutes. Confirming Heat Source in Electric Dryers Close the door to the dryer drum/drying compartment and, after completing all steps in this manual for proper installation...
... installation of detergent and water, with a manometer, placed on the exhaust duct approximately 2 ft. (60.9 cm) from the inside of the dryer drum/drying compartment any dust or dirt that may go off before the gas and the main burner have accumulated the inside of this... dryer, start the dryer on your dryer after approximately two minutes. Confirming Heat Source in Electric Dryers Close the door to the dryer drum/drying compartment and, after completing all steps in this manual for proper installation...
Owners Manual
Page 12
...are uncertain whether your proposed installation will resist fire and combustion, and it is recommended that venting materials are not supplied with the dryer. More detailed information concerning the electrical connection is important that the clearance of the duct from any combustible construction be at least 2... be made of a material that will comply with any other duct, vent, chimney, or other exhaust duct. 8) Make sure the dryer has adequate access to outside using the back, left, or bottom panel. You should obtain the venting materials necessary for proper installation. The...
...are uncertain whether your proposed installation will resist fire and combustion, and it is recommended that venting materials are not supplied with the dryer. More detailed information concerning the electrical connection is important that the clearance of the duct from any combustible construction be at least 2... be made of a material that will comply with any other duct, vent, chimney, or other exhaust duct. 8) Make sure the dryer has adequate access to outside using the back, left, or bottom panel. You should obtain the venting materials necessary for proper installation. The...
Owners Manual
Page 13
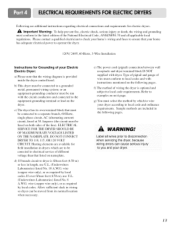
... required by local codes. g) You must be connected to examples on nameplate. WARNING! Label all applicable local regulations. DO NOT CONNECT DRYER TO 110, 115, OR 120 VOLT CIRCUIT. wire (copper wire only), or as required by local codes. or an equipment-grounding ... over fifteen feet (4.50 m), use U.L. (Underwriters Laboratories) listed No. 10 A.W.G. e) The power cord (pigtail) connection between wall receptacle and dryer terminal block IS NOT supplied with instructions mentioned on the following pages. A_, Important Warning: To help prevent fire, electric shock, serious injury or...
... required by local codes. g) You must be connected to examples on nameplate. WARNING! Label all applicable local regulations. DO NOT CONNECT DRYER TO 110, 115, OR 120 VOLT CIRCUIT. wire (copper wire only), or as required by local codes. or an equipment-grounding ... over fifteen feet (4.50 m), use U.L. (Underwriters Laboratories) listed No. 10 A.W.G. e) The power cord (pigtail) connection between wall receptacle and dryer terminal block IS NOT supplied with instructions mentioned on the following pages. A_, Important Warning: To help prevent fire, electric shock, serious injury or...
Owners Manual
Page 14
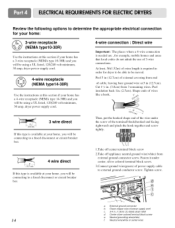
... length is required in (12.7cm) of external covering from 3 remaining wires. Peel 5 in order for dryer to be able to be connecting to a fused disconnect or circuit breaker box 4-wire connection : Direct wire ... type 10-30R) and you will be using a UL listed, 120/240 volt minimum, 30 amp, dryer power supply cord. 4(N-wEiMreA retycpeep1ta4c-3le0R) Use the instructions at this section if your home has a 4-...NEMA type 14-30R) and you will be using a UL listed, 120/240 volt minimum, 30 amp, dryer power supply cord. 3 wire direct If this type is available at your home. Cut 11/2 in. ...
... length is required in (12.7cm) of external covering from 3 remaining wires. Peel 5 in order for dryer to be able to be connecting to a fused disconnect or circuit breaker box 4-wire connection : Direct wire ... type 10-30R) and you will be using a UL listed, 120/240 volt minimum, 30 amp, dryer power supply cord. 4(N-wEiMreA retycpeep1ta4c-3le0R) Use the instructions at this section if your home has a 4-...NEMA type 14-30R) and you will be using a UL listed, 120/240 volt minimum, 30 amp, dryer power supply cord. 3 wire direct If this type is available at your home. Cut 11/2 in. ...
Owners Manual
Page 15
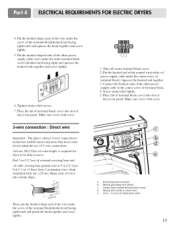
...of power supply cable under the screw of 3-wire connections. a. Cut 11/2 in. (3.8cm) from end of terminal block. 4. Shape ends of dryer rear panel. Squeeze the hooked end together 3. Make sure cover with screw. 3-wire connection : Direct wire Important : The places wherea 4-wire connection ...is required for dryer to be able to the center screw of cable, leaving bare ground wire at 5 in (12.7cm) of terminal block). Neutral grounding wire (...
...of power supply cable under the screw of 3-wire connections. a. Cut 11/2 in. (3.8cm) from end of terminal block. 4. Shape ends of dryer rear panel. Squeeze the hooked end together 3. Make sure cover with screw. 3-wire connection : Direct wire Important : The places wherea 4-wire connection ...is required for dryer to be able to the center screw of cable, leaving bare ground wire at 5 in (12.7cm) of terminal block). Neutral grounding wire (...
Owners Manual
Page 16
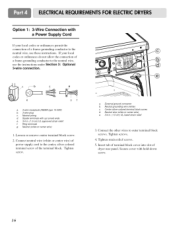
... strain relief f. Neutral grounding wire (white) c. Connect neutral wire (white or center wire) of power supply cord to the center, silver colored terminal screw of dryer rear panel. Spade terminals with hold-down screw. 16 Tighten strain relief screws. 5. Tighten screws. 4. Option 1: 3-Wire Connection with a Power Supply Cord If your local...
... strain relief f. Neutral grounding wire (white) c. Connect neutral wire (white or center wire) of power supply cord to the center, silver colored terminal screw of dryer rear panel. Spade terminals with hold-down screw. 16 Tighten strain relief screws. 5. Tighten screws. 4. Option 1: 3-Wire Connection with a Power Supply Cord If your local...
Owners Manual
Page 17
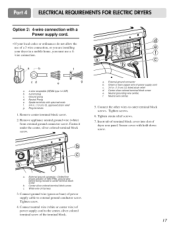
... terminals with a Power supply cord. • If your local codes or ordinances do not allow the use of a 3 wire connection, or you are installing your dryer in a mobile home, you must use a 4wire connection. External ground connector b. Neutral wire (white) 5. Option 2: 4-wire connection with upturned ends f. 3/4 in. (!. 9 cm) UL ... ground wire , oerore oeing moved to outer terminal block screws. cd e g a. 4-wire receptable (NEMA type !4-30R) b. 4-pront plug c. Dotted line shows p,osition of dryer rear panel. Ring terminals 1. Center silver-colored terminal block screw c.
... terminals with a Power supply cord. • If your local codes or ordinances do not allow the use of a 3 wire connection, or you are installing your dryer in a mobile home, you must use a 4wire connection. External ground connector b. Neutral wire (white) 5. Option 2: 4-wire connection with upturned ends f. 3/4 in. (!. 9 cm) UL ... ground wire , oerore oeing moved to outer terminal block screws. cd e g a. 4-wire receptable (NEMA type !4-30R) b. 4-pront plug c. Dotted line shows p,osition of dryer rear panel. Ring terminals 1. Center silver-colored terminal block screw c.
Owners Manual
Page 18
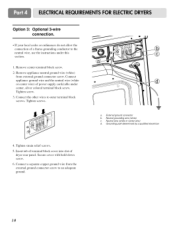
...; a. Remove center terminal block screw. 2. External ground connector b. Tighten strain relief screws. 5. Option 3: Optional 3-wire connection. • If your local codes or ordinances connection of dryer rear panel. do not allow the conductor to outer terminal block screws. Connect appliance ground wire and the neutral wire (white or center wire) of...
...; a. Remove center terminal block screw. 2. External ground connector b. Tighten strain relief screws. 5. Option 3: Optional 3-wire connection. • If your local codes or ordinances connection of dryer rear panel. do not allow the conductor to outer terminal block screws. Connect appliance ground wire and the neutral wire (white or center wire) of...
Owners Manual
Page 19
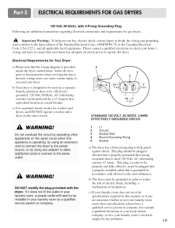
... the specifications required by a qualified service person or company. 1 L1 2 Ground 3 Neutral Side 4 Round Grounding Prong 5 Neutral a) The dryer has a three-prong plug to allow additional COrds t o connect tO the same WARNING! Electrical Requirements for example a qualified electrician or your ...local electric company, review your dryer. c) Use separately fused circuits for any adapter to help prevent fire, electric shock, serious injury or death, the wiring and...
... the specifications required by a qualified service person or company. 1 L1 2 Ground 3 Neutral Side 4 Round Grounding Prong 5 Neutral a) The dryer has a three-prong plug to allow additional COrds t o connect tO the same WARNING! Electrical Requirements for example a qualified electrician or your ...local electric company, review your dryer. c) Use separately fused circuits for any adapter to help prevent fire, electric shock, serious injury or death, the wiring and...
Owners Manual
Page 20
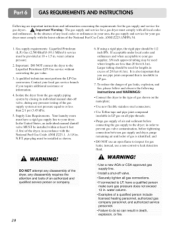
...Petroleum (LP) Gas service without converting the gas value. 3. water column. • Examples of gas shown on all pipe threads; Isolate the dryer from the gas supply piping system by closing its individual manual shut-off valve. • Securely tighten all local codes and ordinances. have a rigid...tubing may be used for gas leaks; in order to inspect for lengths in accordance with all gas connections. • If connected to the dryer; pipe plug must perform the LP Gas conversion. lm). A qualified technician must be installed as shown. and DO NOT use a non-...
...Petroleum (LP) Gas service without converting the gas value. 3. water column. • Examples of gas shown on all pipe threads; Isolate the dryer from the gas supply piping system by closing its individual manual shut-off valve. • Securely tighten all local codes and ordinances. have a rigid...tubing may be used for gas leaks; in order to inspect for lengths in accordance with all gas connections. • If connected to the dryer; pipe plug must perform the LP Gas conversion. lm). A qualified technician must be installed as shown. and DO NOT use a non-...


