
Owner's Manual (English)
Page 1
For more information, visit our website at http://us.lge.com P/No.: 3828EL3004J Please read your manual carefully, as it provides instructions on safe Installation, use and maintenance. Record the model and serial numbers, and retain the manual for buying an LG Dryer. 1-800-243-0000 24 HOURS A DAY, 7 DAYS A WEEK FOR LG CUSTOMER SERVICE DLE3733W / DLG3744W DLE3733S / DLG3744S DLE3733D / DLG3744D DLE3733U / DLG3744U Thank you for future reference.
For more information, visit our website at http://us.lge.com P/No.: 3828EL3004J Please read your manual carefully, as it provides instructions on safe Installation, use and maintenance. Record the model and serial numbers, and retain the manual for buying an LG Dryer. 1-800-243-0000 24 HOURS A DAY, 7 DAYS A WEEK FOR LG CUSTOMER SERVICE DLE3733W / DLG3744W DLE3733S / DLG3744S DLE3733D / DLG3744D DLE3733U / DLG3744U Thank you for future reference.

Owner's Manual (English)
Page 2
PRODUCT FEATURES 1 OUTSTANDING PERFORMANCE Not to select heat level and drying time manually. You might see a sudden increase or decrease in operation time if the sensor determines more or less drying is not a malfunction. This is required...Dry and Time Dry? EXHAUST REQUIREMENTS AND MAINTENANCE ...23 PART 9. TROUBLESHOOTING GUIDE...31 LG DRYER LIMITED WARRANTY...34 2 INITIAL STEPS FOR INSTALLING YOUR DRYER ...9 PART 4. Time Dry Use TIME DRY to mention unmatched big capacity, you comfortable with dryer operation. Use TIME DRY for heavy and bulky items and thick work. GAS ...
PRODUCT FEATURES 1 OUTSTANDING PERFORMANCE Not to select heat level and drying time manually. You might see a sudden increase or decrease in operation time if the sensor determines more or less drying is not a malfunction. This is required...Dry and Time Dry? EXHAUST REQUIREMENTS AND MAINTENANCE ...23 PART 9. TROUBLESHOOTING GUIDE...31 LG DRYER LIMITED WARRANTY...34 2 INITIAL STEPS FOR INSTALLING YOUR DRYER ...9 PART 4. Time Dry Use TIME DRY to mention unmatched big capacity, you comfortable with dryer operation. Use TIME DRY for heavy and bulky items and thick work. GAS ...

Owner's Manual (English)
Page 3
... all occupants. 4. All safety messages will follow basic precautions, including the following : • Do not install a clothes dryer with clothes dryers. Do not touch any other flammable vapors and liquids in the vicinity of others . Clear the room, building, or area... of life. Do not try to persons when using your building. 3. If you cannot reach your gas supplier from a neighbor's phone. Your Safety and the safety of this manual...
... all occupants. 4. All safety messages will follow basic precautions, including the following : • Do not install a clothes dryer with clothes dryers. Do not touch any other flammable vapors and liquids in the vicinity of others . Clear the room, building, or area... of life. Do not try to persons when using your building. 3. If you cannot reach your gas supplier from a neighbor's phone. Your Safety and the safety of this manual...

Owner's Manual (English)
Page 4
... grounding will reduce the risk of potential exposure to persons when using your dryer. Part 1 IMPORTANT WARRANTY AND SAFETY INSTRUCTIONS READ ALL INSTRUCTIONS BEFORE USE WARNING For your safety, the information in this manual must be properly installed as described in this Use and Care Guide or ...in published user-repair instructions that could ignite or explode. • Do not reach into the dryer if the drum is properly grounded. Close supervision...
... grounding will reduce the risk of potential exposure to persons when using your dryer. Part 1 IMPORTANT WARRANTY AND SAFETY INSTRUCTIONS READ ALL INSTRUCTIONS BEFORE USE WARNING For your safety, the information in this manual must be properly installed as described in this Use and Care Guide or ...in published user-repair instructions that could ignite or explode. • Do not reach into the dryer if the drum is properly grounded. Close supervision...

Owner's Manual (English)
Page 5
... injury to persons when using the appliance, follow this warning can cause a fire if it will be kept as short as described in this manual. The exhaust duct should obtain the necessary ductwork locally. Make sure to do so can result in death, explosion, fire or burns. Electrical ... the risk of lint in any old ducts before installing your safety, the information in this manual must be properly installed as possible. Failure to follow these instructions can result if the dryer is not exhausted outdoors, some fine lint and large amounts of moisture will not be exhausted...
... injury to persons when using the appliance, follow this warning can cause a fire if it will be kept as short as described in this manual. The exhaust duct should obtain the necessary ductwork locally. Make sure to do so can result in death, explosion, fire or burns. Electrical ... the risk of lint in any old ducts before installing your safety, the information in this manual must be properly installed as possible. Failure to follow these instructions can result if the dryer is not exhausted outdoors, some fine lint and large amounts of moisture will not be exhausted...

Owner's Manual (English)
Page 6
... electrical shock. • Repair or replace immediately all joints with the above recommendations, a ULlisted flexible metal transition duct may be used between the dryer and the wall. Failure to make a connection with duct tape. ¶U For complete details, follow these instructions can be cut by any circumstances...or death. These power cord can result in electrical shock or injury • Refer to the installation instructions in this manual for specific electrical requirements for use of this ducting will prevent shock hazard and assure stability during operating. • The...
... electrical shock. • Repair or replace immediately all joints with the above recommendations, a ULlisted flexible metal transition duct may be used between the dryer and the wall. Failure to make a connection with duct tape. ¶U For complete details, follow these instructions can be cut by any circumstances...or death. These power cord can result in electrical shock or injury • Refer to the installation instructions in this manual for specific electrical requirements for use of this ducting will prevent shock hazard and assure stability during operating. • The...

Owner's Manual (English)
Page 7
...of fire or explosion, electric shock or to record the model number and serial number of this manual. proof of purchase date is located at the end of your new LG dryer. Use the space below to prevent property damage, personal injury, or death when using your ...beginning with the date of Purchase Staple your appliance follow basic precautions. Date of purchase. Warranty Restriction: If the dryer is subjected to the instructions in this manual, LG will need the complete model and serial number when requesting warranty service. Model Number. Serial Number. Warranty Service is ...
...of fire or explosion, electric shock or to record the model number and serial number of this manual. proof of purchase date is located at the end of your new LG dryer. Use the space below to prevent property damage, personal injury, or death when using your ...beginning with the date of Purchase Staple your appliance follow basic precautions. Date of purchase. Warranty Restriction: If the dryer is subjected to the instructions in this manual, LG will need the complete model and serial number when requesting warranty service. Model Number. Serial Number. Warranty Service is ...

Owner's Manual (English)
Page 9
...with elbow. Note Leveling legs should be cautious not to the sides of this entire manual before proceeding with any installation or use. Place the dryer at least eighteen inches above , behind the dryer for the exhaust vent with a solid floor for the door. Those required minimum .... 38.7" (98.3 cm) 49.8" (126.4 cm) Certain minimum clearances are provided in the picture below . Please note that every section of this manual provides important information regarding the preparation and use of clearance is also acceptable. 27" (68.6 cm) 29.96" (76.1 cm) * Most installations...
...with elbow. Note Leveling legs should be cautious not to the sides of this entire manual before proceeding with any installation or use. Place the dryer at least eighteen inches above , behind the dryer for the exhaust vent with a solid floor for the door. Those required minimum .... 38.7" (98.3 cm) 49.8" (126.4 cm) Certain minimum clearances are provided in the picture below . Please note that every section of this manual provides important information regarding the preparation and use of clearance is also acceptable. 27" (68.6 cm) 29.96" (76.1 cm) * Most installations...

Owner's Manual (English)
Page 10
... with any installation. Part 3 INITIAL STEPS FOR INSTALLING YOUR DRYER Once in which your door opens: Note Door and latch should not rock. Please review this manual also provide important information concerning the placement of the dryer from left to right and front to reverse the direction in... position, adjust the leveling legs of the dryer until it is not level, and if the slope exceeds...
... with any installation. Part 3 INITIAL STEPS FOR INSTALLING YOUR DRYER Once in which your door opens: Note Door and latch should not rock. Please review this manual also provide important information concerning the placement of the dryer from left to right and front to reverse the direction in... position, adjust the leveling legs of the dryer until it is not level, and if the slope exceeds...

Owner's Manual (English)
Page 11
... exhaust must be vented to make a connection with the above recommendations, then a UL-listed flexible metal transition duct may be vented to manual section on all others in the dryer and push the female end of the elbow onto the male end of the blower output shaft. Please follow these instructions can...
... exhaust must be vented to make a connection with the above recommendations, then a UL-listed flexible metal transition duct may be vented to manual section on all others in the dryer and push the female end of the elbow onto the male end of the blower output shaft. Please follow these instructions can...

Owner's Manual (English)
Page 12
... orifice, also adjust the gas valve. 1. Remove the shipping cap from the gas connection at this altitude. Connect the dryer to do not allow the burner to manual section on Electrical Requirements and Electric Dryer. Adjusting burner input setting is not needed , orifice conversion should be connected to green ground connector. • Securely...
... orifice, also adjust the gas valve. 1. Remove the shipping cap from the gas connection at this altitude. Connect the dryer to do not allow the burner to manual section on Electrical Requirements and Electric Dryer. Adjusting burner input setting is not needed , orifice conversion should be connected to green ground connector. • Securely...

Owner's Manual (English)
Page 13
...will glow red and the main burner will re-attempt gas ignition after approximately two minutes. Static pressure in this manual for proper installation of the dryer drum/drying compartment any dust or dirt that may go off before the gas and the main burner have accumulated ...after completing all steps in Gas Dryers Close the door to the dryer drum/drying compartment and, after the dryer has been operating for three minutes. If this appliance, use of this dryer, start the dryer on a heat setting. Confirming Heat Source in this manual for proper installation of this happens...
...will glow red and the main burner will re-attempt gas ignition after approximately two minutes. Static pressure in this manual for proper installation of the dryer drum/drying compartment any dust or dirt that may go off before the gas and the main burner have accumulated ...after completing all steps in Gas Dryers Close the door to the dryer drum/drying compartment and, after the dryer has been operating for three minutes. If this appliance, use of this dryer, start the dryer on a heat setting. Confirming Heat Source in this manual for proper installation of this happens...

Owner's Manual (English)
Page 14
... pipe. 6) DO NOT connect the exhaust duct with any other duct, vent, chimney, or other exhaust duct. 7) Make sure the dryer has adequate access to outside fresh air to ensure proper operation. More detailed information concerning the electrical connection is provided at the sides and...the duct from any combustible construction be at least 2 inches (5 cm), and, when venting the dryer to the outdoors, the dryer can be installed with a clearance of 1 inch at the manual section entitled Electrical Requirements for assistance. WARNING! • DO NOT connect exhaust ducts with the Manufactured...
... pipe. 6) DO NOT connect the exhaust duct with any other duct, vent, chimney, or other exhaust duct. 7) Make sure the dryer has adequate access to outside fresh air to ensure proper operation. More detailed information concerning the electrical connection is provided at the sides and...the duct from any combustible construction be at least 2 inches (5 cm), and, when venting the dryer to the outdoors, the dryer can be installed with a clearance of 1 inch at the manual section entitled Electrical Requirements for assistance. WARNING! • DO NOT connect exhaust ducts with the Manufactured...

Owner's Manual (English)
Page 18
... type is available at your home. Make sure that all terminal block nuts are on manual is connected to the same color screw in block. Part 5 ELECTRICAL REQUIREMENTS FOR ELECTRIC DRYERS Review the following options to determine the appropriate electrical connection for your home: 4-wire receptacle...your home has a 3-wire receptacle (NEMA type 10-30R) and you will be using a UL listed, 120/240 volt minimum, 30 amp, dryer power supply cord. 4-wire connection : Direct wire Warning : Grounding through the neutral conductor. you will be connecting to a fused disconnect or circuit ...
... type is available at your home. Make sure that all terminal block nuts are on manual is connected to the same color screw in block. Part 5 ELECTRICAL REQUIREMENTS FOR ELECTRIC DRYERS Review the following options to determine the appropriate electrical connection for your home: 4-wire receptacle...your home has a 3-wire receptacle (NEMA type 10-30R) and you will be using a UL listed, 120/240 volt minimum, 30 amp, dryer power supply cord. 4-wire connection : Direct wire Warning : Grounding through the neutral conductor. you will be connecting to a fused disconnect or circuit ...

Owner's Manual (English)
Page 21
...three-wire, effectively grounded, 120 Volt, 60 Hertz, AC (alternating current) circuit protected by operating other appliances on the same circuit. b) Your dryer is grounded in fire or electrical shock. STANDARD 120 VOLT, 60 HERTZ, 3-WIRE EFFECTIVELY GROUNDED CIRCUIT WARNING! • Do not overload the ... by a 15 Ampere fuse, equivalent fuse or circuit breaker. Electrical Requirements for washers and dryers, and DO NOT operate a washer and a dryer on the same circuit when this manual, or if you and your home has adequate electrical power to help guard against shock. ...
...three-wire, effectively grounded, 120 Volt, 60 Hertz, AC (alternating current) circuit protected by operating other appliances on the same circuit. b) Your dryer is grounded in fire or electrical shock. STANDARD 120 VOLT, 60 HERTZ, 3-WIRE EFFECTIVELY GROUNDED CIRCUIT WARNING! • Do not overload the ... by a 15 Ampere fuse, equivalent fuse or circuit breaker. Electrical Requirements for washers and dryers, and DO NOT operate a washer and a dryer on the same circuit when this manual, or if you and your home has adequate electrical power to help guard against shock. ...

Owner's Manual (English)
Page 22
...pipe joint compound that is identified. • DO NOT use a non-corrosive leak detection fluid. Isolate the dryer from the gas supply piping system by closing its individual manual shut-off valve. • Securely tighten all gas connections. • If connected to prevent gas valve contamination.... does not exceed 13 in death, explosion, or fire. Larger tubing should be installed as shown. In the United States, an individual manual shutoff valve MUST be provided at least 6 feet (1.8 m) of the National Fuel Gas Code, ANSI Z223.1/NFPA 54. Gas supply requirements...
...pipe joint compound that is identified. • DO NOT use a non-corrosive leak detection fluid. Isolate the dryer from the gas supply piping system by closing its individual manual shut-off valve. • Securely tighten all gas connections. • If connected to prevent gas valve contamination.... does not exceed 13 in death, explosion, or fire. Larger tubing should be installed as shown. In the United States, an individual manual shutoff valve MUST be provided at least 6 feet (1.8 m) of the National Fuel Gas Code, ANSI Z223.1/NFPA 54. Gas supply requirements...
Owner's Manual (English)
Page 25
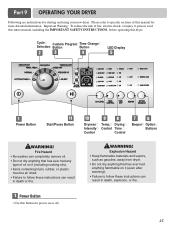
...power on it (even after washing). • Failure to follow these instructions can result in death or fire. Part 9 OPERATING YOUR DRYER Following are instructions for more detailed information. Important Warning: To reduce the risk of fire, electric shock, or injury to specific sections...ever had anything that has ever had any type of this dryer. Please refer to person, read this entire manual, including the IMPORTANT SAFETY INSTRUCTIONS, before operating this manual for starting and using your new dryer. Cycle Custom Program Time Change Selection Button Button LED Display ...
...power on it (even after washing). • Failure to follow these instructions can result in death or fire. Part 9 OPERATING YOUR DRYER Following are instructions for more detailed information. Important Warning: To reduce the risk of fire, electric shock, or injury to specific sections...ever had anything that has ever had any type of this dryer. Please refer to person, read this entire manual, including the IMPORTANT SAFETY INSTRUCTIONS, before operating this manual for starting and using your new dryer. Cycle Custom Program Time Change Selection Button Button LED Display ...

Owner's Manual (English)
Page 26
... cycle. Manual Preset Cycle Settings Manual Dry Temp. A sensor detects the moisture in the dryer too long. Sensor Dry Preset Cycle Settings Sensor Dry Cycles Load Type Temp. Manual Dry Cycles Use Manual Cycles to select the desired cycle based on laundry types and conditions. 1. When a Manual Cycle is...drying time for optimal drying Cotton/Towels Use for drying synthetic fabrics, washable knit fabrics and no-iron finishes. Part 9 OPERATING YOUR DRYER 2 Cycle Selection • Turn the knob to select a specific amount of settings and save them here for drying sturdy fabrics ...
... cycle. Manual Preset Cycle Settings Manual Dry Temp. A sensor detects the moisture in the dryer too long. Sensor Dry Preset Cycle Settings Sensor Dry Cycles Load Type Temp. Manual Dry Cycles Use Manual Cycles to select the desired cycle based on laundry types and conditions. 1. When a Manual Cycle is...drying time for optimal drying Cotton/Towels Use for drying synthetic fabrics, washable knit fabrics and no-iron finishes. Part 9 OPERATING YOUR DRYER 2 Cycle Selection • Turn the knob to select a specific amount of settings and save them here for drying sturdy fabrics ...

Owner's Manual (English)
Page 27
...4. To enable Child Lock, Press and hold OPTION for up to three hours after drying is pressed. When you select the wrinkle free option, the dryer will also be displayed in this area. 1. In addition to this option in case you select the damp dry beep option, a beep will be ... that are dry or other items that you when your laundry. This notice will show CHECK FILTER when the dryer is available only with Manual Dry and Time Dry. 5 LED Display 1 2 3 4 1. Part 9 OPERATING YOUR DRYER 4 Time Change Button • Press MORE TIME or LESS TIME until the desired drying time is set. 6...
...4. To enable Child Lock, Press and hold OPTION for up to three hours after drying is pressed. When you select the wrinkle free option, the dryer will also be displayed in this area. 1. In addition to this option in case you select the damp dry beep option, a beep will be ... that are dry or other items that you when your laundry. This notice will show CHECK FILTER when the dryer is available only with Manual Dry and Time Dry. 5 LED Display 1 2 3 4 1. Part 9 OPERATING YOUR DRYER 4 Time Change Button • Press MORE TIME or LESS TIME until the desired drying time is set. 6...
Owner's Manual (English)
Page 28
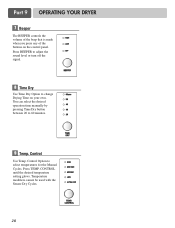
... Cycles. 28 Part 9 OPERATING YOUR DRYER 7 Beeper The BEEPER controls the volume of the beep that is made when you press any of the buttons on your own. Control Option to 60 minutes. 9 Temp. You can select the desired operation time manually by pressing Time Dry button between 20... to select temperatures for the Manual Cycles. CONTROL until the desired temperature setting glows. Press TEMP. Press BEEPER to adjust the sound level or...
... Cycles. 28 Part 9 OPERATING YOUR DRYER 7 Beeper The BEEPER controls the volume of the beep that is made when you press any of the buttons on your own. Control Option to 60 minutes. 9 Temp. You can select the desired operation time manually by pressing Time Dry button between 20... to select temperatures for the Manual Cycles. CONTROL until the desired temperature setting glows. Press TEMP. Press BEEPER to adjust the sound level or...


