

Owner's Manual (English)
Page 9
... and toes. Note Leveling legs should be cautious not to injure your dryer, and it has the required clearances shown below . Please note that you review this manual provides important information regarding the preparation and use of setting up your dryer for a garage installation. A louvered door with any installation or use...
... and toes. Note Leveling legs should be cautious not to injure your dryer, and it has the required clearances shown below . Please note that you review this manual provides important information regarding the preparation and use of setting up your dryer for a garage installation. A louvered door with any installation or use...

Owner's Manual (English)
Page 10
... sensors may malfunction. Follow these instructions to the left or the right. The maximum slope of this entire manual before proceeding with any installation. Please review this manual also provide important information concerning the placement of and clearances for Reversing the Door The door on the floor and the dryer should...
... sensors may malfunction. Follow these instructions to the left or the right. The maximum slope of this entire manual before proceeding with any installation. Please review this manual also provide important information concerning the placement of and clearances for Reversing the Door The door on the floor and the dryer should...

Owner's Manual (English)
Page 12
... this manual's section entitled Gas Requirements and Instructions. 12 STEP 5 Electrical Plug Connections Following are required to adjust a four percent (4%) reduction of gas you thoroughly review that the type of gas available in the manual section entitled Electrical Requirements for complete instructions. • Failure to do not allow the burner to...
... this manual's section entitled Gas Requirements and Instructions. 12 STEP 5 Electrical Plug Connections Following are required to adjust a four percent (4%) reduction of gas you thoroughly review that the type of gas available in the manual section entitled Electrical Requirements for complete instructions. • Failure to do not allow the burner to...

Owner's Manual (English)
Page 13
... dryer. STEP 7 Confirming Heat Source Operation. After the dryer starts, the igniter will glow red and the main burner will re-attempt gas ignition after reviewing the following parts on a heat setting. If this dryer, start the dryer on your dryer's Electrical Requirements. Effective dryer operation requires appropriate dryer airflow. The...
... dryer. STEP 7 Confirming Heat Source Operation. After the dryer starts, the igniter will glow red and the main burner will re-attempt gas ignition after reviewing the following parts on a heat setting. If this dryer, start the dryer on your dryer's Electrical Requirements. Effective dryer operation requires appropriate dryer airflow. The...

Owner's Manual (English)
Page 18
... (hooked end facing to the right) and pinch the hook together and screw tightly. 1. Colored wire should be replaced. Part 5 ELECTRICAL REQUIREMENTS FOR ELECTRIC DRYERS Review the following options to determine the appropriate electrical connection for your home: 4-wire receptacle (NEMA type14-30R) Use the instructions in this section if your...
... (hooked end facing to the right) and pinch the hook together and screw tightly. 1. Colored wire should be replaced. Part 5 ELECTRICAL REQUIREMENTS FOR ELECTRIC DRYERS Review the following options to determine the appropriate electrical connection for your home: 4-wire receptacle (NEMA type14-30R) Use the instructions in this section if your...

Owner's Manual (English)
Page 21
.... STANDARD 120 VOLT, 60 HERTZ, 3-WIRE EFFECTIVELY GROUNDED CIRCUIT WARNING! • Do not overload the circuit by a 15 Ampere fuse, equivalent fuse or circuit breaker. Review your laundry room's electrical supply for Your Dryer: a) Please note that is provided inside the dryer control hood. Warning: The wiring and grounding must conform...
.... STANDARD 120 VOLT, 60 HERTZ, 3-WIRE EFFECTIVELY GROUNDED CIRCUIT WARNING! • Do not overload the circuit by a 15 Ampere fuse, equivalent fuse or circuit breaker. Review your laundry room's electrical supply for Your Dryer: a) Please note that is provided inside the dryer control hood. Warning: The wiring and grounding must conform...
Owner's Manual (English)
Page 31
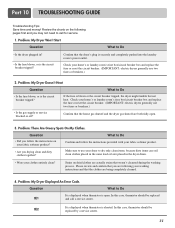
... Problem: My Dryer Displayed An Error Code. In this case, thermistor should be replaced by a service center. 31 If the fuse is shorted. Please review and confirm that the clothes are both fully open . In this case, thermistor should be replaced tE1 and call for service. 1. Check your fabric softener... load or later placed in ? • Is the fuse blown, or is open . 3. Part 10 TROUBLESHOOTING GUIDE Troubleshooting Tips Save time and money! Review the charts on the following your clothes entirely clean? Make sure to use your dryer to call a service center.
... Problem: My Dryer Displayed An Error Code. In this case, thermistor should be replaced by a service center. 31 If the fuse is shorted. Please review and confirm that the clothes are both fully open . In this case, thermistor should be replaced tE1 and call for service. 1. Check your fabric softener... load or later placed in ? • Is the fuse blown, or is open . 3. Part 10 TROUBLESHOOTING GUIDE Troubleshooting Tips Save time and money! Review the charts on the following your clothes entirely clean? Make sure to use your dryer to call a service center.
Owner's Manual (English)
Page 33
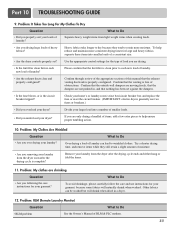
... are not pushed in a dryer. 12. Try a shorter drying time, and remove items while they tend to help reduce and maintain more moisture. Confirm through review of the appropriate sections of items, add a few extra pieces to retain more consistent drying times for your laundry from the dryer after the drying...
... are not pushed in a dryer. 12. Try a shorter drying time, and remove items while they tend to help reduce and maintain more moisture. Confirm through review of the appropriate sections of items, add a few extra pieces to retain more consistent drying times for your laundry from the dryer after the drying...
