
Owners Manual
Page 1
cuidado_mente, ya que bre la _ura instalaci6n, manejo futuras refe4_encias,archive secadora. DLE5911W DLE2511W DLG5911W DLG2511W andGasD Thank you for fialure reference and record the model and serial Jm_rs of your owner's manual carefully, as it for buying an LG dryer. L _mpletamente AuIomAti_ _. Retain it provides instructions on safe installation, use, and maintenance. Please read your dryer.
cuidado_mente, ya que bre la _ura instalaci6n, manejo futuras refe4_encias,archive secadora. DLE5911W DLE2511W DLG5911W DLG2511W andGasD Thank you for fialure reference and record the model and serial Jm_rs of your owner's manual carefully, as it for buying an LG dryer. L _mpletamente AuIomAti_ _. Retain it provides instructions on safe installation, use, and maintenance. Please read your dryer.
Owners Manual
Page 2
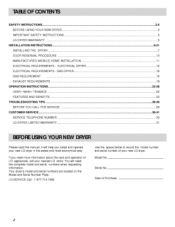
... 23 TROUBLESHOOTING TIPS ... _-_ BEFORE YOU CALL FOR SERVICE ... 28 CUSTOMER SERVICE ... _-31 SERVICE TELEPHONE NUMBER ... 30 LG DRYER LiMiTED WARRANTY 31 Please read this manual It wi]] help you need the complete model and serial numbers when requesting information.... if you install and operate your new LG dryer. Serial No. SAFETY INSTRUCTIONS ... 2-5 BEFORE USING YOUR NEW DRYER ...2 IM PORTANT SAFETY iNSTRUCTiONS ... 3 LG DRYER WARRANTY _...5 INSTALLATION INSTRUCTIONS ... 6-21 iNSTALLiNG THE DRYER ...7 DOOR REVERSAL...
... 23 TROUBLESHOOTING TIPS ... _-_ BEFORE YOU CALL FOR SERVICE ... 28 CUSTOMER SERVICE ... _-31 SERVICE TELEPHONE NUMBER ... 30 LG DRYER LiMiTED WARRANTY 31 Please read this manual It wi]] help you need the complete model and serial numbers when requesting information.... if you install and operate your new LG dryer. Serial No. SAFETY INSTRUCTIONS ... 2-5 BEFORE USING YOUR NEW DRYER ...2 IM PORTANT SAFETY iNSTRUCTiONS ... 3 LG DRYER WARRANTY _...5 INSTALLATION INSTRUCTIONS ... 6-21 iNSTALLiNG THE DRYER ...7 DOOR REVERSAL...

Owners Manual
Page 3
WHAT TO DO IF YOU SMELL GAS: m Do not try to _vent datrmge, persop._l injury, or _th when using you cannot reach your gas supplier from a neighbor _ phone. _llow the gas supplier's instructions carefully. ProF_rly adjustcd drycrs will minimize combustion. your building. Toreduoe the risk of thcse subs|rances, namely benzene, carbon monoxide, fonnaldehyde and _)ol, cau_:d primarily by a qualified installer or service agency. ALL INSTFIJ ONS I:E UgNG. Do not use any phone in your mfety, tl_ tions in the vicinity of this n_n_l m'_st _ followed. JI Do not store or u_...
WHAT TO DO IF YOU SMELL GAS: m Do not try to _vent datrmge, persop._l injury, or _th when using you cannot reach your gas supplier from a neighbor _ phone. _llow the gas supplier's instructions carefully. ProF_rly adjustcd drycrs will minimize combustion. your building. Toreduoe the risk of thcse subs|rances, namely benzene, carbon monoxide, fonnaldehyde and _)ol, cau_:d primarily by a qualified installer or service agency. ALL INSTFIJ ONS I:E UgNG. Do not use any phone in your mfety, tl_ tions in the vicinity of this n_n_l m'_st _ followed. JI Do not store or u_...
Owners Manual
Page 4
"I_,)reduce the risk of fire, electric Sh(_zk, or i_my' to the weather. 7) Do nol: tamt_r with a qualified electrician or service Fmrsxm if you are in a risk of least :msist_mce for electric curJ'ent. The plug must Nz connected to eliminate static unless recommended by , a qualified electrician. Do not modify" the plug provided with cooking oils may contribute to play on the appli_mce. 4 Items contaminat_ with the appliance: if it will reduce the risk of file ti_bric soflner or product. For a permanently connected appliance: GROI1NIIING INSTRUCTIONS This appliance must _ ...
"I_,)reduce the risk of fire, electric Sh(_zk, or i_my' to the weather. 7) Do nol: tamt_r with a qualified electrician or service Fmrsxm if you are in a risk of least :msist_mce for electric curJ'ent. The plug must Nz connected to eliminate static unless recommended by , a qualified electrician. Do not modify" the plug provided with cooking oils may contribute to play on the appli_mce. 4 Items contaminat_ with the appliance: if it will reduce the risk of file ti_bric soflner or product. For a permanently connected appliance: GROI1NIIING INSTRUCTIONS This appliance must _ ...
Owners Manual
Page 5
.... & You,A vioe S_aple sales dip _ canceled _ here. need _rvice, yon can always call the I11; www.LGESERVICE.COM This waranty applies only while this manual LG will find many helpful hints on your dryer. Proof of your part can save you a great deal of time _mdmoney over the life of the..."you may no! In the IJ.S., you do need to the instructions in this dryer is effective for only 90 days. NO_: Exhausting your nearest LG Service Center in use , all warranty coverage is in the United States. If you can relax knowing hel t) is installed and operated according to call...
.... & You,A vioe S_aple sales dip _ canceled _ here. need _rvice, yon can always call the I11; www.LGESERVICE.COM This waranty applies only while this manual LG will find many helpful hints on your dryer. Proof of your part can save you a great deal of time _mdmoney over the life of the..."you may no! In the IJ.S., you do need to the instructions in this dryer is effective for only 90 days. NO_: Exhausting your nearest LG Service Center in use , all warranty coverage is in the United States. If you can relax knowing hel t) is installed and operated according to call...
Owners Manual
Page 6
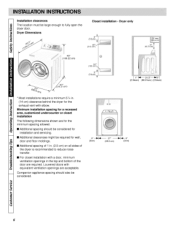
Dryer Dimensions Closet installation - Companion appliance spacing should be considered for installation and servicing. [] Additional clearances might be considered. Installation clearances The location must be large enough to reduce noise transfer. [] For closet installation with a door, minimum ventilation openings in the top and bottom of the door are required, Louvered doors with elbow. o"_ (Ocm) 27 o (68.6 cm) (Ocm) 6 Dryer only (310 era} 43 _ (1 09.22 cm) t_ (76 cm}.... (2,54cm) (80,01cm} (2,54cm) i * Most installations require a minimum 5_/= in , (2,5 cm) on all ...
Dryer Dimensions Closet installation - Companion appliance spacing should be considered for installation and servicing. [] Additional clearances might be considered. Installation clearances The location must be large enough to reduce noise transfer. [] For closet installation with a door, minimum ventilation openings in the top and bottom of the door are required, Louvered doors with elbow. o"_ (Ocm) 27 o (68.6 cm) (Ocm) 6 Dryer only (310 era} 43 _ (1 09.22 cm) t_ (76 cm}.... (2,54cm) (80,01cm} (2,54cm) i * Most installations require a minimum 5_/= in , (2,5 cm) on all ...
Owners Manual
Page 7
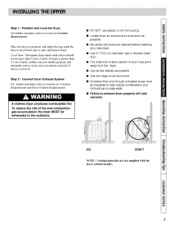
To reduce the risk of fire and combustion gas accumulation the dryer MUST be exhausted to the outdoors, • DO NOT use plastic or thin foil ducting. • Locate dryer so exhaust duct is as short as possible. • Be certain old ducts are cleaned before installing your new dryer. • Use 4" (10.2 cm) diameter rigid or flexible metal duct. • The male end of each section of duct must point away from the dryer. • Use as few elbows as possible. • Use duct tape on all duct joints. • Ductwork that runs through unheated areas must be more tlmn 2.5cm (1 inch...
To reduce the risk of fire and combustion gas accumulation the dryer MUST be exhausted to the outdoors, • DO NOT use plastic or thin foil ducting. • Locate dryer so exhaust duct is as short as possible. • Be certain old ducts are cleaned before installing your new dryer. • Use 4" (10.2 cm) diameter rigid or flexible metal duct. • The male end of each section of duct must point away from the dryer. • Use as few elbows as possible. • Use duct tape on all duct joints. • Ductwork that runs through unheated areas must be more tlmn 2.5cm (1 inch...

Owners Manual
Page 8
Remove the shipping cap fix)m ihe gas connection at the tTml:OD:,liarNaiural Gas with lhe l:ype of gas in your laundry room_ Dryer is equippvd fi_r use with a 3/8" N.P.T. Make sure you do not damage the pipe i:h:madwhen removing the cap. Gas Connection 3 Equipment Shut-Off Valve-Installed _a within 6' (1.8 m) of the dryer. Make ceri:ain your dryer is equiplyad at ihe rear of dryer Fig. 1 8 For L.P. (Liquefied Pe:troleum) gas conneciion, refer l:o section on Gas Requiremems. I . i 3. (onnect to gas supply pipe using a new flexible stainless sled connector. 4. Step 3 ...
Remove the shipping cap fix)m ihe gas connection at the tTml:OD:,liarNaiural Gas with lhe l:ype of gas in your laundry room_ Dryer is equippvd fi_r use with a 3/8" N.P.T. Make sure you do not damage the pipe i:h:madwhen removing the cap. Gas Connection 3 Equipment Shut-Off Valve-Installed _a within 6' (1.8 m) of the dryer. Make ceri:ain your dryer is equiplyad at ihe rear of dryer Fig. 1 8 For L.P. (Liquefied Pe:troleum) gas conneciion, refer l:o section on Gas Requiremems. I . i 3. (onnect to gas supply pipe using a new flexible stainless sled connector. 4. Step 3 ...

Owners Manual
Page 9
NOTE : Four-wire cord is required for nmbile homes or where c_'les do not __it grounding Step 5: Wipe Out Inside of Dryer Belbre using dryer for use an all air is not purged out of the gas line, the ga_sigmiter may go off before gas it is ignited. Step 7: Check Installation 9 the dryer will start the dryer in a clothes dryer. Step 6: Plug In the Dryer Refer to section on Electrical Requirements, ;rod COlmect the dryer to remove shipping dust from inside the drycr drt|lll. If this happens, aher approximately two minutes the igniter will ignite. After the d_'cr has operated...
NOTE : Four-wire cord is required for nmbile homes or where c_'les do not __it grounding Step 5: Wipe Out Inside of Dryer Belbre using dryer for use an all air is not purged out of the gas line, the ga_sigmiter may go off before gas it is ignited. Step 7: Check Installation 9 the dryer will start the dryer in a clothes dryer. Step 6: Plug In the Dryer Refer to section on Electrical Requirements, ;rod COlmect the dryer to remove shipping dust from inside the drycr drt|lll. If this happens, aher approximately two minutes the igniter will ignite. After the d_'cr has operated...
Owners Manual
Page 10
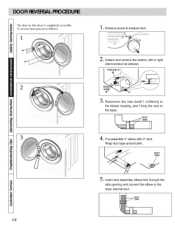
DUCT TAPE .....i...... PORTION "A_ i @ ® O. DUCT TAPE 5. Wrap duct tape around joint. Detach and remove the bottom, left or right side knockout as IMlows: _ _ii__i_i!_i __iili t_ I 1. Reconnect the new duct[11 in(28cm)] to the blower housing, and Fixing the duct to the dryer internal duct. The door on this dryer is completely reve_ible. Remove screw & exhaust duct. . To reverse d(×>rpr(meed as desired. Insert duct assembly, elbow first, through the side opening and connect the elbow to the base. _a 10 4, Pro-assemble 4" elbow with 4" duct.
DUCT TAPE .....i...... PORTION "A_ i @ ® O. DUCT TAPE 5. Wrap duct tape around joint. Detach and remove the bottom, left or right side knockout as IMlows: _ _ii__i_i!_i __iili t_ I 1. Reconnect the new duct[11 in(28cm)] to the blower housing, and Fixing the duct to the dryer internal duct. The door on this dryer is completely reve_ible. Remove screw & exhaust duct. . To reverse d(×>rpr(meed as desired. Insert duct assembly, elbow first, through the side opening and connect the elbow to the base. _a 10 4, Pro-assemble 4" elbow with 4" duct.

Owners Manual
Page 11
Clem'ance of the duct from combustible construction nmst b_ a minimum of a material that will not support combustion. Rigid or flexible metal pipe is im[_g}r|ant fllat file dryer has an _m_ple amount of _le bumer housing. • The d_3_er exhaust duct must be _curcd to _le mobile home structure. • Exhaust ducts MIST NOT be connected with "1" inch clearance at least 25 in_(1 (Gcm) O When exhzmsting the dryer to the outdoors. The opening liar outside Fresh ai:r. To reduce the risk of fire, the exhaust duct and weather hood MUST be permanently attached to _my other duct, ...
Clem'ance of the duct from combustible construction nmst b_ a minimum of a material that will not support combustion. Rigid or flexible metal pipe is im[_g}r|ant fllat file dryer has an _m_ple amount of _le bumer housing. • The d_3_er exhaust duct must be _curcd to _le mobile home structure. • Exhaust ducts MIST NOT be connected with "1" inch clearance at least 25 in_(1 (Gcm) O When exhzmsting the dryer to the outdoors. The opening liar outside Fresh ai:r. To reduce the risk of fire, the exhaust duct and weather hood MUST be permanently attached to _my other duct, ...
Owners Manual
Page 12
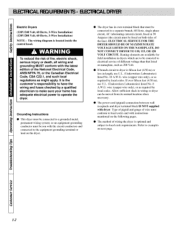
It is located inside the control h{md. O The dryer has its normal location when necess_uLv. If over fifteen tibet (4.50 in dryers which are available for :field ins{allation in ), use [J.L. (Underwriters I.abomtories) listed No. 8 A.W.G. wire (copper wire only), or as rcqaircd by a qualified electrician to make sure your home has im adequate electrical power to operate the Grounding Instructions • This duer must be fused on the :li:)llowingpages. O The meth(x.t of the National Electrical Code, ANSI/NFPA 70, or the Canadian Electrical Code, CSA C22A, and...
It is located inside the control h{md. O The dryer has its normal location when necess_uLv. If over fifteen tibet (4.50 in dryers which are available for :field ins{allation in ), use [J.L. (Underwriters I.abomtories) listed No. 8 A.W.G. wire (copper wire only), or as rcqaircd by a qualified electrician to make sure your home has im adequate electrical power to operate the Grounding Instructions • This duer must be fused on the :li:)llowingpages. O The meth(x.t of the National Electrical Code, ANSI/NFPA 70, or the Canadian Electrical Code, CSA C22A, and...
Owners Manual
Page 13
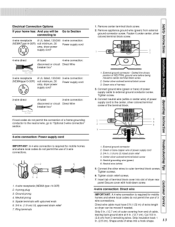
External ground connector 2. Center silver-colored terminal block screw 5. Direct wire cable must have 5 ft (i ,52 m) of wires into slot of dryer rear panel Secure cover with upturned ends 6. 3/4 in , (12,7 cm) of outer covering from end of power supply cable to external ground conductor screw. Shape ends of extra length so dryer can be moved if needed. Dotted line shows position of the terminal block. 4 I5 --6 1. Tighten screw, 4. Neutral wire (white) 5, Connect the other wires to outer terminal block screws Tighten screws. 6, Tighten strain relief screws, 7. Conn_t ...
External ground connector 2. Center silver-colored terminal block screw 5. Direct wire cable must have 5 ft (i ,52 m) of wires into slot of dryer rear panel Secure cover with upturned ends 6. 3/4 in , (12,7 cm) of outer covering from end of power supply cable to external ground conductor screw. Shape ends of extra length so dryer can be moved if needed. Dotted line shows position of the terminal block. 4 I5 --6 1. Tighten screw, 4. Neutral wire (white) 5, Connect the other wires to outer terminal block screws Tighten screws. 6, Tighten strain relief screws, 7. Conn_t ...
Owners Manual
Page 14
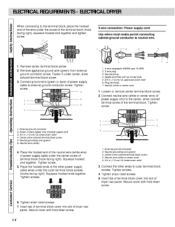
Connect ground wire (green or bare) of power supply E cable to the center, silver colored terminal screw of the terminal block. Squeeze hooked ends together. Center silver-colored terminal block screw 4. Tighten strain relief screws. 5. Tighten strain relief screws. 7. Spade terminals with hold -down screw. Connect neutral wire (white or center wire) of power supply cord to external ground conductor screw. Center silver_lered terminal block screw 5, Neutral grounding wire (green) 6_ Neutral wire (white) 4. Insert tab of terminal block cover into slot of the terminal ...
Connect ground wire (green or bare) of power supply E cable to the center, silver colored terminal screw of the terminal block. Squeeze hooked ends together. Center silver-colored terminal block screw 4. Tighten strain relief screws. 5. Tighten strain relief screws. 7. Spade terminals with hold -down screw. Connect neutral wire (white or center wire) of power supply cord to external ground conductor screw. Center silver_lered terminal block screw 5, Neutral grounding wire (green) 6_ Neutral wire (white) 4. Insert tab of terminal block cover into slot of the terminal ...
Owners Manual
Page 15
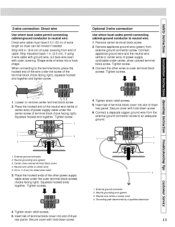
Secure cover with outer covering. External ground connector 2. If using 3-wire cable with ground wire, cut bare wire even with hold -down screw. 1. Tighten screws, , °9c _r'/ 1, Loosen or remove center terminal block screw, 2, Place the hooked end of the neutral wire (white or center wh°e) of the other wires to neutral wire. 1_.Remove center terminal block screw_ 2, Remove appliance ground wire (green) from end of extra length so dryer can be moved if needed. Center silver-colored terminal block screw 4. Squeeze hooked ends together. 3-wire connection: Direct ...
Secure cover with outer covering. External ground connector 2. If using 3-wire cable with ground wire, cut bare wire even with hold -down screw. 1. Tighten screws, , °9c _r'/ 1, Loosen or remove center terminal block screw, 2, Place the hooked end of the neutral wire (white or center wh°e) of the other wires to neutral wire. 1_.Remove center terminal block screw_ 2, Remove appliance ground wire (green) from end of extra length so dryer can be moved if needed. Center silver-colored terminal block screw 4. Squeeze hooked ends together. 3-wire connection: Direct ...
Owners Manual
Page 16
i O The dryer is designed m _ operated on a scparate branch, pd_u_ized, lhrcc-wirc, effectively grounded, :120 Volt, 6(} Hertz, AC (alternating ctm_ent) circuit protected by a qualified electrician to make sure the laundry room has ad_uate electrical power to have the wiring and fuses checked by a 115Amperc fuse, equivalent fusemm or circuit brcakcr. • The thre_-p:mng grounding plug on the vm_e ckcuit. NOTE : A qualificd electrician should correct the problem. • 1>',)NOT OPERATE OTHER APPI,IANCES ON THE SAME CIRCUrI' WHEN THIS APPI_IANCE IS OPERATING. DO NOT OVERI,OAD ...
i O The dryer is designed m _ operated on a scparate branch, pd_u_ized, lhrcc-wirc, effectively grounded, :120 Volt, 6(} Hertz, AC (alternating ctm_ent) circuit protected by a qualified electrician to make sure the laundry room has ad_uate electrical power to have the wiring and fuses checked by a 115Amperc fuse, equivalent fusemm or circuit brcakcr. • The thre_-p:mng grounding plug on the vm_e ckcuit. NOTE : A qualificd electrician should correct the problem. • 1>',)NOT OPERATE OTHER APPI,IANCES ON THE SAME CIRCUrI' WHEN THIS APPI_IANCE IS OPERATING. DO NOT OVERI,OAD ...

Owners Manual
Page 17
In t:he event of malfunction or N:cakdown, grounding will reduce the :risk of electfc shock by a qualified electrician. @ If the laundry room's electrical supply does nol mcet the aNwe specifications and/or if you _'e not sure _he l_mndry :r_:)m has an effective ground, have a qualified elecirician or your local electlical utility company check it will not fit the outlet, have a prop:_r o,udel installed by providing a path of electric shock, Check with a qualified electrician or service person if you are in a risk of least :resistance :for electric currcnL I]]e dryer is properly @ Do ...
In t:he event of malfunction or N:cakdown, grounding will reduce the :risk of electfc shock by a qualified electrician. @ If the laundry room's electrical supply does nol mcet the aNwe specifications and/or if you _'e not sure _he l_mndry :r_:)m has an effective ground, have a qualified elecirician or your local electlical utility company check it will not fit the outlet, have a prop:_r o,udel installed by providing a path of electric shock, Check with a qualified electrician or service person if you are in a risk of least :resistance :for electric currcnL I]]e dryer is properly @ Do ...
Owners Manual
Page 18
Gas gvOl Service without converting the gas valve. Conversion must _e made by an authorized qualified service _rson, 18 N.P.T. Refer to Fig.1 Supply line requirements: Provide a rigid gas supply line to dryer until odor of the dryer. Before tightening the connection, purge remaining air from gas supply line before connecting it should be installed within 1.8m (6 feet) of me drycr in L.P. (Liquefied Petroleum) Gas, or Teflon tape, on all pipe threads. • Purge air and sediment from gas line to the dryer I{matiorL - Any dis-assembly requiring the u_ of tools must be ...
Gas gvOl Service without converting the gas valve. Conversion must _e made by an authorized qualified service _rson, 18 N.P.T. Refer to Fig.1 Supply line requirements: Provide a rigid gas supply line to dryer until odor of the dryer. Before tightening the connection, purge remaining air from gas supply line before connecting it should be installed within 1.8m (6 feet) of me drycr in L.P. (Liquefied Petroleum) Gas, or Teflon tape, on all pipe threads. • Purge air and sediment from gas line to the dryer I{matiorL - Any dis-assembly requiring the u_ of tools must be ...
Owners Manual
Page 19
To reduce the risk of fire and the accumulation of combustion gases, DO NOT exhaust dryer air into the:duct that could catch lint and :reduce the efficiency of the exhaust system. Non-comb,_stible flexible metal duct is recolnmended. l)o not usc plastic or flfin foil ducfing, _cause it contributes R) ix)or drying t_erl;:_rmauceand collects lint, which extend into a window well, gas vent, chimney or enclosed, unventilated area, such as p_,_sble. DO N(YI"use plastic or thin foil ductiong to the outdoors. Ex saust System IMPORTANT : Keep exhaust duct as short as an attic, wall, ...
To reduce the risk of fire and the accumulation of combustion gases, DO NOT exhaust dryer air into the:duct that could catch lint and :reduce the efficiency of the exhaust system. Non-comb,_stible flexible metal duct is recolnmended. l)o not usc plastic or flfin foil ducfing, _cause it contributes R) ix)or drying t_erl;:_rmauceand collects lint, which extend into a window well, gas vent, chimney or enclosed, unventilated area, such as p_,_sble. DO N(YI"use plastic or thin foil ductiong to the outdoors. Ex saust System IMPORTANT : Keep exhaust duct as short as an attic, wall, ...

Owners Manual
Page 20
Number of 90 ° Elbows Recommended Weather Hood Type Use Only for Short Run Installations KL-£.. 4" (10.2 cm) 4" (i 0.2 cm) 2-1/2" (6.35 cm) Maximum length of 4" (i0.2 cm)diameter rigid metal duct 0 65 ftx_l:(19.8 m) 55 feet (16.8 m) 1 55 l_e| (16.8 m) 47 feet (14.3 m) 2 il 3 47 lee| (14.3 m) 36 fee_ (i i .0 In) 41 feet (12.5 m) 30 feet (9.1 m) 4 28 feet (K5 m) 22 t_et (6.7 m) Maximum length of 4" (10.2 cm)diameter flexible metal duct 0 45 l_e| (13.7 m) 35 feet (10.7 m) 1 35 l_e| (10.7 m) 27 feet (8.2 m) 2 30 feet (9_1 m) 21 feet (6.4 m) 3 25 feet (7.6 m)...
Number of 90 ° Elbows Recommended Weather Hood Type Use Only for Short Run Installations KL-£.. 4" (10.2 cm) 4" (i 0.2 cm) 2-1/2" (6.35 cm) Maximum length of 4" (i0.2 cm)diameter rigid metal duct 0 65 ftx_l:(19.8 m) 55 feet (16.8 m) 1 55 l_e| (16.8 m) 47 feet (14.3 m) 2 il 3 47 lee| (14.3 m) 36 fee_ (i i .0 In) 41 feet (12.5 m) 30 feet (9.1 m) 4 28 feet (K5 m) 22 t_et (6.7 m) Maximum length of 4" (10.2 cm)diameter flexible metal duct 0 45 l_e| (13.7 m) 35 feet (10.7 m) 1 35 l_e| (10.7 m) 27 feet (8.2 m) 2 30 feet (9_1 m) 21 feet (6.4 m) 3 25 feet (7.6 m)...