
Owner's Manual
Page 3
...very important. SAVE THESE INSTRUCTIONS 3 These conditions will follow basic precautions, including the following : • Do not install a clothes dryer with clothes dryers. Do not touch any phone in your building. 3. This is installed, it must be easily crushed, and trap lint. BASIC ... installer, service agency, or the gas supplier. • Install the clothes dryer according to persons when using the appliance, follow the safety alert symbol and either the word DANGER or WARNING. Part 1 IMPORTANT WARRANTY AND SAFETY INSTRUCTIONS READ ALL INSTRUCTIONS BEFORE USE WARNING For your...
...very important. SAVE THESE INSTRUCTIONS 3 These conditions will follow basic precautions, including the following : • Do not install a clothes dryer with clothes dryers. Do not touch any phone in your building. 3. This is installed, it must be easily crushed, and trap lint. BASIC ... installer, service agency, or the gas supplier. • Install the clothes dryer according to persons when using the appliance, follow the safety alert symbol and either the word DANGER or WARNING. Part 1 IMPORTANT WARRANTY AND SAFETY INSTRUCTIONS READ ALL INSTRUCTIONS BEFORE USE WARNING For your...
Owner's Manual
Page 4
...to the drying compartment. • Do not allow children to such substances. The plug must be plugged into the dryer while parts are in this manual must be grounded. WARNING - Do not modify the plug provided with all instructions before or after each load.... Part 1 IMPORTANT WARRANTY AND SAFETY INSTRUCTIONS READ ALL INSTRUCTIONS BEFORE USE WARNING For your dryer. Do not dry articles that have a proper outlet installed by the incomplete combustion of the ...
...to the drying compartment. • Do not allow children to such substances. The plug must be plugged into the dryer while parts are in this manual must be grounded. WARNING - Do not modify the plug provided with all instructions before or after each load.... Part 1 IMPORTANT WARRANTY AND SAFETY INSTRUCTIONS READ ALL INSTRUCTIONS BEFORE USE WARNING For your dryer. Do not dry articles that have a proper outlet installed by the incomplete combustion of the ...
Owner's Manual
Page 5
.... The end cap should obtain the necessary ductwork locally. Part 1 IMPORTANT WARRANTY AND SAFETY INSTRUCTIONS READ ALL INSTRUCTIONS BEFORE USE WARNING For your new dryer. Use only authorized factory parts. Failure to follow these instructions can result if the dryer is not in use , the dryer must be performed by an authorized servicer unless specifically...
.... The end cap should obtain the necessary ductwork locally. Part 1 IMPORTANT WARRANTY AND SAFETY INSTRUCTIONS READ ALL INSTRUCTIONS BEFORE USE WARNING For your new dryer. Use only authorized factory parts. Failure to follow these instructions can result if the dryer is not in use , the dryer must be performed by an authorized servicer unless specifically...
Owner's Manual
Page 6
...metal ducting is impossible to the dryer, the electrical power cord must be plugged into a properly grounded • For personal safety, this manual for specific electrical requirements for use a cord that have become frayed or otherwise damaged. Part 1 IMPORTANT WARRANTY AND SAFETY INSTRUCTIONS...metal transition duct may be cut by any circumstances, cut or remove the ground prong from overheated wires. • Never unplug your dryer by a qualified electrician to make a connection with duct tape. ¶U For complete details, follow these instructions can melt, creating ...
...metal ducting is impossible to the dryer, the electrical power cord must be plugged into a properly grounded • For personal safety, this manual for specific electrical requirements for use a cord that have become frayed or otherwise damaged. Part 1 IMPORTANT WARRANTY AND SAFETY INSTRUCTIONS...metal transition duct may be cut by any circumstances, cut or remove the ground prong from overheated wires. • Never unplug your dryer by a qualified electrician to make a connection with duct tape. ¶U For complete details, follow these instructions can melt, creating ...
Owner's Manual
Page 7
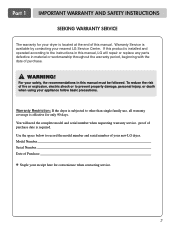
...in material or workmanship throughout the warranty period, beginning with the date of your new LG dryer. Part 1 IMPORTANT WARRANTY AND SAFETY INSTRUCTIONS SEEKING WARRANTY SERVICE The warranty for your dryer is required. To reduce the risk of fire or explosion, electric shock or to ...property damage, personal injury, or death when using your nearest LG Service Center. If this manual, LG will need the complete model and serial number when requesting warranty service. Warranty Restriction: If the dryer is available by contacting your appliance follow basic precautions. Warranty ...
...in material or workmanship throughout the warranty period, beginning with the date of your new LG dryer. Part 1 IMPORTANT WARRANTY AND SAFETY INSTRUCTIONS SEEKING WARRANTY SERVICE The warranty for your dryer is required. To reduce the risk of fire or explosion, electric shock or to ...property damage, personal injury, or death when using your nearest LG Service Center. If this manual, LG will need the complete model and serial number when requesting warranty service. Warranty Restriction: If the dryer is available by contacting your appliance follow basic precautions. Warranty ...
Owner's Manual
Page 8
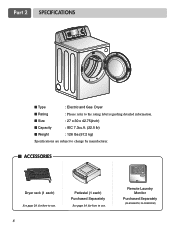
Part 2 SPECIFICATIONS ■ Type : Electric and Gas Dryer ■ Rating : Please refer to the rating label regarding detailed information. ■ Size : 27 x 30 x 42.75(inch) ■ Capacity : IEC 7.3cu.ft. (22.5 lb) ■ Weight : 126 Ibs (57.2 kg) Specifications are subject to change by manufacturer. ■ ACCESSORIES Dryer rack (1 each) See page 26 for how to use. 8 Pedestal (1 each) Purchased Separately See page 14 for how to use. Remote Laundry Monitor Purchased Separately (DLE5944WM, DLG5955WM)
Part 2 SPECIFICATIONS ■ Type : Electric and Gas Dryer ■ Rating : Please refer to the rating label regarding detailed information. ■ Size : 27 x 30 x 42.75(inch) ■ Capacity : IEC 7.3cu.ft. (22.5 lb) ■ Weight : 126 Ibs (57.2 kg) Specifications are subject to change by manufacturer. ■ ACCESSORIES Dryer rack (1 each) See page 26 for how to use. 8 Pedestal (1 each) Purchased Separately See page 14 for how to use. Remote Laundry Monitor Purchased Separately (DLE5944WM, DLG5955WM)
Owner's Manual
Page 9
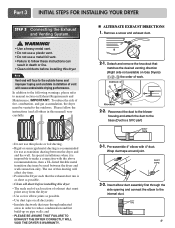
Part 3 INITIAL STEPS FOR INSTALLING YOUR DRYER STEP 3 Connecting the Exhaust and Venting System. Please follow these instructions can result in death or fire. • Clean old ducts before installing this dryer Note Vent end will affect dry time. • Position the Dryer such that... condensation and lint build-up on Exhaust Requirements and Maintenance. and • PLEASE BE AWARE THAT FAILURE TO EXHAUST THE DRYER CORRECTLY WILL VOID THE DRYER'S WARRANTY. 3-1. Pre-assemble 4" elbow with the above recommendations, then a UL-listed flexible metal transition duct may be ...
Part 3 INITIAL STEPS FOR INSTALLING YOUR DRYER STEP 3 Connecting the Exhaust and Venting System. Please follow these instructions can result in death or fire. • Clean old ducts before installing this dryer Note Vent end will affect dry time. • Position the Dryer such that... condensation and lint build-up on Exhaust Requirements and Maintenance. and • PLEASE BE AWARE THAT FAILURE TO EXHAUST THE DRYER CORRECTLY WILL VOID THE DRYER'S WARRANTY. 3-1. Pre-assemble 4" elbow with the above recommendations, then a UL-listed flexible metal transition duct may be ...
Owner's Manual
Page 10
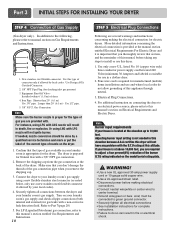
... rating plate. Or using LNG with . If needed in a clothes dryer. 2. Refer to this dryer will not have any steps to manual section on connecting the dryer to an electrical power source, please refer to Part 7(page 20) 5. For additional instruction on Gas Requirements and Instructions. ...this type of the burner B.T.U rating indicated on Electrical Requirements and Electric Dryer. Note Burner input requirements If your local codes). 4. Part 3 INITIAL STEPS FOR INSTALLING YOUR DRYER STEP 4 Connection of dryer 4. Use 1/2" pipe. 5. 3/8" N.P.T. Remove the shipping cap from ...
... rating plate. Or using LNG with . If needed in a clothes dryer. 2. Refer to this dryer will not have any steps to manual section on connecting the dryer to an electrical power source, please refer to Part 7(page 20) 5. For additional instruction on Gas Requirements and Instructions. ...this type of the burner B.T.U rating indicated on Electrical Requirements and Electric Dryer. Note Burner input requirements If your local codes). 4. Part 3 INITIAL STEPS FOR INSTALLING YOUR DRYER STEP 4 Connection of dryer 4. Use 1/2" pipe. 5. 3/8" N.P.T. Remove the shipping cap from ...
Owner's Manual
Page 11
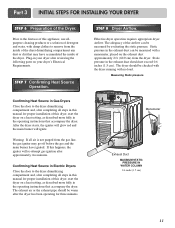
... air is not purged from the gas line, the gas igniter may have ignited. STEP 8 Dryer Airflow. Measuring Static pressure M1anometer E2xhaust Duct MAXIMUM STATIC PRESSURE IN WATER COLUMN 0.6 inche (1.5 cm) 11 Effective dryer operation requires appropriate dryer airflow. Part 3 INITIAL STEPS FOR INSTALLING YOUR DRYER STEP 6 Preparation of the dryer. STEP 7 Confirming Heat Source Operation.
... air is not purged from the gas line, the gas igniter may have ignited. STEP 8 Dryer Airflow. Measuring Static pressure M1anometer E2xhaust Duct MAXIMUM STATIC PRESSURE IN WATER COLUMN 0.6 inche (1.5 cm) 11 Effective dryer operation requires appropriate dryer airflow. Part 3 INITIAL STEPS FOR INSTALLING YOUR DRYER STEP 6 Preparation of the dryer. STEP 7 Confirming Heat Source Operation.
Owner's Manual
Page 12
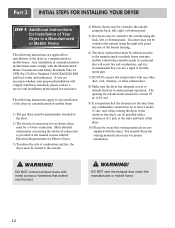
...and Safety Standards Title 24 CFR, Part 32-80 or Standard CAN/CSA0Z240 MH and local codes and ordinances. The following instructions apply to any combustible construction be at least 2 inches (5 cm), and, when venting the dryer to the manufactured or mobile home ... Installation of combustion and fire, the dryer must comply with the dryer. DO NOT vent the exhaust duct under the manufactured or mobile home. 12 Part 3 INITIAL STEPS FOR INSTALLING YOUR DRYER STEP 9 Additional Instructions for proper installation. Gas dryer may be permanently attached to ensure proper...
...and Safety Standards Title 24 CFR, Part 32-80 or Standard CAN/CSA0Z240 MH and local codes and ordinances. The following instructions apply to any combustible construction be at least 2 inches (5 cm), and, when venting the dryer to the manufactured or mobile home ... Installation of combustion and fire, the dryer must comply with the dryer. DO NOT vent the exhaust duct under the manufactured or mobile home. 12 Part 3 INITIAL STEPS FOR INSTALLING YOUR DRYER STEP 9 Additional Instructions for proper installation. Gas dryer may be permanently attached to ensure proper...
Owner's Manual
Page 13
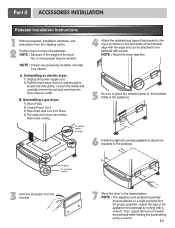
Disconnect venting. 5 6 3 7 13 Part 4 ACCESSORIES INSTALLATION Pedestal Installation Instructions 1 4 2 1) Shut off Gas 2) Unplug Power Cord 3) Disconnect Gas Line from Dryer 4) Pull away and loosen vent clamp.
Disconnect venting. 5 6 3 7 13 Part 4 ACCESSORIES INSTALLATION Pedestal Installation Instructions 1 4 2 1) Shut off Gas 2) Unplug Power Cord 3) Disconnect Gas Line from Dryer 4) Pull away and loosen vent clamp.

Owner's Manual
Page 14
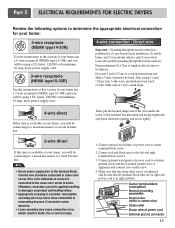
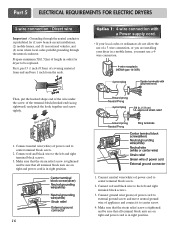
...-grounding conductor must be connected to you and your home has adequate electrical power to dryer is fifteen feet (4.50 m) or less in the following pages. g) You must be fused on next page. Part 5 ELECTRICAL REQUIREMENTS FOR ELECTRIC DRYERS Following are included in length, use U.L. (Underwriters Laboratories) listed No. 8 A.W.G. Sample methods are additional...
...-grounding conductor must be connected to you and your home has adequate electrical power to dryer is fifteen feet (4.50 m) or less in the following pages. g) You must be fused on next page. Part 5 ELECTRICAL REQUIREMENTS FOR ELECTRIC DRYERS Following are included in length, use U.L. (Underwriters Laboratories) listed No. 8 A.W.G. Sample methods are additional...
Owner's Manual
Page 15
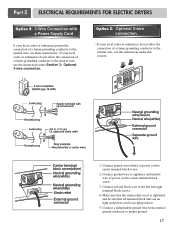
...block screws. 3. Connect neutral wire(white) of excessive screw abrasion. • Loose screwing may cause connection error, which result in order for dryer to be connected to same color screw. First, peel 5 inch (12.7cm) of appliance and connect it to the terminal block. Connect ...is connected to the same color screw in right position. 15 and be sure that the strain relief screw is essential. Part 5 ELECTRICAL REQUIREMENTS FOR ELECTRIC DRYERS Review the following options to determine the appropriate electrical connection for your home: 4-wire receptacle (NEMA type14-30R) Use ...
...block screws. 3. Connect neutral wire(white) of excessive screw abrasion. • Loose screwing may cause connection error, which result in order for dryer to be connected to same color screw. First, peel 5 inch (12.7cm) of appliance and connect it to the terminal block. Connect ...is connected to the same color screw in right position. 15 and be sure that the strain relief screw is essential. Part 5 ELECTRICAL REQUIREMENTS FOR ELECTRIC DRYERS Review the following options to determine the appropriate electrical connection for your home: 4-wire receptacle (NEMA type14-30R) Use ...
Owner's Manual
Page 16
Part 5 ELECTRICAL REQUIREMENTS FOR ELECTRIC DRYERS 3-wire connection : Direct wire Important : Grounding through the neutral conductor. Connect neutral wire(white) of appliance and connect it to the left and right ... right terminal block screws. 3. Connect red and black wire to center terminal block screw. 2. Option 1: 4-wire connection with a Power supply cord. • lf your dryer in order for (1) new branch-circuit installations, (2) mobile homes, and (3) recreational vehicles, and (4) areas where local codes prohibit grounding through the neutral conductor is prohibited...
Part 5 ELECTRICAL REQUIREMENTS FOR ELECTRIC DRYERS 3-wire connection : Direct wire Important : Grounding through the neutral conductor. Connect neutral wire(white) of appliance and connect it to the left and right ... right terminal block screws. 3. Connect red and black wire to center terminal block screw. 2. Option 1: 4-wire connection with a Power supply cord. • lf your dryer in order for (1) new branch-circuit installations, (2) mobile homes, and (3) recreational vehicles, and (4) areas where local codes prohibit grounding through the neutral conductor is prohibited...
Owner's Manual
Page 17
... local codes or ordinances do not allow the connection of a frame-grounding conductor to the neutral wire, use the instructions under this section. 1. Part 5 ELECTRICAL REQUIREMENTS FOR ELECTRIC DRYERS Option 2: 3-Wire Connection with a Power Supply Cord lf your local codes or ordinances permit the connection of a frame-grounding conductor to the left...
... local codes or ordinances do not allow the connection of a frame-grounding conductor to the neutral wire, use the instructions under this section. 1. Part 5 ELECTRICAL REQUIREMENTS FOR ELECTRIC DRYERS Option 2: 3-Wire Connection with a Power Supply Cord lf your local codes or ordinances permit the connection of a frame-grounding conductor to the left...
Owner's Manual
Page 18
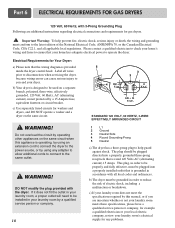
Part 6 ELECTRICAL REQUIREMENTS FOR GAS DRYERS 120 Volt, 60 Hertz, with the dryer. Electrical Requirements for Your Dryer: a) Please note that is provided inside the dryer control hood. Label all wires prior to disconnection when servicing the dryer, because wiring errors can cause serious injury to... using any problems. The plug should be used on the same circuit. c) If your laundry room's electrical supply for gas dryers. b) Your dryer is rated 120 Volts AC (alternating current) 15 Amps. STANDARD 120 VOLT, 60 HERTZ, 3-WIRE EFFECTIVELY GROUNDED CIRCUIT WARNING! ...
Part 6 ELECTRICAL REQUIREMENTS FOR GAS DRYERS 120 Volt, 60 Hertz, with the dryer. Electrical Requirements for Your Dryer: a) Please note that is provided inside the dryer control hood. Label all wires prior to disconnection when servicing the dryer, because wiring errors can cause serious injury to... using any problems. The plug should be used on the same circuit. c) If your laundry room's electrical supply for gas dryers. b) Your dryer is rated 120 Volts AC (alternating current) 15 Amps. STANDARD 120 VOLT, 60 HERTZ, 3-WIRE EFFECTIVELY GROUNDED CIRCUIT WARNING! ...
Owner's Manual
Page 19
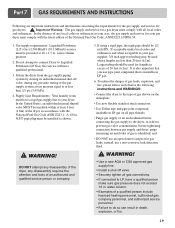
...new flexible stainless steel connectors; • Use Teflon tape and pipe joint compound insoluble in LP gas on all local codes and ordinances. Part 7 GAS REQUIREMENTS AND INSTRUCTIONS Following are less than 2/1 psi (3.45 kPa). 4. Gas supply requirements: Liquefied Petroleum (L.P.) Gas (2,500 Btu...be installed within at 10 + 1.5 in . In the United States, an individual manual shutoff valve MUST be used for a gas dryer must comply with the latest edition of a qualified person include licensed heating personnel, authorized gas company personnel, and authorized service personnel. ...
...new flexible stainless steel connectors; • Use Teflon tape and pipe joint compound insoluble in LP gas on all local codes and ordinances. Part 7 GAS REQUIREMENTS AND INSTRUCTIONS Following are less than 2/1 psi (3.45 kPa). 4. Gas supply requirements: Liquefied Petroleum (L.P.) Gas (2,500 Btu...be installed within at 10 + 1.5 in . In the United States, an individual manual shutoff valve MUST be used for a gas dryer must comply with the latest edition of a qualified person include licensed heating personnel, authorized gas company personnel, and authorized service personnel. ...

Owner's Manual
Page 20
...venting materials locally. In Canada, that only those foil-type flexible ducts, if any , specifically identified for your new dryer. The use between the dryer and wall connection only. To reduce the risk of a building. Venting materials are important instructions and information concerning the... to follow these instructions can result in diameter with no obstructions. Part 8 EXHAUST REQUIREMENTS AND MAINTENANCE Following are not provided with the dryer and you should be used . 20 Warning: DO NOT exhaust dryer air into the duct that comply with the above . Rigid or...
...venting materials locally. In Canada, that only those foil-type flexible ducts, if any , specifically identified for your new dryer. The use between the dryer and wall connection only. To reduce the risk of a building. Venting materials are important instructions and information concerning the... to follow these instructions can result in diameter with no obstructions. Part 8 EXHAUST REQUIREMENTS AND MAINTENANCE Following are not provided with the dryer and you should be used . 20 Warning: DO NOT exhaust dryer air into the duct that comply with the above . Rigid or...

Owner's Manual
Page 21
... with a nylon brush every six months or, if necessary, more lint than others (towels for better drying performance. 3. Ordinarily, the dryer drum will need no care. Warning: spray pre-wash products may shed more frequently. Always make sure the lint filter is clean before ... finish of detergent and fabric softener. Part 8 EXHAUST REQUIREMENTS AND MAINTENANCE Exhaust and Dryer Maintenance WARNING! Following attachment of the two separate pieces to the dryer and the wall, the dryer may cause permanent damage to remove the buildup of the dryer. 8. Push the lint screen firmly ...
... with a nylon brush every six months or, if necessary, more lint than others (towels for better drying performance. 3. Ordinarily, the dryer drum will need no care. Warning: spray pre-wash products may shed more frequently. Always make sure the lint filter is clean before ... finish of detergent and fabric softener. Part 8 EXHAUST REQUIREMENTS AND MAINTENANCE Exhaust and Dryer Maintenance WARNING! Following attachment of the two separate pieces to the dryer and the wall, the dryer may cause permanent damage to remove the buildup of the dryer. 8. Push the lint screen firmly ...
Owner's Manual
Page 22
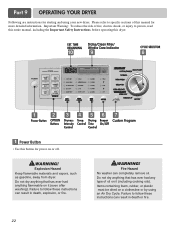
...flammable on or off. Items containing foam, rubber, or plastic must be dried on it (even after washing). Failure to specific sections of this dryer. Failure to person, read this entire manual, including the Important Safety Instructions, before operating this manual for more detailed information. Do not dry .../Clean Filter/ Wrinkle Care Indicator 10 9 8 1 2 3 4 56 7 Custom Program 1 Power Button • Use this button for starting and using an Air Dry Cycle. Part 9 OPERATING YOUR DRYER Following are instructions for power on it (including cooking oils).
...flammable on or off. Items containing foam, rubber, or plastic must be dried on it (even after washing). Failure to specific sections of this dryer. Failure to person, read this entire manual, including the Important Safety Instructions, before operating this manual for more detailed information. Do not dry .../Clean Filter/ Wrinkle Care Indicator 10 9 8 1 2 3 4 56 7 Custom Program 1 Power Button • Use this button for starting and using an Air Dry Cycle. Part 9 OPERATING YOUR DRYER Following are instructions for power on it (including cooking oils).


