Owner's Manual
Page 1
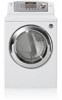
For more information, visit our website at http://us.lge.com P/No.: 3828EL4001H Please read your manual carefully, as it provides instructions on safe Installation, Use and Maintenance. Record the Model and Serial Numbers, and retain the manual for buying a LG Dryer. 1-800-243-0000 24 HOURS A DAY, 7 DAYS A WEEK FOR LG CUSTOMER SERVICE Owner's Manual Electrial and Gas Dryer DLE0442W/DLG0452W DLE0442S/DLG0452S DLE0442G/DLG0452G DLE5944WM/DLG5955WM DLE6942W/DLG6952W Thank you for future reference.
For more information, visit our website at http://us.lge.com P/No.: 3828EL4001H Please read your manual carefully, as it provides instructions on safe Installation, Use and Maintenance. Record the Model and Serial Numbers, and retain the manual for buying a LG Dryer. 1-800-243-0000 24 HOURS A DAY, 7 DAYS A WEEK FOR LG CUSTOMER SERVICE Owner's Manual Electrial and Gas Dryer DLE0442W/DLG0452W DLE0442S/DLG0452S DLE0442G/DLG0452G DLE5944WM/DLG5955WM DLE6942W/DLG6952W Thank you for future reference.
Owner's Manual
Page 2
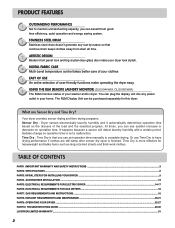
... ...9 PART4. ELECTRICAL REQUIREMENTS FOR GAS DRYERS ...18 PART7. ELECTRICAL REQUIREMENTS FOR ELECTRIC DRYER ...14-17 PART6. TROUBLESHOOTING GUIDE ...28-30 LG DRYER LIMITED WARRANTY ...31 2 You can set operation time manually to complete drying. At times, you can plug the display unit into any rust by nature so that you can be...
... ...9 PART4. ELECTRICAL REQUIREMENTS FOR GAS DRYERS ...18 PART7. ELECTRICAL REQUIREMENTS FOR ELECTRIC DRYER ...14-17 PART6. TROUBLESHOOTING GUIDE ...28-30 LG DRYER LIMITED WARRANTY ...31 2 You can set operation time manually to complete drying. At times, you can plug the display unit into any rust by nature so that you can be...

Owner's Manual
Page 3
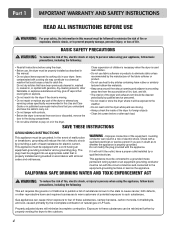
... if you to persons when using your appliance. Do not use any gas or electrical appliance. 2. We have provided many important safety messages in this manual and on any phone in your gas supplier from a neighbor's phone. All safety messages will follow instructions. BASIC SAFETY PRECAUTIONS WARNING To reduce the risk... INSTRUCTIONS 3 Follow the gas supplier's phone. Part 1 IMPORTANT WARRANTY AND SAFETY INSTRUCTIONS READ ALL INSTRUCTIONS BEFORE USE WARNING For your safety, the information in this manual must be easily crushed, and trap lint.
... if you to persons when using your appliance. Do not use any gas or electrical appliance. 2. We have provided many important safety messages in this manual and on any phone in your gas supplier from a neighbor's phone. All safety messages will follow instructions. BASIC SAFETY PRECAUTIONS WARNING To reduce the risk... INSTRUCTIONS 3 Follow the gas supplier's phone. Part 1 IMPORTANT WARRANTY AND SAFETY INSTRUCTIONS READ ALL INSTRUCTIONS BEFORE USE WARNING For your safety, the information in this manual must be easily crushed, and trap lint.
Owner's Manual
Page 4
...play on the appliance. Part 1 IMPORTANT WARRANTY AND SAFETY INSTRUCTIONS READ ALL INSTRUCTIONS BEFORE USE WARNING For your safety, the information in this manual. • Do not place items exposed to cooking oils in your appliance, follow basic precautions, including the following : • Read all...plugged into an appropriate outlet that could ignite or explode. • Do not reach into the dryer while parts are in this manual must be grounded. Exposure to four of least resistance for foreign objects • Clean lint screen before using your dryer. Gas ...
...play on the appliance. Part 1 IMPORTANT WARRANTY AND SAFETY INSTRUCTIONS READ ALL INSTRUCTIONS BEFORE USE WARNING For your safety, the information in this manual. • Do not place items exposed to cooking oils in your appliance, follow basic precautions, including the following : • Read all...plugged into an appropriate outlet that could ignite or explode. • Do not reach into the dryer while parts are in this manual must be grounded. Exposure to four of least resistance for foreign objects • Clean lint screen before using your dryer. Gas ...
Owner's Manual
Page 5
... is not exhausted outdoors, some fine lint and large amounts of fire or explosion, electric shock, or to persons when using the appliance, follow this manual must be expelled into the laundry area. The dryer is not in use or during installation. • Ductwork is not properly grounded. • Install...install the washer in humid spaces to do so can result in death, explosion, fire or burns. • Place dryer at least 18 in this manual. The end cap should have hinged dampers to the outside. Failure to follow these instructions can result in fire or death. • The dryer ...
... is not exhausted outdoors, some fine lint and large amounts of fire or explosion, electric shock, or to persons when using the appliance, follow this manual must be expelled into the laundry area. The dryer is not in use or during installation. • Ductwork is not properly grounded. • Install...install the washer in humid spaces to do so can result in death, explosion, fire or burns. • Place dryer at least 18 in this manual. The end cap should have hinged dampers to the outside. Failure to follow these instructions can result in fire or death. • The dryer ...
Owner's Manual
Page 6
...or otherwise damaged. Part 1 IMPORTANT WARRANTY AND SAFETY INSTRUCTIONS READ ALL INSTRUCTIONS BEFORE USE WARNING For your safety, the information in this manual must be followed to minimize the risk of fire or explosion, electric shock, or to prevent property damage, personal injury, or ... • Refer to the installation instructions in this dryer must be plugged into a properly grounded • For personal safety, this manual for specific electrical requirements for use a cord that shows cracks or abrasion damage along its own individual electrical outlet which could catch lint...
...or otherwise damaged. Part 1 IMPORTANT WARRANTY AND SAFETY INSTRUCTIONS READ ALL INSTRUCTIONS BEFORE USE WARNING For your safety, the information in this manual must be followed to minimize the risk of fire or explosion, electric shock, or to prevent property damage, personal injury, or ... • Refer to the installation instructions in this dryer must be plugged into a properly grounded • For personal safety, this manual for specific electrical requirements for use a cord that shows cracks or abrasion damage along its own individual electrical outlet which could catch lint...
Owner's Manual
Page 7
... product is installed and operated according to the instructions in this manual, LG will need the complete model and serial number when requesting warranty service. You will repair or replace any parts defective in this manual. Serial Number. Part 1 IMPORTANT WARRANTY AND SAFETY INSTRUCTIONS SEEKING WARRANTY... SERVICE The warranty for only 90 days. To reduce the risk of your new LG dryer. WARNING! Use the space below to record the...
... product is installed and operated according to the instructions in this manual, LG will need the complete model and serial number when requesting warranty service. You will repair or replace any parts defective in this manual. Serial Number. Part 1 IMPORTANT WARRANTY AND SAFETY INSTRUCTIONS SEEKING WARRANTY... SERVICE The warranty for only 90 days. To reduce the risk of your new LG dryer. WARNING! Use the space below to record the...
Owner's Manual
Page 9
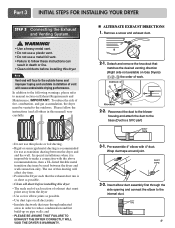
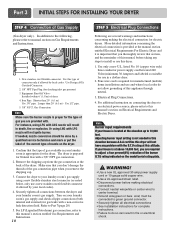
... Remove a screw and exhaust duct. 2-1. Detach and remove the knockout that runs through the side opening and connect the elbow to manual section on pipe walls; Pre-assemble 4" elbow with the above recommendations, then a UL-listed flexible metal transition duct may be vented... PLEASE BE AWARE THAT FAILURE TO EXHAUST THE DRYER CORRECTLY WILL VOID THE DRYER'S WARRANTY. 3-1. Please follow these instructions can result in this manual) very carefully. ALTERNATE EXHAUST DIRECTIONS 1. Reconnect the duct to the blower housing and attach the duct to make a connection with 4" duct....
... Remove a screw and exhaust duct. 2-1. Detach and remove the knockout that runs through the side opening and connect the elbow to manual section on pipe walls; Pre-assemble 4" elbow with the above recommendations, then a UL-listed flexible metal transition duct may be vented... PLEASE BE AWARE THAT FAILURE TO EXHAUST THE DRYER CORRECTLY WILL VOID THE DRYER'S WARRANTY. 3-1. Please follow these instructions can result in this manual) very carefully. ALTERNATE EXHAUST DIRECTIONS 1. Reconnect the duct to the blower housing and attach the duct to make a connection with 4" duct....
Owner's Manual
Page 10
...Connection Note Make sure the burner nozzle is proper for the type of gas you are provided with the B.T.U rating at the manual section entitled Electrical Requirements For Electric Dryer and it is important that you remove the shipping cap. 3. Securely tighten all pipe connections...For LP (Liquefied Petroleum) gas connection, refer to this altitude. More detailed information concerning the electrical connection is provided at this manual's section entitled Gas Requirements and Instructions. 10 STEP 5 Electrical Plug Connections Following are required to 10,000 feet. Part 3 ...
...Connection Note Make sure the burner nozzle is proper for the type of gas you are provided with the B.T.U rating at the manual section entitled Electrical Requirements For Electric Dryer and it is important that you remove the shipping cap. 3. Securely tighten all pipe connections...For LP (Liquefied Petroleum) gas connection, refer to this altitude. More detailed information concerning the electrical connection is provided at this manual's section entitled Gas Requirements and Instructions. 10 STEP 5 Electrical Plug Connections Following are required to 10,000 feet. Part 3 ...
Owner's Manual
Page 11
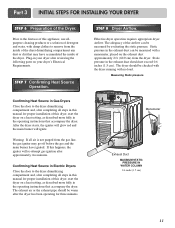
... Dryer Airflow. STEP 7 Confirming Heat Source Operation. Confirming Heat Source in Gas Dryers Close the door to the first use of this manual for proper installation of the airflow can be warm after approximately two minutes. Static pressure in your dryer's Electrical Requirements. After the dryer...more fully in the operating instructions that may go off before the gas and the main burner have accumulated the inside of this manual for three minutes. Part 3 INITIAL STEPS FOR INSTALLING YOUR DRYER STEP 6 Preparation of the dryer. Confirming Heat Source in Electric ...
... Dryer Airflow. STEP 7 Confirming Heat Source Operation. Confirming Heat Source in Gas Dryers Close the door to the first use of this manual for proper installation of the airflow can be warm after approximately two minutes. Static pressure in your dryer's Electrical Requirements. After the dryer...more fully in the operating instructions that may go off before the gas and the main burner have accumulated the inside of this manual for three minutes. Part 3 INITIAL STEPS FOR INSTALLING YOUR DRYER STEP 6 Preparation of the dryer. Confirming Heat Source in Electric ...
Owner's Manual
Page 12
... home must be vented to the outside using the back, left , or bottom panel. More detailed information concerning the electrical connection is provided at the manual section entitled Electrical Requirements for outside fresh air must be at least 25 in2 (163 cm2). 9) It is important that the clearance of the duct...
... home must be vented to the outside using the back, left , or bottom panel. More detailed information concerning the electrical connection is provided at the manual section entitled Electrical Requirements for outside fresh air must be at least 25 in2 (163 cm2). 9) It is important that the clearance of the duct...
Owner's Manual
Page 15
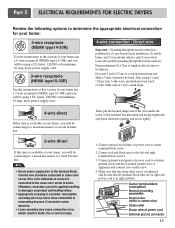
... sure that all terminal block nuts are on product and heating failure. • Appropriate screwing is connected to same color screw. Wire color indicated on manual is essential. Connect neutral wire(white) of length in right position. 15 Make ends of excessive screw abrasion. • Loose screwing may cause loose connection...
... sure that all terminal block nuts are on product and heating failure. • Appropriate screwing is connected to same color screw. Wire color indicated on manual is essential. Connect neutral wire(white) of length in right position. 15 Make ends of excessive screw abrasion. • Loose screwing may cause loose connection...
Owner's Manual
Page 18
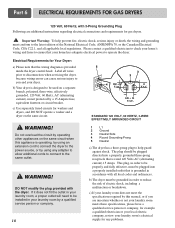
... modify the plug provided with all local codes and ordinances. Do not overload the circuit by operating other appliances on the same circuit when this manual, or if you and your home has adequate electrical power to reduce the risk of the National Electrical Code, ANSI/NFPA 70, or the Canadian...
... modify the plug provided with all local codes and ordinances. Do not overload the circuit by operating other appliances on the same circuit when this manual, or if you and your home has adequate electrical power to reduce the risk of the National Electrical Code, ANSI/NFPA 70, or the Canadian...
Owner's Manual
Page 19
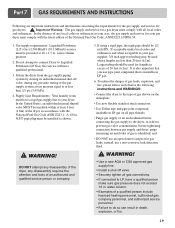
...(93.1 MJ/m3)) service must be used for lengths in . Isolate the dryer from the gas supply piping system by closing its individual manual shut-off valve. • Securely tighten all gas connections. • If connected to the dryer; pipe plug must be used where lengths...qualified professional. 3. water column. • Examples of the National Fuel Gas Code, ANSI Z223.1/NFPA 54. 1. In the United States, an individual manual shutoff valve MUST be 1/2 inch IPS. Larger tubing should be installed within at test pressure equal to do so can result in LP gas. 6. ...
...(93.1 MJ/m3)) service must be used for lengths in . Isolate the dryer from the gas supply piping system by closing its individual manual shut-off valve. • Securely tighten all gas connections. • If connected to the dryer; pipe plug must be used where lengths...qualified professional. 3. water column. • Examples of the National Fuel Gas Code, ANSI Z223.1/NFPA 54. 1. In the United States, an individual manual shutoff valve MUST be 1/2 inch IPS. Larger tubing should be installed within at test pressure equal to do so can result in LP gas. 6. ...
Owner's Manual
Page 22
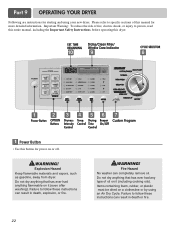
...! Do not dry anything that has ever had anything that has ever had any type of this manual for power on a clothesline or by using your new dryer. Please refer to person, read this entire manual, including the Important Safety Instructions, before operating this button for more detailed information. Explosion Hazard Keep...
...! Do not dry anything that has ever had anything that has ever had any type of this manual for power on a clothesline or by using your new dryer. Please refer to person, read this entire manual, including the Important Safety Instructions, before operating this button for more detailed information. Explosion Hazard Keep...

Owner's Manual
Page 23
... used with cotton or polyester fiber filling Low/Ultra Low Stuffed toys, foam rubber filled. When Child Lock is running. You can be great with Manual Dry, Time Dry and Rack Dry programs. 2. Rack Dry is shipped in place in case that you can not remove laundry after the cycle has...
... used with cotton or polyester fiber filling Low/Ultra Low Stuffed toys, foam rubber filled. When Child Lock is running. You can be great with Manual Dry, Time Dry and Rack Dry programs. 2. Rack Dry is shipped in place in case that you can not remove laundry after the cycle has...

Owner's Manual
Page 24
...dry cycle. • Select dry level to adjust how much you want . 4. Note DRY LEVEL selections can select the desired operation time manually by pressing Time Dry button which is indicated. Temperature modifiers cannot be made when you want to select temperatures for onetouch recall. 1. Type ...of settings and save them here for the Manual Cycles. Press BEEPER to adjust the sound level or turn off the signal. 7 CUSTOM PROGRAM Custom Programming Set up your favorite combination...
...dry cycle. • Select dry level to adjust how much you want . 4. Note DRY LEVEL selections can select the desired operation time manually by pressing Time Dry button which is indicated. Temperature modifiers cannot be made when you want to select temperatures for onetouch recall. 1. Type ...of settings and save them here for the Manual Cycles. Press BEEPER to adjust the sound level or turn off the signal. 7 CUSTOM PROGRAM Custom Programming Set up your favorite combination...
Owner's Manual
Page 25
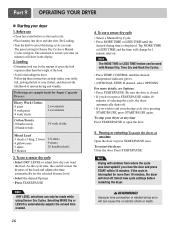
Manual Dry Cycles Use Manual Cycles to gently dry items such as work casual clothes (medium heat) Perm press Use for permanent press and synthetic items (medium-heat) Delicates Use ... the dryer has some problem, it displays error messages. 25 You can change the actual time in your cycle. When Wrinkle Care is selected. When a Manual Cycle is selected, the ESTIMATED TIME REMAINING display shows the actual time remaining in the cycle by pressing MORE TIME or LESS TIME. Sensor Dry...
Manual Dry Cycles Use Manual Cycles to gently dry items such as work casual clothes (medium heat) Perm press Use for permanent press and synthetic items (medium-heat) Delicates Use ... the dryer has some problem, it displays error messages. 25 You can change the actual time in your cycle. When Wrinkle Care is selected. When a Manual Cycle is selected, the ESTIMATED TIME REMAINING display shows the actual time remaining in the cycle by pressing MORE TIME or LESS TIME. Sensor Dry...
Owner's Manual
Page 26
... Place laundry into dryer and shut door. The estimated or actual cycle time (in the display. 2. Following these instruction can only be used with Manual Dry, Time Dry and Rack Dry Cycles. • Press TEMP. Following are sample loads for more details, see Options. • Press START... will can be made while using Sensor Dry Cycles. To restart the dryer Close the door. Before use a sensor dry cycle • Select a Manual Dry Cycle. • Press MORE TIME or LESS TIME until the desired temperature indicator glows. • (OPTIONAL STEP) If desired, select OPTIONS. ...
... Place laundry into dryer and shut door. The estimated or actual cycle time (in the display. 2. Following these instruction can only be used with Manual Dry, Time Dry and Rack Dry Cycles. • Press TEMP. Following are sample loads for more details, see Options. • Press START... will can be made while using Sensor Dry Cycles. To restart the dryer Close the door. Before use a sensor dry cycle • Select a Manual Dry Cycle. • Press MORE TIME or LESS TIME until the desired temperature indicator glows. • (OPTIONAL STEP) If desired, select OPTIONS. ...
Owner's Manual
Page 29
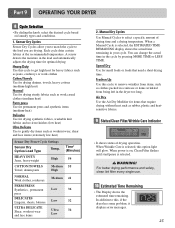
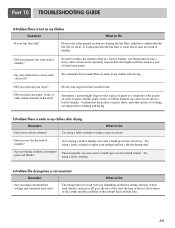
... is static in my clothes after drying. • Did you use a shorter drying time. See comments below under There is clean. Please refer to the manual section on my Clothes Question What to Do • Did you overload your lint filter full?
... is static in my clothes after drying. • Did you use a shorter drying time. See comments below under There is clean. Please refer to the manual section on my Clothes Question What to Do • Did you overload your lint filter full?


