
Owner's Manual
Page 7
... electrical connection for manufactured (mobile) home installations and use this manual's section on a heat setting, as all -purpose cleaning products or a solution of detergent and water, with a damp cloth to remove from the inside of the dryer drum/drying compartment any steps to install or use and where local codes do...
... electrical connection for manufactured (mobile) home installations and use this manual's section on a heat setting, as all -purpose cleaning products or a solution of detergent and water, with a damp cloth to remove from the inside of the dryer drum/drying compartment any steps to install or use and where local codes do...
Owner's Manual
Page 9
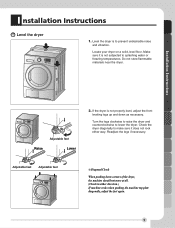
... store flammable materials near the dryer. Installation Instructions Adjustable feet Raise Lower 2. Check the dryer diagonally to make sure it is not subjected to splashing water or freezing temperatures. If the dryer is to lower the dryer.
... store flammable materials near the dryer. Installation Instructions Adjustable feet Raise Lower 2. Check the dryer diagonally to make sure it is not subjected to splashing water or freezing temperatures. If the dryer is to lower the dryer.

Owner's Manual
Page 13
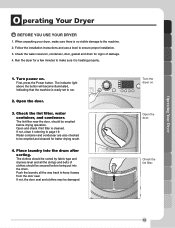
A ppearance And Design Water Container F Control Panel Door Condenser Cover Air Ventilation Grill Control Panel Program Selector LED Display • Time Display • Indicator Lamps Appearance And Design Power ON/OFF Button START/PAUSE Additional Function Buttons • MORE TIME • TIME DELAY • LESS TIME • CUSTOM PGM • OPTION • WRINKLE CARE • BEEPER • DRUM LIGHT 13
A ppearance And Design Water Container F Control Panel Door Condenser Cover Air Ventilation Grill Control Panel Program Selector LED Display • Time Display • Indicator Lamps Appearance And Design Power ON/OFF Button START/PAUSE Additional Function Buttons • MORE TIME • TIME DELAY • LESS TIME • CUSTOM PGM • OPTION • WRINKLE CARE • BEEPER • DRUM LIGHT 13
Owner's Manual
Page 15
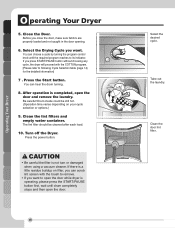
..., condenser, door, gasket and drum for a few minutes to make sure there is cleaned. Check the lint filter, water container, and condenser. Open and check if lint filter is no visible damage to run. 2. The clothes should be sorted by fabric type and dryness ... door, should be emptied before being put into the drum after sorting. Check the lint filter. 15 Place laundry into the drum. Turn power on . Water container and condenser are also checked to keep it is ready set to the machine. 2. F Turn the dryer on . Follow the installation instructions and use...
..., condenser, door, gasket and drum for a few minutes to make sure there is cleaned. Check the lint filter, water container, and condenser. Open and check if lint filter is no visible damage to run. 2. The clothes should be sorted by fabric type and dryness ... door, should be emptied before being put into the drum after sorting. Check the lint filter. 15 Place laundry into the drum. Turn power on . Water container and condenser are also checked to keep it is ready set to the machine. 2. F Turn the dryer on . Follow the installation instructions and use...
Owner's Manual
Page 16
Operating Your Dryer O perating Your Dryer 5. Press the Start button. Clean the lint filters and empty water container. If there is a little residue buildup on your cycle selection or options.) 9. If you want . The lint filter should be still hot. (Operation time ...
Operating Your Dryer O perating Your Dryer 5. Press the Start button. Clean the lint filters and empty water container. If there is a little residue buildup on your cycle selection or options.) 9. If you want . The lint filter should be still hot. (Operation time ...
Owner's Manual
Page 19
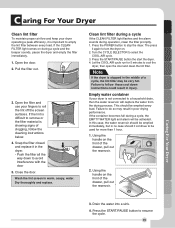
...down to avoid Interference with the door 5. Failure to follow the cleaning instructions below. 4. Wash the lint screen in the dryer. - Drain the water into a sink. 4. Press the POWER button to select the COOL AIR cycle. 3. Failure to do so may be activated. Pull the filter... a household drain, then the water reservoir will be very hot. This should it in warm, soapy, water. If the container becomes full during a cycle, the EMPTY WATER light and alarm will capture the water from the drying process. In this case, the water reservoir should be emptied immediately, ...
...down to avoid Interference with the door 5. Failure to follow the cleaning instructions below. 4. Wash the lint screen in the dryer. - Drain the water into a sink. 4. Press the POWER button to select the COOL AIR cycle. 3. Failure to do so may be activated. Pull the filter... a household drain, then the water reservoir will be very hot. This should it in warm, soapy, water. If the container becomes full during a cycle, the EMPTY WATER light and alarm will capture the water from the drying process. In this case, the water reservoir should be emptied immediately, ...
Owner's Manual
Page 20
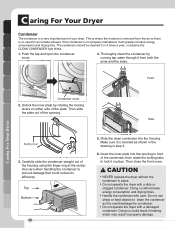
... straight out of the plate. Make sure it in property damage. Front Caring For Your Dryer Condenser cover 2. Unlock the inner plate by running tap water through it will increase energy consumption and drying times. • Handle the condenser with a dirty or clogged condenser. Insert the inner plate into the housing...
... straight out of the plate. Make sure it in property damage. Front Caring For Your Dryer Condenser cover 2. Unlock the inner plate by running tap water through it will increase energy consumption and drying times. • Handle the condenser with a dirty or clogged condenser. Insert the inner plate into the housing...
Owner's Manual
Page 21
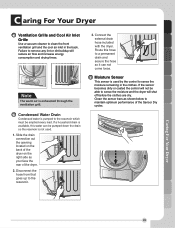
... side as shown below to maintain optimum performance of the dryer. 2. Connect the external drain hose included with the dryer. Route this water can not come loose. Condensed Water Drain Condensed water is pumped to the reservoir which must be pumped down the drain so the reservoir is used . 1. Clean the sensor bars...
... side as shown below to maintain optimum performance of the dryer. 2. Connect the external drain hose included with the dryer. Route this water can not come loose. Condensed Water Drain Condensed water is pumped to the reservoir which must be pumped down the drain so the reservoir is used . 1. Clean the sensor bars...


