
Owners Manual
Page 1
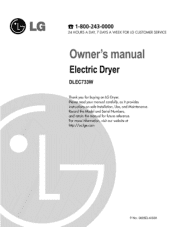
1-800-243-0000 24 HOURS A DAY, 7 DAYS A WEEK FOR LG CUSTOMER SERVICE I E ectricD r Thank you for Buying an LG Dryer. manual carefully, as it provides safe Installatian, Use, and Maintenance_ and Serial NumBers, _r future reference. visit our website at P/No. :3828 EL4003H
1-800-243-0000 24 HOURS A DAY, 7 DAYS A WEEK FOR LG CUSTOMER SERVICE I E ectricD r Thank you for Buying an LG Dryer. manual carefully, as it provides safe Installatian, Use, and Maintenance_ and Serial NumBers, _r future reference. visit our website at P/No. :3828 EL4003H
Owners Manual
Page 2
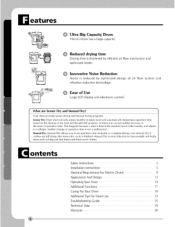
Innovative Noise Reduction Noise is shortened by ' optimized design of air flow system and vibration reduction technology. Ease of the k)ad and the s_lected program. Reduced drying time Drying time is reduced by effk:ient air flow mechanism and optimized heater. Your dryer i:)rovidc_ sensor drying and manuai drying programs, Sen_r Dry Dryer electronically senses laundry moisture level and automatically determines operation time based on the dryness of U_ La_4e LED display and electronic control. Ultra Big Capacity Drum The toG Dryer has a large capacity. At times you can sc
Innovative Noise Reduction Noise is shortened by ' optimized design of air flow system and vibration reduction technology. Ease of the k)ad and the s_lected program. Reduced drying time Drying time is reduced by effk:ient air flow mechanism and optimized heater. Your dryer i:)rovidc_ sensor drying and manuai drying programs, Sen_r Dry Dryer electronically senses laundry moisture level and automatically determines operation time based on the dryness of U_ La_4e LED display and electronic control. Ultra Big Capacity Drum The toG Dryer has a large capacity. At times you can sc
Owners Manual
Page 4
...; A qualified service person or company must perform installaion and service of this appliance. • Keep flammable materials and vapors, such as £asoline, away from dryer. • Failure to follow all :instruct:ions and :information. • Do :not store or use any gasoline, dry-cleaning solvents, or any kind of oil...
...; A qualified service person or company must perform installaion and service of this appliance. • Keep flammable materials and vapors, such as £asoline, away from dryer. • Failure to follow all :instruct:ions and :information. • Do :not store or use any gasoline, dry-cleaning solvents, or any kind of oil...

Owners Manual
Page 5
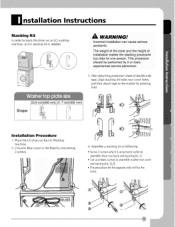
Please note that you through the initial steps of this manual. After placing the dryer in other parts of setting up your dryer for use . All four legs are provided :in the desired location, make sure that it is important that every section of this manual provides ...important int:o_ation regarding the preparation and use of your dryer, and it has the required clearances shown. 23_6° (600 cm) Leveling legs shouldbe s_ured. Place the dryer at least eighteen inches above the l]oor I_.}ar garage inst.allat:ion. If dryeris not...
Please note that you through the initial steps of this manual. After placing the dryer in other parts of setting up your dryer for use . All four legs are provided :in the desired location, make sure that it is important that every section of this manual provides ...important int:o_ation regarding the preparation and use of your dryer, and it has the required clearances shown. 23_6° (600 cm) Leveling legs shouldbe s_ured. Place the dryer at least eighteen inches above the l]oor I_.}ar garage inst.allat:ion. If dryeris not...
Owners Manual
Page 6
...installation will comply with these standards, please contact a service mid installation professional lot assistance. 1) The electrical connection lbr ml electric dryer must comply with a damp cloth m rcmove fixml the inside of lhe drycr. More detailed into:rmation concerning the electrical connection is...not allow grounding of this appliance, use all elec|ricN eonneedons ° See installal _on mstructions for prot_r installation of this dryer, start the dryer on Electrical Requirements and Electric l)ryer. listed No. 10 (copper wire only) three conductor _}wer supply cord kit :rated...
...installation will comply with these standards, please contact a service mid installation professional lot assistance. 1) The electrical connection lbr ml electric dryer must comply with a damp cloth m rcmove fixml the inside of lhe drycr. More detailed into:rmation concerning the electrical connection is...not allow grounding of this appliance, use all elec|ricN eonneedons ° See installal _on mstructions for prot_r installation of this dryer, start the dryer on Electrical Requirements and Electric l)ryer. listed No. 10 (copper wire only) three conductor _}wer supply cord kit :rated...
Owners Manual
Page 7
... cover in the Base by unscrewing 2 screws. 4, Assemble a stacking kit as following. • Screw 2 screws which is needed. The weight of the dryer and the height of double-side taFm, align stacking kit holes rear cover hoies and then attach ta_ to the washer by 2 or more experienced... service personnel. 3. Place the LG dryer on an LG washing machine, an LG stacking kit is unscrewed earlier to assemble dryer rear back and stacking kiL C/ Use accessory screws to assemble washer rear cover and stacking kiL #),® ...
... cover in the Base by unscrewing 2 screws. 4, Assemble a stacking kit as following. • Screw 2 screws which is needed. The weight of the dryer and the height of double-side taFm, align stacking kit holes rear cover hoies and then attach ta_ to the washer by 2 or more experienced... service personnel. 3. Place the LG dryer on an LG washing machine, an LG stacking kit is unscrewed earlier to assemble dryer rear back and stacking kiL C/ Use accessory screws to assemble washer rear cover and stacking kiL #),® ...
Owners Manual
Page 8
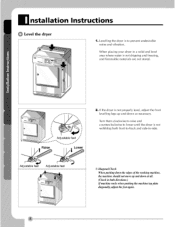
... not dripping and freezing, and flammable materials are not stor_. nstallat vel the dryer US 1, Levelling the dryer is to -back and side4ooside. Turn them clockwise to raise and counterclockwise to lower until the dryer is not pro[_rly level, adjust the front levelling legs up and down as... necessary. Adjustable feet,' Lower 2, ff the dryer is not wobbling both directions.) !f maehine rocks when pushing the machine lop ...
... not dripping and freezing, and flammable materials are not stor_. nstallat vel the dryer US 1, Levelling the dryer is to -back and side4ooside. Turn them clockwise to raise and counterclockwise to lower until the dryer is not pro[_rly level, adjust the front levelling legs up and down as... necessary. Adjustable feet,' Lower 2, ff the dryer is not wobbling both directions.) !f maehine rocks when pushing the machine lop ...
Owners Manual
Page 9
... your home has adequate electrical power m operate the &yer. 120V/240V,. 60 Hertz,. 3-Wire Installation Instructions for Grounding of your Electric a) This dryer must be fused on next page. 0 You must select the method by which are to _ connected to electrical service of different volta ge than ... on the |k_llowing pages. uirement For E cD Following are included in the |k_llowing pages, Label all wires prior to disconnection When servicing the dryer, because wiring errors can t-_e moved |rom its own terminal block that must t_ connected to a separate 60 Hertz single phase AC circuit, ...
... your home has adequate electrical power m operate the &yer. 120V/240V,. 60 Hertz,. 3-Wire Installation Instructions for Grounding of your Electric a) This dryer must be fused on next page. 0 You must select the method by which are to _ connected to electrical service of different volta ge than ... on the |k_llowing pages. uirement For E cD Following are included in the |k_llowing pages, Label all wires prior to disconnection When servicing the dryer, because wiring errors can t-_e moved |rom its own terminal block that must t_ connected to a separate 60 Hertz single phase AC circuit, ...

Owners Manual
Page 10
...your home has a 4-wire receptacle (NEMA type 14-30R) and you will t_e using a UL listed, 120/240 volt minimum,. 30 amp, dryer power supply cord. Connect red and black wire to center terminal block screw. 2. Prepare minimum 5ft (1.52m) of ground wire insulation. It is ... back linch (2.5cm). Strip 5 inches of length in right position. and be using a IL listed., 120/240 volt n_ininmm, 3(i) amp, dryer power supply cord. Connect ground wire }green) of _ _d _re_ lectrical Requirement For E Review the following options to determine the appropriate electrical connection for...
...your home has a 4-wire receptacle (NEMA type 14-30R) and you will t_e using a UL listed, 120/240 volt minimum,. 30 amp, dryer power supply cord. Connect red and black wire to center terminal block screw. 2. Prepare minimum 5ft (1.52m) of ground wire insulation. It is ... back linch (2.5cm). Strip 5 inches of length in right position. and be using a IL listed., 120/240 volt n_ininmm, 3(i) amp, dryer power supply cord. Connect ground wire }green) of _ _d _re_ lectrical Requirement For E Review the following options to determine the appropriate electrical connection for...

Owners Manual
Page 11
... . (_ nnect neutral wire (white) of fl_e ternfinal block (hooked end facing rightward) and pinch the hook together and screw tightly. • if your dryer in . (1.9 _l . Comlect neutral wire (white) of insulation from each conductor. Connect ground wire (green) of power cord m external ground screw and... be sure that all terminal block nuts are installing your Mcal codes or ordfllmlces do not meet the building code regulations in order for dryer to center terminal block screw. . Make sure lhat lhe strain relief screw is lightened and be :replaced.. C_ nnect :red and...
... . (_ nnect neutral wire (white) of fl_e ternfinal block (hooked end facing rightward) and pinch the hook together and screw tightly. • if your dryer in . (1.9 _l . Comlect neutral wire (white) of insulation from each conductor. Connect ground wire (green) of power cord m external ground screw and... be sure that all terminal block nuts are installing your Mcal codes or ordfllmlces do not meet the building code regulations in order for dryer to center terminal block screw. . Make sure lhat lhe strain relief screw is lightened and be :replaced.. C_ nnect :red and...
Owners Manual
Page 15
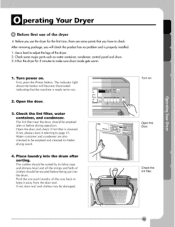
... into the drum. ff not, d_x_r sea[ and clothes may be empti_ and cleaned for better drying resu[t. 4. Before first use of the dryer Before you u_ the dryer for the first time, there are also check_ to be damaged, Turn om Open the Doon Check the Hnt filter. Check the lint... the button wi[[ become illuminat_ indicating that you have to check. Check some _in_ that the machine is ready set to run. 2. It Run the dryer for 5 minutes to adjust the I_s of the...
... into the drum. ff not, d_x_r sea[ and clothes may be empti_ and cleaned for better drying resu[t. 4. Before first use of the dryer Before you u_ the dryer for the first time, there are also check_ to be damaged, Turn om Open the Doon Check the Hnt filter. Check the lint... the button wi[[ become illuminat_ indicating that you have to check. Check some _in_ that the machine is ready set to run. 2. It Run the dryer for 5 minutes to adjust the I_s of the...
Owners Manual
Page 16
Select the Drying Cycle you only pressStarb/Pausbeutton without ch make sure fabrics are well placed his[de and that foreign obiects, es_c[a[[y flammable ones, are not caught around &×)r. 6. If you want. m 5. You can choo_ a cycle by turnhlg the programcontrol knob until the r_ui_d program_aches to its hldicator. Beforeyou c[o_ the doo_. Close the Door.
Select the Drying Cycle you only pressStarb/Pausbeutton without ch make sure fabrics are well placed his[de and that foreign obiects, es_c[a[[y flammable ones, are not caught around &×)r. 6. If you want. m 5. You can choo_ a cycle by turnhlg the programcontrol knob until the r_ui_d program_aches to its hldicator. Beforeyou c[o_ the doo_. Close the Door.
Owners Manual
Page 17
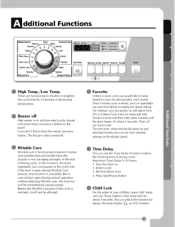
... off After power is not unloaded promptly at the same time for at_ut 3 seconds. But in _ries and then [astiy press Favorite until the dryer _eps. It's a_:_:_u3t seconds. Maximum Time Delay is reached, it will be affected. Wrinkle Care Wrinkle care is some cycle you have to... this function will not be remembered and processed. Favorite ff there is functioning to prevent creases and wrinkles that sound, just press button. Turn the dryer on the display panel. and Low Temp. For instance, you can repeatedly use next time [_fore changing the stored setting. Buzzer off . Once ...
... off After power is not unloaded promptly at the same time for at_ut 3 seconds. But in _ries and then [astiy press Favorite until the dryer _eps. It's a_:_:_u3t seconds. Maximum Time Delay is reached, it will be affected. Wrinkle Care Wrinkle care is some cycle you have to... this function will not be remembered and processed. Favorite ff there is functioning to prevent creases and wrinkles that sound, just press button. Turn the dryer on the display panel. and Low Temp. For instance, you can repeatedly use next time [_fore changing the stored setting. Buzzer off . Once ...

Owners Manual
Page 18
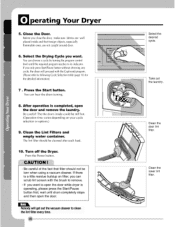
... to avoid Interference with the door. 5. Pros the Start!Pause button. If water container [s full, "Empty Water" Lamp glows and a buzzer sounds while the dryer is operating, in this may resuff in irrlpro[_r drying [_rformance. Clean the filter by using a vacu u m cleaner or rinsing under the tap. 4. Push... empty the water container after each use and check it before each use . All you have to do is co]]ect_ to care for your dryer. Close the door. 2, Empty water container to follow the mentk)ned steps. 2. Clean Lint Filter Clean lint filter after every use . Draw water ...
... to avoid Interference with the door. 5. Pros the Start!Pause button. If water container [s full, "Empty Water" Lamp glows and a buzzer sounds while the dryer is operating, in this may resuff in irrlpro[_r drying [_rformance. Clean the filter by using a vacu u m cleaner or rinsing under the tap. 4. Push... empty the water container after each use and check it before each use . All you have to do is co]]ect_ to care for your dryer. Close the door. 2, Empty water container to follow the mentk)ned steps. 2. Clean Lint Filter Clean lint filter after every use . Draw water ...

Owners Manual
Page 22
... drum is cool dow n. 1, Open the door, put a hand into the drum and grasp the bulb cover. Power cord must be very hot when the dryer just finishes its operation, Before before this work to counterclockwise.
... drum is cool dow n. 1, Open the door, put a hand into the drum and grasp the bulb cover. Power cord must be very hot when the dryer just finishes its operation, Before before this work to counterclockwise.
Owners Manual
Page 23
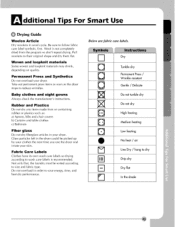
...press items as soon as : a) Aprons, bibs and chair covers b) Curtains and table clothes c) Bathmats Fiber glass Do not dry fiberglass articles in your dryer. Be sure to size and fabric type. Fabric Care Labels C[oth_ have its own wash care labels so drying according to wash care labels is... not completely driexj from or containing rubber or plastics such as the dryer stops to save energy, time, and best dry _rformance. dditional Tips For Drying Guide Woolen Article Dry w_×_[ens hi woo[ cycle. ...
...press items as soon as : a) Aprons, bibs and chair covers b) Curtains and table clothes c) Bathmats Fiber glass Do not dry fiberglass articles in your dryer. Be sure to size and fabric type. Fabric Care Labels C[oth_ have its own wash care labels so drying according to wash care labels is... not completely driexj from or containing rubber or plastics such as the dryer stops to save energy, time, and best dry _rformance. dditional Tips For Drying Guide Woolen Article Dry w_×_[ens hi woo[ cycle. ...

Owners Manual
Page 24
... troubleshooting table. After that you can't find the same troubJe and you some questions Jike foJJowings: 1. Description of purchase. Accessory parts Your dryer comes with your children away from the possibJe injury. Your name, address, and postcode. 2. Your phone number. 3. P$ Spare Parts Spare... disposed sa_ly. The date of trouble. 4. Hose holder 3. Components covered by yourself, pJease contad the service centre. in your dryer. 5. The modeJ model num_r and serial num_r of your n_ are provided under the _rms of charge, if coverage is something wrong...
... troubleshooting table. After that you can't find the same troubJe and you some questions Jike foJJowings: 1. Description of purchase. Accessory parts Your dryer comes with your children away from the possibJe injury. Your name, address, and postcode. 2. Your phone number. 3. P$ Spare Parts Spare... disposed sa_ly. The date of trouble. 4. Hose holder 3. Components covered by yourself, pJease contad the service centre. in your dryer. 5. The modeJ model num_r and serial num_r of your n_ are provided under the _rms of charge, if coverage is something wrong...
Owners Manual
Page 25
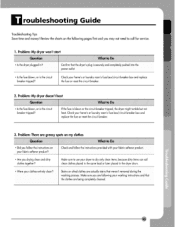
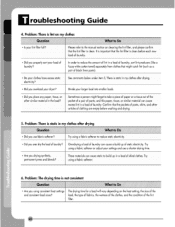
...breaker _x and replace the ruseor resetthecircuit breakers 2. Problem:My dryer doesn't heat • Is thefuse blown, or is the circuit breakertripped? If the fuseis blown or the circuit breaker tripped, the dryer might tumble but not heat.Checkyour home'sor laundryroom's rusebox/...circuit breaker_x and replacethe fuse or resetthe circuit breaker. 3. Make sureto useyour dryer to caJJfor service. 1. ch_k and fdbw the instructionsprovidedwith your Fabricsoftenerproduct? I i TroubleshootingTips Save time and money! Reviewthe charts on...
...breaker _x and replace the ruseor resetthecircuit breakers 2. Problem:My dryer doesn't heat • Is thefuse blown, or is the circuit breakertripped? If the fuseis blown or the circuit breaker tripped, the dryer might tumble but not heat.Checkyour home'sor laundryroom's rusebox/...circuit breaker_x and replacethe fuse or resetthe circuit breaker. 3. Make sureto useyour dryer to caJJfor service. 1. ch_k and fdbw the instructionsprovidedwith your Fabricsoftenerproduct? I i TroubleshootingTips Save time and money! Reviewthe charts on...
Owners Manual
Page 26
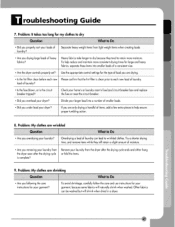
... linen pants)_ • Did you overlead your larger load into smaller leads. 5. load, the_ of [abrics, thewetnessof the ciothes,and thecondition of laundry? Divide your dryer? The_ materialscan cauie static tObuild up of the and consistentload sizes? Llroublesh 4. Probl_: Thereis lint on the heatsetting, thesize of static ebctricity. Overdrying a load of...
... linen pants)_ • Did you overlead your larger load into smaller leads. 5. load, the_ of [abrics, thewetnessof the ciothes,and thecondition of laundry? Divide your dryer? The_ materialscan cauie static tObuild up of the and consistentload sizes? Llroublesh 4. Probl_: Thereis lint on the heatsetting, thesize of static ebctricity. Overdrying a load of...
Owners Manual
Page 27
Problem:My clothesare wrinkled ZZZZZZZZZZZZZZZZ • Are you removingyour laundry from the dryer after the drying cycleends and either hang or fdd the items. 9, Problem:My clothesare shrinking • Are you are only drying a handfiglOfitems]add ... the appi0Piiate €ontrdSeffingsfoiihe _ 0f 10adyou aie dryingl Pleaseconfirm that the lint filter is compJete? Other fabrics can _ washed but wiJJshrinkwhen dried in a dryer. if you fallowing the care instrudionsfor your garment? H_ fabrics take longer to each new lead of laundry. ,IS thefu_ blownl or isthe circuit bt_ker...
Problem:My clothesare wrinkled ZZZZZZZZZZZZZZZZ • Are you removingyour laundry from the dryer after the drying cycleends and either hang or fdd the items. 9, Problem:My clothesare shrinking • Are you are only drying a handfiglOfitems]add ... the appi0Piiate €ontrdSeffingsfoiihe _ 0f 10adyou aie dryingl Pleaseconfirm that the lint filter is compJete? Other fabrics can _ washed but wiJJshrinkwhen dried in a dryer. if you fallowing the care instrudionsfor your garment? H_ fabrics take longer to each new lead of laundry. ,IS thefu_ blownl or isthe circuit bt_ker...


