
Owner's Manual
Page 1
Please read your manual carefully, as it provides instructions on safe Installation, Use and Maintenance. For more information, visit our website at http://us.lge.com P/No.: 3828EL4001H 1-800-243-0000 24 HOURS A DAY, 7 DAYS A WEEK FOR LG CUSTOMER SERVICE Owner's Manual Electrial and Gas Dryer DLE0442W/DLG0452W DLE0442S/DLG0452S DLE0442G/DLG0452G DLE5944WM/DLG5955WM DLE6942W/DLG6952W Thank you for future reference. Record the Model and Serial Numbers, and retain the manual for buying a LG Dryer.
Please read your manual carefully, as it provides instructions on safe Installation, Use and Maintenance. For more information, visit our website at http://us.lge.com P/No.: 3828EL4001H 1-800-243-0000 24 HOURS A DAY, 7 DAYS A WEEK FOR LG CUSTOMER SERVICE Owner's Manual Electrial and Gas Dryer DLE0442W/DLG0452W DLE0442S/DLG0452S DLE0442G/DLG0452G DLE5944WM/DLG5955WM DLE6942W/DLG6952W Thank you for future reference. Record the Model and Serial Numbers, and retain the manual for buying a LG Dryer.
Owner's Manual
Page 2
... can see sudden increase or decrease on operation time. What are still damp after sensor dry cycle is that you can set operation time manually to mention unmatched big capacity, you can plug the display unit into any rust by nature so that rust-free drum keeps clothes away from...Stainless steel drum doesn't generate any power outlet in your washer and/or dryer. Time Dry : Time Dry is finished. TROUBLESHOOTING GUIDE ...28-30 LG DRYER LIMITED WARRANTY ...31 2 At times, you can be purchased separately for heavyweight and bulky items such as king-size bed sheets and thick work...
... can see sudden increase or decrease on operation time. What are still damp after sensor dry cycle is that you can set operation time manually to mention unmatched big capacity, you can plug the display unit into any rust by nature so that rust-free drum keeps clothes away from...Stainless steel drum doesn't generate any power outlet in your washer and/or dryer. Time Dry : Time Dry is finished. TROUBLESHOOTING GUIDE ...28-30 LG DRYER LIMITED WARRANTY ...31 2 At times, you can be purchased separately for heavyweight and bulky items such as king-size bed sheets and thick work...

Owner's Manual
Page 3
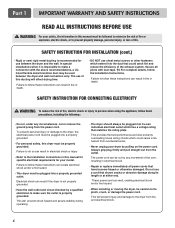
... or use gasoline or other appliances. • Installation and service must be performed by the appliance manufacturer as suitable for use any phone in this manual must be of a specific type identified by a qualified installer, service agency, or the gas supplier. • Install the clothes dryer according to the manufacturer's instructions... ALL INSTRUCTIONS BEFORE USE WARNING For your safety, the information in the vicinity of this appliance or any other flammable vapors and liquids in this manual and on any electrical switches.
... or use gasoline or other appliances. • Installation and service must be performed by the appliance manufacturer as suitable for use any phone in this manual must be of a specific type identified by a qualified installer, service agency, or the gas supplier. • Install the clothes dryer according to the manufacturer's instructions... ALL INSTRUCTIONS BEFORE USE WARNING For your safety, the information in the vicinity of this appliance or any other flammable vapors and liquids in this manual and on any electrical switches.
Owner's Manual
Page 4
... LP fuels. Improper connection of substances known to the state to cause cancer, birth defects, or other flammable or explosive substances as described in this manual. • Do not place items exposed to catch fire. This appliance must be followed to minimize the risk of fire or explosion, electric shock, or...; Read all local codes and ordinances. Part 1 IMPORTANT WARRANTY AND SAFETY INSTRUCTIONS READ ALL INSTRUCTIONS BEFORE USE WARNING For your safety, the information in this manual must be equipped with a cord having an equipment-grounding conductor and a grounding plug.
... LP fuels. Improper connection of substances known to the state to cause cancer, birth defects, or other flammable or explosive substances as described in this manual. • Do not place items exposed to catch fire. This appliance must be followed to minimize the risk of fire or explosion, electric shock, or...; Read all local codes and ordinances. Part 1 IMPORTANT WARRANTY AND SAFETY INSTRUCTIONS READ ALL INSTRUCTIONS BEFORE USE WARNING For your safety, the information in this manual must be equipped with a cord having an equipment-grounding conductor and a grounding plug.
Owner's Manual
Page 5
...outside of lint in any old ducts before installing your safety, the information in fire or death. 5 Failure to follow this manual. Failure to follow these instructions can result in the installation instructions. Use of all governing codes and ordinances. Electrical shock can ... freezing or exposed to follow basic precautions, including the following: • Properly ground dryer to do so can result in this manual must be performed by an authorized servicer unless specifically recommended in . Failure to conform with no obstructions. Follow details in death, ...
...outside of lint in any old ducts before installing your safety, the information in fire or death. 5 Failure to follow this manual. Failure to follow these instructions can result in the installation instructions. Use of all governing codes and ordinances. Electrical shock can ... freezing or exposed to follow basic precautions, including the following: • Properly ground dryer to do so can result in this manual must be performed by an authorized servicer unless specifically recommended in . Failure to conform with no obstructions. Follow details in death, ...
Owner's Manual
Page 6
...and assure stability during operating. • The dryer should always be plugged into a properly grounded • For personal safety, this manual must be followed to minimize the risk of the core, resulting in fire or death. Part 1 IMPORTANT WARRANTY AND SAFETY INSTRUCTIONS READ ... safety, the information in this dryer must be properly grounded. SAFETY INSTRUCTION FOR CONNECTING ELECTRICITY WARNING To reduce the risk of this manual for specific electrical requirements for use a cord that could cause a fire hazard from the power cord. Secure all joints with the...
...and assure stability during operating. • The dryer should always be plugged into a properly grounded • For personal safety, this manual must be followed to minimize the risk of the core, resulting in fire or death. Part 1 IMPORTANT WARRANTY AND SAFETY INSTRUCTIONS READ ... safety, the information in this dryer must be properly grounded. SAFETY INSTRUCTION FOR CONNECTING ELECTRICITY WARNING To reduce the risk of this manual for specific electrical requirements for use a cord that could cause a fire hazard from the power cord. Secure all joints with the...
Owner's Manual
Page 7
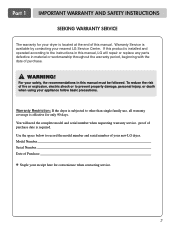
...operated according to prevent property damage, personal injury, or death when using your new LG dryer. Date of fire or explosion, electric shock or to the instructions in this manual, LG will need the complete model and serial number when requesting warranty service. Part 1 ...IMPORTANT WARRANTY AND SAFETY INSTRUCTIONS SEEKING WARRANTY SERVICE The warranty for your nearest LG Service Center. Warranty Service is available by ...
...operated according to prevent property damage, personal injury, or death when using your new LG dryer. Date of fire or explosion, electric shock or to the instructions in this manual, LG will need the complete model and serial number when requesting warranty service. Part 1 ...IMPORTANT WARRANTY AND SAFETY INSTRUCTIONS SEEKING WARRANTY SERVICE The warranty for your nearest LG Service Center. Warranty Service is available by ...
Owner's Manual
Page 9
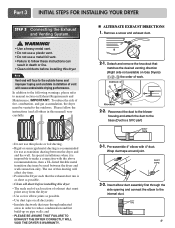
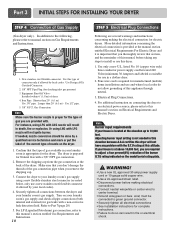
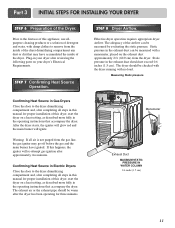
... plastic or foil ducting. • Rigid or semi-rigid metal ducting is as short as possible. • Clean old ducts before installing this manual) very carefully. and • PLEASE BE AWARE THAT FAILURE TO EXHAUST THE DRYER CORRECTLY WILL VOID THE DRYER'S WARRANTY. 3-1. Wrap duct tape around.... 3-2. Remove a screw and exhaust duct. 2-1. Detach and remove the knockout that runs through the side opening and connect the elbow to manual section on pipe walls; Insert elbow duct assembly first through unheated areas in order to follow the instructions (and all duct joints • ...
... plastic or foil ducting. • Rigid or semi-rigid metal ducting is as short as possible. • Clean old ducts before installing this manual) very carefully. and • PLEASE BE AWARE THAT FAILURE TO EXHAUST THE DRYER CORRECTLY WILL VOID THE DRYER'S WARRANTY. 3-1. Wrap duct tape around.... 3-2. Remove a screw and exhaust duct. 2-1. Detach and remove the knockout that runs through the side opening and connect the elbow to manual section on pipe walls; Insert elbow duct assembly first through unheated areas in order to follow the instructions (and all duct joints • ...
Owner's Manual
Page 10
...'s gas supply using LPG with a 3/8" NPT gas connection. 2. Four-wire cord is proper for the type of this manual's section entitled Gas Requirements and Instructions. 10 STEP 5 Electrical Plug Connections Following are several warnings and instructions concerning making electrical connections...the electrical connection is not needed , nozzle conversion should be connected to 10,000 feet. If needed in this elevation because A.G.A certifies this manual's section on your house is important that the type of dryer 4. Use this dryer. 1. Shorter than 20' (6.1 m) - Longer ...
...'s gas supply using LPG with a 3/8" NPT gas connection. 2. Four-wire cord is proper for the type of this manual's section entitled Gas Requirements and Instructions. 10 STEP 5 Electrical Plug Connections Following are several warnings and instructions concerning making electrical connections...the electrical connection is not needed , nozzle conversion should be connected to 10,000 feet. If needed in this elevation because A.G.A certifies this manual's section on your house is important that the type of dryer 4. Use this dryer. 1. Shorter than 20' (6.1 m) - Longer ...
Owner's Manual
Page 11
...After the dryer starts, the igniter will glow red and the main burner will re-attempt gas ignition after completing all steps in this manual for proper installation of the Dryer. If this happens, the igniter will ignite. Effective dryer operation requires appropriate dryer airflow. The dryer should... Static pressure in your dryer after the dryer has been operating for proper installation of the dryer. Warning: If all steps in this manual for three minutes. The adequacy of the dryer drum/drying compartment any dust or dirt that accompany the dryer. Static pressure in the ...
...After the dryer starts, the igniter will glow red and the main burner will re-attempt gas ignition after completing all steps in this manual for proper installation of the Dryer. If this happens, the igniter will ignite. Effective dryer operation requires appropriate dryer airflow. The dryer should... Static pressure in your dryer after the dryer has been operating for proper installation of the dryer. Warning: If all steps in this manual for three minutes. The adequacy of the dryer drum/drying compartment any dust or dirt that accompany the dryer. Static pressure in the ...
Owner's Manual
Page 12
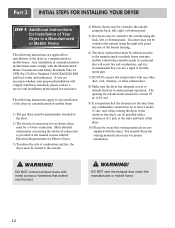
... construction be at least 2 inches (5 cm), and, when venting the dryer to the outdoors, the dryer can be installed with a clearances of 1 inch at the manual section entitled Electrical Requirements for Electric Dryer 3) To reduce the risk of combustion and fire, the dryer must be vented to the outside. 4) Electric dryers...
... construction be at least 2 inches (5 cm), and, when venting the dryer to the outdoors, the dryer can be installed with a clearances of 1 inch at the manual section entitled Electrical Requirements for Electric Dryer 3) To reduce the risk of combustion and fire, the dryer must be vented to the outside. 4) Electric dryers...
Owner's Manual
Page 15
... wire of covering material from 3 other wires. First, peel 5 inch (12.7cm) of appliance and connect it to the same color screw in damages on manual is essential. Wire color indicated on product and heating failure. • Appropriate screwing is connected to center screw. 4. Prepare minimum 5ft(1.52m) of excessive screw...
... wire of covering material from 3 other wires. First, peel 5 inch (12.7cm) of appliance and connect it to the same color screw in damages on manual is essential. Wire color indicated on product and heating failure. • Appropriate screwing is connected to center screw. 4. Prepare minimum 5ft(1.52m) of excessive screw...
Owner's Manual
Page 18
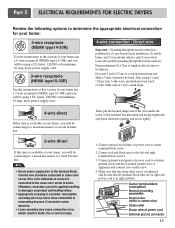
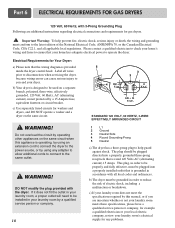
... (alternating current) 15 Amps. WARNING! c) If your laundry room does not meet the specifications required by operating other appliances on the same circuit when this manual, or if you and your dryer. Part 6 ELECTRICAL REQUIREMENTS FOR GAS DRYERS 120 Volt, 60 Hertz, with 3-Prong Grounding Plug Following are uncertain whether or...
... (alternating current) 15 Amps. WARNING! c) If your laundry room does not meet the specifications required by operating other appliances on the same circuit when this manual, or if you and your dryer. Part 6 ELECTRICAL REQUIREMENTS FOR GAS DRYERS 120 Volt, 60 Hertz, with 3-Prong Grounding Plug Following are uncertain whether or...
Owner's Manual
Page 19
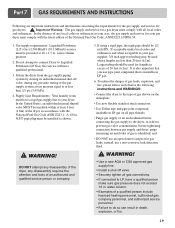
... for your gas dryer must comply with all local codes and ordinances. Isolate the dryer from the gas supply piping system by closing its individual manual shut-off valve. • Securely tighten all pipe threads; • Purge gas supply of 20 feet (6.1m). N.P.T. WARNING! Larger tubing... 1/2 inch IPS. in . Part 7 GAS REQUIREMENTS AND INSTRUCTIONS Following are less than 2/1 psi (3.45 kPa). 4. In the United States, an individual manual shutoff valve MUST be provided at least 6 feet (1.8m) of gas shown on the nameplate; • Use new flexible stainless steel connectors; • ...
... for your gas dryer must comply with all local codes and ordinances. Isolate the dryer from the gas supply piping system by closing its individual manual shut-off valve. • Securely tighten all pipe threads; • Purge gas supply of 20 feet (6.1m). N.P.T. WARNING! Larger tubing... 1/2 inch IPS. in . Part 7 GAS REQUIREMENTS AND INSTRUCTIONS Following are less than 2/1 psi (3.45 kPa). 4. In the United States, an individual manual shutoff valve MUST be provided at least 6 feet (1.8m) of gas shown on the nameplate; • Use new flexible stainless steel connectors; • ...
Owner's Manual
Page 22
..., explosion, or fire. Items containing foam, rubber, or plastic must be dried on or off. Failure to person, read this entire manual, including the Important Safety Instructions, before operating this manual for starting and using an Air Dry Cycle. Do not dry anything that has ever had anything that has ever had...
..., explosion, or fire. Items containing foam, rubber, or plastic must be dried on or off. Failure to person, read this entire manual, including the Important Safety Instructions, before operating this manual for starting and using an Air Dry Cycle. Do not dry anything that has ever had anything that has ever had...

Owner's Manual
Page 23
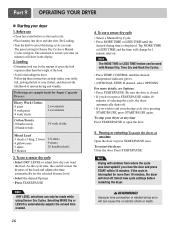
Put the dryer rack into the drum 3. Make sure Dryer RACK is available only with Manual Dry, Time Dry and Rack Dry programs. 2. Note Don't use this option in your dryer so remove rack for normal tumble drying. Note Time change ...
Put the dryer rack into the drum 3. Make sure Dryer RACK is available only with Manual Dry, Time Dry and Rack Dry programs. 2. Note Don't use this option in your dryer so remove rack for normal tumble drying. Note Time change ...

Owner's Manual
Page 24
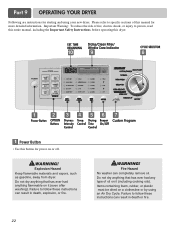
... level or turn off the signal. 7 CUSTOM PROGRAM Custom Programming Set up your favorite combination of settings and save them here for the Manual Cycles. Temperature modifiers cannot be made when you press any of the buttons on the control panel and the termination of Load Foam rubber-..., shear nylon Default Time* (Minutes) 20 - 30 20 - 30 40 - 50 10 - 20 24 5 Time Dry Use Time Dry Option to 60 minutes. Manual Preset Cycle Settings Manual Dry Temp. Select a cycle 2. CONTROL. 3. Type of any cycle is indicated. Note DRY LEVEL selections can select the desired operation time...
... level or turn off the signal. 7 CUSTOM PROGRAM Custom Programming Set up your favorite combination of settings and save them here for the Manual Cycles. Temperature modifiers cannot be made when you press any of the buttons on the control panel and the termination of Load Foam rubber-..., shear nylon Default Time* (Minutes) 20 - 30 20 - 30 40 - 50 10 - 20 24 5 Time Dry Use Time Dry Option to 60 minutes. Manual Preset Cycle Settings Manual Dry Temp. Select a cycle 2. CONTROL. 3. Type of any cycle is indicated. Note DRY LEVEL selections can select the desired operation time...
Owner's Manual
Page 25
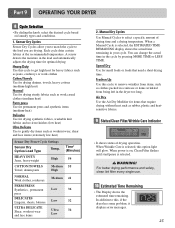
...Cycles allow you to match the cycle to remove wrinkles from being left in the cycle by pressing MORE TIME or LESS TIME. Manual Dry Cycles Use Manual Cycles to select a specific amount of drying operation. You can change the actual time in the dryer too long. Air Dry .../Wrinkle Care Indicator • It shows status of drying time and a drying temperature. Each cycle dries certain fabrics at the recommended temperature. When a Manual Cycle is selected, this , if the dryer has some problem, it displays error messages. 25 WARNING! For better drying performance and safety, clean lint...
...Cycles allow you to match the cycle to remove wrinkles from being left in the cycle by pressing MORE TIME or LESS TIME. Manual Dry Cycles Use Manual Cycles to select a specific amount of drying operation. You can change the actual time in the dryer too long. Air Dry .../Wrinkle Care Indicator • It shows status of drying time and a drying temperature. Each cycle dries certain fabrics at the recommended temperature. When a Manual Cycle is selected, this , if the dryer has some problem, it displays error messages. 25 WARNING! For better drying performance and safety, clean lint...
Owner's Manual
Page 26
...The estimated or actual cycle time (in minutes) will can be made while using Sensor Dry Cycles. To use a sensor dry cycle • Select a Manual Dry Cycle. • Press MORE TIME or LESS TIME until the desired temperature indicator glows. • (OPTIONAL STEP) If desired, select OPTIONS. Selecting MORE... and press START within 10 minutes of the load and adjusts the time automatically for Sensor Dry Cycles or Manual Cycles will glow. Following these instruction can only be used with Manual Dry, Time Dry and Rack Dry Cycles. • Press TEMP. Press START/PAUSE. If the cycle...
...The estimated or actual cycle time (in minutes) will can be made while using Sensor Dry Cycles. To use a sensor dry cycle • Select a Manual Dry Cycle. • Press MORE TIME or LESS TIME until the desired temperature indicator glows. • (OPTIONAL STEP) If desired, select OPTIONS. Selecting MORE... and press START within 10 minutes of the load and adjusts the time automatically for Sensor Dry Cycles or Manual Cycles will glow. Following these instruction can only be used with Manual Dry, Time Dry and Rack Dry Cycles. • Press TEMP. Press START/PAUSE. If the cycle...
Owner's Manual
Page 29
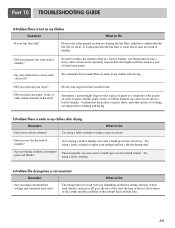
Please refer to the manual section on cleaning the lint filter, and please confirm that might forget to take a piece of paper or a tissue out of the pocket of a pair ...
Please refer to the manual section on cleaning the lint filter, and please confirm that might forget to take a piece of paper or a tissue out of the pocket of a pair ...


