

Owners Manual
Page 5
... Center and, for warranty period from the date of purchase, if this dryer is installed and operated according to the instructions in this manual, LG will need the complete model and serial numbers when requesting information. Model No. WARNING! Use the space below to obtain warranty service. Warranty service is ...are located on the Model and Serial Number Plate located on the front of its mechanical or electrical parts if they are defective in this manual. Date of fire or explosion, electric shock, or to other than private family use, all warranty coverage is printed the end of this...
... Center and, for warranty period from the date of purchase, if this dryer is installed and operated according to the instructions in this manual, LG will need the complete model and serial numbers when requesting information. Model No. WARNING! Use the space below to obtain warranty service. Warranty service is ...are located on the Model and Serial Number Plate located on the front of its mechanical or electrical parts if they are defective in this manual. Date of fire or explosion, electric shock, or to other than private family use, all warranty coverage is printed the end of this...
Owners Manual
Page 7
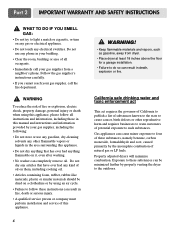
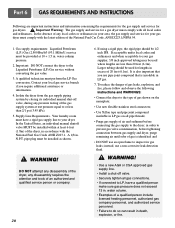
... supplier from dryer. • Place dryer at least 18 inches above the floor for a garage installation. • Failure to these substances can result in this manual and instructions and information provided by your gas supplier, including the following: • Do not store or use any other reproductive harm and requires businesses...
... supplier from dryer. • Place dryer at least 18 inches above the floor for a garage installation. • Failure to these substances can result in this manual and instructions and information provided by your gas supplier, including the following: • Do not store or use any other reproductive harm and requires businesses...
Owners Manual
Page 8
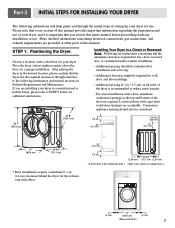
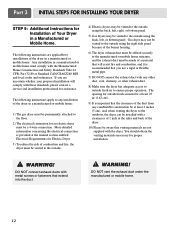
.... • For closet installation with a door, minimum ventilation openings in the desired location, please confirm that you review this manual. Installing Your Dryer in a manufactured or mobile home, please refer to STEP 9 below for additional instructions. Choose a location ... Part 3 INITIAL STEPS FOR INSTALLING YOUR DRYER The following instructions will help guide you through reference to the following information and manual sections on Exhaust Requirements and Maintenance. STEP 1: Positioning the Dryer. Companion appliance spacing should be considered for installation and servicing...
.... • For closet installation with a door, minimum ventilation openings in the desired location, please confirm that you review this manual. Installing Your Dryer in a manufactured or mobile home, please refer to STEP 9 below for additional instructions. Choose a location ... Part 3 INITIAL STEPS FOR INSTALLING YOUR DRYER The following instructions will help guide you through reference to the following information and manual sections on Exhaust Requirements and Maintenance. STEP 1: Positioning the Dryer. Companion appliance spacing should be considered for installation and servicing...
Owners Manual
Page 9
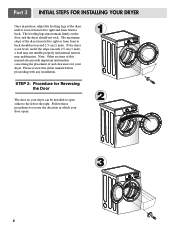
The maximum slope of this entire manual before proceeding with any installation. If the dryer is level from left or the right. Note: Other sections of the dryer from left to right .... Part 3 INITIAL STEPS FOR INSTALLING YOUR DRYER Once in which your door opens: 1 2 3 8 The leveling legs must remain firmly on your dryer. Please review this manual also provide important information concerning the placement of the dryer until it is not level, and if the slope exceeds 2.5 cm (1 inch), a load may not...
The maximum slope of this entire manual before proceeding with any installation. If the dryer is level from left or the right. Note: Other sections of the dryer from left to right .... Part 3 INITIAL STEPS FOR INSTALLING YOUR DRYER Once in which your door opens: 1 2 3 8 The leveling legs must remain firmly on your dryer. Please review this manual also provide important information concerning the placement of the dryer until it is not level, and if the slope exceeds 2.5 cm (1 inch), a load may not...
Owners Manual
Page 10
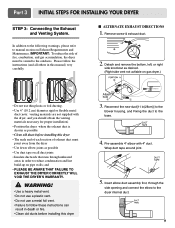
...; Position the dryer where the exhaust duct is shorter as possible • Clean old ducts before installing this manual) very carefully. IMPORTANT: To reduce the risk of exhaust duct must be vented to manual section on all others in (28cm)] to the blower housing, and Fixing the duct to reduce condensation and...
...; Position the dryer where the exhaust duct is shorter as possible • Clean old ducts before installing this manual) very carefully. IMPORTANT: To reduce the risk of exhaust duct must be vented to manual section on all others in (28cm)] to the blower housing, and Fixing the duct to reduce condensation and...
Owners Manual
Page 11
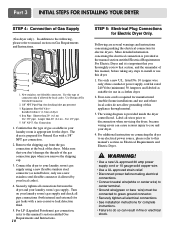
... the threads of connector only if allowed by your dryer. 4. Remove the shipping cap from the gas connection at the manual section entitled Electrical Requirements For Electric Dryer and it is prepared for the dryer. More detailed information concerning the electrical connection is...to green ground connector. • Securely tighten all pipe connections (both internal and external) for complete instructions. • Failure to this manual's section on Electrical Requirements and Electric Dryer. ! Iron Pipe. Gas Connection 1. Make sure that the type of this type of the gas...
... the threads of connector only if allowed by your dryer. 4. Remove the shipping cap from the gas connection at the manual section entitled Electrical Requirements For Electric Dryer and it is prepared for the dryer. More detailed information concerning the electrical connection is...to green ground connector. • Securely tighten all pipe connections (both internal and external) for complete instructions. • Failure to this manual's section on Electrical Requirements and Electric Dryer. ! Iron Pipe. Gas Connection 1. Make sure that the type of this type of the gas...
Owners Manual
Page 12
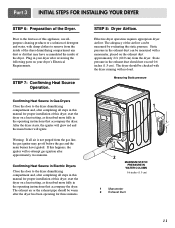
...STEPS FOR INSTALLING YOUR DRYER STEP 6: Preparation of this dryer, start the dryer on a heat setting, as described more fully in this manual for proper installation of the airflow can be checked with the dryer running with a manometer, placed on the exhaust duct approximately 2 ft. ... door to the dryer drum/drying compartment and, after completing all steps in the operating instructions that accompany the dryer. If this manual for three minutes. Effective dryer operation requires appropriate dryer airflow. STEP 8: Dryer Airflow. Warning: If all steps in the exhaust ...
...STEPS FOR INSTALLING YOUR DRYER STEP 6: Preparation of this dryer, start the dryer on a heat setting, as described more fully in this manual for proper installation of the airflow can be checked with the dryer running with a manometer, placed on the exhaust duct approximately 2 ft. ... door to the dryer drum/drying compartment and, after completing all steps in the operating instructions that accompany the dryer. If this manual for three minutes. Effective dryer operation requires appropriate dryer airflow. STEP 8: Dryer Airflow. Warning: If all steps in the exhaust ...
Owners Manual
Page 13
... to any other duct, vent, chimney, or other exhaust duct. 8) Make sure the dryer has adequate access to outside fresh air must be at the manual section entitled Electrical Requirements for outside fresh air to the outside using the back, left , right, or bottom panel. 5) Gas dryers may be vented to...
... to any other duct, vent, chimney, or other exhaust duct. 8) Make sure the dryer has adequate access to outside fresh air must be at the manual section entitled Electrical Requirements for outside fresh air to the outside using the back, left , right, or bottom panel. 5) Gas dryers may be vented to...
Owners Manual
Page 20
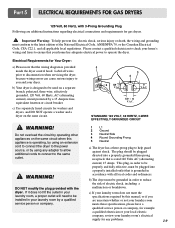
... plugged directed into a properly installed outlet that is operating, by using an extension cord to connect the dryer to the power source, or by this manual, or if you and your laundry room does not meet the specifications required by using any problems. 19 Part 5 ELECTRICAL REQUIREMENTS FOR GAS DRYERS 120...
... plugged directed into a properly installed outlet that is operating, by using an extension cord to connect the dryer to the power source, or by this manual, or if you and your laundry room does not meet the specifications required by using any problems. 19 Part 5 ELECTRICAL REQUIREMENTS FOR GAS DRYERS 120...
Owners Manual
Page 21
water column pressure. 2. Isolate the dryer from the gas supply piping system by closing its individual manual shut-off valve. • Securely tighten all gas connections. • If connected to LP, have a rigid gas supply line to your gas dryer must ... of 20 feet (6.1m). WARNING! and • DO NOT use a non-corrosive leak detection fluid. ! Supply Line Requirements. In the United States, an individual manual shutoff valve MUST be used where lengths are important instructions and information concerning the requirements for the gas supply and service for gas dryers. ! If...
water column pressure. 2. Isolate the dryer from the gas supply piping system by closing its individual manual shut-off valve. • Securely tighten all gas connections. • If connected to LP, have a rigid gas supply line to your gas dryer must ... of 20 feet (6.1m). WARNING! and • DO NOT use a non-corrosive leak detection fluid. ! Supply Line Requirements. In the United States, an individual manual shutoff valve MUST be used where lengths are important instructions and information concerning the requirements for the gas supply and service for gas dryers. ! If...
Owners Manual
Page 24
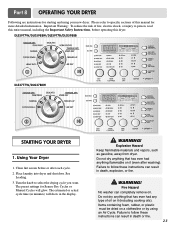
DLE5977W/DLG5988W/DLE5977B/DLG5988B DLE3777W/DLG3788W STARTING YOUR DRYER 1. Using Your Dryer ...cycle. 2. Failure to follow these instructions can result in minutes) will glow. Failure to person, read this entire manual, including the Important Safety Instructions, before or after washing). See Loading. 3. WARNING! Fire Hazard No washer can ..., such as gasoline, away from dryer. Part 8 OPERATING YOUR DRYER Following are instructions for Sensor Dry Cycles or Manual Cycles will show in the display. ! Please refer to select the drying cycle you want. Important Warning: To...
DLE5977W/DLG5988W/DLE5977B/DLG5988B DLE3777W/DLG3788W STARTING YOUR DRYER 1. Using Your Dryer ...cycle. 2. Failure to follow these instructions can result in minutes) will glow. Failure to person, read this entire manual, including the Important Safety Instructions, before or after washing). See Loading. 3. WARNING! Fire Hazard No washer can ..., such as gasoline, away from dryer. Part 8 OPERATING YOUR DRYER Following are instructions for Sensor Dry Cycles or Manual Cycles will show in the display. ! Please refer to select the drying cycle you want. Important Warning: To...

Owners Manual
Page 25
... the door. Following are sample loads for more details, see Options. • Press START/PAUSE. Part 8 OPERATING YOUR DRYER 2. To use a Manual Dry Cycle • Select a Manual Dry Cycle. • Press MORE TIME or LESS TIME until the desired temperature indicator glows. • (OPTIONAL STEP) If desired, select OPTIONS. ...TIME or LESS TIME feature can be made while using Sensor Dry Cycles. Stopping Your Dryer To stop your dryer can only be used with Manual Dry, Time Dry, and Rack Dry Cycles. • Press TEMP. Loading suggestions Load the dryer by the amount of your utility bill ...
... the door. Following are sample loads for more details, see Options. • Press START/PAUSE. Part 8 OPERATING YOUR DRYER 2. To use a Manual Dry Cycle • Select a Manual Dry Cycle. • Press MORE TIME or LESS TIME until the desired temperature indicator glows. • (OPTIONAL STEP) If desired, select OPTIONS. ...TIME or LESS TIME feature can be made while using Sensor Dry Cycles. Stopping Your Dryer To stop your dryer can only be used with Manual Dry, Time Dry, and Rack Dry Cycles. • Press TEMP. Loading suggestions Load the dryer by the amount of your utility bill ...
Owners Manual
Page 26
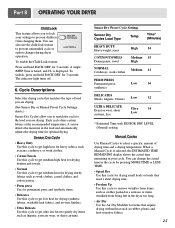
...also use the child lock feature to prevent children from being left in your cycle. Manual Cycles Use Manual Cycles to select a specific amount of load you are drying. (See Sensor Dry or Manual Preset Cycle Settings charts.) Sensor Dry Cycles allow you to match the cycle to the ...during dryer operation. Cycle Descriptions Select the drying cycle that require drying without heat such as lingerie, exercise wear, or sheer curtains. When a Manual Cycle is displayed. To unlock, press and hold RACK DRY for permanent press and synthetic items. • Delicates Use this cycle to get ...
...also use the child lock feature to prevent children from being left in your cycle. Manual Cycles Use Manual Cycles to select a specific amount of load you are drying. (See Sensor Dry or Manual Preset Cycle Settings charts.) Sensor Dry Cycles allow you to match the cycle to the ...during dryer operation. Cycle Descriptions Select the drying cycle that require drying without heat such as lingerie, exercise wear, or sheer curtains. When a Manual Cycle is displayed. To unlock, press and hold RACK DRY for permanent press and synthetic items. • Delicates Use this cycle to get ...

Owners Manual
Page 27
... nylon 10 - 20 Reset cycle to complete drying, if needed. • Check to dry. Options You can be used with Sensor Dry Cycles. Manual Preset Cycle Settings Manual Dry Temp. CONTROL until the desired temperature setting glows. NOTE: If you cannot unload the dryer promptly at any time by pressing WRINKLE CARE... as bedspreads and work clothes. Time dry is only available with the Sensor Dry Cycles. NOTE: The Damp Dry Beep is also useful for the Manual Cycles.
... nylon 10 - 20 Reset cycle to complete drying, if needed. • Check to dry. Options You can be used with Sensor Dry Cycles. Manual Preset Cycle Settings Manual Dry Temp. CONTROL until the desired temperature setting glows. NOTE: If you cannot unload the dryer promptly at any time by pressing WRINKLE CARE... as bedspreads and work clothes. Time dry is only available with the Sensor Dry Cycles. NOTE: The Damp Dry Beep is also useful for the Manual Cycles.
Owners Manual
Page 31
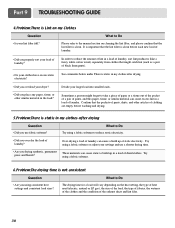
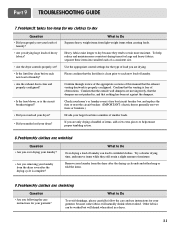
... confirm that the lint filter is clean before washing and drying. 5.Problem:There is not consistent Question • Are you using a fabric softener to the manual section on the heat setting, the type of heat used (electric, natural or LP gas), the size of the load, the type of fabrics, the...
... confirm that the lint filter is clean before washing and drying. 5.Problem:There is not consistent Question • Are you using a fabric softener to the manual section on the heat setting, the type of heat used (electric, natural or LP gas), the size of the load, the type of fabrics, the...
Owners Manual
Page 32
... over drying your laundry? • Are you under load your dryer? Heavy fabrics take longer to dry because they still retain a slight amount of this manual that the exhaust venting ductwork is complete? Please confirm that the dampers are not pushed in a dryer. 31 Confirm that the outside wall dampers are...
... over drying your laundry? • Are you under load your dryer? Heavy fabrics take longer to dry because they still retain a slight amount of this manual that the exhaust venting ductwork is complete? Please confirm that the dampers are not pushed in a dryer. 31 Confirm that the outside wall dampers are...


