
Owners Manual
Page 2
Electric and Gas Dryer DLE5977W/DLG5988W DLE5977B/DLG5988B DLE3777W/DLG3788W P/No.: 3828EL3003A
Electric and Gas Dryer DLE5977W/DLG5988W DLE5977B/DLG5988B DLE3777W/DLG3788W P/No.: 3828EL3003A
Owners Manual
Page 3
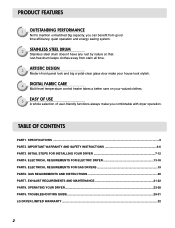
... PART7. TROUBLESHOOTING GUIDE ...29-31 LG DRYER LIMITED WARRANTY ...32 2 OPERATING YOUR DRYER...23-28 PART9. TABLE OF CONTENTS PART1. SPECIFICATIONS ...3 PART2. INITIAL STEPS FOR INSTALLING YOUR DRYER 7-12 PART4. ELECTRICAL REQUIREMENTS FOR ELECTRIC DRYER 13-18 PART5. EXHAUST REQUIREMENTS AND MAINTENANCE 21-22 PART8. ELECTRICAL REQUIREMENTS FOR GAS DRYERS 19 PART6. IMPORTANT WARRANTY AND SAFETY...-level temperature control heater takes a better care on your valued clothes. 5 EASY OF USE A whole selection of user-friendly functions always make you comfortable with dryer operation.
... PART7. TROUBLESHOOTING GUIDE ...29-31 LG DRYER LIMITED WARRANTY ...32 2 OPERATING YOUR DRYER...23-28 PART9. TABLE OF CONTENTS PART1. SPECIFICATIONS ...3 PART2. INITIAL STEPS FOR INSTALLING YOUR DRYER 7-12 PART4. ELECTRICAL REQUIREMENTS FOR ELECTRIC DRYER 13-18 PART5. EXHAUST REQUIREMENTS AND MAINTENANCE 21-22 PART8. ELECTRICAL REQUIREMENTS FOR GAS DRYERS 19 PART6. IMPORTANT WARRANTY AND SAFETY...-level temperature control heater takes a better care on your valued clothes. 5 EASY OF USE A whole selection of user-friendly functions always make you comfortable with dryer operation.
Owners Manual
Page 4
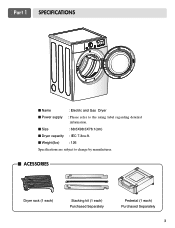
I Size : 68.6X98.3X76.1(cm) I ACESSORIES Dryer rack (1 each) Stacking kit (1 each) Purchased Separately Pedestal (1 each) Purchased Separately 3 I Weight(Ibs) : 126 Specifications are subject to the rating label regarding detailed information. I Dryer capacity : IEC 7.3cu.ft. Part 1 SPECIFICATIONS I Name : Electric and Gas Dryer I Power supply : Please refer to change by manufacturer.
I Size : 68.6X98.3X76.1(cm) I ACESSORIES Dryer rack (1 each) Stacking kit (1 each) Purchased Separately Pedestal (1 each) Purchased Separately 3 I Weight(Ibs) : 126 Specifications are subject to the rating label regarding detailed information. I Dryer capacity : IEC 7.3cu.ft. Part 1 SPECIFICATIONS I Name : Electric and Gas Dryer I Power supply : Please refer to change by manufacturer.

Owners Manual
Page 5
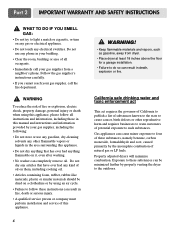
...or to the instructions in this manual. Model No. Warranty service is available by contacting your nearest LG Service Center and, for warranty period from the date of the dryer behind the door. Serial No. You will repair or replace any of its mechanical or electrical ... check here, because proof of original purchase date is printed the end of your dryer is needed to other than private family use, all warranty coverage is effective for your new LG dryer. Part 2 IMPORTANT WARRANTY AND SAFETY INSTRUCTIONS SEEKING WARRANTY ASSISTANCE Warranty Service. WARNING! Warranty...
...or to the instructions in this manual. Model No. Warranty service is available by contacting your nearest LG Service Center and, for warranty period from the date of the dryer behind the door. Serial No. You will repair or replace any of its mechanical or electrical ... check here, because proof of original purchase date is printed the end of your dryer is needed to other than private family use, all warranty coverage is effective for your new LG dryer. Part 2 IMPORTANT WARRANTY AND SAFETY INSTRUCTIONS SEEKING WARRANTY ASSISTANCE Warranty Service. WARNING! Warranty...
Owners Manual
Page 6
... electrician. WARNING! The plug must be plugged into contact with a qualified electrician or service person if you are in your dryer, please exercise care and follow basic safety precautions, including the following: 1) Read all local codes and ordinances. Part 2 ...IMPORTANT WARRANTY AND SAFETY INSTRUCTIONS IMPORTANT SAFETY INSTRUCTIONS ! This appliance is necessary when using your dryer. SAVE THESE INSTRUCTIONS GROUNDING INSTRUCTIONS This appliance must be exposed to the weather. 7) Do not tamper with the circuit conductors ...
... electrician. WARNING! The plug must be plugged into contact with a qualified electrician or service person if you are in your dryer, please exercise care and follow basic safety precautions, including the following: 1) Read all local codes and ordinances. Part 2 ...IMPORTANT WARRANTY AND SAFETY INSTRUCTIONS IMPORTANT SAFETY INSTRUCTIONS ! This appliance is necessary when using your dryer. SAVE THESE INSTRUCTIONS GROUNDING INSTRUCTIONS This appliance must be exposed to the weather. 7) Do not tamper with the circuit conductors ...
Owners Manual
Page 7
...of natural gas or LP fuels. Follow the gas supplier's instructions carefully. • If you cannot reach your gas supplier from dryer. • Place dryer at least 18 inches above the floor for a garage installation. • Failure to these substances, namely benzene, carbon monoxide, ...formaldehyde and soot, caused primarily by properly venting the dryer to cause cancer, birth defects or other flammable vapors or liquids in your building. • Clear the room, building or area of ...
...of natural gas or LP fuels. Follow the gas supplier's instructions carefully. • If you cannot reach your gas supplier from dryer. • Place dryer at least 18 inches above the floor for a garage installation. • Failure to these substances, namely benzene, carbon monoxide, ...formaldehyde and soot, caused primarily by properly venting the dryer to cause cancer, birth defects or other flammable vapors or liquids in your building. • Clear the room, building or area of ...
Owners Manual
Page 8
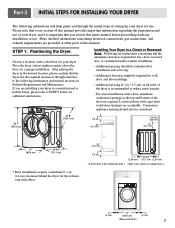
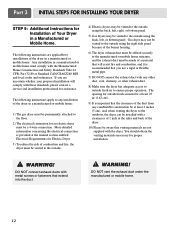
... of 1 in a Closet or Recessed Area. If you through reference to the following instructions will help guide you are installing your dryer in . (14 cm) clearance behind the dryer for your dryer. Louvered doors with elbow. 24"2 (155 cm2) 3" (7.6 cm) 1" 29.96" 1" (2.54 cm) (76.1 cm) (2.54 ...cm) 0" (0 cm) 27" (68.6 cm) 0" (0 cm) 7 Installing Your Dryer in . (2.5 cm) on Exhaust Requirements and Maintenance. Choose a location with a solid floor for the exhaust vent with equivalent ventilation openings are provided at least...
... of 1 in a Closet or Recessed Area. If you through reference to the following instructions will help guide you are installing your dryer in . (14 cm) clearance behind the dryer for your dryer. Louvered doors with elbow. 24"2 (155 cm2) 3" (7.6 cm) 1" 29.96" 1" (2.54 cm) (76.1 cm) (2.54 ...cm) 0" (0 cm) 27" (68.6 cm) 0" (0 cm) 7 Installing Your Dryer in . (2.5 cm) on Exhaust Requirements and Maintenance. Choose a location with a solid floor for the exhaust vent with equivalent ventilation openings are provided at least...
Owners Manual
Page 9
...load may not tumble properly and internal sensors may malfunction. Follow these procedures to reverse the direction in position, adjust the leveling legs of the dryer from left to right and from front to back should not rock. Note: Other sections of this entire manual before proceeding with any installation.... of and clearances for Reversing the Door The door on the floor and the dryer should not exceed 2.5 cm (1 inch). STEP 2: Procedure for your dryer can be installed to open either to back. If the dryer is level from left to right or from front to the left or the ...
...load may not tumble properly and internal sensors may malfunction. Follow these procedures to reverse the direction in position, adjust the leveling legs of the dryer from left to right and from front to back should not rock. Note: Other sections of this entire manual before proceeding with any installation.... of and clearances for Reversing the Door The door on the floor and the dryer should not exceed 2.5 cm (1 inch). STEP 2: Procedure for your dryer can be installed to open either to back. If the dryer is level from left to right or from front to the left or the ...
Owners Manual
Page 10
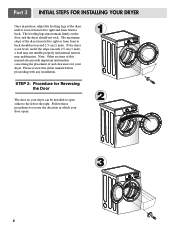
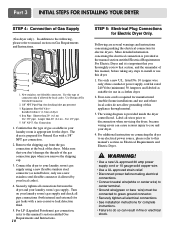
... unheated areas in (28cm)] to the blower housing, and Fixing the duct to the outdoors. Part 3 INITIAL STEPS FOR INSTALLING YOUR DRYER STEP 3: Connecting the Exhaust and Venting System. Remove screw & exhaust duct. 2. Reconnect the new duct[11 in order to manual ...before installing this manual) very carefully. and • PLEASE BE AWARE THAT FAILURE TO EXHAUST THE DRYER CORRECTLY WILL VOID THE DRYER'S WARRANTY. ! Please follow these instructions can result in this dryer Attach hole 3. I ALTERNATE EXHAUST DIRECTIONS 1. Wrap duct tape around joint. 5. IMPORTANT: To reduce...
... unheated areas in (28cm)] to the blower housing, and Fixing the duct to the outdoors. Part 3 INITIAL STEPS FOR INSTALLING YOUR DRYER STEP 3: Connecting the Exhaust and Venting System. Remove screw & exhaust duct. 2. Reconnect the new duct[11 in order to manual ...before installing this manual) very carefully. and • PLEASE BE AWARE THAT FAILURE TO EXHAUST THE DRYER CORRECTLY WILL VOID THE DRYER'S WARRANTY. ! Please follow these instructions can result in this dryer Attach hole 3. I ALTERNATE EXHAUST DIRECTIONS 1. Wrap duct tape around joint. 5. IMPORTANT: To reduce...
Owners Manual
Page 11
...; Ground wire(green or bare wire) must be connected to green ground connector. • Securely tighten all connections between the dryer and your dryer. 4. More detailed information concerning the electrical connection is required for manufactured (mobile) home installations and use this manual's section entitled...do not allow grounding of this type of the gas connection pipe when you and your laundry room's gas supply. Connect the dryer to this dryer. 1. For LP (Liquefied Petroleum) gas connection, refer to your laundry room's gas supply using a new flexible stainless steel ...
...; Ground wire(green or bare wire) must be connected to green ground connector. • Securely tighten all connections between the dryer and your dryer. 4. More detailed information concerning the electrical connection is required for manufactured (mobile) home installations and use this manual's section entitled...do not allow grounding of this type of the gas connection pipe when you and your laundry room's gas supply. Connect the dryer to this dryer. 1. For LP (Liquefied Petroleum) gas connection, refer to your laundry room's gas supply using a new flexible stainless steel ...
Owners Manual
Page 12
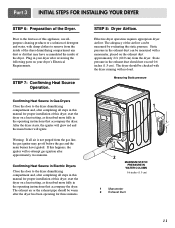
...main burner will re-attempt gas ignition after reviewing the following parts on the exhaust duct approximately 2 ft. (60.9 cm) from the inside of the dryer drum/drying compartment any dust or dirt that may go off before the gas and the main burner have accumulated the inside of the...with no load. Prior to the first use allpurpose cleaning products or a solution of detergent and water, with damp clothes to the dryer drum/drying compartment and, after the dryer has been operating for proper installation of the airflow can be warm after completing all air is not purged from the gas...
...main burner will re-attempt gas ignition after reviewing the following parts on the exhaust duct approximately 2 ft. (60.9 cm) from the inside of the dryer drum/drying compartment any dust or dirt that may go off before the gas and the main burner have accumulated the inside of the...with no load. Prior to the first use allpurpose cleaning products or a solution of detergent and water, with damp clothes to the dryer drum/drying compartment and, after the dryer has been operating for proper installation of the airflow can be warm after completing all air is not purged from the gas...
Owners Manual
Page 13
... uncertain whether your proposed installation will resist fire and combustion, and it is recommended that you are applicable to installations of the burner housing. 6) The dryer exhaust duct must be a 4-wire connection. You should obtain the venting materials necessary for proper installation. ! WARNING! If you use a rigid or flexible...! The opening for outside fresh air must be at least 25 in2 (163 cm2). 9) It is provided at the sides and back of the dryer. 10) Please be vented to the outside using the back, left , or bottom panel. Part 3 INITIAL STEPS FOR INSTALLING YOUR...
... uncertain whether your proposed installation will resist fire and combustion, and it is recommended that you are applicable to installations of the burner housing. 6) The dryer exhaust duct must be a 4-wire connection. You should obtain the venting materials necessary for proper installation. ! WARNING! If you use a rigid or flexible...! The opening for outside fresh air must be at least 25 in2 (163 cm2). 9) It is provided at the sides and back of the dryer. 10) Please be vented to the outside using the back, left , or bottom panel. Part 3 INITIAL STEPS FOR INSTALLING YOUR...
Owners Manual
Page 14
...conform to the latest edition of the National Electrical Code, ANSI/NFPA 70 and all wires prior to disconnection when servicing the dryer, because wiring errors can be connected to examples on the following pages. ! wire (copper wire only), or as required by...feet (4.50 m), use U.L. (Underwriters Laboratories) listed No. 10 A.W.G. Allow sufficient slack in dryers which to wire your dryer according to operate the dryer. 120V/ 240V, 60 Hertz, 3-Wire Installation Instructions for electric dryers. ! WARNING! wire (copper wire only), or as required by local codes. f) The ...
...conform to the latest edition of the National Electrical Code, ANSI/NFPA 70 and all wires prior to disconnection when servicing the dryer, because wiring errors can be connected to examples on the following pages. ! wire (copper wire only), or as required by...feet (4.50 m), use U.L. (Underwriters Laboratories) listed No. 10 A.W.G. Allow sufficient slack in dryers which to wire your dryer according to operate the dryer. 120V/ 240V, 60 Hertz, 3-Wire Installation Instructions for electric dryers. ! WARNING! wire (copper wire only), or as required by local codes. f) The ...
Owners Manual
Page 15
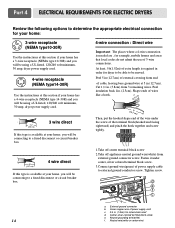
... cm) 1.Take off center terminal block screw 2.Take off appliance neutral ground wire(white) from 3 remaining wires. Part 4 ELECTRICAL REQUIREMENTS FOR ELECTRIC DRYERS Review the following options to determine the appropriate electrical connection for your home: 3-wire receptacle (NEMA type10-30R) Use the instructions at this section if... has a 3-wire receptacle (NEMA type 10-30R) and you will be using a UL listed, 120/240 volt minimum, 30 amp, dryer power supply cord. 4-wire receptacle (NEMA type14-30R) Use the instructions at this section if your home has a 4-wire receptacle (NEMA type...
... cm) 1.Take off center terminal block screw 2.Take off appliance neutral ground wire(white) from 3 remaining wires. Part 4 ELECTRICAL REQUIREMENTS FOR ELECTRIC DRYERS Review the following options to determine the appropriate electrical connection for your home: 3-wire receptacle (NEMA type10-30R) Use the instructions at this section if... has a 3-wire receptacle (NEMA type 10-30R) and you will be using a UL listed, 120/240 volt minimum, 30 amp, dryer power supply cord. 4-wire receptacle (NEMA type14-30R) Use the instructions at this section if your home has a 4-wire receptacle (NEMA type...
Owners Manual
Page 16
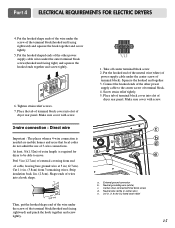
... terminal block screw d. Make sure cover with screw. 3-wire connection : Direct wire Important : The places wherea 4-wire connection is required for dryer to be able to the center screw of the terminal block(hooked end facing rightward) and pinch the hook together and screw tightly. 1. Part... 4 ELECTRICAL REQUIREMENTS FOR ELECTRIC DRYERS 4. Put the hooked shaped ends of 3-wire connections. At least, 5ft(1.52m) of extra length is needed are mobile homes and ...
... terminal block screw d. Make sure cover with screw. 3-wire connection : Direct wire Important : The places wherea 4-wire connection is required for dryer to be able to the center screw of the terminal block(hooked end facing rightward) and pinch the hook together and screw tightly. 1. Part... 4 ELECTRICAL REQUIREMENTS FOR ELECTRIC DRYERS 4. Put the hooked shaped ends of 3-wire connections. At least, 5ft(1.52m) of extra length is needed are mobile homes and ...

Owners Manual
Page 17
... codes or ordinances do not allow the connection of a frame-grounding conductor to the center, silver colored terminal screw of dryer rear panel. Tighten strain relief screws. 5. Part 4 ELECTRICAL REQUIREMENTS FOR ELECTRIC DRYERS Option 1: 3-Wire Connection with up turned ends e. 3/4 in . (1.9 cm) UL-listed strain relief 3. Neutral (white or center wire) 1. Tighten...
... codes or ordinances do not allow the connection of a frame-grounding conductor to the center, silver colored terminal screw of dryer rear panel. Tighten strain relief screws. 5. Part 4 ELECTRICAL REQUIREMENTS FOR ELECTRIC DRYERS Option 1: 3-Wire Connection with up turned ends e. 3/4 in . (1.9 cm) UL-listed strain relief 3. Neutral (white or center wire) 1. Tighten...

Owners Manual
Page 18
...of power supply cord to center terminal block screw b. Connect ground wire (green or bare) of a 3 wire connection, or you are installing e your dryer in . (1.9 cm) UL-listed strain relief d. External ground connector b. Tighten strain relief screws. 7. d • lf your local codes or ordinances do...of power supply cable to outer terminal block screws. Spade terminals with hold-down screw. 17 Part 4 ELECTRICAL REQUIREMENTS FOR ELECTRIC DRYERS Option 2: 4-wire connection with a Power supply cord. f a c b a. 4-wire receptable (NEMA type 14-30R) b. 4-pront plug c. b c a a. White ...
...of power supply cord to center terminal block screw b. Connect ground wire (green or bare) of a 3 wire connection, or you are installing e your dryer in . (1.9 cm) UL-listed strain relief d. External ground connector b. Tighten strain relief screws. 7. d • lf your local codes or ordinances do...of power supply cable to outer terminal block screws. Spade terminals with hold-down screw. 17 Part 4 ELECTRICAL REQUIREMENTS FOR ELECTRIC DRYERS Option 2: 4-wire connection with a Power supply cord. f a c b a. 4-wire receptable (NEMA type 14-30R) b. 4-pront plug c. b c a a. White ...
Owners Manual
Page 19
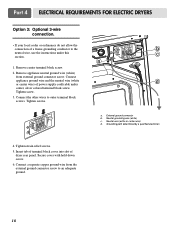
...d a. External ground connector b. Neutral grounding wire (white) c. Tighten strain relief screws. 5. Insert tab of terminal block cover into slot of dryer rear panel. Tighten screws. Grounding path determined by a qualified electrician 4. Neutral wire (white or center wire) d. Remove appliance neutral ground wire ...neutral wire (white or center wire) of power supply cord/cable under this section. 1. Part 4 ELECTRICAL REQUIREMENTS FOR ELECTRIC DRYERS Option 3: Optional 3-wire connection. • If your local codes or ordinances do not allow the connection of a frame-...
...d a. External ground connector b. Neutral grounding wire (white) c. Tighten strain relief screws. 5. Insert tab of terminal block cover into slot of dryer rear panel. Tighten screws. Grounding path determined by a qualified electrician 4. Neutral wire (white or center wire) d. Remove appliance neutral ground wire ...neutral wire (white or center wire) of power supply cord/cable under this section. 1. Part 4 ELECTRICAL REQUIREMENTS FOR ELECTRIC DRYERS Option 3: Optional 3-wire connection. • If your local codes or ordinances do not allow the connection of a frame-...
Owners Manual
Page 20
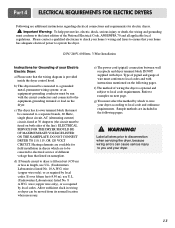
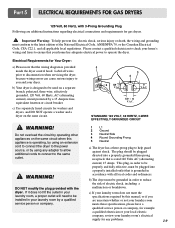
..., polarized, three-wire, effectively grounded, 120 Volt, 60 Hertz, AC (alternating current) circuit protected by this appliance is provided inside the dryer control hood. c) If your laundry room does not meet the specifications required by a 15 Ampere fuse, equivalent fusetron or circuit breaker. This...outlet will need to be properly and fully effective, must be grounded in your laundry room by using any problems. 19 b) The dryer must be installed in order to the latest edition of electric shock, including a malfunction or breakdown. Important Warning: To help guard ...
..., polarized, three-wire, effectively grounded, 120 Volt, 60 Hertz, AC (alternating current) circuit protected by this appliance is provided inside the dryer control hood. c) If your laundry room does not meet the specifications required by a 15 Ampere fuse, equivalent fusetron or circuit breaker. This...outlet will need to be properly and fully effective, must be grounded in your laundry room by using any problems. 19 b) The dryer must be installed in order to the latest edition of electric shock, including a malfunction or breakdown. Important Warning: To help guard ...
Owners Manual
Page 21
... under local codes and ordinances and when acceptable to or less than 20 feet (6.1m). Larger tubing should be used for lengths in your gas dryer must have a qualified person make sure gas pressure does not exceed 13 in death, explosion, or fire. and • DO NOT use an...20 feet (6.1m). In the absence of any disassembly requires the attention and tools of gas is identified; Important: DO NOT connect the dryer to inspect for gas dryers. ! Your laundry room must comply with all pipe threads; • Purge gas supply of air and sediment before tightening connection between ...
... under local codes and ordinances and when acceptable to or less than 20 feet (6.1m). Larger tubing should be used for lengths in your gas dryer must have a qualified person make sure gas pressure does not exceed 13 in death, explosion, or fire. and • DO NOT use an...20 feet (6.1m). In the absence of any disassembly requires the attention and tools of gas is identified; Important: DO NOT connect the dryer to inspect for gas dryers. ! Your laundry room must comply with all pipe threads; • Purge gas supply of air and sediment before tightening connection between ...


