
Owner's Manual (English)
Page 2
...whole selection of user-friendly functions always make you comfortable with dryer operation. ELECTRICAL REQUIREMENTS FOR ELECTRIC DRYERS ...17 PART 6. EXHAUST REQUIREMENTS AND MAINTENANCE ...23 PART 9. PRODUCT FEATURES 1 OUTSTANDING PERFORMANCE Not to select heat level...PART 1. ELECTRICAL REQUIREMENTS FOR GAS DRYERS...21 PART 7. TROUBLESHOOTING GUIDE...31 LG DRYER LIMITED WARRANTY...34 2 What are not as dry as you like them at the end of the cycle. GAS REQUIREMENTS AND INSTRUCTIONS ...22 PART 8. SPECIFICATIONS ...8 PART 3. INITIAL STEPS FOR INSTALLING YOUR DRYER ...9 PART...
...whole selection of user-friendly functions always make you comfortable with dryer operation. ELECTRICAL REQUIREMENTS FOR ELECTRIC DRYERS ...17 PART 6. EXHAUST REQUIREMENTS AND MAINTENANCE ...23 PART 9. PRODUCT FEATURES 1 OUTSTANDING PERFORMANCE Not to select heat level...PART 1. ELECTRICAL REQUIREMENTS FOR GAS DRYERS...21 PART 7. TROUBLESHOOTING GUIDE...31 LG DRYER LIMITED WARRANTY...34 2 What are not as dry as you like them at the end of the cycle. GAS REQUIREMENTS AND INSTRUCTIONS ...22 PART 8. SPECIFICATIONS ...8 PART 3. INITIAL STEPS FOR INSTALLING YOUR DRYER ...9 PART...

Owner's Manual (English)
Page 3
... This is installed, it must be of a specific type identified by a qualified installer, service agency, or the gas supplier. • Install the clothes dryer according to collapse, be killed or seriously injured if you cannot reach your appliance, follow the safety alert symbol and either the word DANGER or... using your gas supplier, call your building. 3. SAVE THESE INSTRUCTIONS 3 Follow the gas supplier's phone. Follow the gas supplier's instructions carefully. 5. Part 1 IMPORTANT WARRANTY AND SAFETY INSTRUCTIONS READ ALL INSTRUCTIONS BEFORE USE WARNING For your appliance.
... This is installed, it must be of a specific type identified by a qualified installer, service agency, or the gas supplier. • Install the clothes dryer according to collapse, be killed or seriously injured if you cannot reach your appliance, follow the safety alert symbol and either the word DANGER or... using your gas supplier, call your building. 3. SAVE THESE INSTRUCTIONS 3 Follow the gas supplier's phone. Follow the gas supplier's instructions carefully. 5. Part 1 IMPORTANT WARRANTY AND SAFETY INSTRUCTIONS READ ALL INSTRUCTIONS BEFORE USE WARNING For your appliance.

Owner's Manual (English)
Page 4
... of life. Items contaminated with cooking oils may contribute to a chemical reaction that could ignite or explode. • Do not reach into the dryer while parts are in a risk of electric shock. In the event of malfunction or breakdown, grounding will minimize incomplete combustion... this Use and Care Guide or in published user-repair instructions that you are moving . • Do not repair or replace any part of the dryer or attempt any servicing unless specifically recommended in this manual must be run with the circuit conductors and connected to the equipment-grounding terminal...
... of life. Items contaminated with cooking oils may contribute to a chemical reaction that could ignite or explode. • Do not reach into the dryer while parts are in a risk of electric shock. In the event of malfunction or breakdown, grounding will minimize incomplete combustion... this Use and Care Guide or in published user-repair instructions that you are moving . • Do not repair or replace any part of the dryer or attempt any servicing unless specifically recommended in this manual must be run with the circuit conductors and connected to the equipment-grounding terminal...

Owner's Manual (English)
Page 5
... when using the appliance, follow these instructions can result in death, explosion, fire or burns. Part 1 IMPORTANT WARRANTY AND SAFETY INSTRUCTIONS READ ALL INSTRUCTIONS BEFORE USE WARNING For your new dryer. Failure to reduce the risk of life. Use of plastic or other combustible ductwork can cause .... SAFETY INSTRUCTION FOR INSTALLATION WARNING To reduce the risk of the home can result in . Improper power circuit can result if the dryer is not exhausted outdoors, some fine lint and large amounts of all governing codes and ordinances. An accumulation of lint in any old...
... when using the appliance, follow these instructions can result in death, explosion, fire or burns. Part 1 IMPORTANT WARRANTY AND SAFETY INSTRUCTIONS READ ALL INSTRUCTIONS BEFORE USE WARNING For your new dryer. Failure to reduce the risk of life. Use of plastic or other combustible ductwork can cause .... SAFETY INSTRUCTION FOR INSTALLATION WARNING To reduce the risk of the home can result in . Improper power circuit can result if the dryer is not exhausted outdoors, some fine lint and large amounts of all governing codes and ordinances. An accumulation of lint in any old...

Owner's Manual (English)
Page 6
...the wall outlet and circuit checked by a qualified electrician to persons when using the appliance, follow these instructions can result if the dryer is properly grounded. Failure to follow basic precautions, including the following : • Do not, under any movement of life....dryer must be used between the dryer and the wall. This provides the best performance and also prevents overloading house wiring circuits which has a voltage rating that have become frayed or otherwise damaged. To prevent personal injury or damage to follow the Installation Instructions. Part...
...the wall outlet and circuit checked by a qualified electrician to persons when using the appliance, follow these instructions can result if the dryer is properly grounded. Failure to follow basic precautions, including the following : • Do not, under any movement of life....dryer must be used between the dryer and the wall. This provides the best performance and also prevents overloading house wiring circuits which has a voltage rating that have become frayed or otherwise damaged. To prevent personal injury or damage to follow the Installation Instructions. Part...

Owner's Manual (English)
Page 7
... explosion, electric shock or to record the model number and serial number of Purchase Staple your nearest LG Service Center. You will repair or replace any parts defective in this manual. Warranty Restriction: If the dryer is effective for only 90 days. Model Number. Date of your safety, the recommendations in material or...
... explosion, electric shock or to record the model number and serial number of Purchase Staple your nearest LG Service Center. You will repair or replace any parts defective in this manual. Warranty Restriction: If the dryer is effective for only 90 days. Model Number. Date of your safety, the recommendations in material or...
Owner's Manual (English)
Page 8
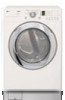
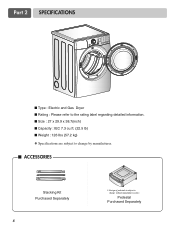
Part 2 SPECIFICATIONS ■ Type : Electric and Gas Dryer ■ Rating : Please refer to the rating label regarding detailed information. ■ Size : 27 x 29.9 x 38.7(inch) ■ Capacity : IEC 7.3 cu.ft. (22.5 lb) ■ Weight : 126 Ibs (57.2 kg) ❋ Specifications are subject to change by manufacturer. ■ ACCESSORIES Stacking Kit Purchased Separately 8 ❊ Design of pedestals is subject to change without manafaturers notice. Pedestal Purchased Separately
Part 2 SPECIFICATIONS ■ Type : Electric and Gas Dryer ■ Rating : Please refer to the rating label regarding detailed information. ■ Size : 27 x 29.9 x 38.7(inch) ■ Capacity : IEC 7.3 cu.ft. (22.5 lb) ■ Weight : 126 Ibs (57.2 kg) ❋ Specifications are subject to change by manufacturer. ■ ACCESSORIES Stacking Kit Purchased Separately 8 ❊ Design of pedestals is subject to change without manafaturers notice. Pedestal Purchased Separately

Owner's Manual (English)
Page 9
... Most installations require a minimum 51/2 inches. (14 cm) clearance behind , and to level with any installation or use. Part 3 INITIAL STEPS FOR INSTALLING YOUR DRYER The following instructions in mind when installing in a closet or recessed area: • Consider allowing additional clearance for installation and ...and use . Note Leveling legs should be cautious not to injure your dryer in other parts of clearance is important that it is recommended to STEP 9 for a garage installation. If dryer is not level, laundry may necessitate additional clearances. • An ...
... Most installations require a minimum 51/2 inches. (14 cm) clearance behind , and to level with any installation or use. Part 3 INITIAL STEPS FOR INSTALLING YOUR DRYER The following instructions in mind when installing in a closet or recessed area: • Consider allowing additional clearance for installation and ...and use . Note Leveling legs should be cautious not to injure your dryer in other parts of clearance is important that it is recommended to STEP 9 for a garage installation. If dryer is not level, laundry may necessitate additional clearances. • An ...

Owner's Manual (English)
Page 10
... and clearances for Reversing the Door The door on the floor and the dryer should not exceed 2.5 cm (1 inch). Follow these instructions to back. Part 3 INITIAL STEPS FOR INSTALLING YOUR DRYER Once in which your dryer. Note: Other sections of the dryer from left or the right. SSTTEEPP 22: Procedure for your door opens: Note...
... and clearances for Reversing the Door The door on the floor and the dryer should not exceed 2.5 cm (1 inch). Follow these instructions to back. Part 3 INITIAL STEPS FOR INSTALLING YOUR DRYER Once in which your dryer. Note: Other sections of the dryer from left or the right. SSTTEEPP 22: Procedure for your door opens: Note...

Owner's Manual (English)
Page 11
...runs through the hole in death or fire. ■ ALTERNATE EXHAUST DIRECTIONS 1. Remove screw and exhaust duct. (Use exhaust kit part #3911EZ9131X.) 2-1. Tape the joint. 3-2. The use plastic or thin foil duct. • Clean old ducts before installing this assembly...installing this ducting will cause dryer malfunction. Part 3 INITIAL STEPS FOR INSTALLING YOUR DRYER STEP 3 Connecting the Exhaust and Venting System. Warning: The dryer must point away from the dryer. • Use as few elbow joints as transition ducting between the dryer and wall connection only. Insert...
...runs through the hole in death or fire. ■ ALTERNATE EXHAUST DIRECTIONS 1. Remove screw and exhaust duct. (Use exhaust kit part #3911EZ9131X.) 2-1. Tape the joint. 3-2. The use plastic or thin foil duct. • Clean old ducts before installing this assembly...installing this ducting will cause dryer malfunction. Part 3 INITIAL STEPS FOR INSTALLING YOUR DRYER STEP 3 Connecting the Exhaust and Venting System. Warning: The dryer must point away from the dryer. • Use as few elbow joints as transition ducting between the dryer and wall connection only. Insert...

Owner's Manual (English)
Page 12
... gas connection. 2. Turn on the model/serial rating plate. More detailed information concerning the electrical connection is appropriate for electric dryers. A four-wire cord is proper for complete instructions. • Failure to do not allow the burner to this manual's... of this manual, before making the electrical connection for the dryer. Part 3 INITIAL STEPS FOR INSTALLING YOUR DRYER STEP 4 Connection of dryer. 4. Use 1/2" pipe. 5. 3/8" N.P.T. If needed at this elevation because AGA certifies this dryer. 1. Or using a new flexible stainless steel connector (as...
... gas connection. 2. Turn on the model/serial rating plate. More detailed information concerning the electrical connection is appropriate for electric dryers. A four-wire cord is proper for complete instructions. • Failure to do not allow the burner to this manual's... of this manual, before making the electrical connection for the dryer. Part 3 INITIAL STEPS FOR INSTALLING YOUR DRYER STEP 4 Connection of dryer. 4. Use 1/2" pipe. 5. 3/8" N.P.T. If needed at this elevation because AGA certifies this dryer. 1. Or using a new flexible stainless steel connector (as...

Owner's Manual (English)
Page 13
... can be warm after completing all steps in this manual for proper installation of this appliance, use of the Dryer. Part 3 INITIAL STEPS FOR INSTALLING YOUR DRYER STEP 6 Preparation of this dryer, start the dryer on your dryer after completing all air is running with a manometer, placed on a heat setting. Warning: If all steps in this...
... can be warm after completing all steps in this manual for proper installation of this appliance, use of the Dryer. Part 3 INITIAL STEPS FOR INSTALLING YOUR DRYER STEP 6 Preparation of this dryer, start the dryer on your dryer after completing all air is running with a manometer, placed on a heat setting. Warning: If all steps in this...

Owner's Manual (English)
Page 14
...! • DO NOT connect exhaust ducts with metal screws or fasteners that the clearance of the duct from any installation of Your Dryer in a manufactured or mobile home: 1) The electrical connection for outside using the back, left , or bottom panel. Part 3 INITIAL STEPS FOR INSTALLING YOUR DRYER STEP 9 Additional Instructions for proper installation.
...! • DO NOT connect exhaust ducts with metal screws or fasteners that the clearance of the duct from any installation of Your Dryer in a manufactured or mobile home: 1) The electrical connection for outside using the back, left , or bottom panel. Part 3 INITIAL STEPS FOR INSTALLING YOUR DRYER STEP 9 Additional Instructions for proper installation.
Owner's Manual (English)
Page 15
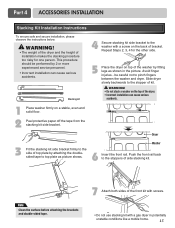
...person. WARNING! • Do not stack a washer on top of the dryer. • Incorrect installation can cause serious accidents. Push the front rail back to the stopper of side stacking kit. Part 4 ACCESSORIES INSTALLATION Stacking Kit Installation Instructions To ensure safe and secure installation, ...please observe the instructions below. WARNING! • The weight of the dryer and the height of installation makes the stacking ...
...person. WARNING! • Do not stack a washer on top of the dryer. • Incorrect installation can cause serious accidents. Push the front rail back to the stopper of side stacking kit. Part 4 ACCESSORIES INSTALLATION Stacking Kit Installation Instructions To ensure safe and secure installation, ...please observe the instructions below. WARNING! • The weight of the dryer and the height of installation makes the stacking ...

Owner's Manual (English)
Page 16
... the front and back feet are solidly against the floor. 2 Retract fully Then loosen 1-1/2 turns Insert the T-clip of the dryer by hand. The dryer feet will fit into the dryer base as shown. Part 4 ACCESSORIES INSTALLATION Pedestal Installation Instructions The pedestal accessory includes: • Drawer divider (1) • Wrench (1) • Screws (18) † •...
... the front and back feet are solidly against the floor. 2 Retract fully Then loosen 1-1/2 turns Insert the T-clip of the dryer by hand. The dryer feet will fit into the dryer base as shown. Part 4 ACCESSORIES INSTALLATION Pedestal Installation Instructions The pedestal accessory includes: • Drawer divider (1) • Wrench (1) • Screws (18) † •...
Owner's Manual (English)
Page 17
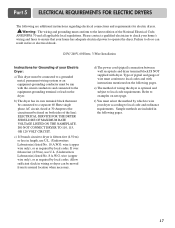
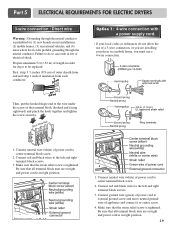
Part 5 ELECTRICAL REQUIREMENTS FOR ELECTRIC DRYERS The following are included in the following pages. b) The dryer has its normal location when necessary. Refer to the equipment-grounding terminal or lead on next page. If over fifteen feet (4.50 m), use U.L. (Underwriters Laboratories) listed No. 10 A.W.G. d) The power cord (pigtail) connection between wall receptacle and dryer... Failure to do so can be moved from its own terminal block that your Electric Dryer: a) This dryer must be connected to a grounded metal, permanent wiring system or an equipment-grounding conductor...
Part 5 ELECTRICAL REQUIREMENTS FOR ELECTRIC DRYERS The following are included in the following pages. b) The dryer has its normal location when necessary. Refer to the equipment-grounding terminal or lead on next page. If over fifteen feet (4.50 m), use U.L. (Underwriters Laboratories) listed No. 10 A.W.G. d) The power cord (pigtail) connection between wall receptacle and dryer... Failure to do so can be moved from its own terminal block that your Electric Dryer: a) This dryer must be connected to a grounded metal, permanent wiring system or an equipment-grounding conductor...

Owner's Manual (English)
Page 18
...if your home has a 3-wire receptacle (NEMA type 10-30R) and you will be using a UL listed, 120/240 volt minimum, 30 amp, dryer power supply cord. 3-wire receptacle (NEMA type10-30R) Use the instructions in this type is available at your home. After cutting 11/2 inch (3.8 cm...or excessive current flow may result. Then, put the hooked shape end of the wire under the screw of length in block. Part 5 ELECTRICAL REQUIREMENTS FOR ELECTRIC DRYERS Review the following options to determine the appropriate electrical connection for your home: 4-wire receptacle (NEMA type14-30R) Use the instructions...
...if your home has a 3-wire receptacle (NEMA type 10-30R) and you will be using a UL listed, 120/240 volt minimum, 30 amp, dryer power supply cord. 3-wire receptacle (NEMA type10-30R) Use the instructions in this type is available at your home. After cutting 11/2 inch (3.8 cm...or excessive current flow may result. Then, put the hooked shape end of the wire under the screw of length in block. Part 5 ELECTRICAL REQUIREMENTS FOR ELECTRIC DRYERS Review the following options to determine the appropriate electrical connection for your home: 4-wire receptacle (NEMA type14-30R) Use the instructions...
Owner's Manual (English)
Page 19
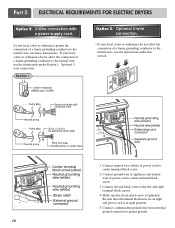
...tighten the screw securely. 1. Connect red and black wires to center terminal block screw. 2. Be sure that all terminal block nuts are installing your dryer in right position. 1. Connect neutral wire (white) of power cord to be replaced. Failure to the left and right terminal block screws. 3. ... screw and move neutral ground wire of a 3-wire connection, or you must use of appliance and connect it to center screw. 4. Part 5 ELECTRICAL REQUIREMENTS FOR ELECTRIC DRYERS 3-wire connection : Direct wire Warning : Grounding through the neutral conductor is tightened.
...tighten the screw securely. 1. Connect red and black wires to center terminal block screw. 2. Be sure that all terminal block nuts are installing your dryer in right position. 1. Connect neutral wire (white) of power cord to be replaced. Failure to the left and right terminal block screws. 3. ... screw and move neutral ground wire of a 3-wire connection, or you must use of appliance and connect it to center screw. 4. Part 5 ELECTRICAL REQUIREMENTS FOR ELECTRIC DRYERS 3-wire connection : Direct wire Warning : Grounding through the neutral conductor is tightened.
Owner's Manual (English)
Page 20
... local codes or ordinances do not allow the connection of a frame-grounding conductor to the neutral wire, use the instructions under Section 1: Optional 3wire connection. Part 5 ELECTRICAL REQUIREMENTS FOR ELECTRIC DRYERS Option 2: 3-Wire connection with a power supply cord.
... local codes or ordinances do not allow the connection of a frame-grounding conductor to the neutral wire, use the instructions under Section 1: Optional 3wire connection. Part 5 ELECTRICAL REQUIREMENTS FOR ELECTRIC DRYERS Option 2: 3-Wire connection with a power supply cord.

Owner's Manual (English)
Page 21
...Electrical Code, ANSI/NFPA 70, or the Canadian Electrical Code, CSA C22.1, and all local codes and ordinances. Electrical Requirements for gas dryers. c) If your laundry room does not meet the specifications required by this appliance is rated 120 Volts AC (alternating current) 15 Amps...can result in fire or electrical shock. WARNING! • DO NOT modify the plug provided with all applicable local regulations. Part 6 ELECTRICAL REQUIREMENTS FOR GAS DRYERS 120 Volt, 60 Hertz, with 3-Prong Grounding Plug Following are uncertain whether or not your laundry room by a qualified ...
...Electrical Code, ANSI/NFPA 70, or the Canadian Electrical Code, CSA C22.1, and all local codes and ordinances. Electrical Requirements for gas dryers. c) If your laundry room does not meet the specifications required by this appliance is rated 120 Volts AC (alternating current) 15 Amps...can result in fire or electrical shock. WARNING! • DO NOT modify the plug provided with all applicable local regulations. Part 6 ELECTRICAL REQUIREMENTS FOR GAS DRYERS 120 Volt, 60 Hertz, with 3-Prong Grounding Plug Following are uncertain whether or not your laundry room by a qualified ...


