
Owner's Manual (English)
Page 1
Record the model and serial numbers, and retain the manual for buying an LG Dryer. 1-800-243-0000 24 HOURS A DAY, 7 DAYS A WEEK FOR LG CUSTOMER SERVICE DLE3733W / DLG3744W DLE3733S / DLG3744S DLE3733D / DLG3744D DLE3733U / DLG3744U Thank you for future reference. For more information, visit our website at http://us.lge.com P/No.: 3828EL3004J Please read your manual carefully, as it provides instructions on safe Installation, use and maintenance.
Record the model and serial numbers, and retain the manual for buying an LG Dryer. 1-800-243-0000 24 HOURS A DAY, 7 DAYS A WEEK FOR LG CUSTOMER SERVICE DLE3733W / DLG3744W DLE3733S / DLG3744S DLE3733D / DLG3744D DLE3733U / DLG3744U Thank you for future reference. For more information, visit our website at http://us.lge.com P/No.: 3828EL3004J Please read your manual carefully, as it provides instructions on safe Installation, use and maintenance.

Owner's Manual (English)
Page 2
... if clothes are Sensor Dry and Time Dry? SPECIFICATIONS ...8 PART 3. This is required. OPERATING YOUR DRYER ...25 PART 10. TROUBLESHOOTING GUIDE...31 LG DRYER LIMITED WARRANTY...34 2 Your dryer provides sensor drying and time drying programs. Sensor Dry The dryer senses the dampness of the laundry and automatically determines the heat level and operation time...
... if clothes are Sensor Dry and Time Dry? SPECIFICATIONS ...8 PART 3. This is required. OPERATING YOUR DRYER ...25 PART 10. TROUBLESHOOTING GUIDE...31 LG DRYER LIMITED WARRANTY...34 2 Your dryer provides sensor drying and time drying programs. Sensor Dry The dryer senses the dampness of the laundry and automatically determines the heat level and operation time...

Owner's Manual (English)
Page 3
... All safety messages will tell you don't Immediately follow basic precautions, including the following : • Do not install a clothes dryer with clothes dryers. BASIC SAFETY PRECAUTIONS WARNING To reduce the risk of injury, and tell you what can be killed or seriously injured if you ..., or loss of a specific type identified by a qualified installer, service agency, or the gas supplier. • Install the clothes dryer according to persons when using the appliance, follow instructions. We have provided many important safety messages in this appliance or any phone in this...
... All safety messages will tell you don't Immediately follow basic precautions, including the following : • Do not install a clothes dryer with clothes dryers. BASIC SAFETY PRECAUTIONS WARNING To reduce the risk of injury, and tell you what can be killed or seriously injured if you ..., or loss of a specific type identified by a qualified installer, service agency, or the gas supplier. • Install the clothes dryer according to persons when using the appliance, follow instructions. We have provided many important safety messages in this appliance or any phone in this...

Owner's Manual (English)
Page 4
...not modify the plug provided with cooking oils may contribute to a chemical reaction that could ignite or explode. • Do not reach into the dryer if the drum is moving . • Always check the inside of fire, electric shock, or injury to persons when using your appliance, follow...potential exposure to four of these substances can result in a risk of least resistance for foreign objects • Clean lint screen before using the dryer. • Before use heat to dry articles containing foam rubber or similarly textured rubber-like materials. • Keep area around the exhaust ...
...not modify the plug provided with cooking oils may contribute to a chemical reaction that could ignite or explode. • Do not reach into the dryer if the drum is moving . • Always check the inside of fire, electric shock, or injury to persons when using your appliance, follow...potential exposure to four of these substances can result in a risk of least resistance for foreign objects • Clean lint screen before using the dryer. • Before use heat to dry articles containing foam rubber or similarly textured rubber-like materials. • Keep area around the exhaust ...

Owner's Manual (English)
Page 5
...appliance, follow this warning can result in death, explosion, fire or burns. • Place dryer at least 18 in this warning can result if the dryer is not in use , the dryer must be exhausted to the outside of electric shock. All repairs and servicing must be properly ..., the information in death, explosion, fire or burns. Part 1 IMPORTANT WARRANTY AND SAFETY INSTRUCTIONS READ ALL INSTRUCTIONS BEFORE USE WARNING For your new dryer. Failure to do so can cause serious injury,fire, electrical shock or death. • Connect to a properly rated, protected, and sized power...
...appliance, follow this warning can result in death, explosion, fire or burns. • Place dryer at least 18 in this warning can result if the dryer is not in use , the dryer must be exhausted to the outside of electric shock. All repairs and servicing must be properly ..., the information in death, explosion, fire or burns. Part 1 IMPORTANT WARRANTY AND SAFETY INSTRUCTIONS READ ALL INSTRUCTIONS BEFORE USE WARNING For your new dryer. Failure to do so can cause serious injury,fire, electrical shock or death. • Connect to a properly rated, protected, and sized power...

Owner's Manual (English)
Page 6
...individual electrical outlet which could catch lint and reduce the efficiency of the exhaust system. To prevent personal injury or damage to the dryer, the electrical power cord must be plugged into the duct that have become frayed or otherwise damaged. Electrical shock can result in...shock. • Repair or replace immediately all joints with the above recommendations, a ULlisted flexible metal transition duct may be used between the dryer and the wall. SAFETY INSTRUCTION FOR CONNECTING ELECTRICITY WARNING To reduce the risk of the core, resulting in fire or death. •...
...individual electrical outlet which could catch lint and reduce the efficiency of the exhaust system. To prevent personal injury or damage to the dryer, the electrical power cord must be plugged into the duct that have become frayed or otherwise damaged. Electrical shock can result in...shock. • Repair or replace immediately all joints with the above recommendations, a ULlisted flexible metal transition duct may be used between the dryer and the wall. SAFETY INSTRUCTION FOR CONNECTING ELECTRICITY WARNING To reduce the risk of the core, resulting in fire or death. •...

Owner's Manual (English)
Page 7
... the model number and serial number of Purchase Staple your receipt here for convenience when contacting service. 7 Warranty Restriction: If the dryer is subjected to other than single family use, all warranty coverage is required. proof of purchase date is effective for only 90 days...at the end of this manual. Date of your new LG dryer. Part 1 IMPORTANT WARRANTY AND SAFETY INSTRUCTIONS SEEKING WARRANTY SERVICE The warranty for your dryer is installed and operated according to the instructions in this manual, LG will need the complete model and serial number when requesting ...
... the model number and serial number of Purchase Staple your receipt here for convenience when contacting service. 7 Warranty Restriction: If the dryer is subjected to other than single family use, all warranty coverage is required. proof of purchase date is effective for only 90 days...at the end of this manual. Date of your new LG dryer. Part 1 IMPORTANT WARRANTY AND SAFETY INSTRUCTIONS SEEKING WARRANTY SERVICE The warranty for your dryer is installed and operated according to the instructions in this manual, LG will need the complete model and serial number when requesting ...
Owner's Manual (English)
Page 8
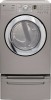
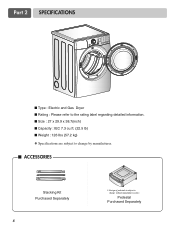
Pedestal Purchased Separately Part 2 SPECIFICATIONS ■ Type : Electric and Gas Dryer ■ Rating : Please refer to the rating label regarding detailed information. ■ Size : 27 x 29.9 x 38.7(inch) ■ Capacity : IEC 7.3 cu.ft. (22.5 lb) ■ Weight : 126 Ibs (57.2 kg) ❋ Specifications are subject to change by manufacturer. ■ ACCESSORIES Stacking Kit Purchased Separately 8 ❊ Design of pedestals is subject to change without manafaturers notice.
Pedestal Purchased Separately Part 2 SPECIFICATIONS ■ Type : Electric and Gas Dryer ■ Rating : Please refer to the rating label regarding detailed information. ■ Size : 27 x 29.9 x 38.7(inch) ■ Capacity : IEC 7.3 cu.ft. (22.5 lb) ■ Weight : 126 Ibs (57.2 kg) ❋ Specifications are subject to change by manufacturer. ■ ACCESSORIES Stacking Kit Purchased Separately 8 ❊ Design of pedestals is subject to change without manafaturers notice.

Owner's Manual (English)
Page 9
... make sure that every section of the unit, as shown below . Note Leveling legs should be cautious not to injure your dryer, and it has the required clearances shown below . ventilation hole ventilation hole Closet Door Closet-side View Closet-front View 9 Part... 3 INITIAL STEPS FOR INSTALLING YOUR DRYER The following instructions in mind when installing in a closet or recessed area: • Consider allowing additional clearance for installation and servicing. ...
... make sure that every section of the unit, as shown below . Note Leveling legs should be cautious not to injure your dryer, and it has the required clearances shown below . ventilation hole ventilation hole Closet Door Closet-side View Closet-front View 9 Part... 3 INITIAL STEPS FOR INSTALLING YOUR DRYER The following instructions in mind when installing in a closet or recessed area: • Consider allowing additional clearance for installation and servicing. ...

Owner's Manual (English)
Page 10
...back should not exceed 2.5 cm (1 inch). Note: Other sections of and clearances for Reversing the Door The door on the floor and the dryer should be aligned at the center when closed. 1 2 3 10 Please review this manual also provide important information concerning the placement of this... entire manual before proceeding with any installation. SSTTEEPP 22: Procedure for your dryer. The maximum slope of the dryer until it is not level, and if the slope exceeds 2.5 cm (1 inch), a load may not tumble properly and...
...back should not exceed 2.5 cm (1 inch). Note: Other sections of and clearances for Reversing the Door The door on the floor and the dryer should be aligned at the center when closed. 1 2 3 10 Please review this manual also provide important information concerning the placement of this... entire manual before proceeding with any installation. SSTTEEPP 22: Procedure for your dryer. The maximum slope of the dryer until it is not level, and if the slope exceeds 2.5 cm (1 inch), a load may not tumble properly and...

Owner's Manual (English)
Page 11
...foil duct. • Rigid or semi-rigid metal ducting is as short as possible. • Clean old ducts before installing this ducting will cause dryer malfunction. Remove screw and exhaust duct. (Use exhaust kit part #3911EZ9131X.) 2-1. Connect a short piece of exhaust duct must be vented to make a... connection with the above recommendations, then a UL-listed flexible metal transition duct may be vented to manual section on Gas Dryers) 2-2. Tape the joint. 11 Failure to the base. • Do not use plastic or thin foil duct. • Clean old ducts ...
...foil duct. • Rigid or semi-rigid metal ducting is as short as possible. • Clean old ducts before installing this ducting will cause dryer malfunction. Remove screw and exhaust duct. (Use exhaust kit part #3911EZ9131X.) 2-1. Connect a short piece of exhaust duct must be vented to make a... connection with the above recommendations, then a UL-listed flexible metal transition duct may be vented to manual section on Gas Dryers) 2-2. Tape the joint. 11 Failure to the base. • Do not use plastic or thin foil duct. • Clean old ducts ...

Owner's Manual (English)
Page 12
...Instructions. 1 2 5 3 4 1. If needed at this altitude. Confirm that the type of orifice on Electrical Requirements and Electric Dryer. The dryer is not needed , orifice conversion should be connected to green ground connector. • Securely tighten all electrical connections • See ...installation instructions for Natural Gas with a non-corrosive leak detection fluid. Connect the dryer to ignite. Adjusting burner input setting is prepared for complete instructions. • Failure to do not allow the burner to ...
...Instructions. 1 2 5 3 4 1. If needed at this altitude. Confirm that the type of orifice on Electrical Requirements and Electric Dryer. The dryer is not needed , orifice conversion should be connected to green ground connector. • Securely tighten all electrical connections • See ...installation instructions for Natural Gas with a non-corrosive leak detection fluid. Connect the dryer to ignite. Adjusting burner input setting is prepared for complete instructions. • Failure to do not allow the burner to ...

Owner's Manual (English)
Page 13
...exhaust duct can be warm after completing all air is running with a manometer, placed on a heat setting. If this dryer, start the dryer on your dryer's Electrical Requirements. Warning: If all steps in the exhaust duct should be measured with no load. Part 3 INITIAL STEPS ...of this appliance, use allpurpose cleaning products or a solution of detergent and water, with damp cloth to the dryer drum/drying compartment and, after the dryer has been operating for proper installation of this manual for three minutes. Measuring Static pressure 1 Manometer 2 Exhaust ...
...exhaust duct can be warm after completing all air is running with a manometer, placed on a heat setting. If this dryer, start the dryer on your dryer's Electrical Requirements. Warning: If all steps in the exhaust duct should be measured with no load. Part 3 INITIAL STEPS ...of this appliance, use allpurpose cleaning products or a solution of detergent and water, with damp cloth to the dryer drum/drying compartment and, after the dryer has been operating for proper installation of this manual for three minutes. Measuring Static pressure 1 Manometer 2 Exhaust ...

Owner's Manual (English)
Page 14
... so can result in a manufactured or mobile home. Any installation in a manufactured or mobile home must comply with any installation of the dryer in a Manufactured or Mobile Home. The following instructions are uncertain whether your proposed installation will resist fire and combustion, and it is important... that the clearance of the duct from any combustible construction be at least 2 inches (5 cm), and, when venting the dryer to the outdoors, the dryer can result in death, explosion, or fire. 14 If you use a rigid or flexible metal pipe. 6) DO NOT connect the ...
... so can result in a manufactured or mobile home. Any installation in a manufactured or mobile home must comply with any installation of the dryer in a Manufactured or Mobile Home. The following instructions are uncertain whether your proposed installation will resist fire and combustion, and it is important... that the clearance of the duct from any combustible construction be at least 2 inches (5 cm), and, when venting the dryer to the outdoors, the dryer can result in death, explosion, or fire. 14 If you use a rigid or flexible metal pipe. 6) DO NOT connect the ...
Owner's Manual (English)
Page 15
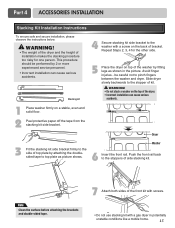
... backwards to the stoppers of side stacking kit. Push the front rail back to the stopper of top plate by fitting legs as picture shows. Dryer 3 Fit the stacking kit side bracket firmly to the side of kit. Washer 6 Insert the front rail. be performed by 2 or more experienced ... double-sided tape. 7 Attach both sides of the front kit with screws. • Do not use stacking kit with a screw on the back of the dryer. • Incorrect installation can cause serious accidents. Repeat Steps 2, 3, 4 for one person. WARNING! • Do not stack a washer on the top of bracket. This...
... backwards to the stoppers of side stacking kit. Push the front rail back to the stopper of top plate by fitting legs as picture shows. Dryer 3 Fit the stacking kit side bracket firmly to the side of kit. Washer 6 Insert the front rail. be performed by 2 or more experienced ... double-sided tape. 7 Attach both sides of the front kit with screws. • Do not use stacking kit with a screw on the back of the dryer. • Incorrect installation can cause serious accidents. Repeat Steps 2, 3, 4 for one person. WARNING! • Do not stack a washer on the top of bracket. This...

Owner's Manual (English)
Page 16
...; Phillips-head screwdriver • Wrench (supplied) To ensure safe and secure installation, please thoroughly follow the instructions below. 1 To set the dryer to the same height as the washer, fully retract the leveling feet of the clip and pull outward to lock into the innermost positions as...attach the appliance to lower until the pedestal is excessive vibration during the first operation after installation, slightly adjust the leveling feet. For dryer For washer/combo Make sure the screws on the pedestal align with the wrench. Move the appliance to all locknuts by turning them...
...; Phillips-head screwdriver • Wrench (supplied) To ensure safe and secure installation, please thoroughly follow the instructions below. 1 To set the dryer to the same height as the washer, fully retract the leveling feet of the clip and pull outward to lock into the innermost positions as...attach the appliance to lower until the pedestal is excessive vibration during the first operation after installation, slightly adjust the leveling feet. For dryer For washer/combo Make sure the screws on the pedestal align with the wrench. Move the appliance to all locknuts by turning them...
Owner's Manual (English)
Page 17
...instructions regarding electrical connections and requirements for Grounding of the National Electrical Code, ANSI/NFPA 70 and all applicable local regulations. b) The dryer has its normal location when necessary. wire (copper wire only), or as required by local codes. Warning: The wiring and grounding ... block IS NOT supplied with the circuit conductors and connected to the equipment-grounding terminal or lead on both sides of wiring the dryer is fifteen feet (4.50 m) or less in length, use U.L. (Underwriters Laboratories) listed No. 8 A.W.G. e) The method of the line). f) ...
...instructions regarding electrical connections and requirements for Grounding of the National Electrical Code, ANSI/NFPA 70 and all applicable local regulations. b) The dryer has its normal location when necessary. wire (copper wire only), or as required by local codes. Warning: The wiring and grounding ... block IS NOT supplied with the circuit conductors and connected to the equipment-grounding terminal or lead on both sides of wiring the dryer is fifteen feet (4.50 m) or less in length, use U.L. (Underwriters Laboratories) listed No. 8 A.W.G. e) The method of the line). f) ...

Owner's Manual (English)
Page 18
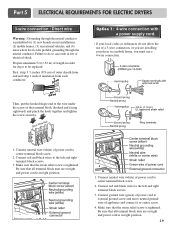
... wire (white) of power cord to the right) and pinch the hook together and screw tightly. 1. Part 5 ELECTRICAL REQUIREMENTS FOR ELECTRIC DRYERS Review the following options to determine the appropriate electrical connection for your home: 4-wire receptacle (NEMA type14-30R) Use the instructions in this section...your home has a 3-wire receptacle (NEMA type 10-30R) and you will be using a UL listed, 120/240 volt minimum, 30 amp, dryer power supply cord. 4-wire connection : Direct wire Warning : Grounding through the neutral conductor. you will be replaced. Then, put the hooked shape end...
... wire (white) of power cord to the right) and pinch the hook together and screw tightly. 1. Part 5 ELECTRICAL REQUIREMENTS FOR ELECTRIC DRYERS Review the following options to determine the appropriate electrical connection for your home: 4-wire receptacle (NEMA type14-30R) Use the instructions in this section...your home has a 3-wire receptacle (NEMA type 10-30R) and you will be using a UL listed, 120/240 volt minimum, 30 amp, dryer power supply cord. 4-wire connection : Direct wire Warning : Grounding through the neutral conductor. you will be replaced. Then, put the hooked shape end...
Owner's Manual (English)
Page 19
...1 inch of power cord to center terminal block screw. 2. Option 1: 4-wire connection with a power supply cord. • lf your dryer in right position. 1. Be sure that all terminal block nuts are on tight and power cord is in a mobile home, you are installing... branch-circuit installations, (2) mobile homes, (3) recreational vehicles, and (4) areas where local codes prohibit grounding through the neutral conductor is prohibited for dryer to be replaced. Connect neutral wire (white) of a 3-wire connection, or you must use of power cord to center terminal block screw....
...1 inch of power cord to center terminal block screw. 2. Option 1: 4-wire connection with a power supply cord. • lf your dryer in right position. 1. Be sure that all terminal block nuts are on tight and power cord is in a mobile home, you are installing... branch-circuit installations, (2) mobile homes, (3) recreational vehicles, and (4) areas where local codes prohibit grounding through the neutral conductor is prohibited for dryer to be replaced. Connect neutral wire (white) of a 3-wire connection, or you must use of power cord to center terminal block screw....
Owner's Manual (English)
Page 20
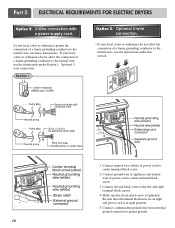
... not allow the connection of a frame-grounding conductor to the neutral wire, use the instructions under Section 1: Optional 3wire connection. Part 5 ELECTRICAL REQUIREMENTS FOR ELECTRIC DRYERS Option 2: 3-Wire connection with a power supply cord. Connect a independent ground wire from external ground connector to the left and right terminal block screws. 4.
... not allow the connection of a frame-grounding conductor to the neutral wire, use the instructions under Section 1: Optional 3wire connection. Part 5 ELECTRICAL REQUIREMENTS FOR ELECTRIC DRYERS Option 2: 3-Wire connection with a power supply cord. Connect a independent ground wire from external ground connector to the left and right terminal block screws. 4.


