Owners Manual
Page 1
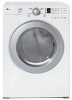
1-800-243-0000 24 HOURS A DAY, 7 DAYS A WEEK FOR LG CUSTOMER SERVICE il .....t.".... ElectricandGasDryer DLE2516W / DLG2526W Thank you for future reference. Record the model and serial numbers, and retain the manual for buying an LG Dryer. For more information, visit our website at http:i/us.lge.com P/No.: 3828EL3004E Please read your manual carefully, as it provides instructions on safe Installation, use and maintenance.
1-800-243-0000 24 HOURS A DAY, 7 DAYS A WEEK FOR LG CUSTOMER SERVICE il .....t.".... ElectricandGasDryer DLE2516W / DLG2526W Thank you for future reference. Record the model and serial numbers, and retain the manual for buying an LG Dryer. For more information, visit our website at http:i/us.lge.com P/No.: 3828EL3004E Please read your manual carefully, as it provides instructions on safe Installation, use and maintenance.
Owners Manual
Page 2
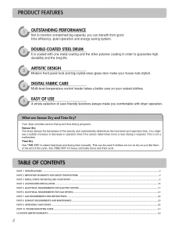
...decrease in order to guarantee high durability and the long life. GAS REQUEREMENTS AND INSTRUCTIONS ... 22 PART 8. TROUBLESHOOTING GUIDE ... 31 LG DRYER LIMITED WARRANTY ... 34 2 EASY OF USE A whole selection of user-friendly functions always make your valued clothes. Time Dry ...Use TIME DRY to select heat level and drying time manually. OPERATING YOUR DRYER ... 25 PART 10. iMPORTANT WARRANTY AND SAFETY iNSTRUCTiONS ... 4 PART 3 INITLAL STEPS FOR INSTALLING YOUR DRYER ... 9 ...
...decrease in order to guarantee high durability and the long life. GAS REQUEREMENTS AND INSTRUCTIONS ... 22 PART 8. TROUBLESHOOTING GUIDE ... 31 LG DRYER LIMITED WARRANTY ... 34 2 EASY OF USE A whole selection of user-friendly functions always make your valued clothes. Time Dry ...Use TIME DRY to select heat level and drying time manually. OPERATING YOUR DRYER ... 25 PART 10. iMPORTANT WARRANTY AND SAFETY iNSTRUCTiONS ... 4 PART 3 INITLAL STEPS FOR INSTALLING YOUR DRYER ... 9 ...
Owners Manual
Page 4
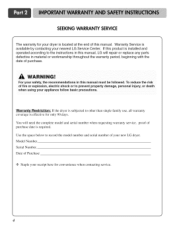
If this manual, LG will need the complete model and serial number when requesting warranty service, proof of Purchase -_ Staple your receipt here for convenience when contacting service. To reduce the risk of purchase. Use the space below to the instructions in this manual. Warranty Restriction: If the ...other than single family use, all warranty coverage is installed and operated according to record the model number and serial number of this manual must be followed. Serial Number. Date of purchase date is required. For your safety, the recom mendations in this product is ...
If this manual, LG will need the complete model and serial number when requesting warranty service, proof of Purchase -_ Staple your receipt here for convenience when contacting service. To reduce the risk of purchase. Use the space below to the instructions in this manual. Warranty Restriction: If the ...other than single family use, all warranty coverage is installed and operated according to record the model number and serial number of this manual must be followed. Serial Number. Date of purchase date is required. For your safety, the recom mendations in this product is ...
Owners Manual
Page 5
...dryer. • Before use, the dryer must be run with gasoline, dry-cleaning solvents, other flammable or explosive substances as described in this manual. • Do not allow children to play on or in the dryer. Your Safety and the safety of the equipment- servicing unless specifically... recommended in this Use and Care Guide or in published user-repair instructions that have provided many important safety messages in this manual and on your dryer. If it will reduce the risk of electric shock by qualified service personnel. Always read and obey all local...
...dryer. • Before use, the dryer must be run with gasoline, dry-cleaning solvents, other flammable or explosive substances as described in this manual. • Do not allow children to play on or in the dryer. Your Safety and the safety of the equipment- servicing unless specifically... recommended in this Use and Care Guide or in published user-repair instructions that have provided many important safety messages in this manual and on your dryer. If it will reduce the risk of electric shock by qualified service personnel. Always read and obey all local...
Owners Manual
Page 7
... the dryer where it collapses or becomes otherwise restricted in the installation instructions. Failure to follow this Owner's Guide. Electrical shock can result in this manual. All repairs and servicing must be exposed to temperatures below freezing or exposed to do so can create a health and fire hazard. Use only authorized...
... the dryer where it collapses or becomes otherwise restricted in the installation instructions. Failure to follow this Owner's Guide. Electrical shock can result in this manual. All repairs and servicing must be exposed to temperatures below freezing or exposed to do so can create a health and fire hazard. Use only authorized...
Owners Manual
Page 8
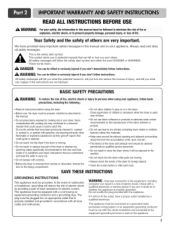
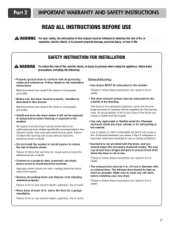
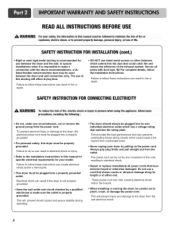
...• Never unplug your model. Failure to pers0ns when using the appliance; The power cord can result in this manual for specific electrical requirements for use of this ducting will affect drying time. This will prevent injury and damage to make... or moving the dryer, be cut or remove the ground prong from the outlet. READALLINSTRUCTIONSBEFOREUSE WARNING ForyouSrafety,the informationin this manual mustbe followed to minimizethe risk Offlreor explosion,electricshock,or to preventpropertydamage,personalinjury,or loss of life, SAFETYINSTRUCTIONFOR INSTALLATION(cont.) •...
...• Never unplug your model. Failure to pers0ns when using the appliance; The power cord can result in this manual for specific electrical requirements for use of this ducting will affect drying time. This will prevent injury and damage to make... or moving the dryer, be cut or remove the ground prong from the outlet. READALLINSTRUCTIONSBEFOREUSE WARNING ForyouSrafety,the informationin this manual mustbe followed to minimizethe risk Offlreor explosion,electricshock,or to preventpropertydamage,personalinjury,or loss of life, SAFETYINSTRUCTIONFOR INSTALLATION(cont.) •...
Owners Manual
Page 9
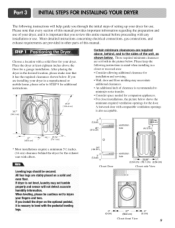
...and even floor. If dryer is important that you are required above the floor for your fingers and toes. If you review this manual. Place the dryer at least eighteen inches above , behind the dryer for companion appliances. • For closet installations, the picture below...closet or recessed area: • Consider allowing additional clearance for use . All four legs are provided in other parts of this entire manual before proceeding with a solid floor for a garage installation. The following instructions in mind when installing in the desired location, please make sure...
...and even floor. If dryer is important that you are required above the floor for your fingers and toes. If you review this manual. Place the dryer at least eighteen inches above , behind the dryer for companion appliances. • For closet installations, the picture below...closet or recessed area: • Consider allowing additional clearance for use . All four legs are provided in other parts of this entire manual before proceeding with a solid floor for a garage installation. The following instructions in mind when installing in the desired location, please make sure...

Owners Manual
Page 10
... be installed to open either to the left to right and front to reverse the direction in position, adjust the leveling legs of this entire manual before proceeding with any installation. The maximum slope of and clearances for your dryer can be aligned at the center when closed. Please review this...
... be installed to open either to the left to right and front to reverse the direction in position, adjust the leveling legs of this entire manual before proceeding with any installation. The maximum slope of and clearances for your dryer can be aligned at the center when closed. Please review this...
Owners Manual
Page 11
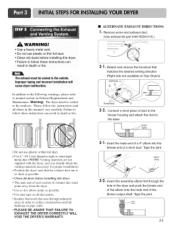
... • ALTERNATE EXHAUST DIRECTIONS ] • Remove screw and exhaust duct. (Use exhaust kit part #3911 EZ9131X.) \ 2- |. Insert this manual) very carefully. DUCT TAPE 3-2. Warning: The dryer must point away from the dryer. • Use as few elbow joints as possible. •...instructions can result in death or fire Improper taping and incorrect installation will cause dryer malfunction, In addition to the following warnings, please refer to manual section on Gas Dryers) f PORTION A Knockout Q \ 2-2. WARNING! • Use a heavy metal vent. • Do not use plastic...
... • ALTERNATE EXHAUST DIRECTIONS ] • Remove screw and exhaust duct. (Use exhaust kit part #3911 EZ9131X.) \ 2- |. Insert this manual) very carefully. DUCT TAPE 3-2. Warning: The dryer must point away from the dryer. • Use as few elbow joints as possible. •...instructions can result in death or fire Improper taping and incorrect installation will cause dryer malfunction, In addition to the following warnings, please refer to manual section on Gas Dryers) f PORTION A Knockout Q \ 2-2. WARNING! • Use a heavy metal vent. • Do not use plastic...

Owners Manual
Page 12
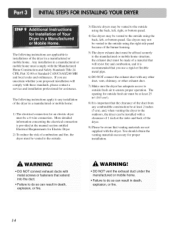
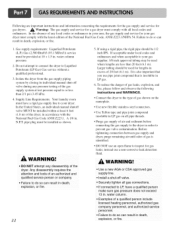
...For additional instruction on Gas Requirements and Instructions. In addition to the following, please refer to do so can result in the manual section entitled Electrical Requirements IBr Electric Dryer. I. Equipment Shut-Off Valve Installed within 6' (1.8 m) of connector only if allowed ... 3. Iron Pipe. If changing the orifice, also adjust the gas valve. 1. (Gas dryer only). New stainless steel flexible connector. Use this manual's section on your local codes). 4. Shorter than 20' (6.1 m) - For instance, using a new flexible stainless steel connector (as suitable for...
...For additional instruction on Gas Requirements and Instructions. In addition to the following, please refer to do so can result in the manual section entitled Electrical Requirements IBr Electric Dryer. I. Equipment Shut-Off Valve Installed within 6' (1.8 m) of connector only if allowed ... 3. Iron Pipe. If changing the orifice, also adjust the gas valve. 1. (Gas dryer only). New stainless steel flexible connector. Use this manual's section on your local codes). 4. Shorter than 20' (6.1 m) - For instance, using a new flexible stainless steel connector (as suitable for...
Owners Manual
Page 13
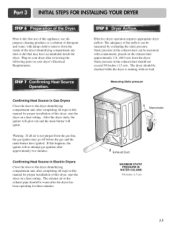
...appliance, use allpurpose cleaning products or a solution of detergent and water, with damp cloth to remove from the dryer. Static pressure in this manual for proper installation of this dryer, start the dryer on a heat setting. The exhaust air or the exhaust pipe should not exceed 518...: If all air is running with a manometer, placed on the exhaust duct approximately 2 ft. (60.9 cm) from the inside of this manual for three minutes. Measuring Static pressure Confirming Heat Source in Gas Dryers Close the door to the dryer drum/drying compartment and, alter completing all...
...appliance, use allpurpose cleaning products or a solution of detergent and water, with damp cloth to remove from the dryer. Static pressure in this manual for proper installation of this dryer, start the dryer on a heat setting. The exhaust air or the exhaust pipe should not exceed 518...: If all air is running with a manometer, placed on the exhaust duct approximately 2 ft. (60.9 cm) from the inside of this manual for three minutes. Measuring Static pressure Confirming Heat Source in Gas Dryers Close the door to the dryer drum/drying compartment and, alter completing all...
Owners Manual
Page 14
... construction be at least 2 inches (5 cm), and, when venting the dryer to the outdoors, the dryer can be installed with a clearance of 1 inch at the manual section entitled Electrical Requirements for assistance.
... construction be at least 2 inches (5 cm), and, when venting the dryer to the outdoors, the dryer can be installed with a clearance of 1 inch at the manual section entitled Electrical Requirements for assistance.
Owners Manual
Page 18
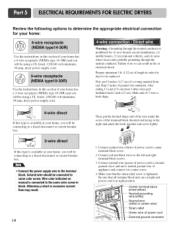
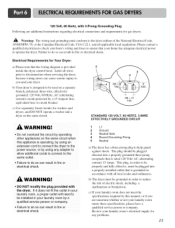
..., dryer power supply cord. Connect red and black wires to the same color screw in block. Make sure that all terminal block nuts are on manual is in fire or electrical shock. Review the following options to determine the appropriate electrical connection for your home: Use the instructions in this section...
..., dryer power supply cord. Connect red and black wires to the same color screw in block. Make sure that all terminal block nuts are on manual is in fire or electrical shock. Review the following options to determine the appropriate electrical connection for your home: Use the instructions in this section...
Owners Manual
Page 21
c) Use separately fused circuits for washers and dryers, and DO NOT operate a washer and a dryer on the same circuit when this manual, or if you are uncertain whether or not your laundry room does not meet the specifications required by a qualified service person or company. • Failure ...
c) Use separately fused circuits for washers and dryers, and DO NOT operate a washer and a dryer on the same circuit when this manual, or if you are uncertain whether or not your laundry room does not meet the specifications required by a qualified service person or company. • Failure ...
Owners Manual
Page 22
... Z223. Do not attempt to connect the dryer to do so can result in LP gas on the nameplate. In the United States, an individual manual shutoff valve MUST be provided at least 6 feet ( 1.8 m) of the dryer, in accordance with all gas connections. • If connected to LP, have a rigid ... an open flame to your gas dryer must be 112 inch IPS. Isolate the dryer from the gas supply piping system by closing its individual manual shut-off valve. • Securely tighten all local codes and ordinances. Purge gas supply of gas is insoluble in excess of a qualified person include ...
... Z223. Do not attempt to connect the dryer to do so can result in LP gas on the nameplate. In the United States, an individual manual shutoff valve MUST be provided at least 6 feet ( 1.8 m) of the dryer, in accordance with all gas connections. • If connected to LP, have a rigid ... an open flame to your gas dryer must be 112 inch IPS. Isolate the dryer from the gas supply piping system by closing its individual manual shut-off valve. • Securely tighten all local codes and ordinances. Purge gas supply of gas is insoluble in excess of a qualified person include ...

Owners Manual
Page 26
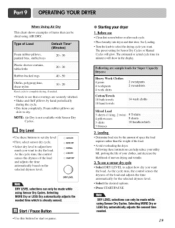
...drying sturdy fabrics such as robber, plastic and heatsensitive fabrics. Speed Dry Use for items that need a short drying time. Manual Dry Cycles Use Manual Cycles to select a specific amount of settings and save them here for drying denims, towels, heavy cottons. Use the Air ... Work clothes, corduroys DELICATES Lingerie, sheets, blouses Temp, Time* (Minutes) Medium 55 High Medium 41 Low 32 26 2. When a Manual Cycle is selected, the ESTIMATED TIME REMAINING display shows the actual time remaining in your stored CUSTOM PROGRAM Press CUSTOM PROGRAM button, then press...
...drying sturdy fabrics such as robber, plastic and heatsensitive fabrics. Speed Dry Use for items that need a short drying time. Manual Dry Cycles Use Manual Cycles to select a specific amount of settings and save them here for drying denims, towels, heavy cottons. Use the Air ... Work clothes, corduroys DELICATES Lingerie, sheets, blouses Temp, Time* (Minutes) Medium 55 High Medium 41 Low 32 26 2. When a Manual Cycle is selected, the ESTIMATED TIME REMAINING display shows the actual time remaining in your stored CUSTOM PROGRAM Press CUSTOM PROGRAM button, then press...
Owners Manual
Page 27
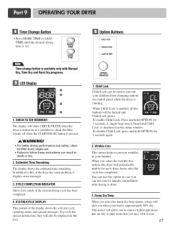
... is approximately 80% dry. To enable Child Lock, Press and hold OPTION for up to prevent wrinkles in your children from changing options on !y with Manual Dry, Time Dry and Rack Dry programs. LEDDisplay 1. It turns off when the START/PAUSE button is set. To disable Child Lock, press and hold...
... is approximately 80% dry. To enable Child Lock, Press and hold OPTION for up to prevent wrinkles in your children from changing options on !y with Manual Dry, Time Dry and Rack Dry programs. LEDDisplay 1. It turns off when the START/PAUSE button is set. To disable Child Lock, press and hold...
Owners Manual
Page 28
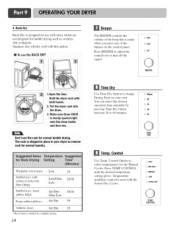
... Cycles. 0 HiGH 0 MID HiGH 0 MEDIUM 0 LOW 0 ULTRA LOW TEMP. The rack is shipped in place in your own. You can select the desired operation time manually by pressing Time Dry button between 20 to adjust the sound level or turn off the signal. 0 HiGH 0 LOW 0 OFF BEEPER 1.0pen the door. Control... Time Use Time Dry Option to select temperatures for normal tumble drying. CONTROL 4. Rack Dry Rack Dry is designed for use the rack for the Manual Cycles. CONTROL until the desired temperature setting glows.
... Cycles. 0 HiGH 0 MID HiGH 0 MEDIUM 0 LOW 0 ULTRA LOW TEMP. The rack is shipped in place in your own. You can select the desired operation time manually by pressing Time Dry button between 20 to adjust the sound level or turn off the signal. 0 HiGH 0 LOW 0 OFF BEEPER 1.0pen the door. Control... Time Use Time Dry Option to select temperatures for normal tumble drying. CONTROL 4. Rack Dry Rack Dry is designed for use the rack for the Manual Cycles. CONTROL until the desired temperature setting glows.
Owners Manual
Page 29
...; Turn the knob to complete drying, if needed time which is not available with Sensor Dry Cycles. The preset setting for Sensor Dry Cycles or Manual Cycles will show in the display. Foam rubber-pillows, padded bras, stuffed toys Plastic shower curtains, tablecloths Rubber-backed rugs 20- 30 40 - 50 Olefim...
...; Turn the knob to complete drying, if needed time which is not available with Sensor Dry Cycles. The preset setting for Sensor Dry Cycles or Manual Cycles will show in the display. Foam rubber-pillows, padded bras, stuffed toys Plastic shower curtains, tablecloths Rubber-backed rugs 20- 30 40 - 50 Olefim...
Owners Manual
Page 30
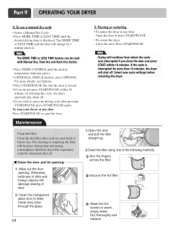
... the door or press START/PAUSE. • To restart the dryer Close the door. Run the fingers across the filter. To use a manual dry cycle • Select a Manual Dry Cycle. • Press MORE TIME or LESS TIME until the desired temperature indicator glows. • (OPTIONAL STEP) If desired, select ...displayed. Otherwise, build-ups of dirty and foreign objects will change by 1 minute interval. The MORE TIME or LESSTIME feature can be used with Manual Dry, Time Dry and Rack Dry Cycles, • Press TEMR CONTROL until the desired drying time is closed. • If you wish ...
... the door or press START/PAUSE. • To restart the dryer Close the door. Run the fingers across the filter. To use a manual dry cycle • Select a Manual Dry Cycle. • Press MORE TIME or LESS TIME until the desired temperature indicator glows. • (OPTIONAL STEP) If desired, select ...displayed. Otherwise, build-ups of dirty and foreign objects will change by 1 minute interval. The MORE TIME or LESSTIME feature can be used with Manual Dry, Time Dry and Rack Dry Cycles, • Press TEMR CONTROL until the desired drying time is closed. • If you wish ...


